Subscribers
 Pabbly Email Marketing Team•Updated Oct 24, 2026•8 min read
In the Subscribers List, we manage our subscribers — adding, deleting, and organizing them into different lists. This helps us easily decide which group of subscribers we want to send emails to. All these subscriber-related actions are handled within the Subscribers List.
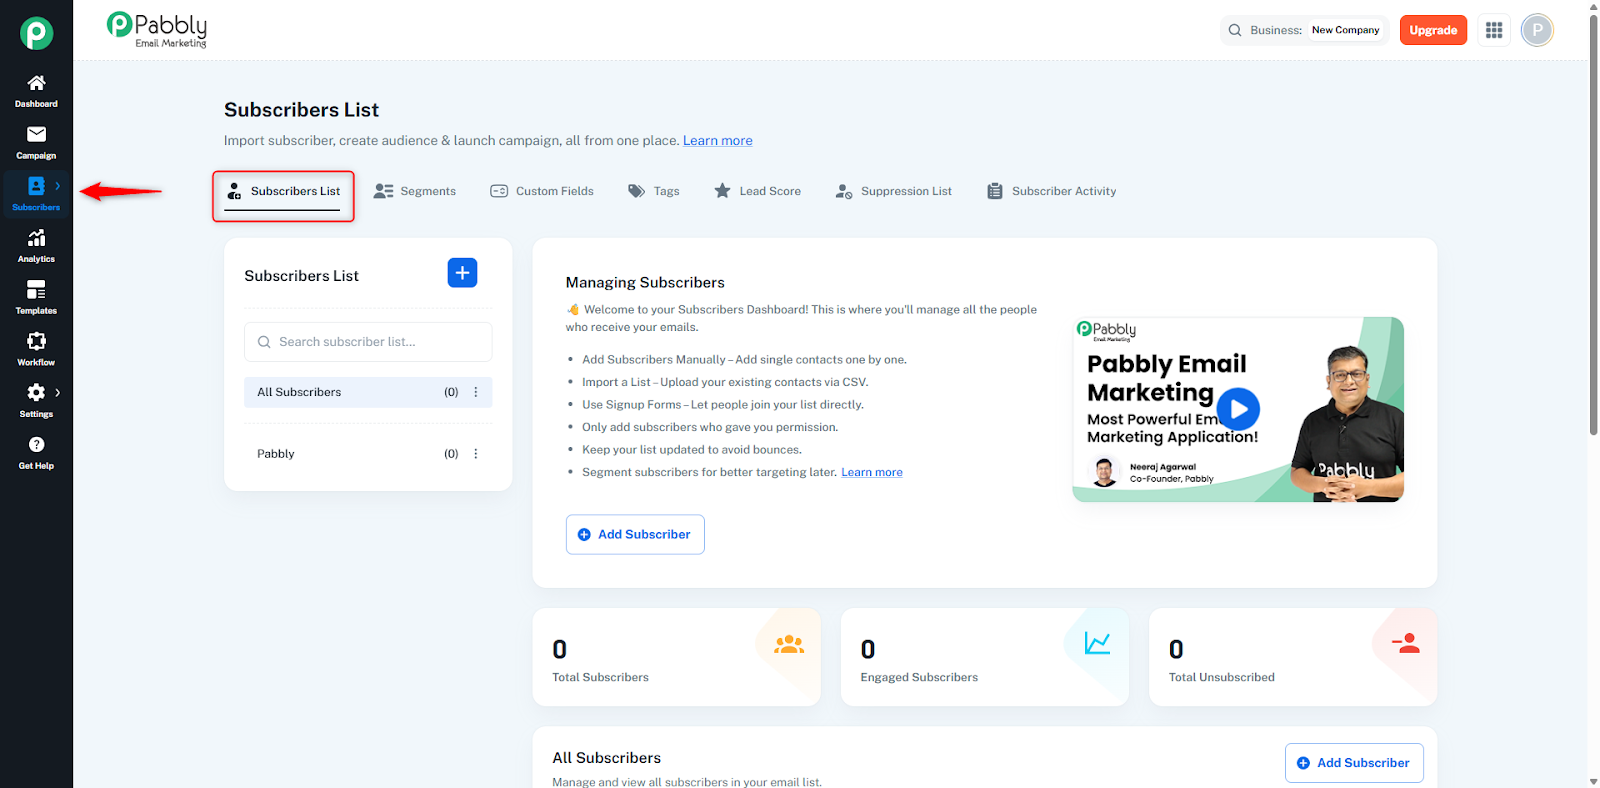
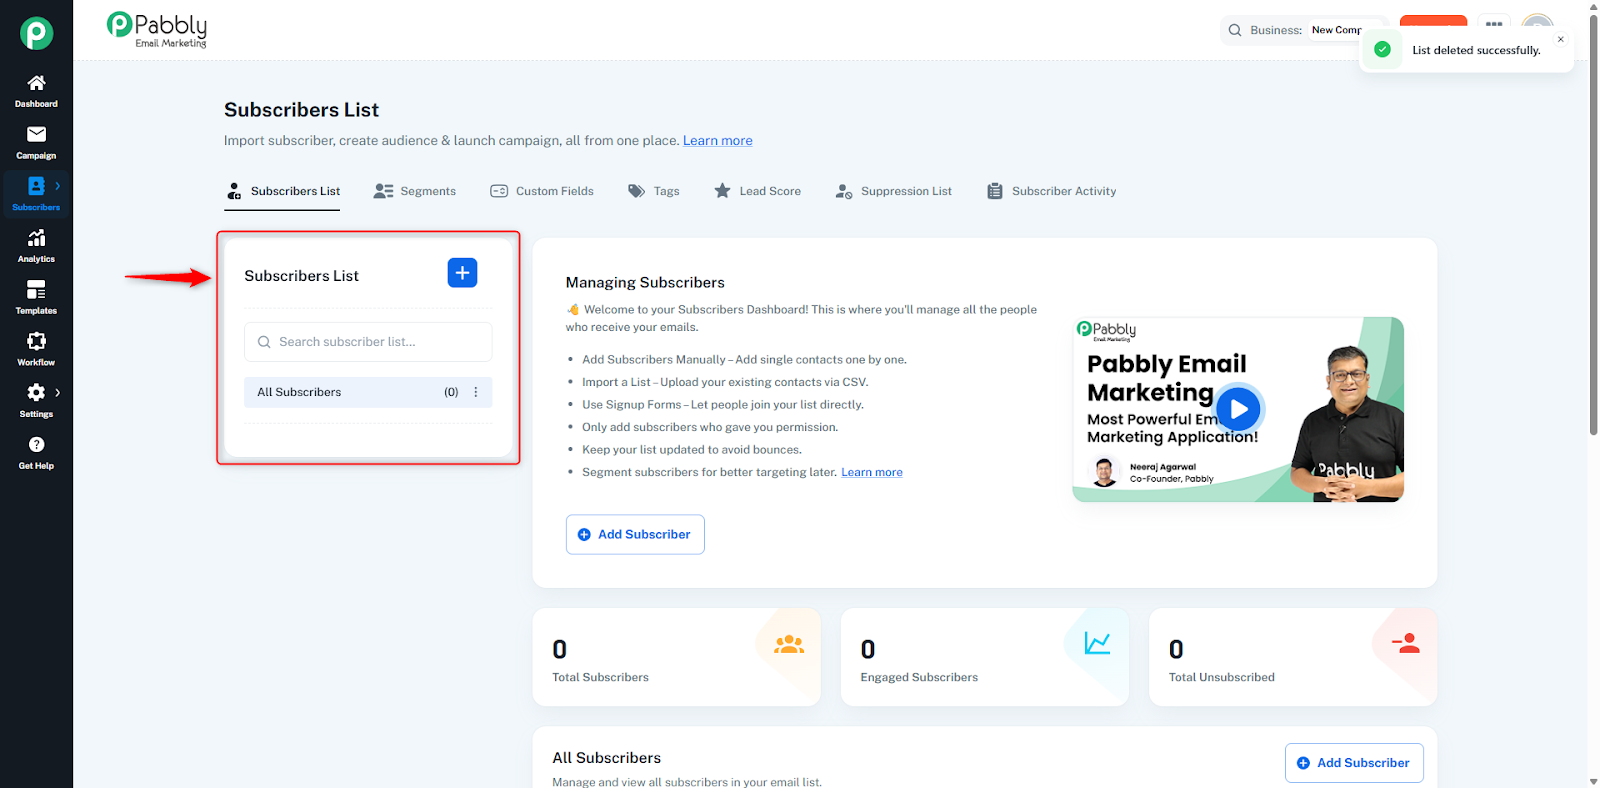
Default Folder – All Subscribers:
This shows all subscribers from all lists and cannot be deleted or emptied.
Search Bar:
Used to search lists by name. It filters lists in real time as you type.
Custom Lists:
All user-created lists are displayed here along with their subscriber count. You can rename, export, empty, split,Subscription Form or delete them.
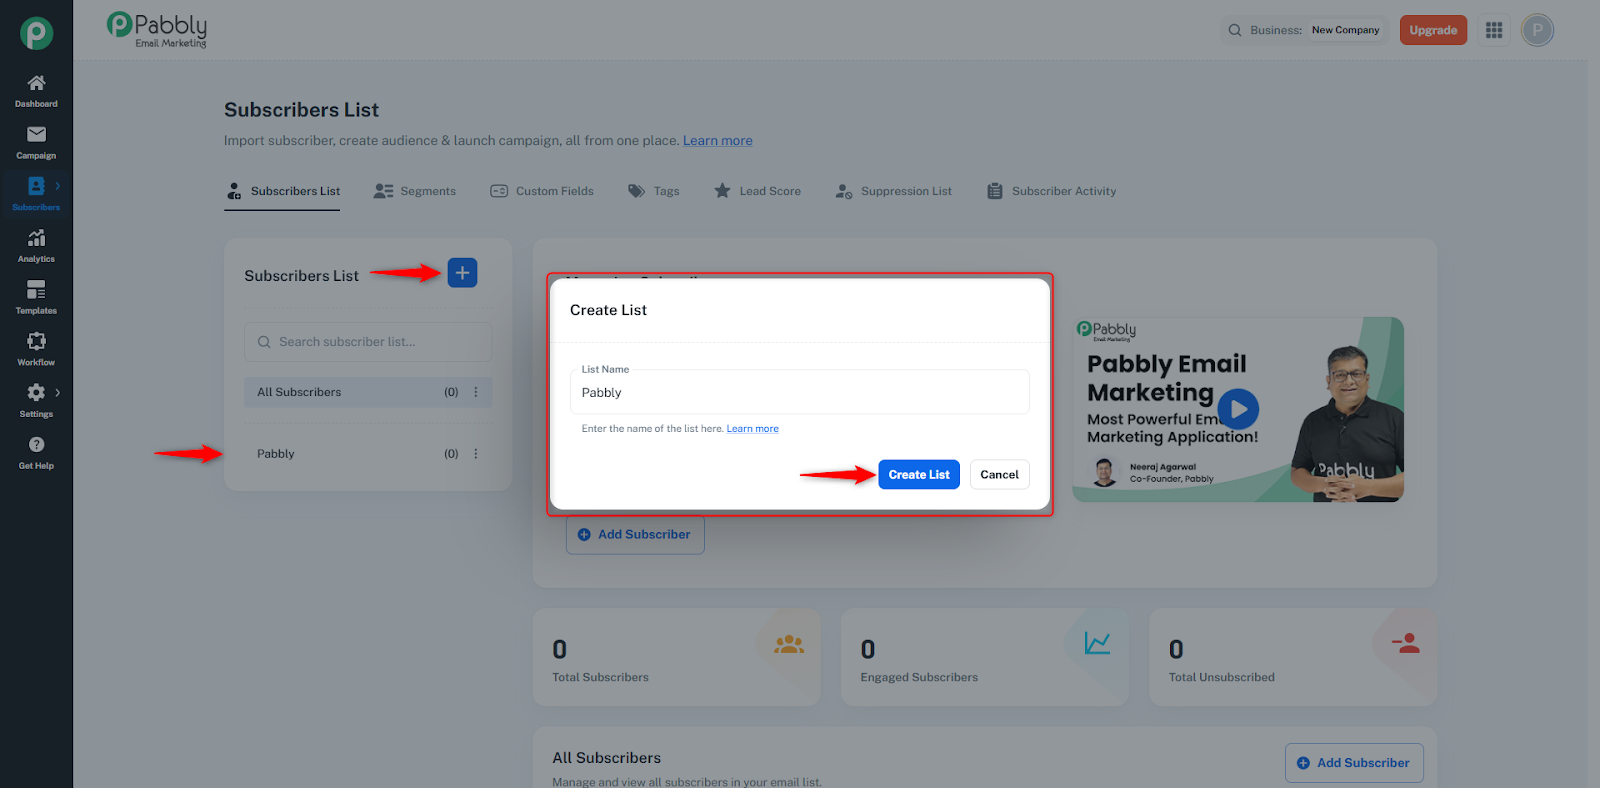
To create a new list, click on the “+” icon on the right side. A dialog box will open where you need to enter your subscriber list name and click on the “Create List” button. Your new list will then be created successfully.
List Actions (Three Dot Menu):
Rename – Use this option to change the name of your subscriber list.
Export List – Lets you download the entire subscriber list in CSV format.
Empty List – Removes all subscribers from the list, but keeps them safe in All Subscribers.
Subscription Form – Allows you to access, share, or embed the subscription form for the selected list. You can share the ready-to-use form link with subscribers or generate the HTML code to embed the form on your website.
Split List – Helps you divide one large list into multiple smaller lists.
Delete List – Completely deletes the list and moves all its subscribers to All Subscribers.
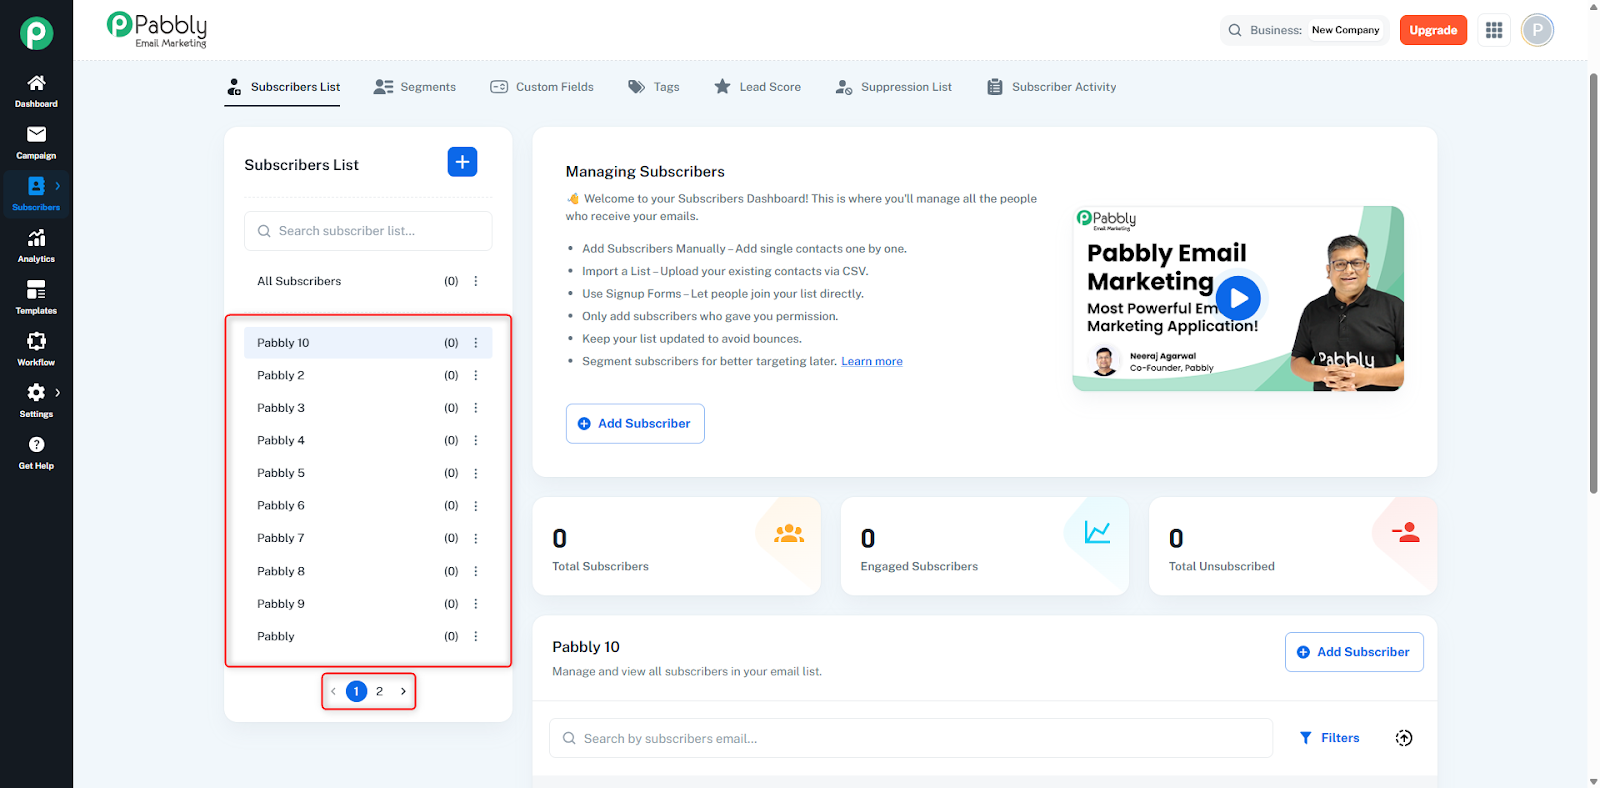
Pagination:
If lists are more than 10, pagination appears. Each page shows 10 lists.
Stats Cards shown at top:
Total Subscribers: Shows total subscribers in selected list or overall.
Engaged Subscribers: Shows active subscribers in last 30 days.
Total Unsubscribed: Shows total unsubscribed users.
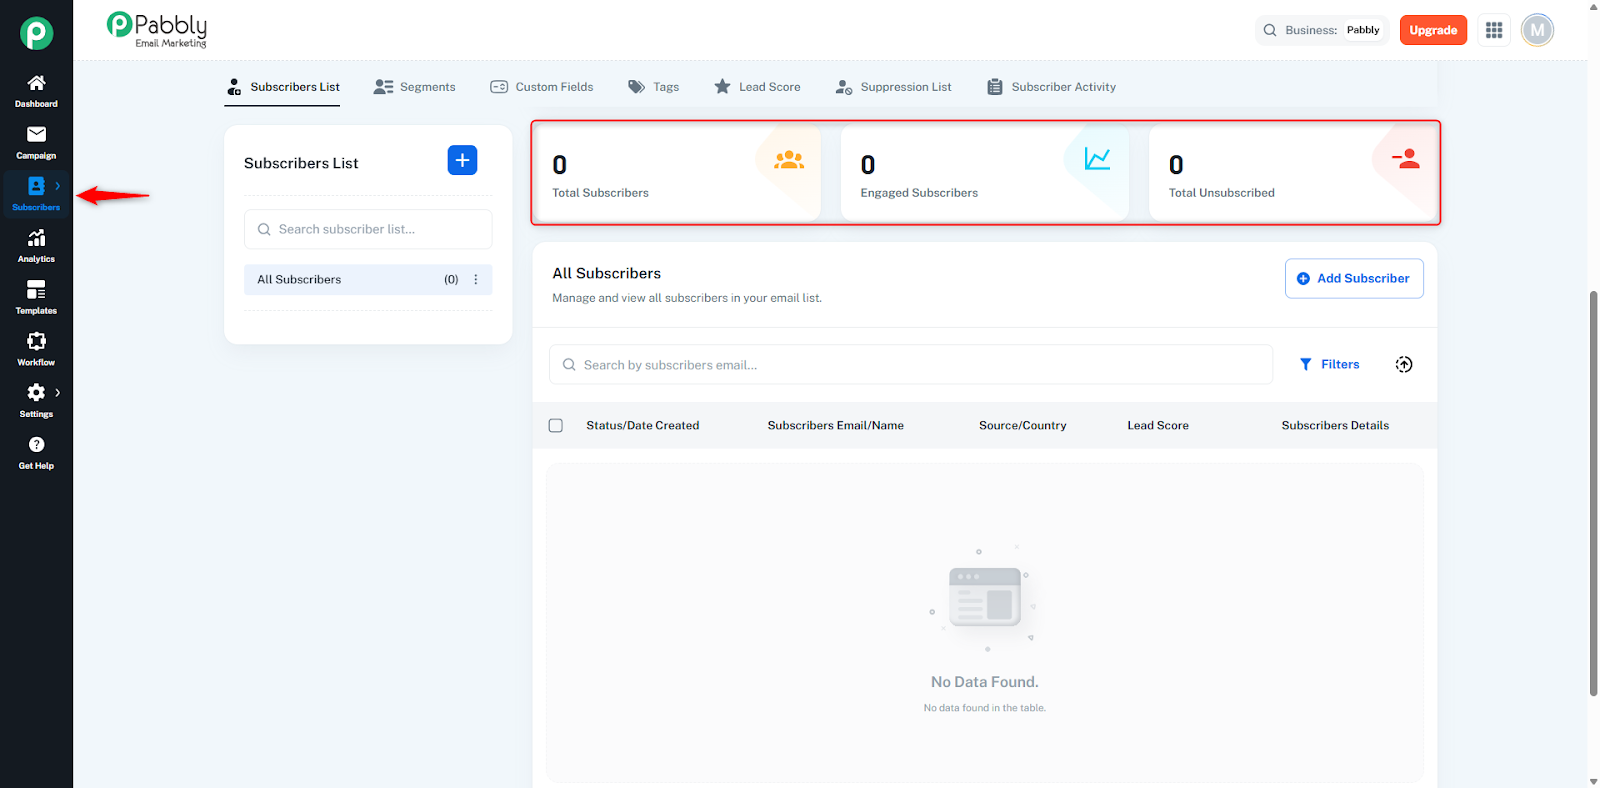
Displayed only when there are zero subscribers.
It shows a welcome message, video, and Add Subscriber button.
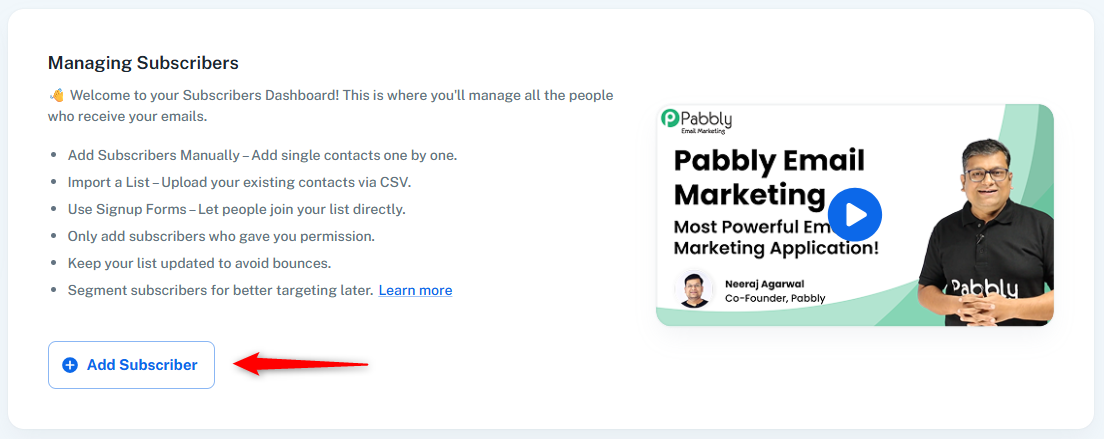
To add a subscriber, click on the Add Subscriber button. A right-side drawer will open, showing two options – Single Subscriber and Bulk Import. First, we will see how to add a subscriber using the Single Subscriber option.
To add a subscriber, click on the Add Subscriber button from either:
The Instruction Card, or
The Subscribers Table.
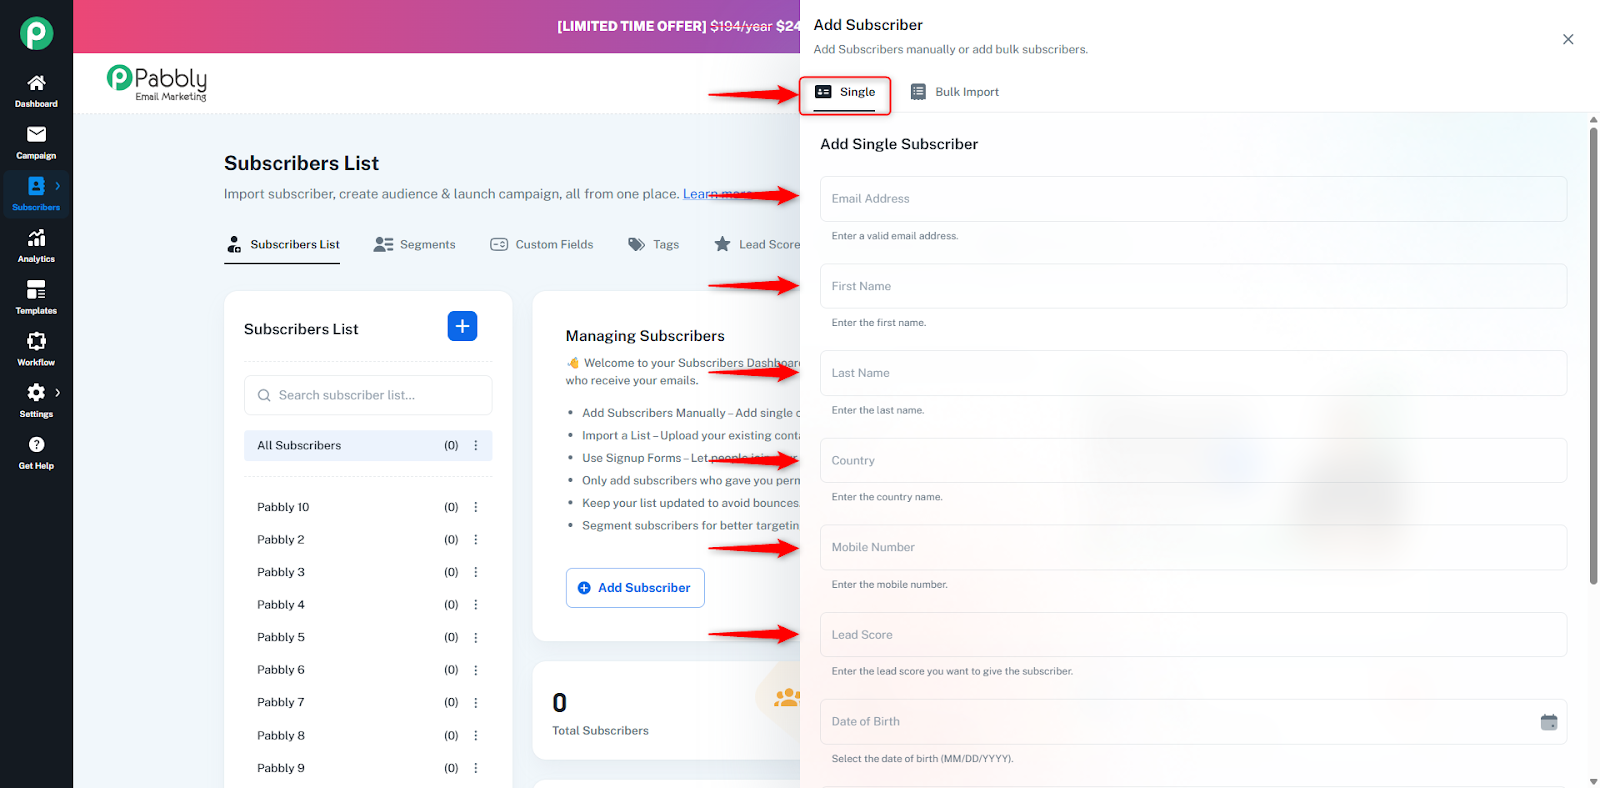
After clicking, a right-side drawer form will open.
At the top, you will see two tabs:
Single and Bulk Import.
Here, we first explain the Single option.
Fill in the subscriber details:
Email Address – Enter the subscriber’s email.
First Name – Enter the first name.
Last Name – Enter the last name.
Mobile Number – Enter the mobile number.
Lead Score – Add a lead score for the subscriber.
Date of Birth – Select the date of birth.
Tags (Optional) – Add relevant tags.
Subscriber Lists (Optional) – Select lists where the subscriber should be added.
At the bottom, you will see an Add Tags button.
When you click it, you will be redirected to the Tags page where:
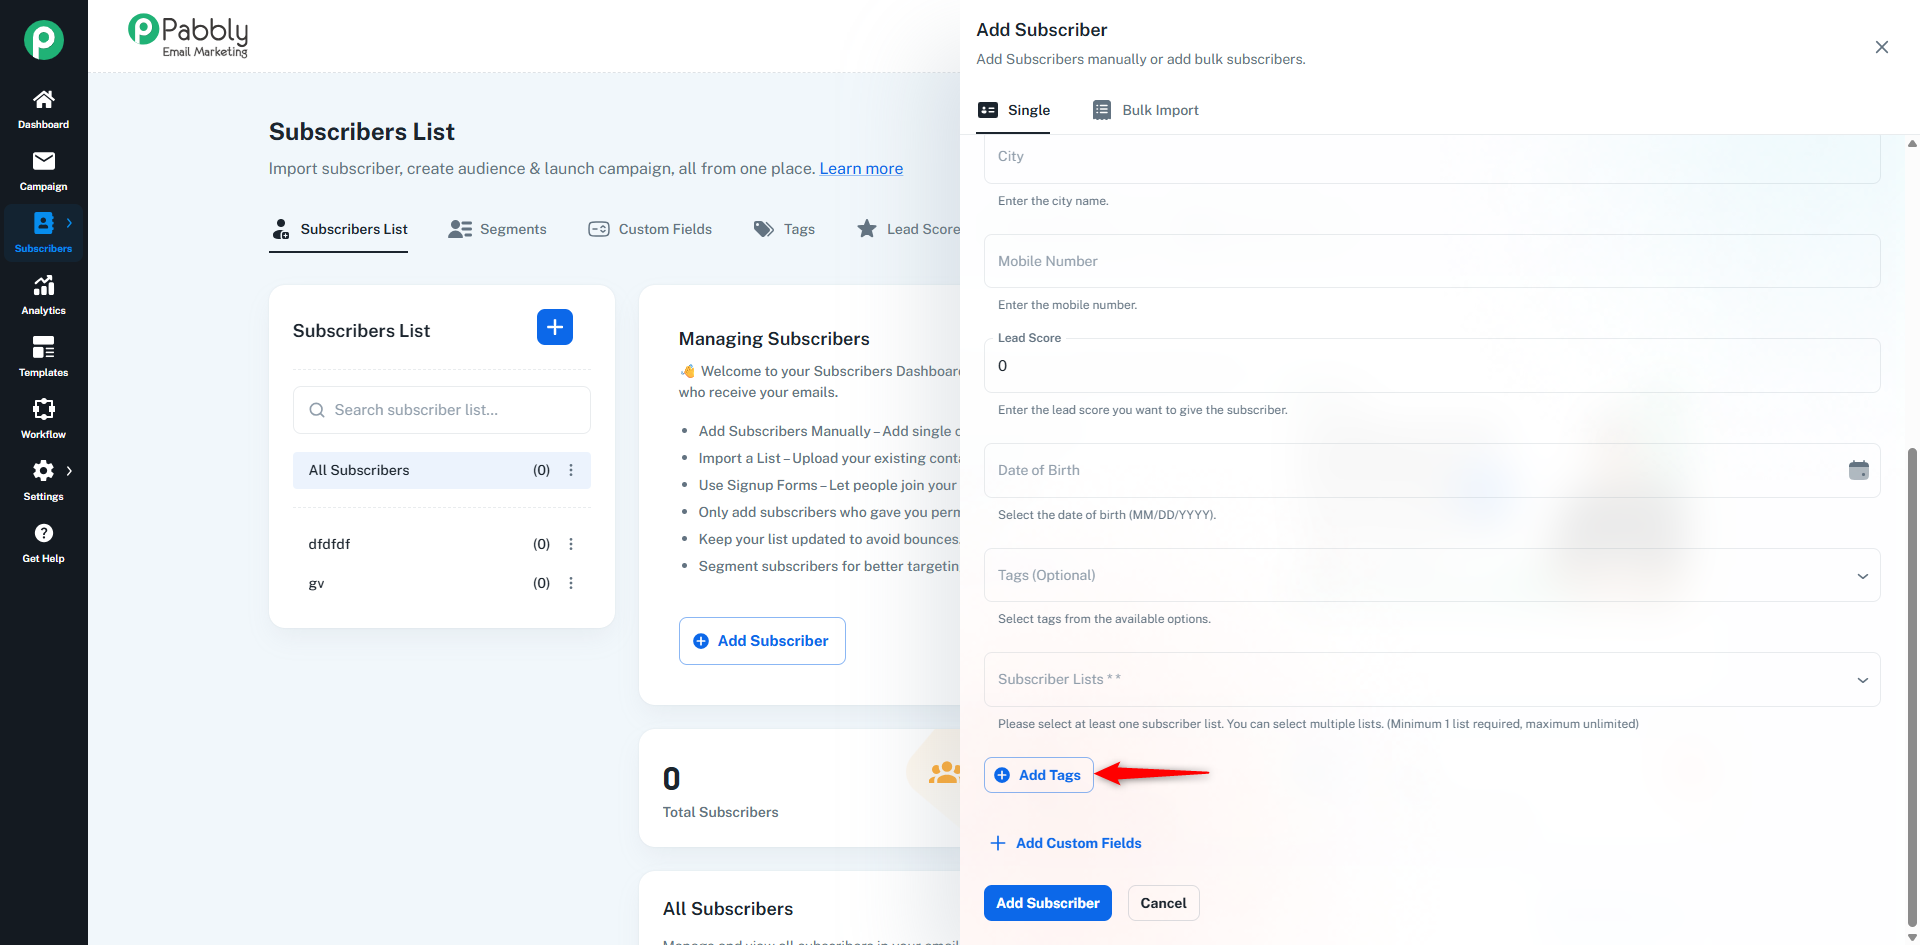
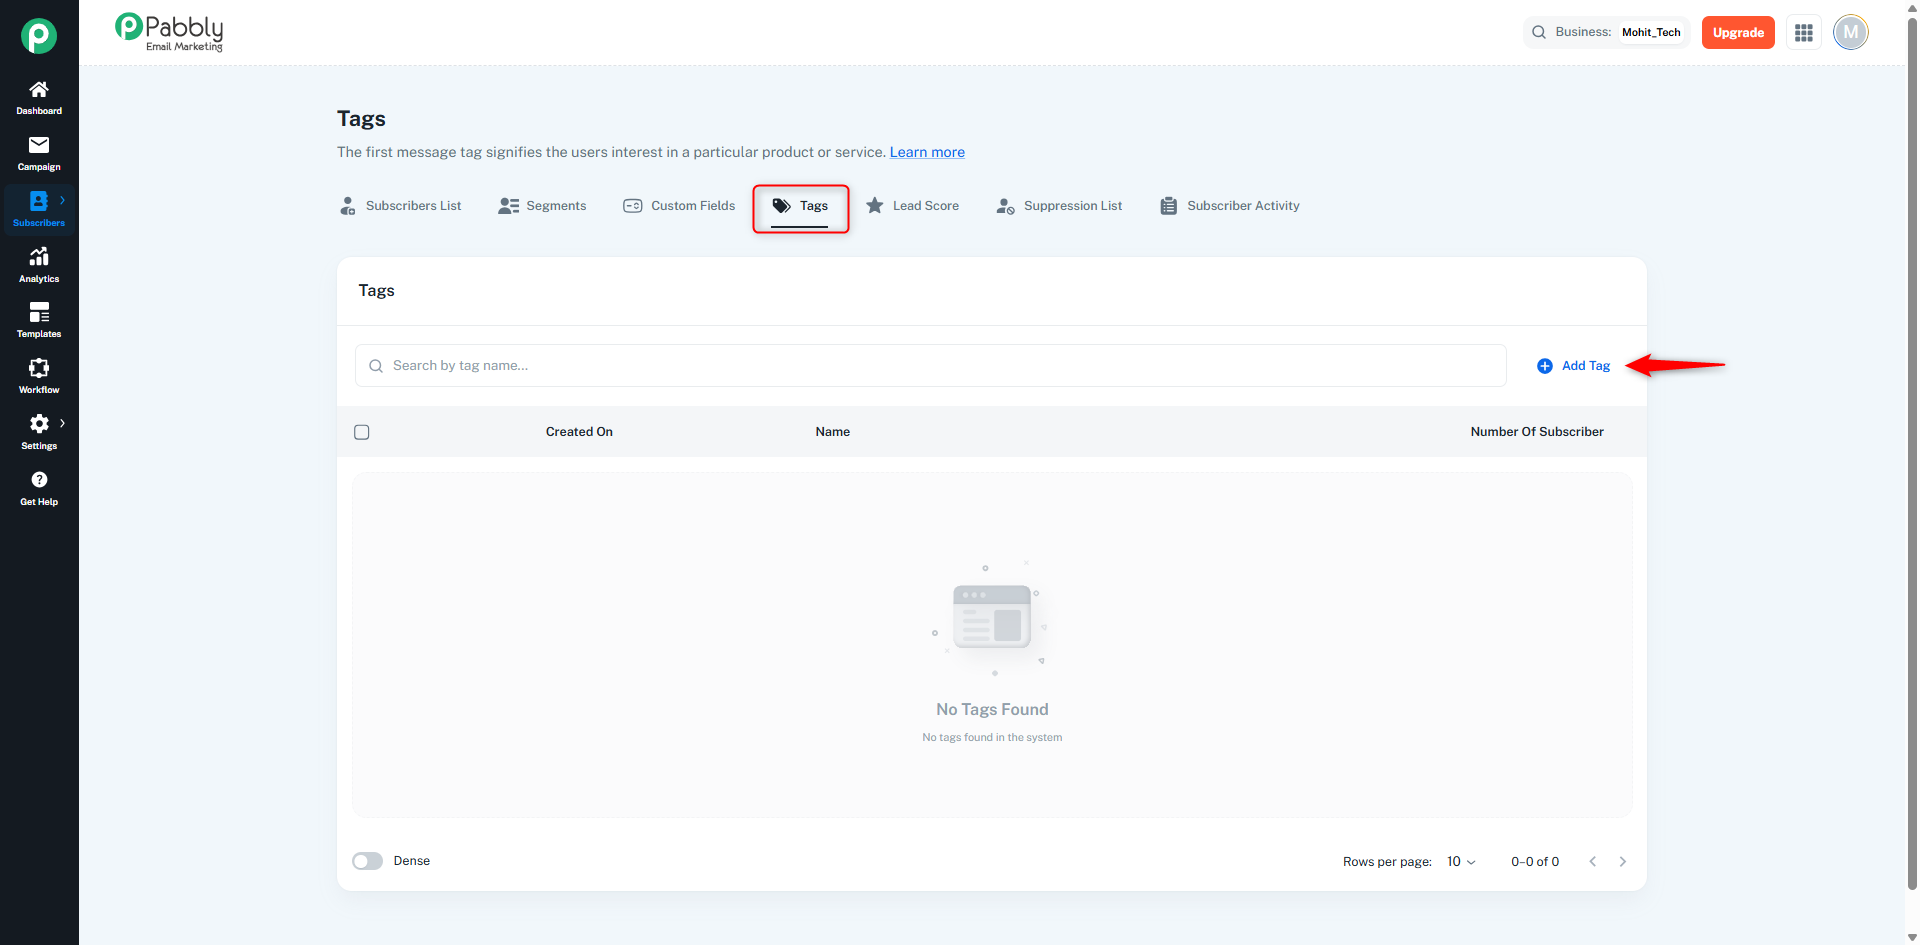
You can create new tags.
After creating, the tags will become available in this form.
If you want to add additional details for the subscriber, you can use Custom Fields.
Click on the Add Custom Fields button.
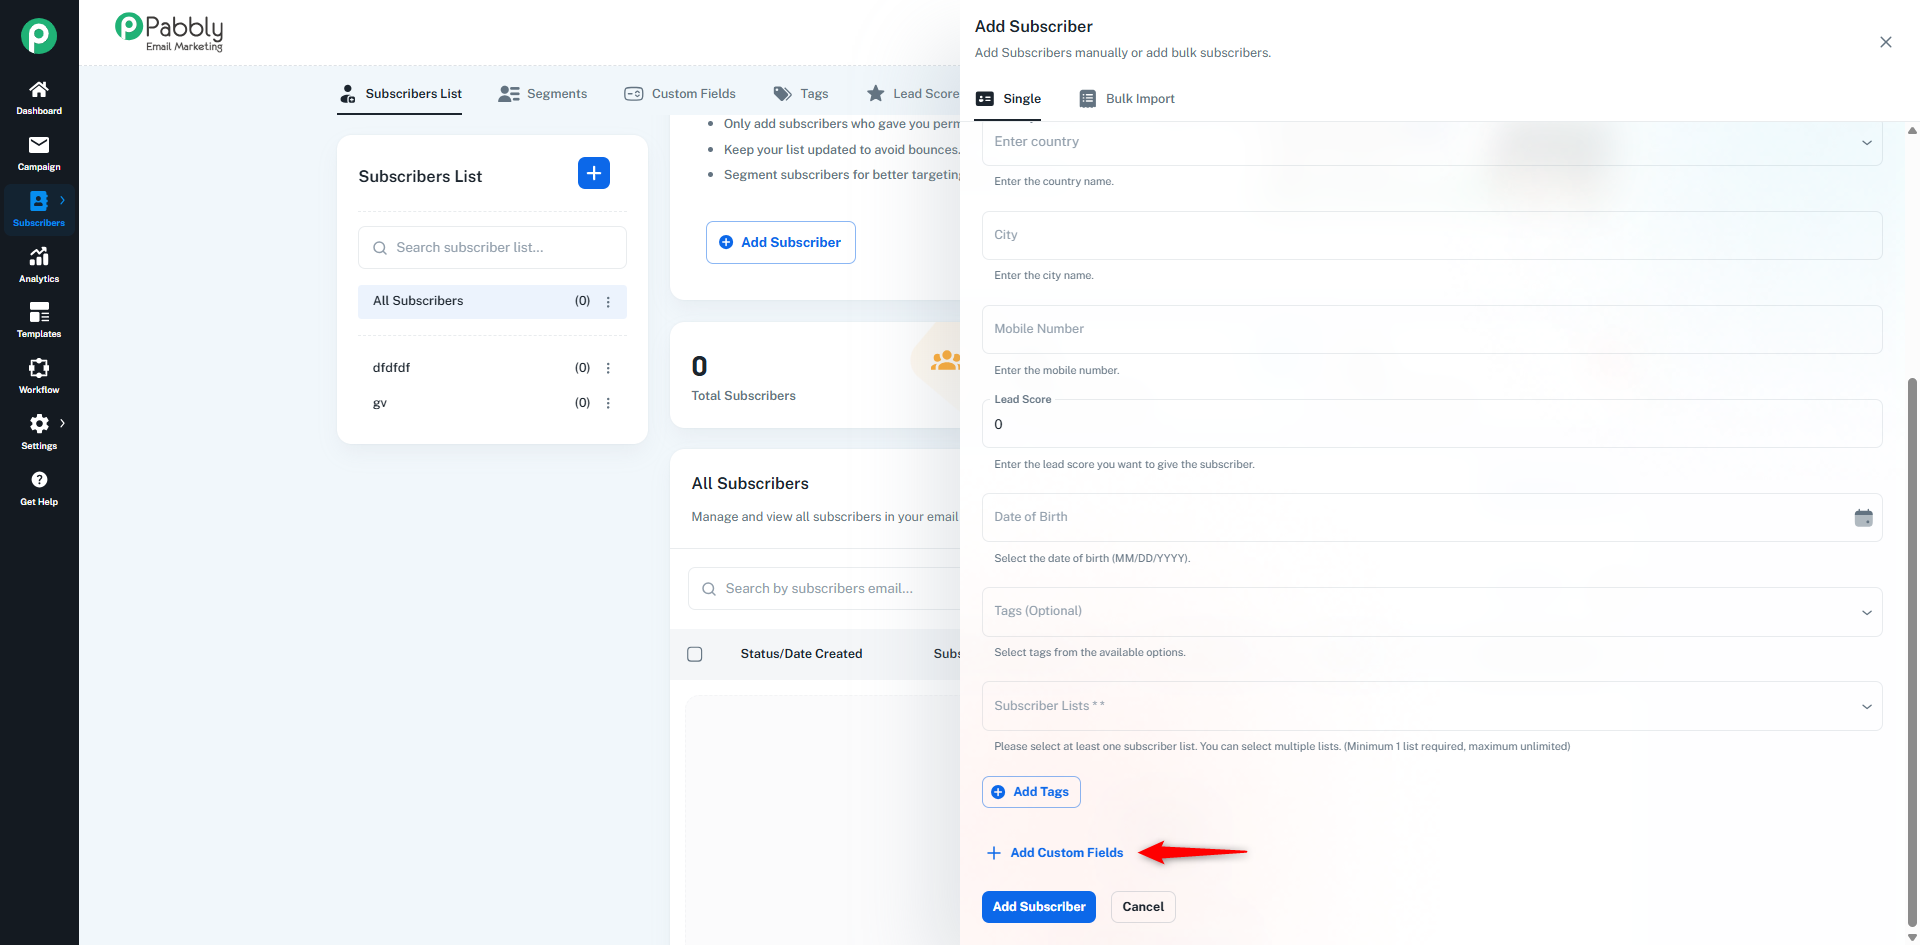
You will be redirected to the Custom Fields page.
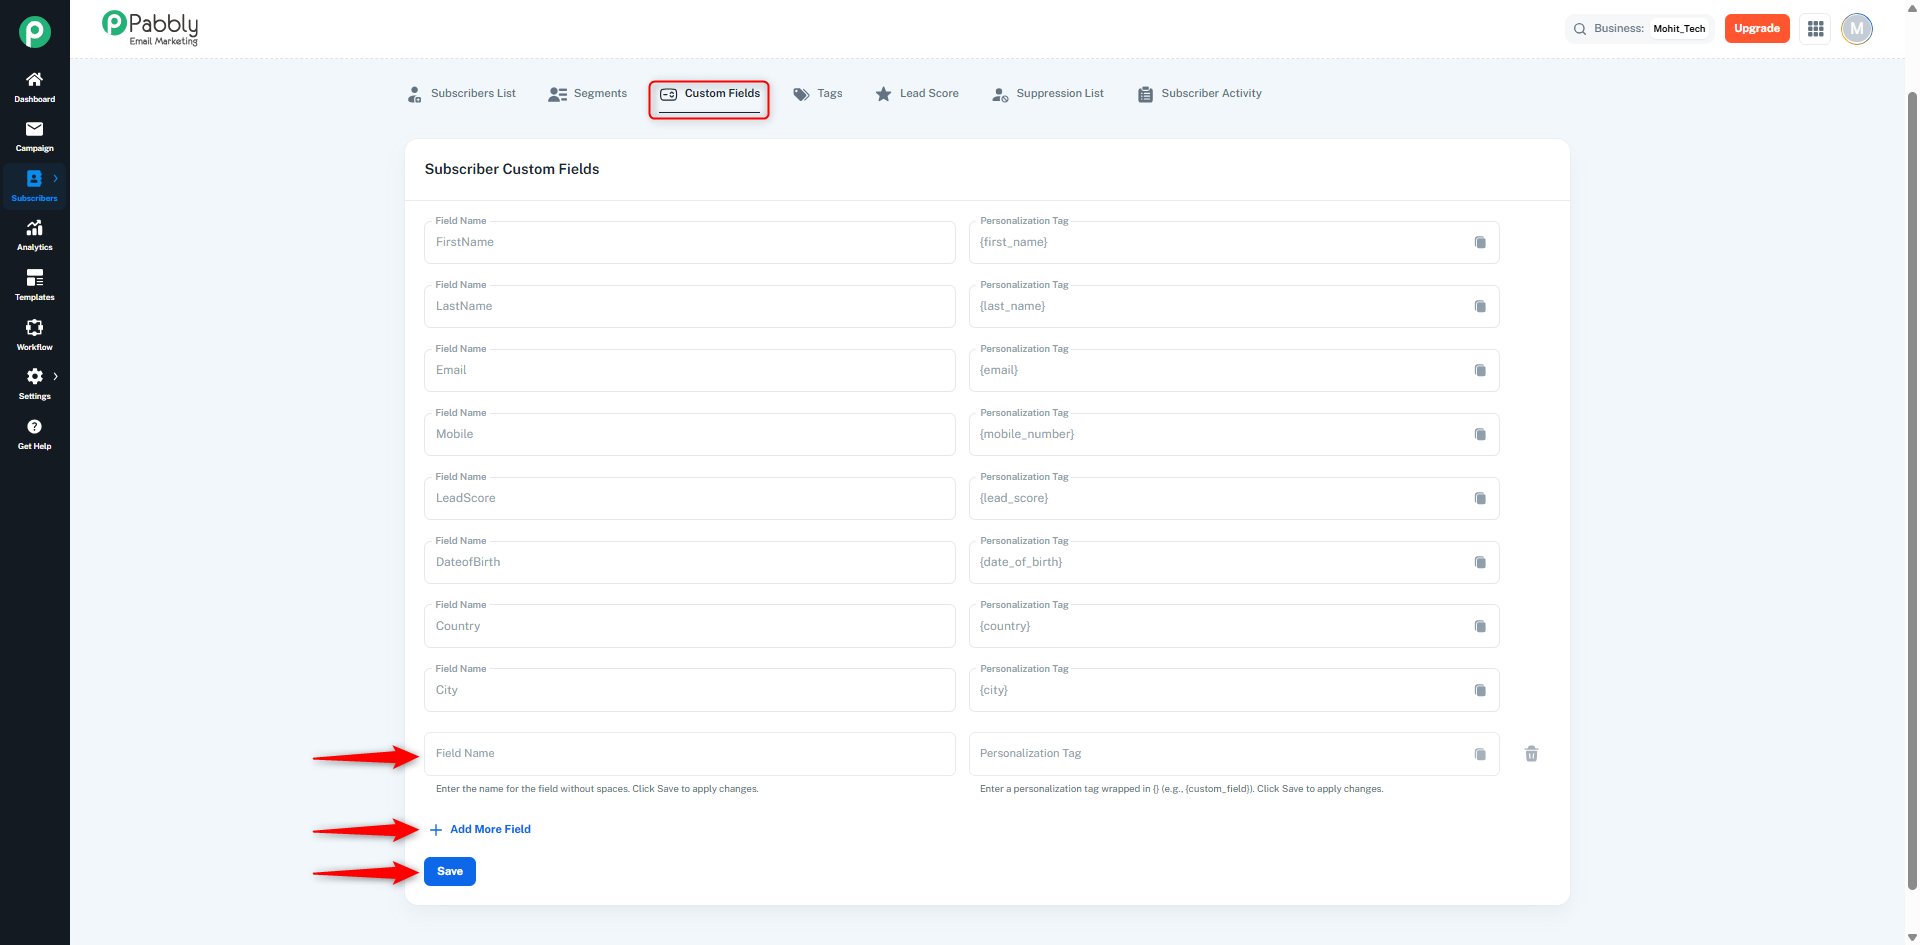
After creating custom fields, they will appear in this drawer form.
Now fill those custom fields and click on the Add Subscriber button.
✅ The subscriber will be successfully added to your account.
To import multiple subscribers at once, follow the steps below using the Bulk Import option:
Open the Add Subscriber Drawer
On the Subscribers page, click the Add Subscriber button.
A right-side drawer will open with two options:
Single
Bulk Import
Select Bulk Import.
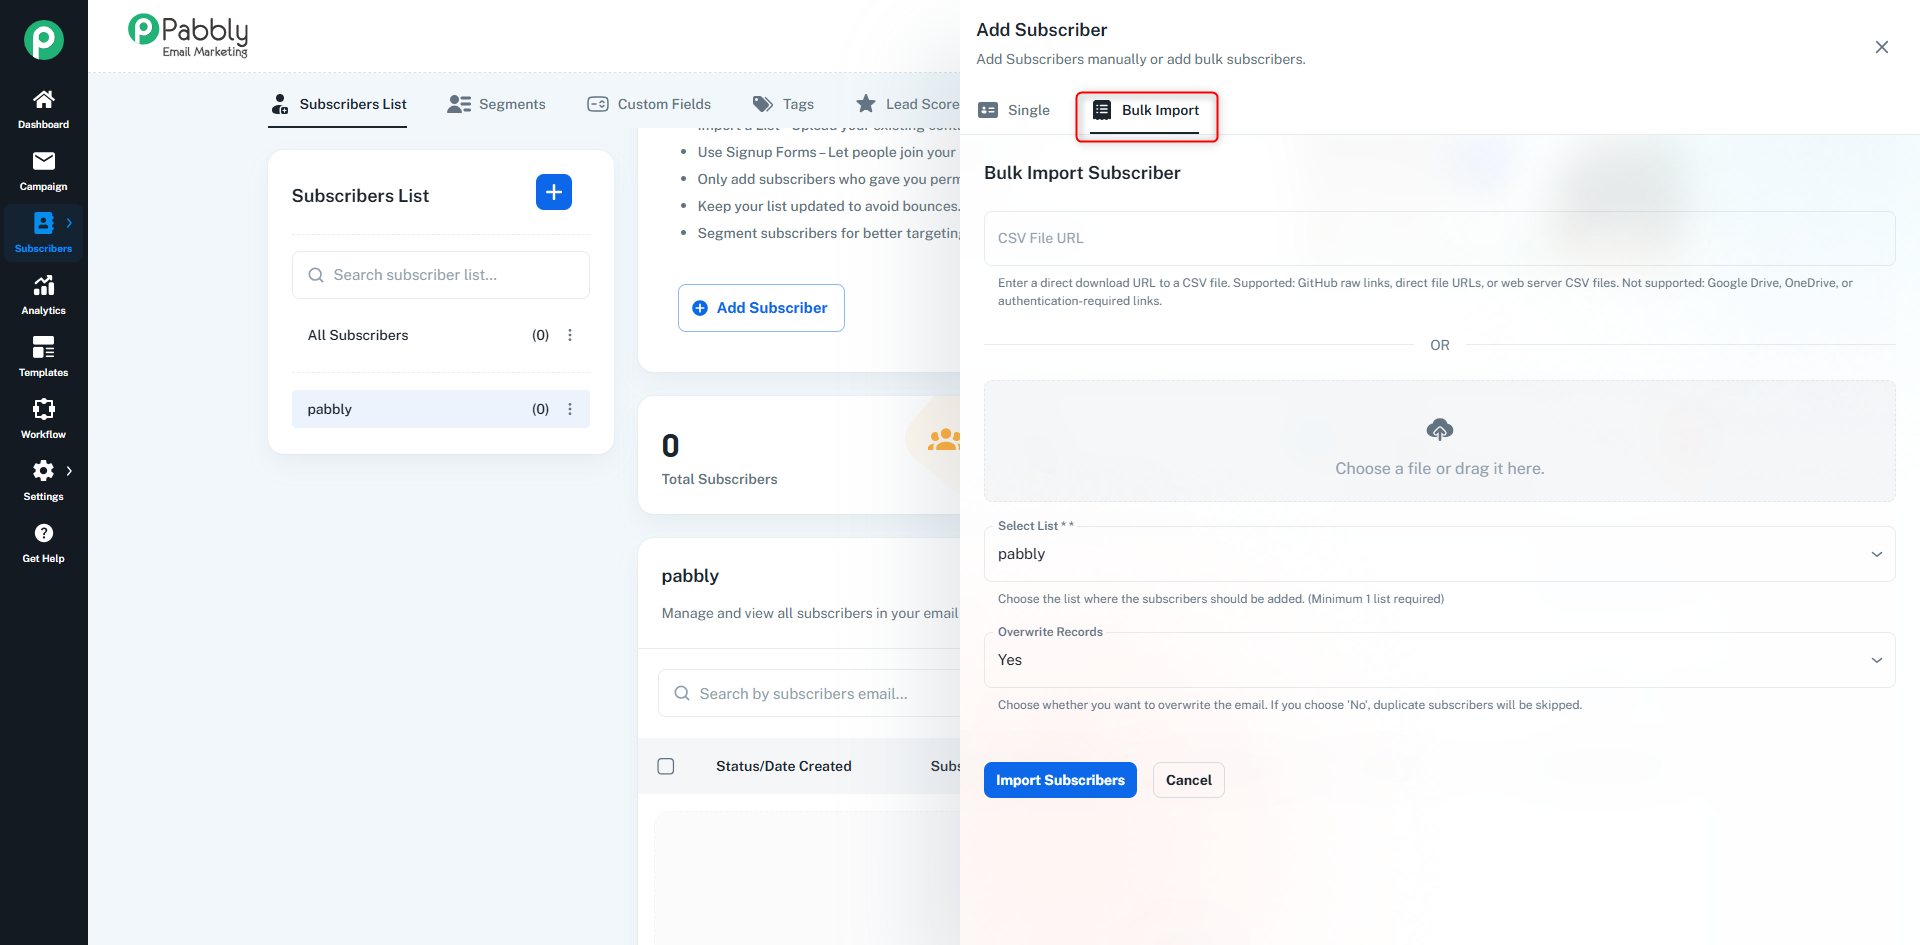
Upload CSV File
You can import subscribers using a CSV file in two ways:
CSV File URL: Paste the direct download link of your CSV file.
Upload File: Upload the CSV file directly from your system.
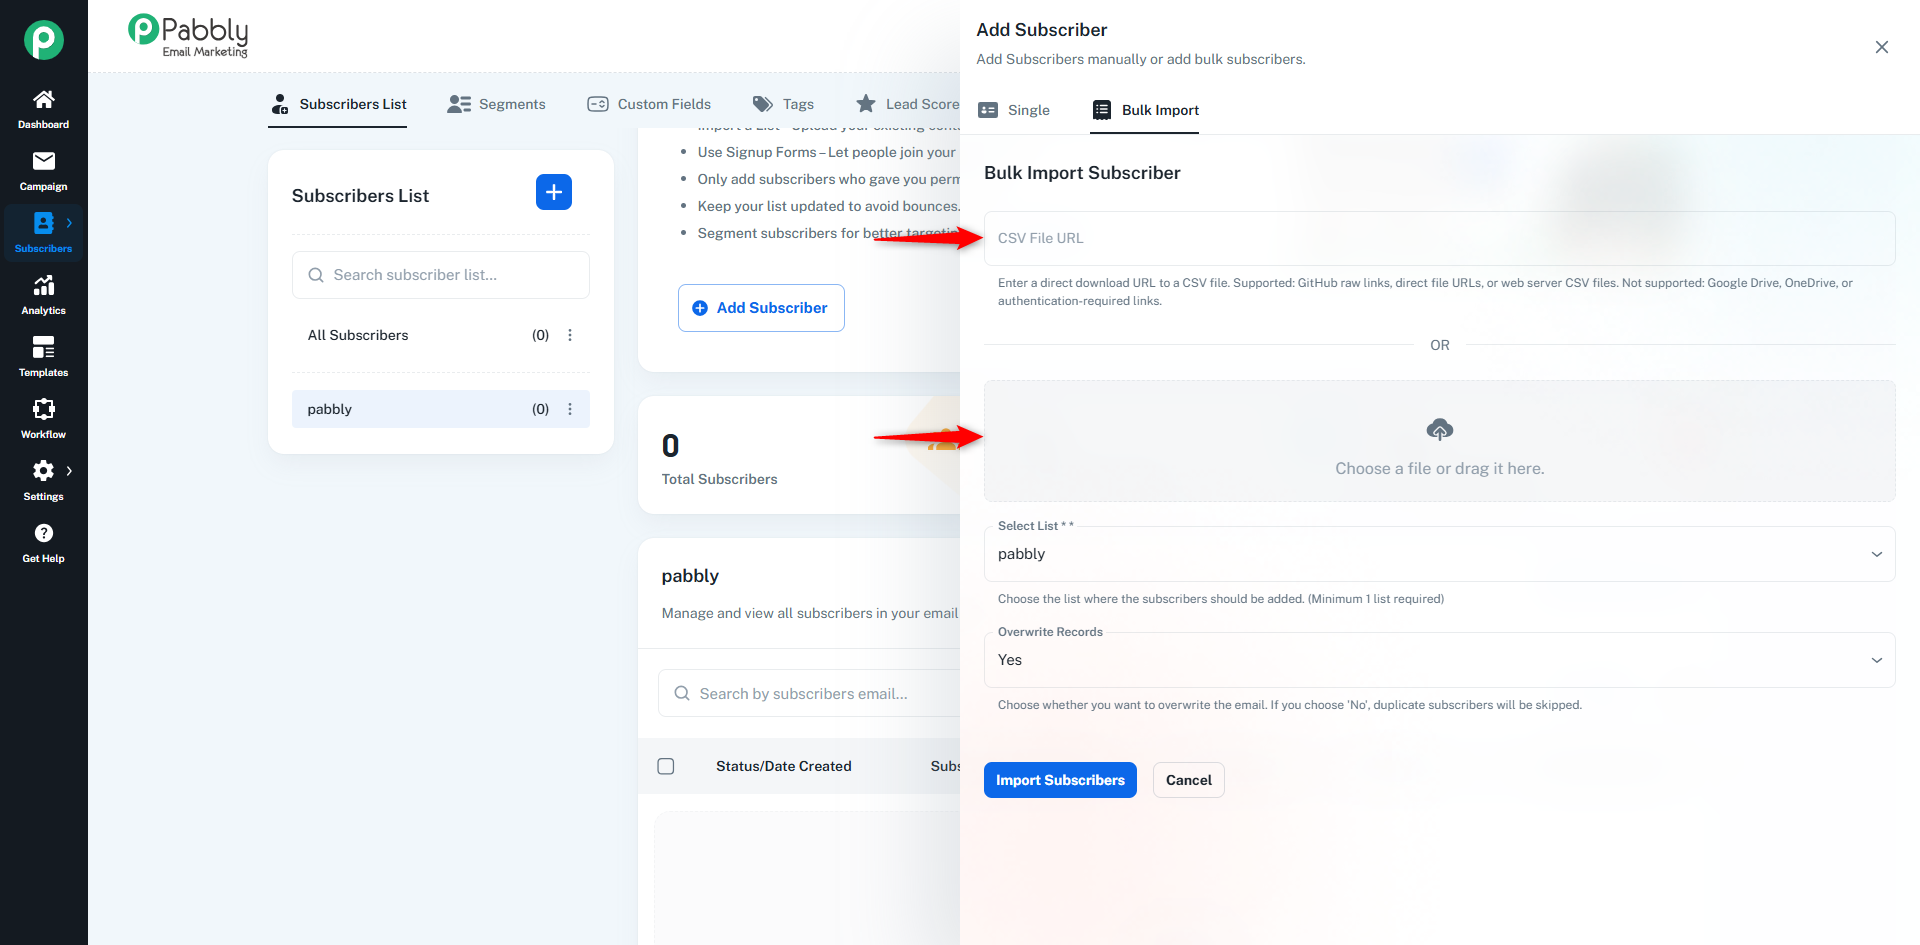
Select List
From the Select List dropdown, choose the list where you want to add the subscribers.
Note: Selecting at least one list is mandatory.
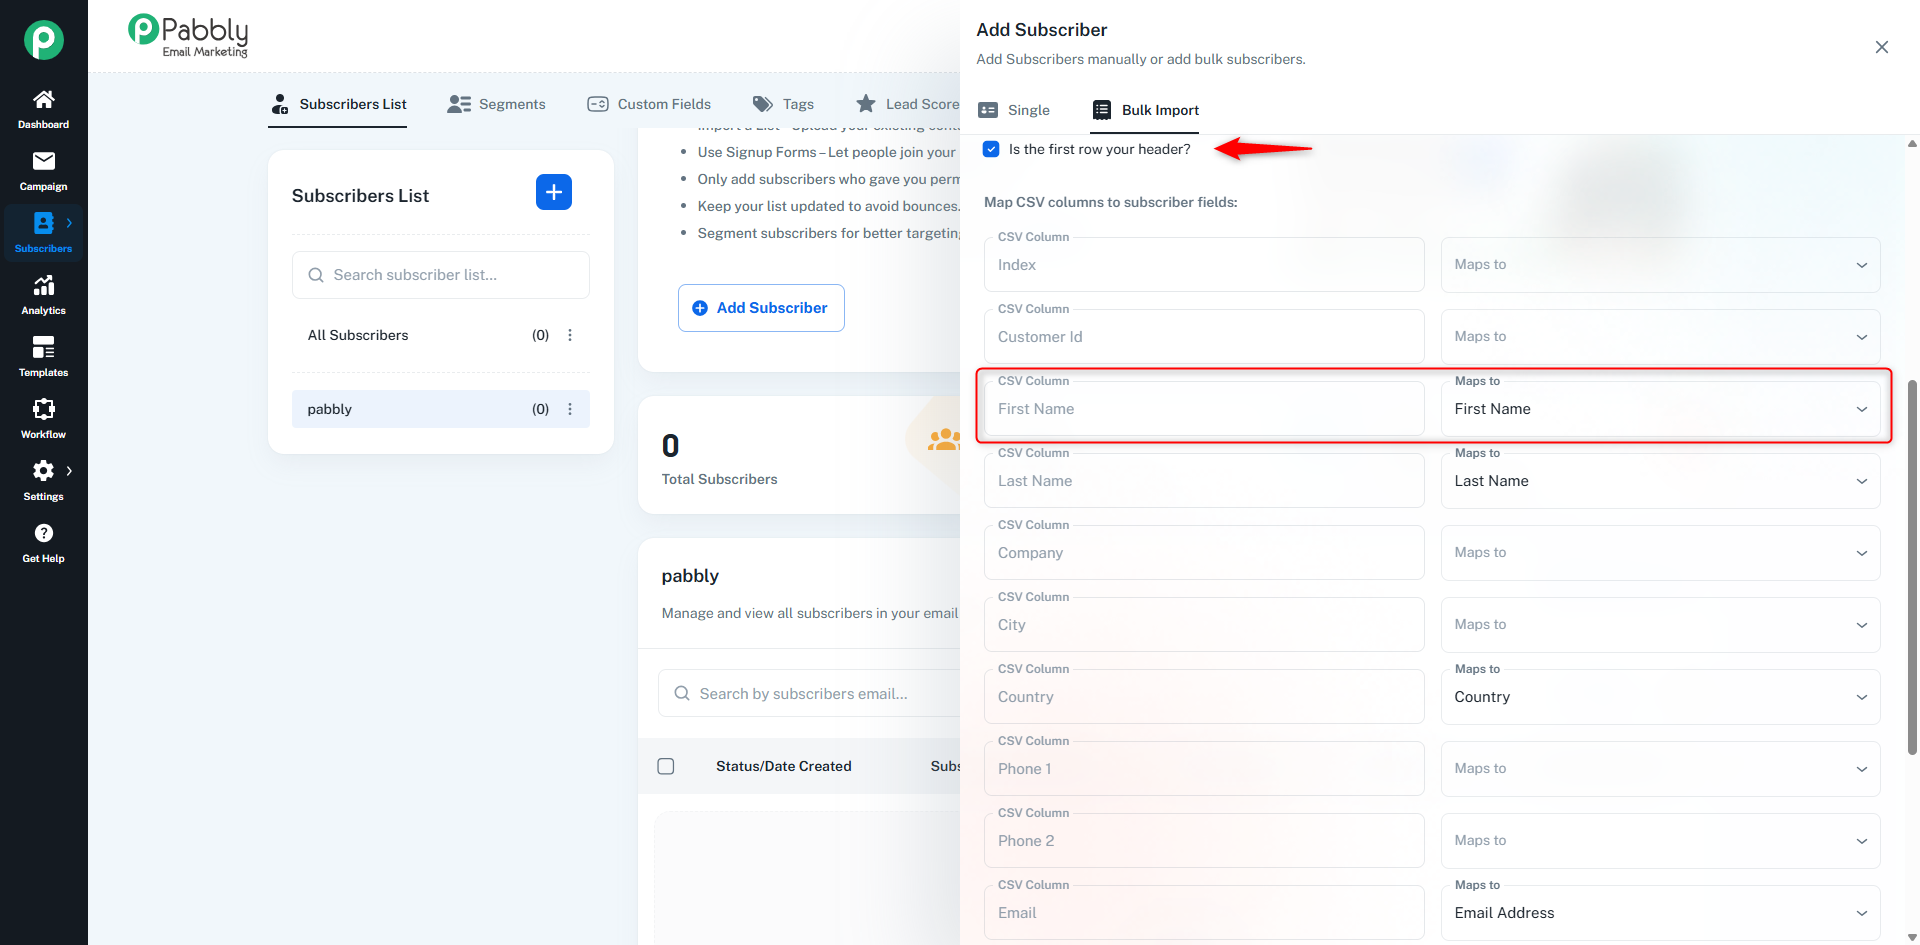
First Row as Header
If the first row of your CSV contains column names (like: Email, First Name, etc.), keep the
“Is the first row your header?” checkbox enabled.
Map CSV Columns to Subscriber Fields
The system will detect your CSV columns.
For each column, select the matching subscriber field,
example:
Email → Email Field
First Name → First Name
Last Name → Last Name
Country → Country
This helps the system correctly map your data.
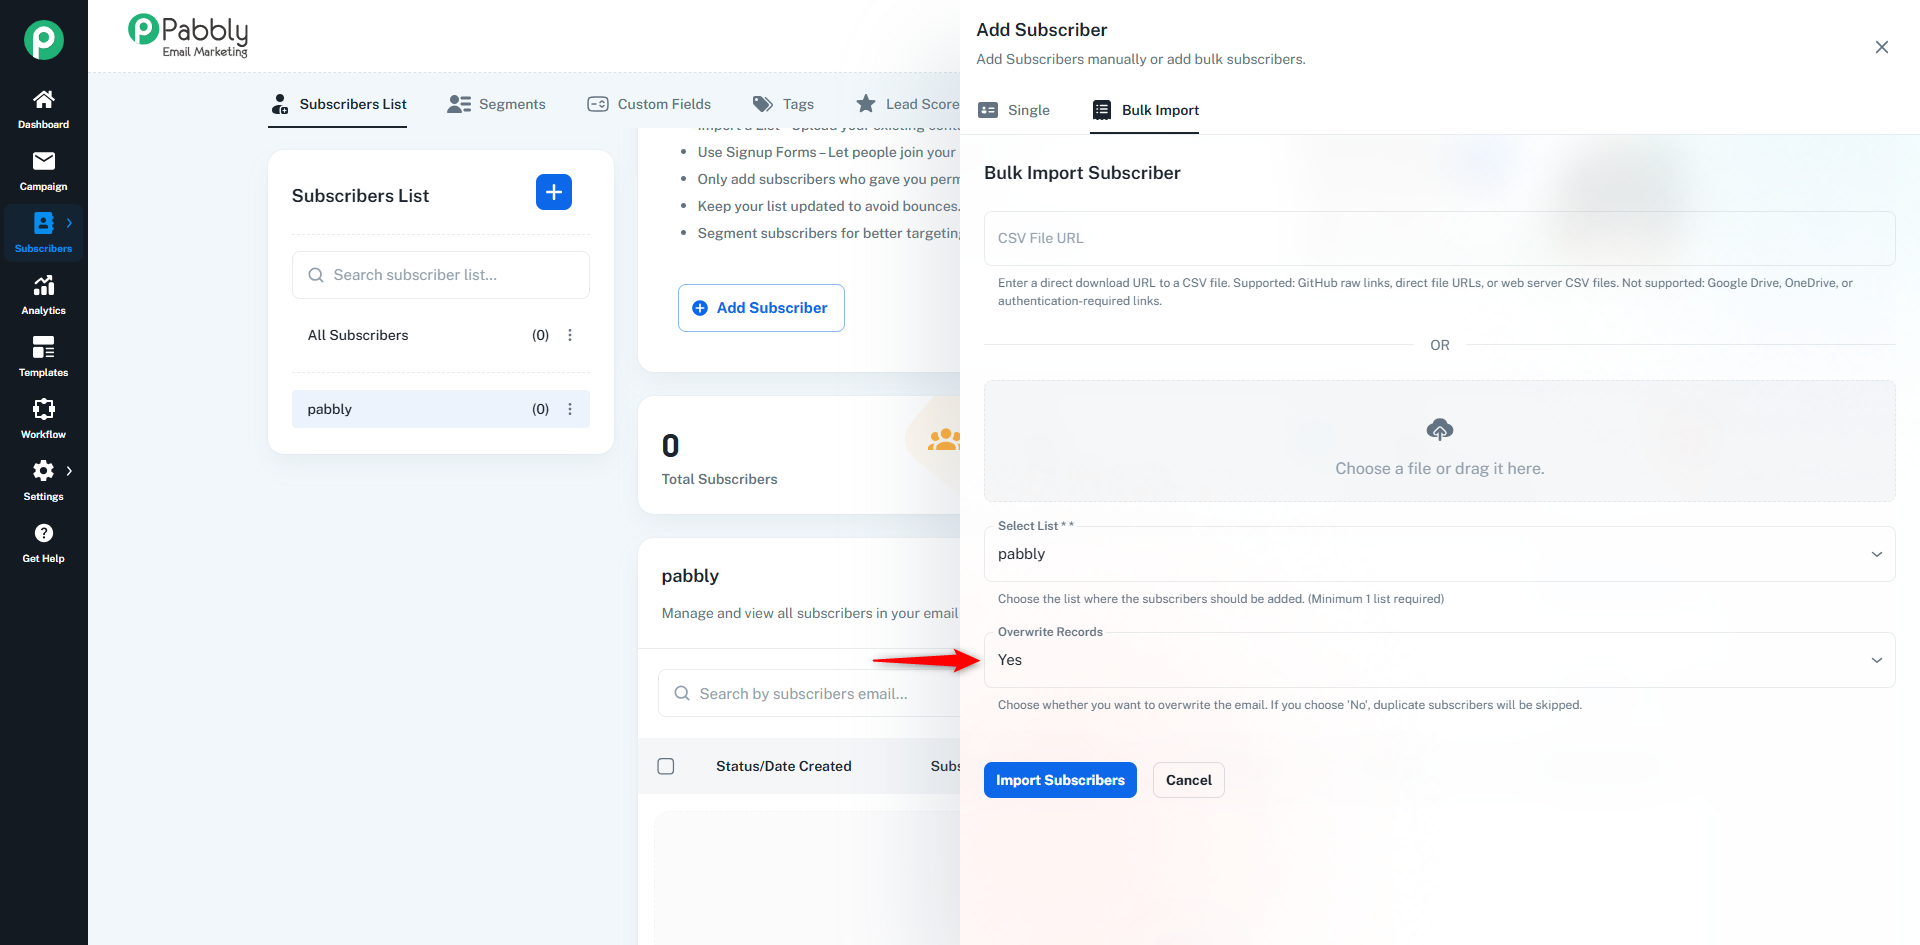
Overwrite Records Option
Choose what should happen if a subscriber already exists:
Yes – The existing subscriber data will be updated.
No – Duplicate subscribers will be skipped.
There is an Import Subscribers button at the bottom. After clicking it, the subscribers will be added to the selected list.
Once the subscribers are successfully added, they will be displayed in the subscribers table of the selected list.
In the Subscribers section, all your added subscribers are displayed in a table format. This table allows you to easily view, manage, search, and perform actions on your subscribers.
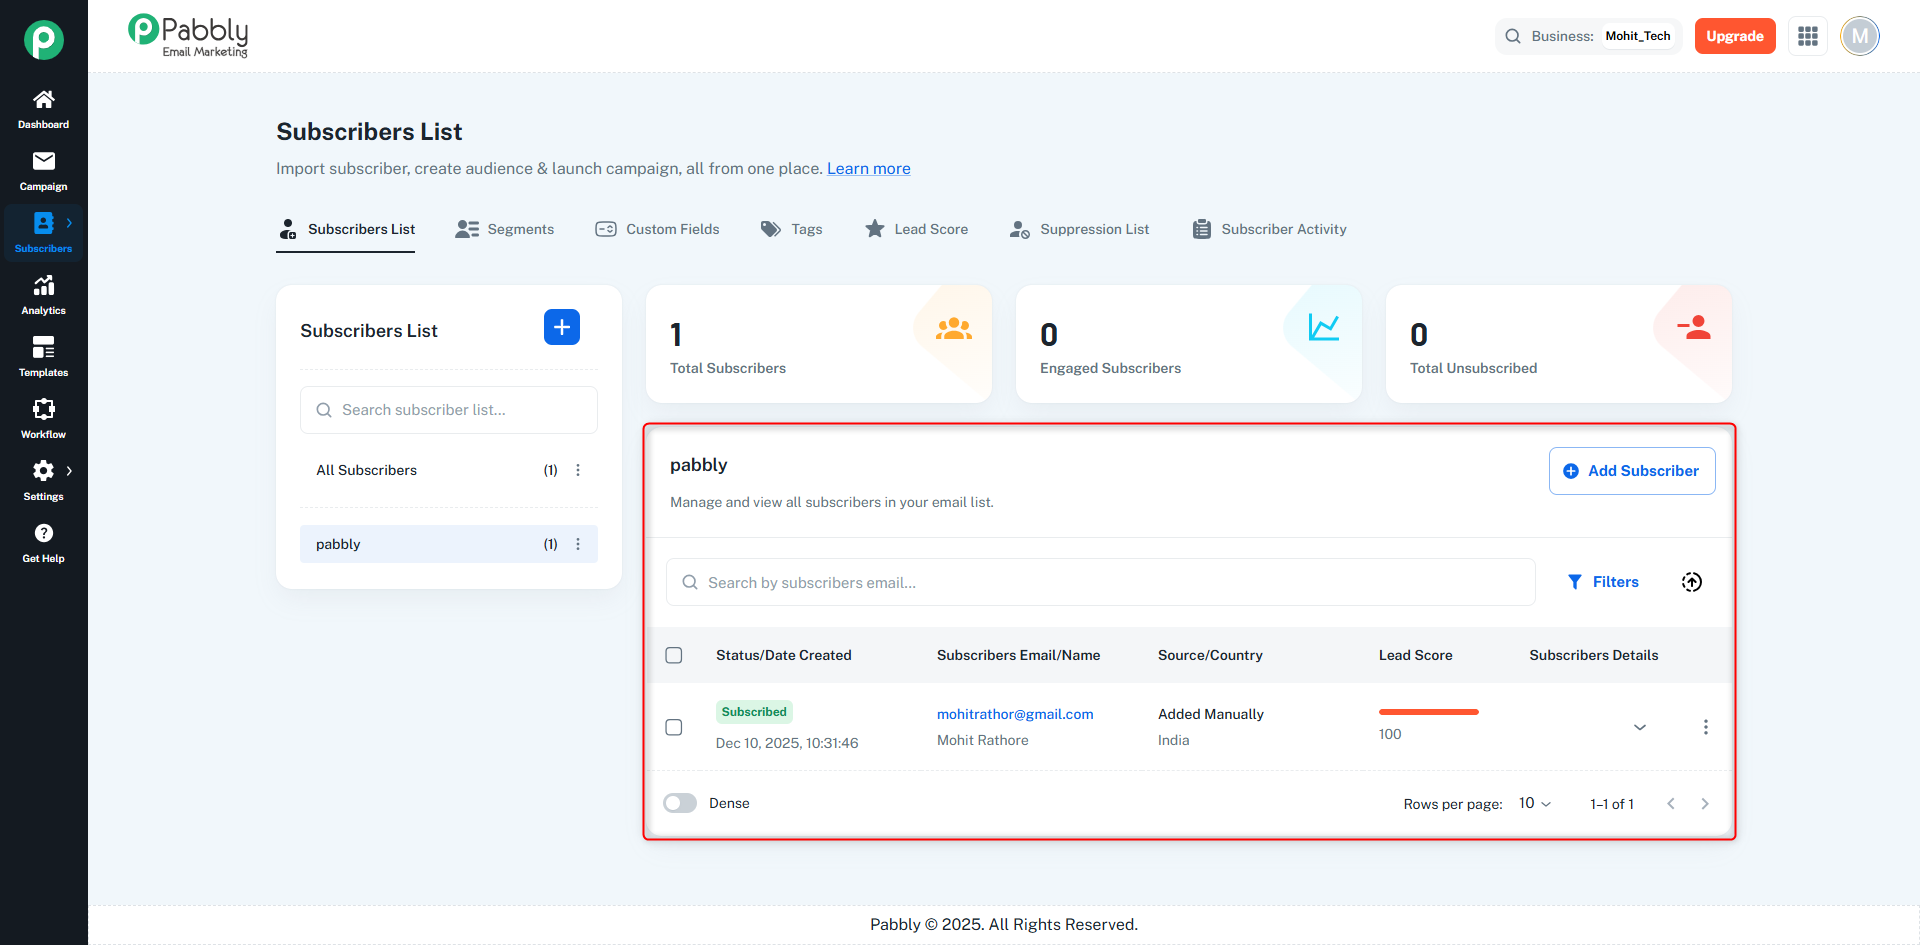
1. Status/Date Created
Shows the current status of the subscriber:
Subscribed – Active subscriber
Unsubscribed – User has opted out
Bounced – Email delivery failed
Blocked / Inactive – Subscriber is not eligible for campaigns
2. Subscriber Email/Name
Displays the subscriber’s basic information such as:
Name
Email address
3. Source / Country
This column shows two details:
Source: How the subscriber was added
(Example: API, Form Submission, CSV Import, Manual Add)
Country: From which country the subscriber was added
4. Lead Score
This column displays the lead score for each subscriber, indicating how engaged or valuable the subscriber is based on their activity.
The lead score is categorized into three types:
Cold Lead – Low engagement and minimal interaction with campaigns.
Average Lead – Moderate engagement with occasional interaction.
Hot Lead – Highly engaged subscribers with frequent interaction and higher conversion potential.
This helps you easily identify and target high-potential subscribers based on their level of engagement.
5. Subscriber Details (Expanded View)
When you click on the toggle icon in the Subscriber Details column, the row expands and shows complete information about the selected subscriber.
The following details are displayed:
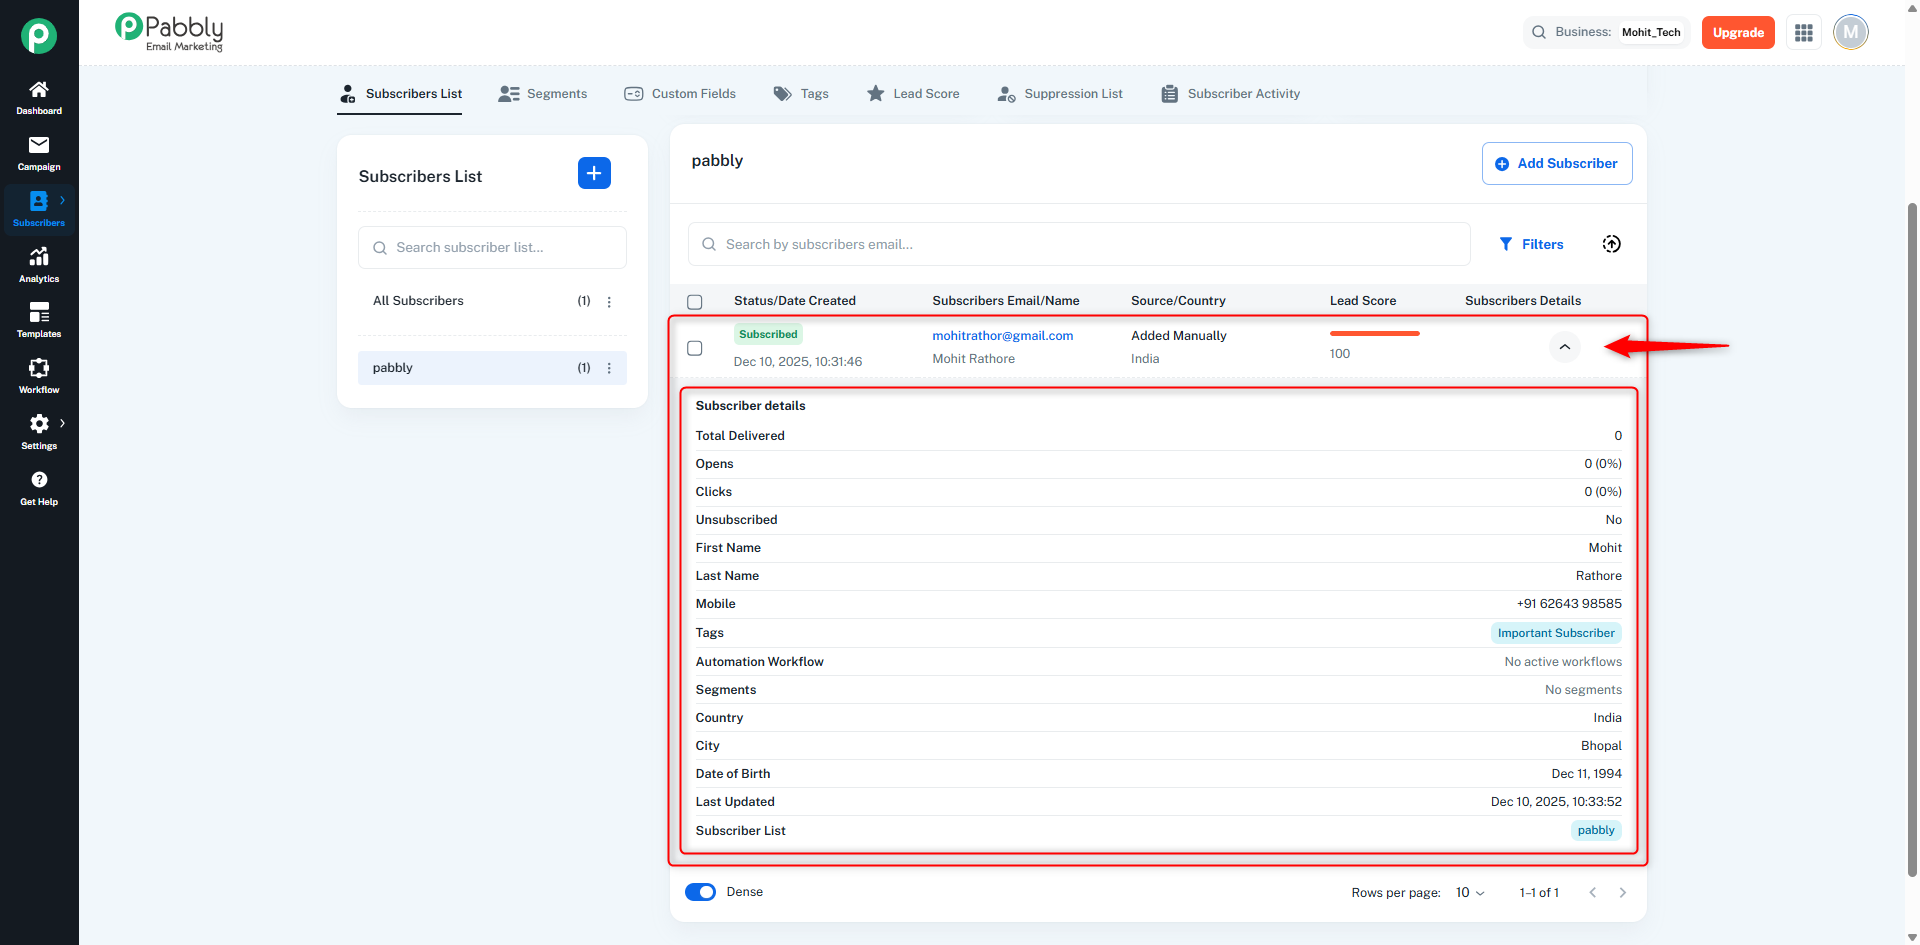
5.1 Total Delivered
Shows the total number of emails successfully delivered to this subscriber.
5.2 Opens
Displays how many times this subscriber has opened the emails.
Also shows the open rate percentage.
5.3 Clicks
Shows the total number of link clicks made by this subscriber.
Includes the click-through percentage.
5.4 Unsubscribed
Indicates whether the subscriber has unsubscribed or not.
Possible values: Yes / No
5.5 First Name
Displays the first name of the subscriber (if provided).
5.6 Last Name
Displays the last name of the subscriber (if provided).
5.7 Mobile
Shows the subscriber’s mobile number if available.
If not added, it shows Not Provided.
5.8 Tags
Lists all tags assigned to the subscriber.
If no tags are added, it shows No tags.
5.9 Automation Workflow
Shows which automation workflows the subscriber is currently part of.
If none are active, it shows No active workflows.
5.10 Segments
Displays the segments in which the subscriber belongs.
If not part of any segment, it shows No segments.
5.11 City
Shows the city of the subscriber.
If not provided, it shows Not Specified.
5.12 Date of Birth
Displays the subscriber’s date of birth.
If not added, it shows Not Provided.
5.13 Last Updated
Shows when the subscriber details were last updated.
If no update is made, it displays N/A.
5.14 Subscriber List
Displays the list(s) this subscriber belongs to.
If not added to any list, it shows No lists.
6. More Actions (Three-Dot Menu)
In the subscriber table, a three-dot menu (⋮) is available at the end of each row.
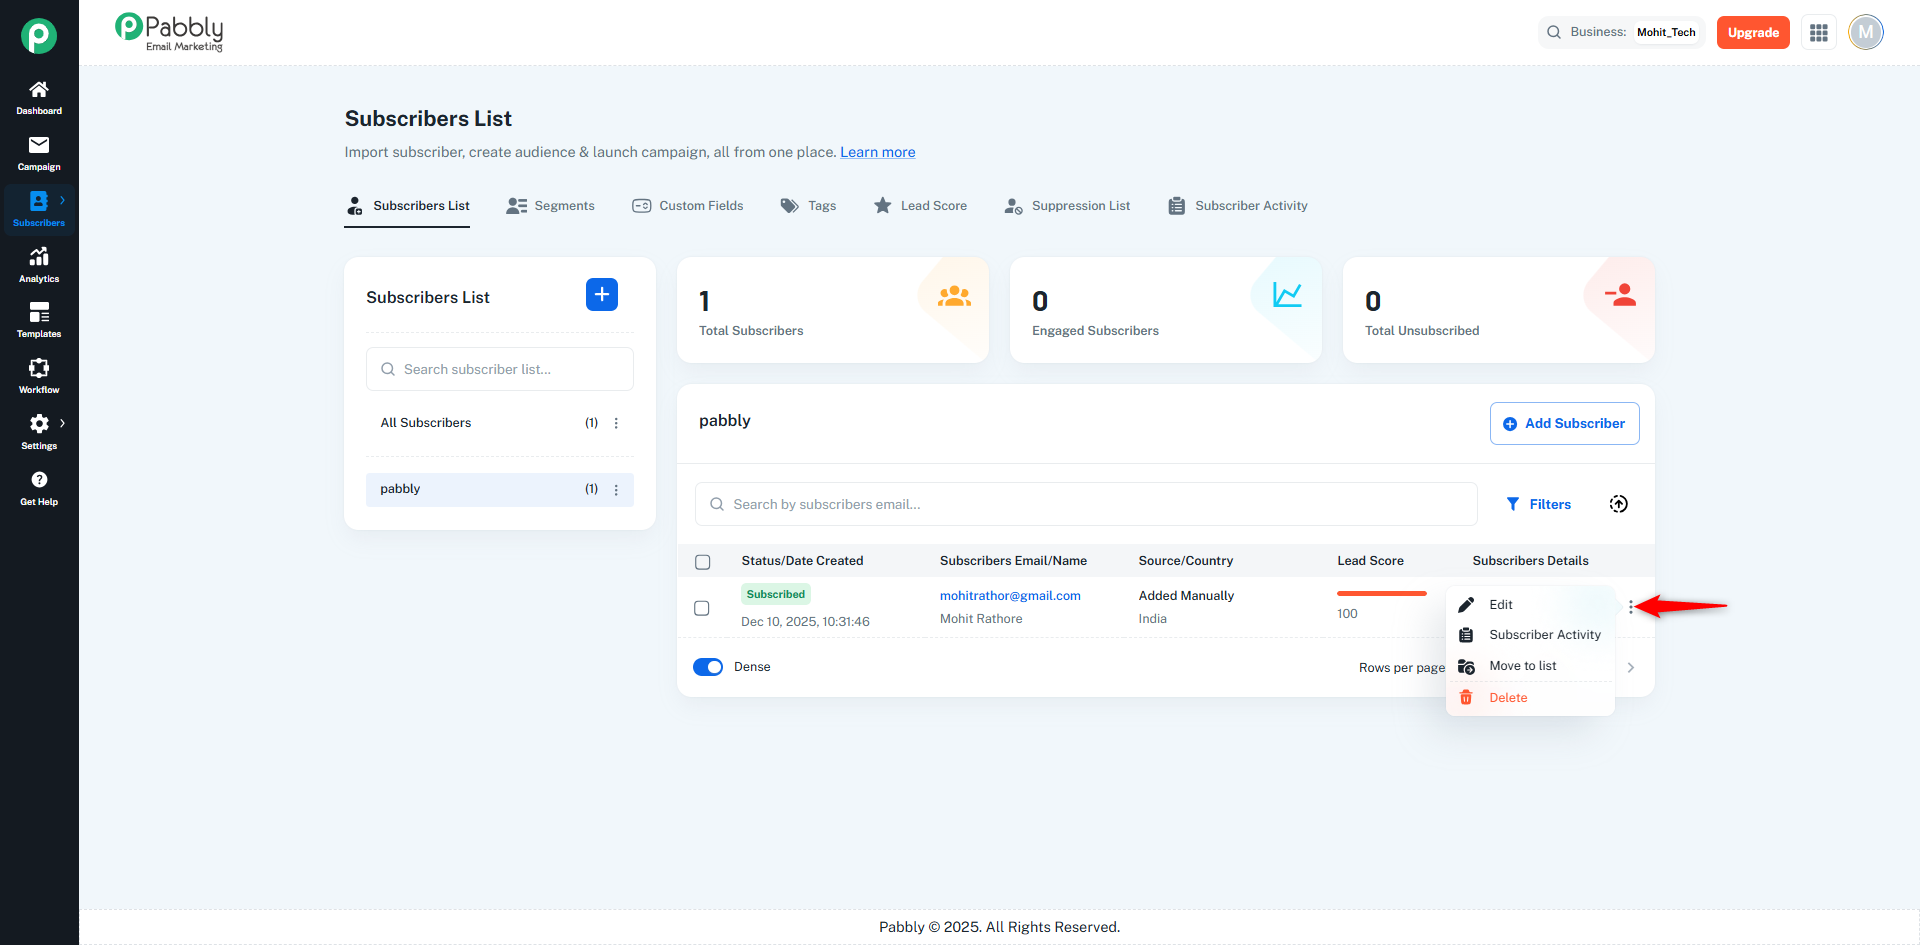
6.1 Edit
Allows you to edit the subscriber’s details such as name, mobile number, tags, city, etc.
6.2 Subscriber Activity
When you click on Subscriber Activity from the three-dot menu, you are redirected to the subscriber activity page where you can view the subscriber’s email engagement history. From there, click on View Details under View Subscriber to see the complete email activity timeline (sent, delivered, opened, clicked, bounced, etc.).
This section helps users track:
✅ Email sending history
✅ Open and click activity
✅ Delivery & bounce status
✅ Complete subscriber engagement journey
6.3 Move to List
Allows you to move the selected subscriber to another list.
This helps you organize subscribers better based on campaigns, customer type, or segmentation.
6.4 Delete
Deletes the selected subscriber.
If you delete a subscriber from a List, they will still remain available in All Subscribers.
A subscriber removed from a list can be added back to the same or another list later.
However, if you delete a subscriber from All Subscribers, it will be permanently deleted and cannot be recovered or added back to any list.
When you have a large number of subscribers in the All Subscribers section and want only specific ones, you can use the Segment feature. Using Advanced Search and Segments, you can filter subscribers by multiple criteria, create new lists, and extract subscriber data efficiently.
