How to Access and Manage the Inbox
The Inbox module in Pabbly Chatflow is your central workspace for managing real-time WhatsApp conversations. It allows team members to respond to customer messages, assign chats, track message history, and collaborate efficiently — all in one place.
The Inbox is where your team can:
View all WhatsApp chats (assigned, unassigned, open, closed).
Respond using plain text, media, or WhatsApp templates.
Assign conversations to teammates or teams.
Tag and organize chats using custom labels.
Add and manage contact details.
Trigger workflows or send quick replies — instantly.
Log in to Pabbly Chatflow.
Navigate to the Inbox from the sidebar.
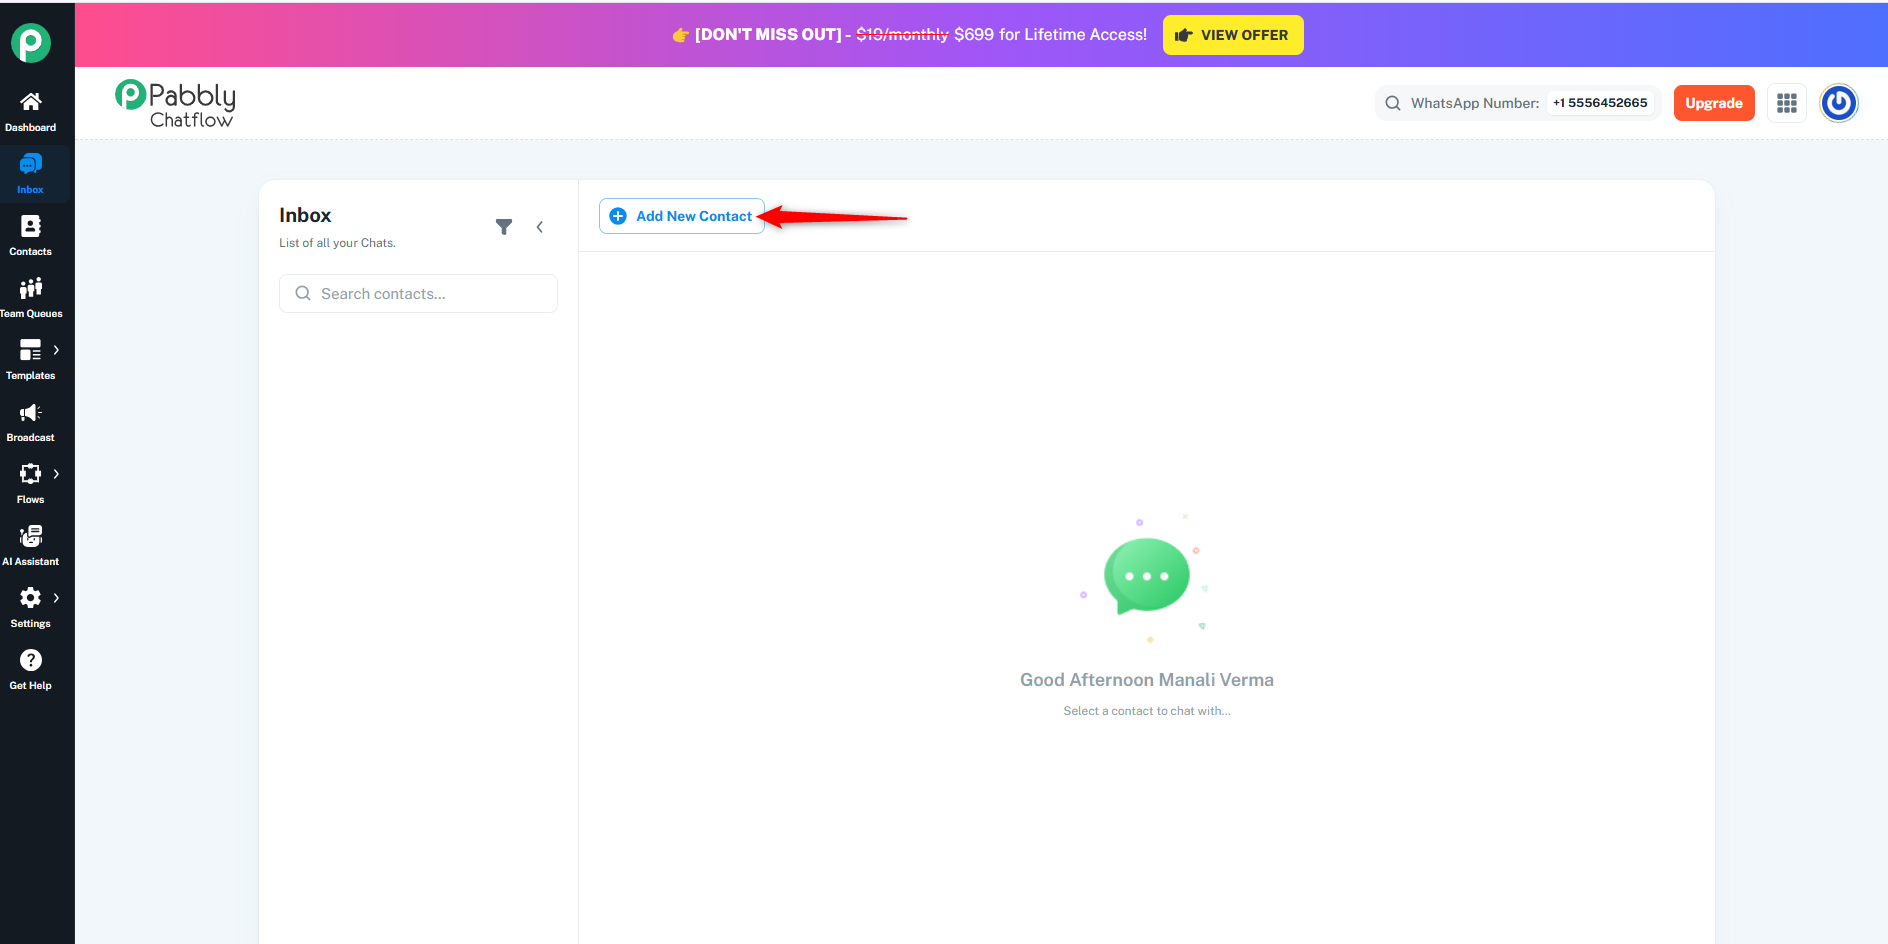
Before starting any conversation, you need to add the contact.
Click + Add New Contact.
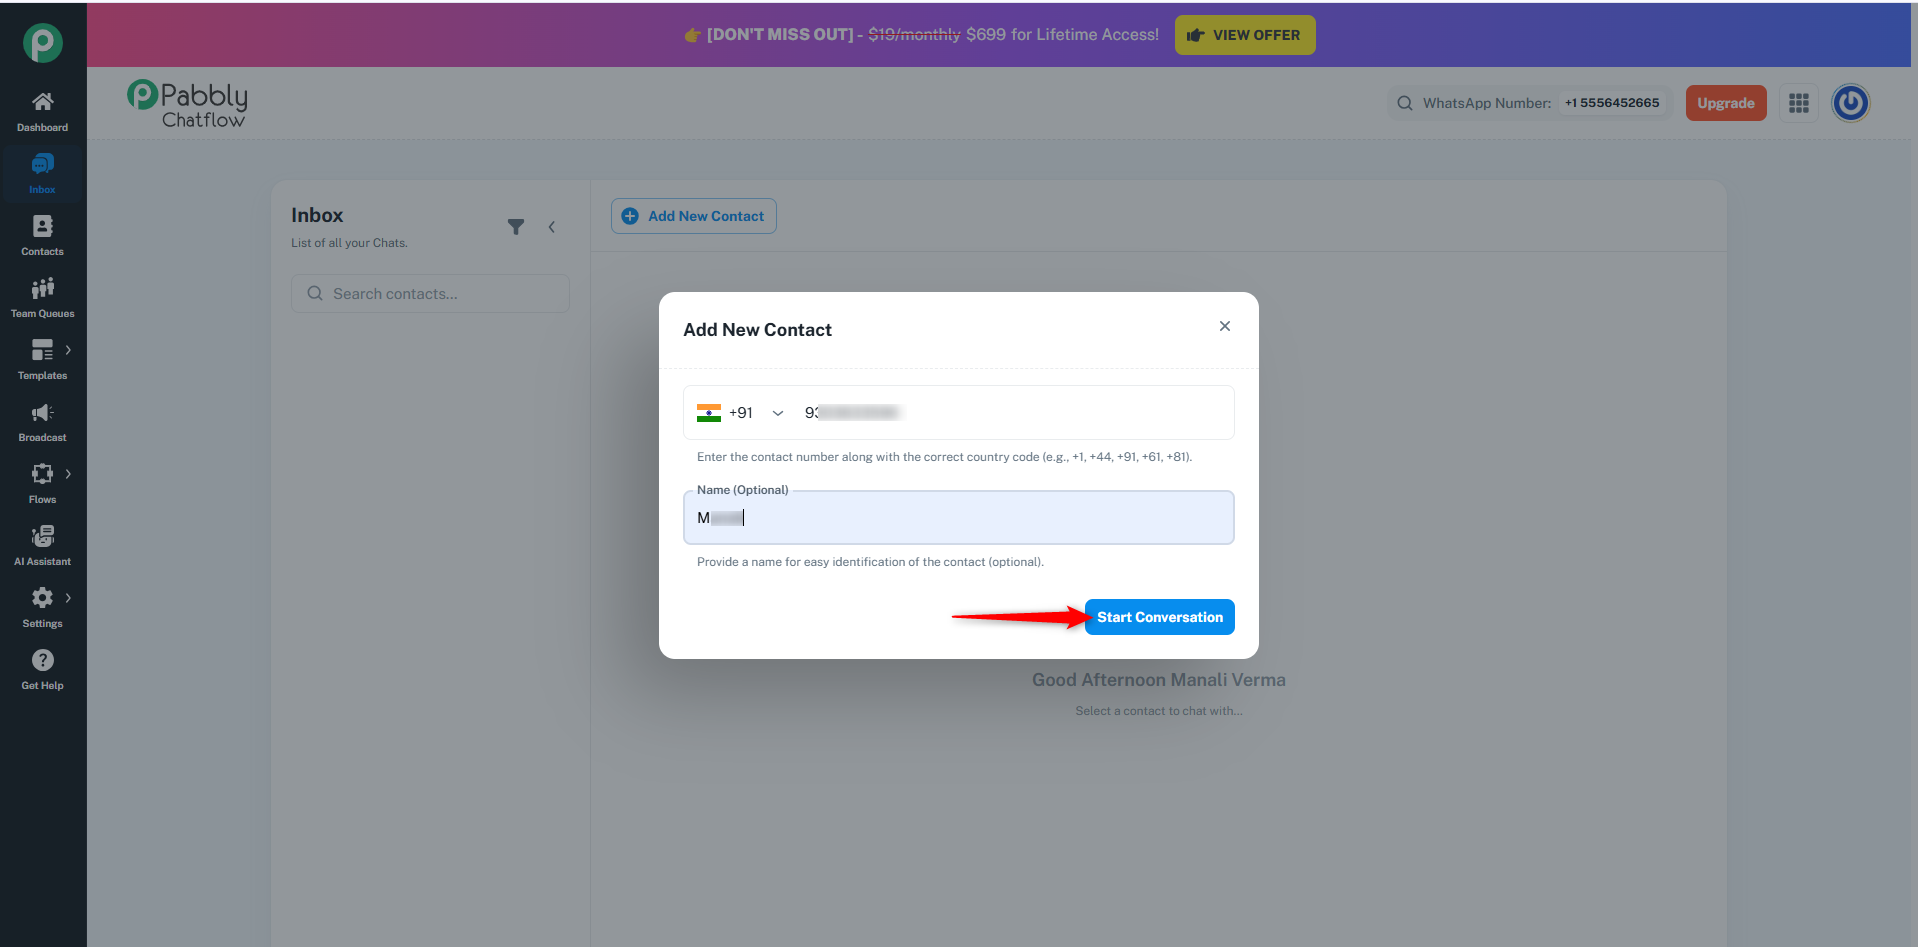
Enter the WhatsApp number (with correct country code like +91, +1, etc.).
Optionally, enter a name for easy identification.
Click Start Conversation.
Once the contact is added, it appears in the left chat list.
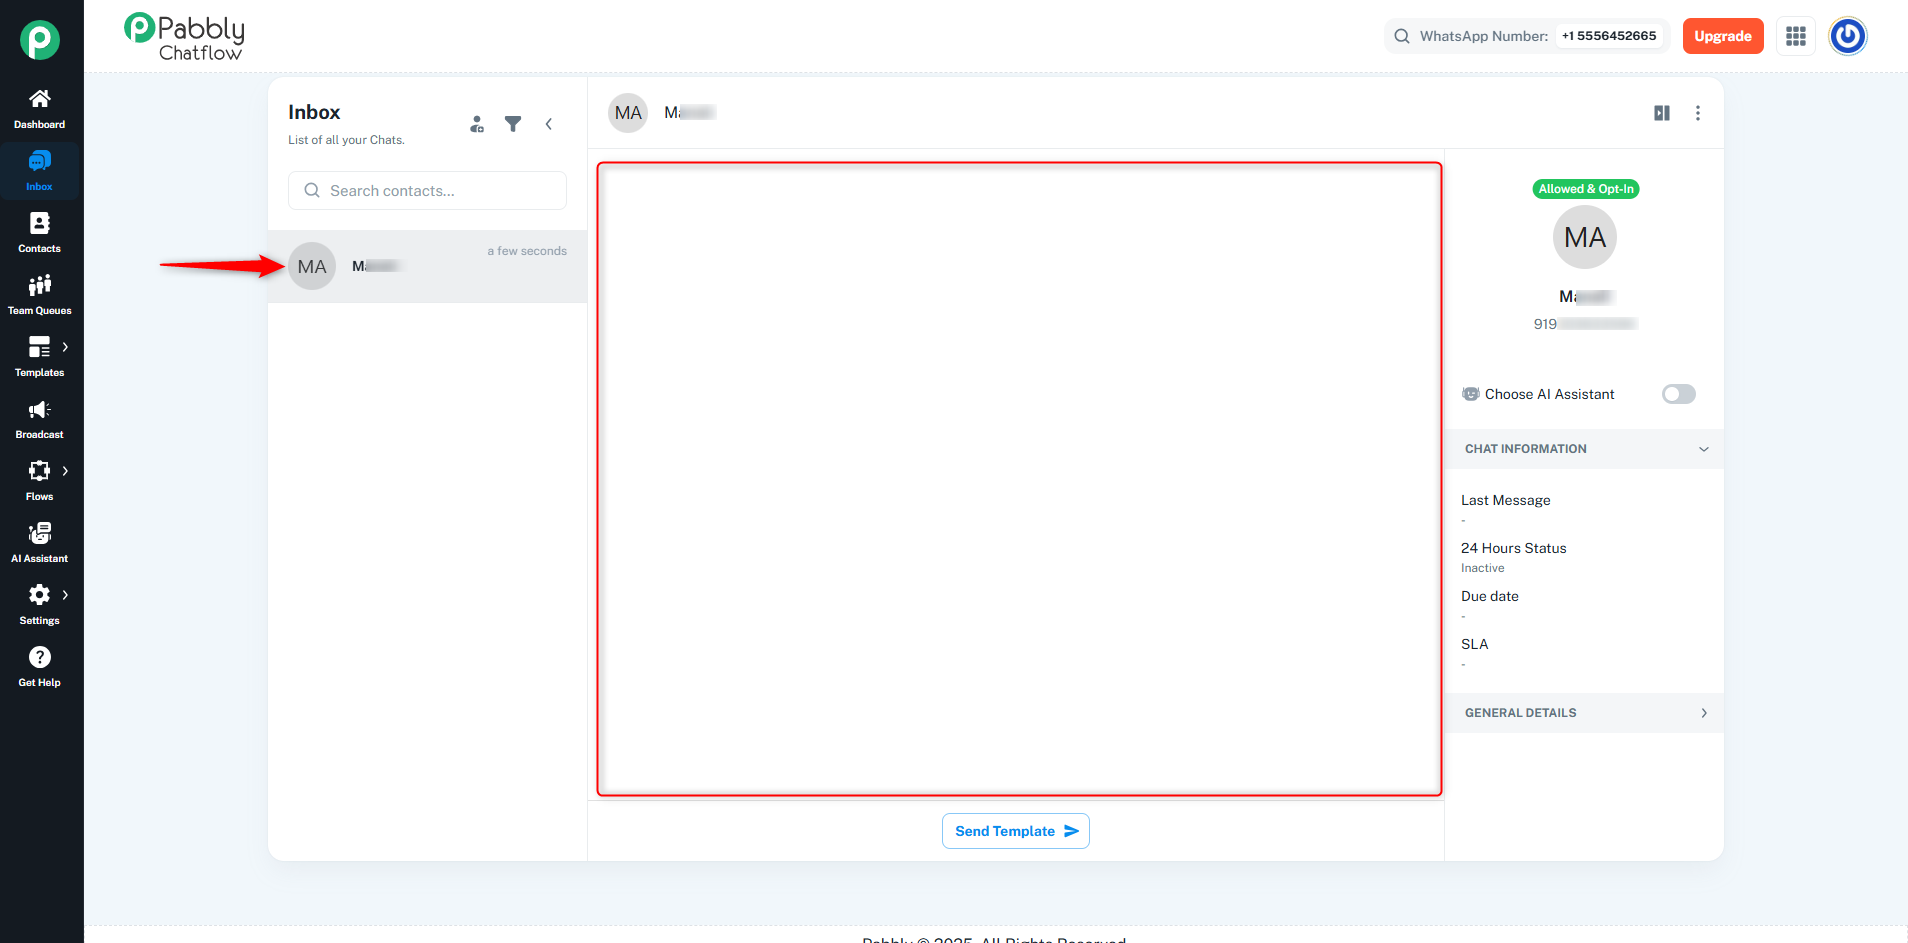
Click on the contact to open the chat view.
Important Note:
For newly added contacts who haven’t initiated a conversation, you must start the interaction with a pre-approved WhatsApp template message.
When you open a chat with a newly added contact, you will see a “Send Template” button instead of the regular message box.
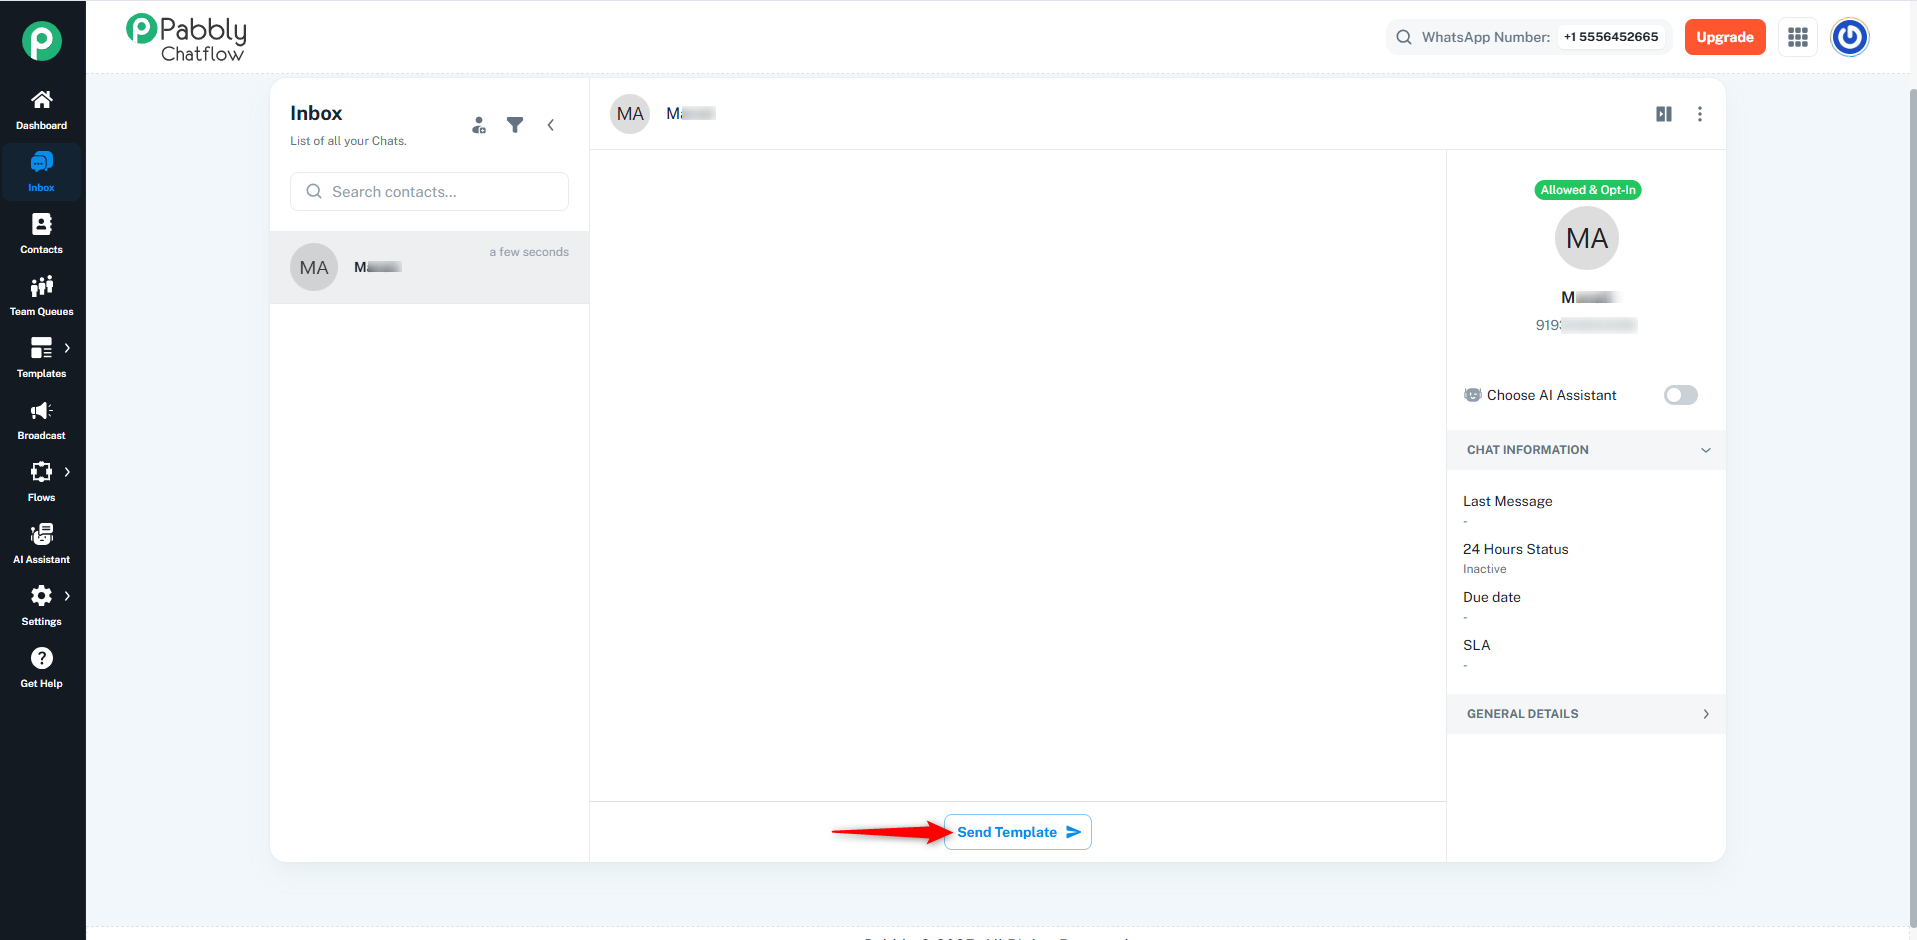
Click Send Template to open the list of templates you have created in the Templates module.
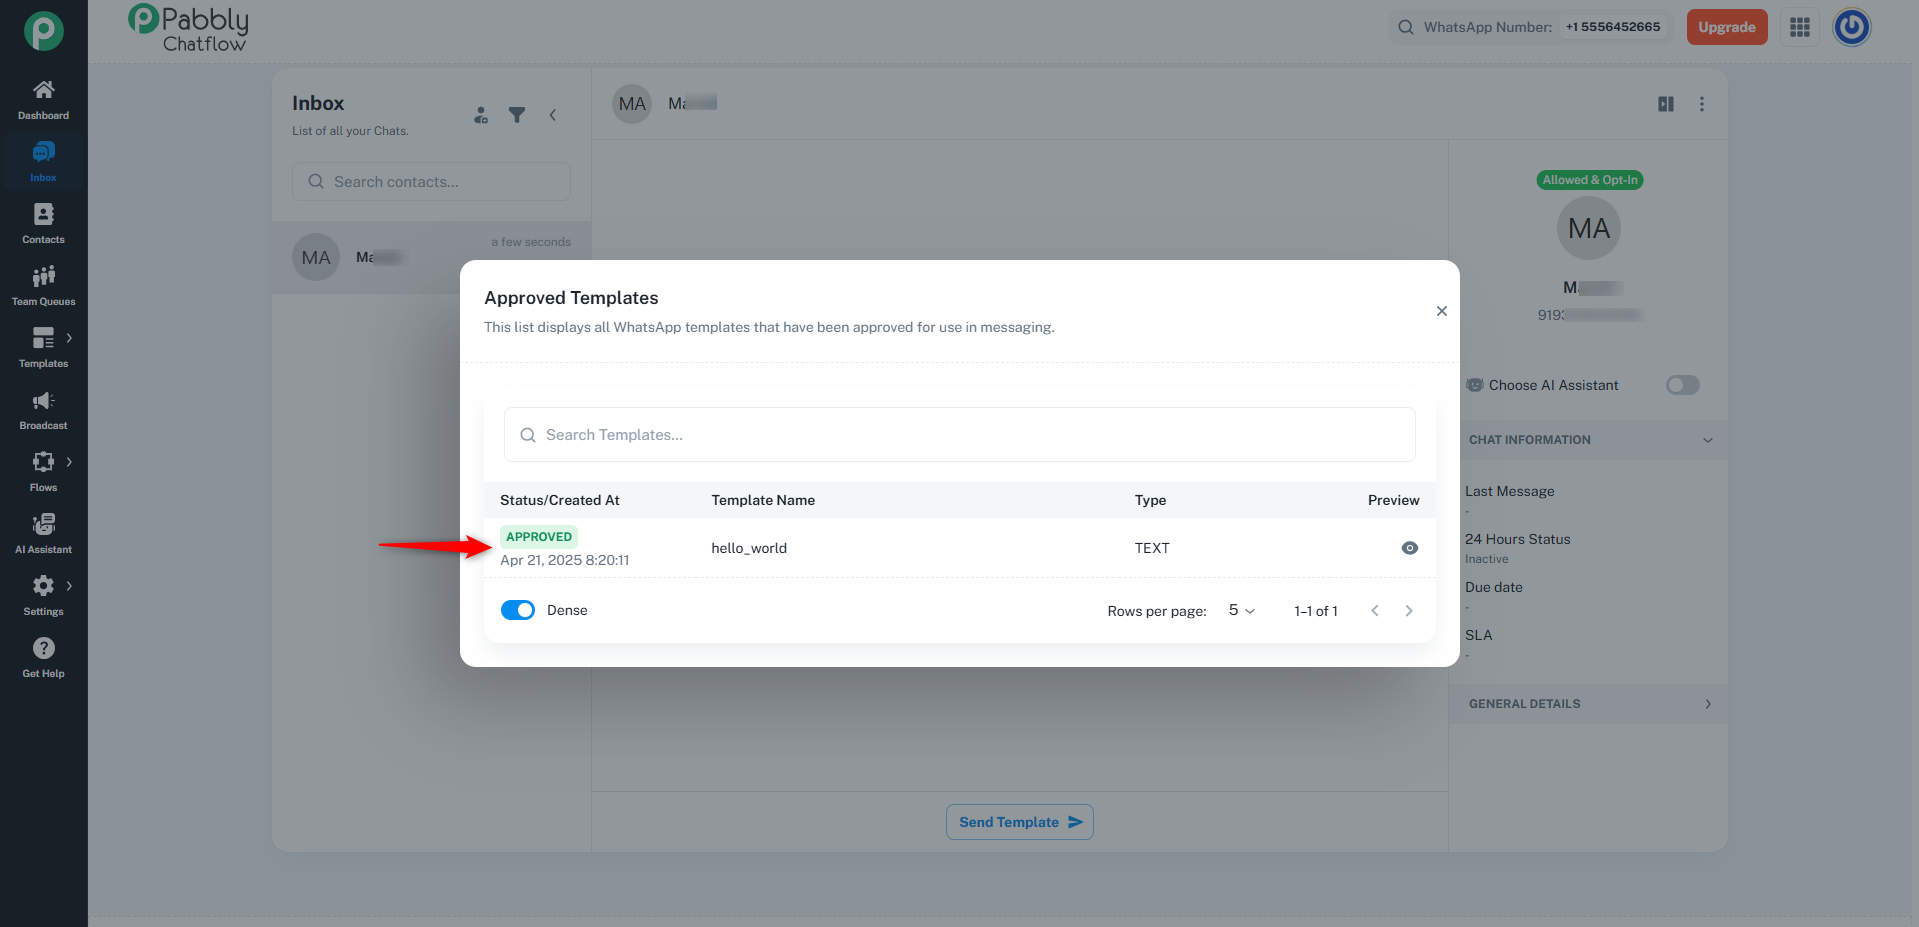
If you have no custom templates created, the default template provided by Meta will be automatically available in the list.
This default template is provided by Meta and is ready for use.
Select the appropriate template from the list to initiate the conversation.
Note:
If you want to create your own templates for future use, go to the Templates module and add custom templates. Once approved by Meta, they will be available in the Send Template dropdown.
After sending the first template, if the customer replies, a 24-hour session opens and you can continue the conversation with free-form messages.
Once the customer replies, or the 24-hour status is active, the full conversation interface becomes available, and additional communication options appear
Intervene Button Visibility
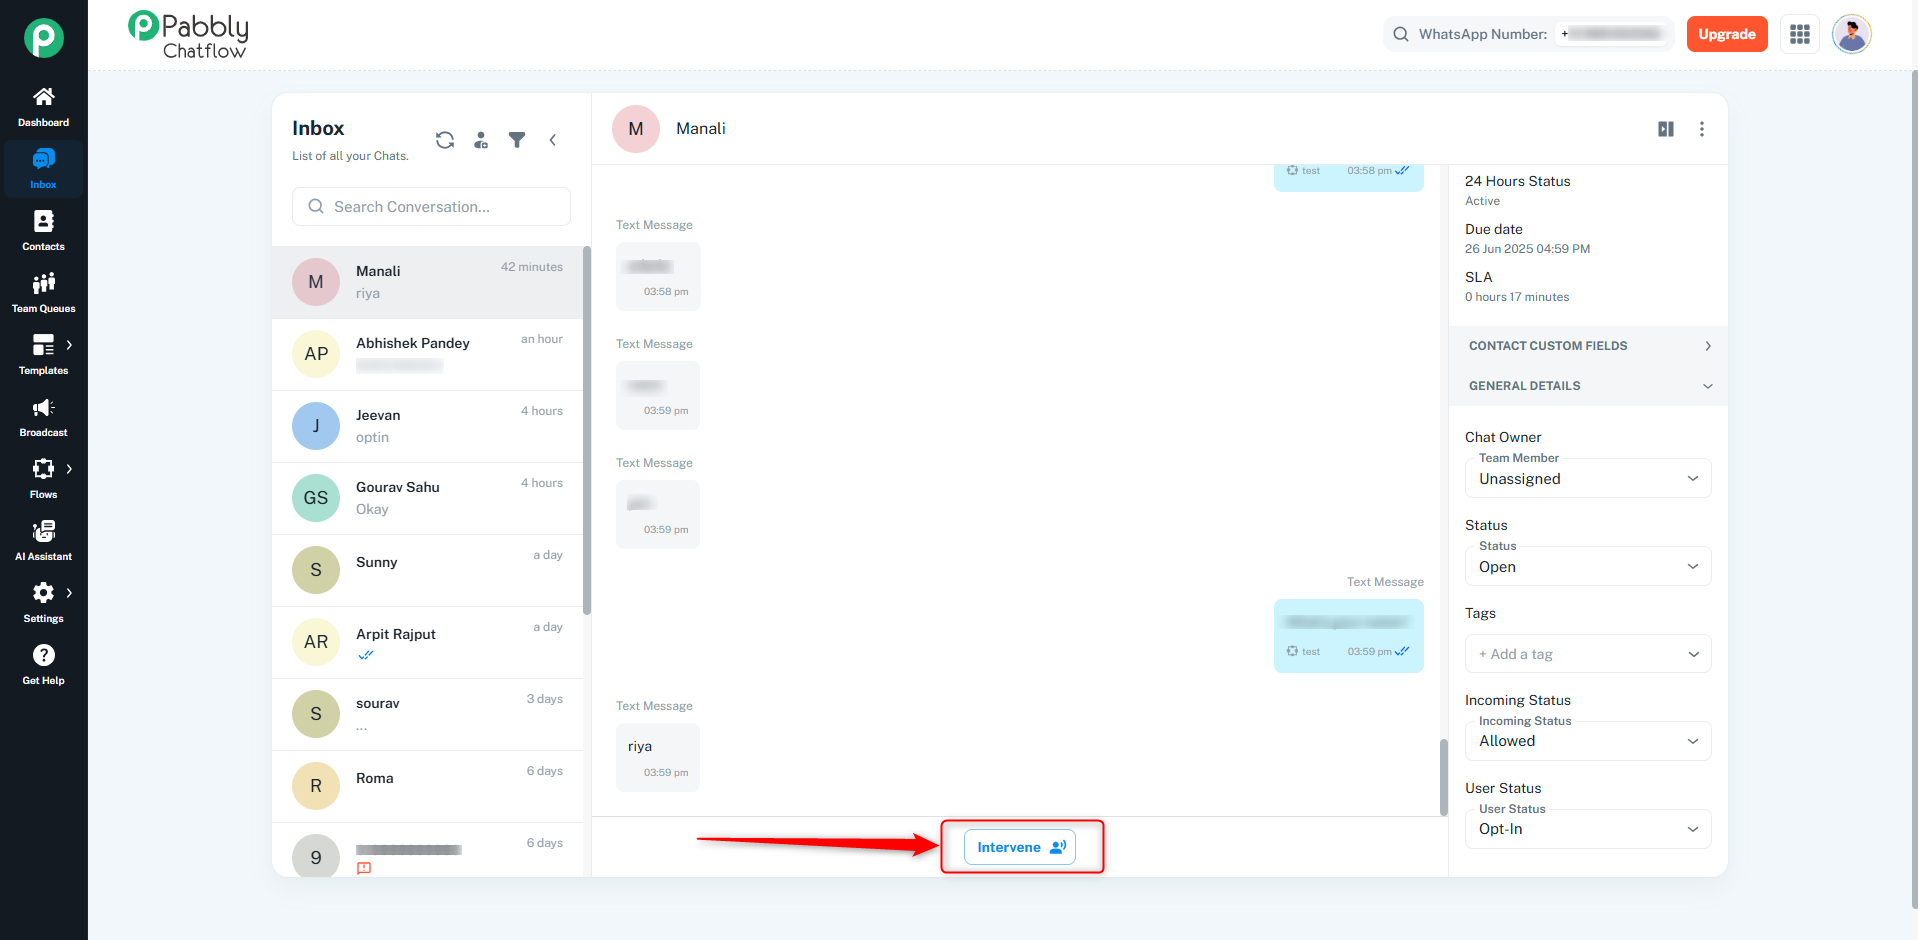
If the chat status has not been intervened or the AI assistant has not been assigned, the Intervene button will be visible. By clicking this button, a human agent can take over the conversation and respond manually. The full conversation interface will be unlocked, and additional communication options will become available.
Note: Upon clicking this button, you can manually engage and reply to the conversation.
Quick Replies
Use Quick Replies for commonly used responses (e.g., “Thank you for contacting us!”).
Type / (slash) to access available quick replies or select them from the dropdown list.
You can easily create and manage these replies for faster and standardized responses.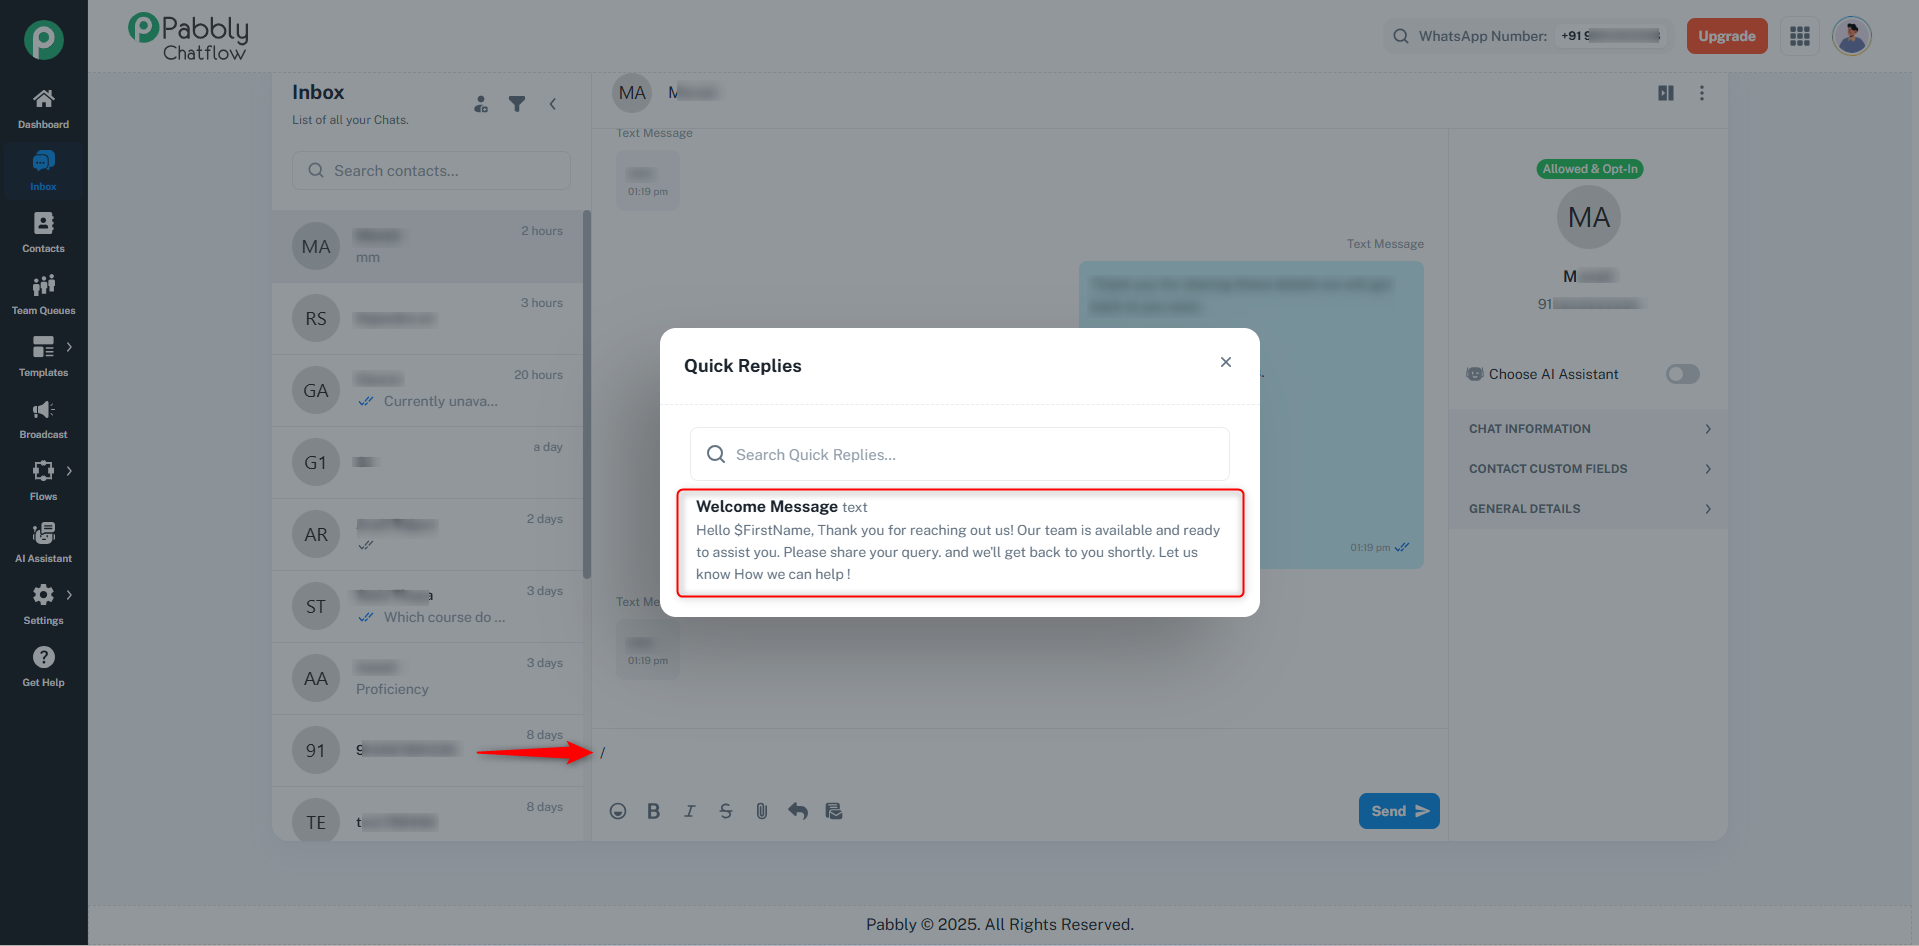
Text Formatting Options
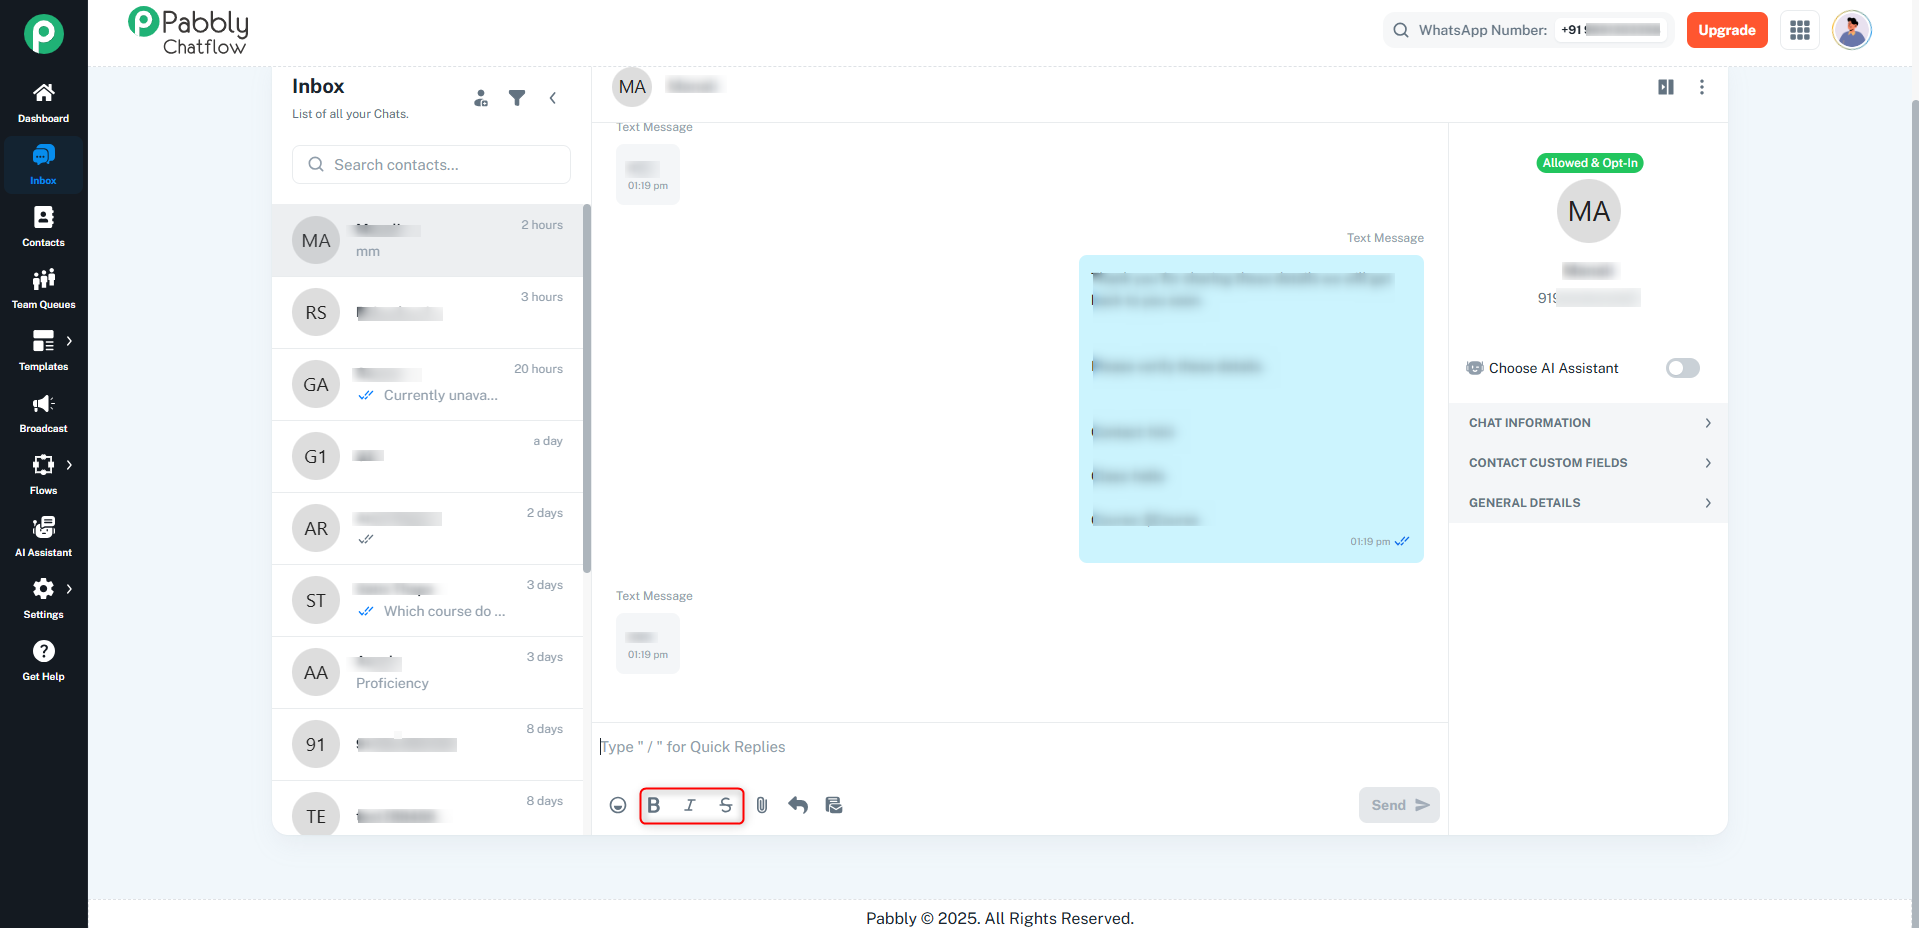
Format your text using bold, italic, or strikethrough to highlight key information.
Send Media Files
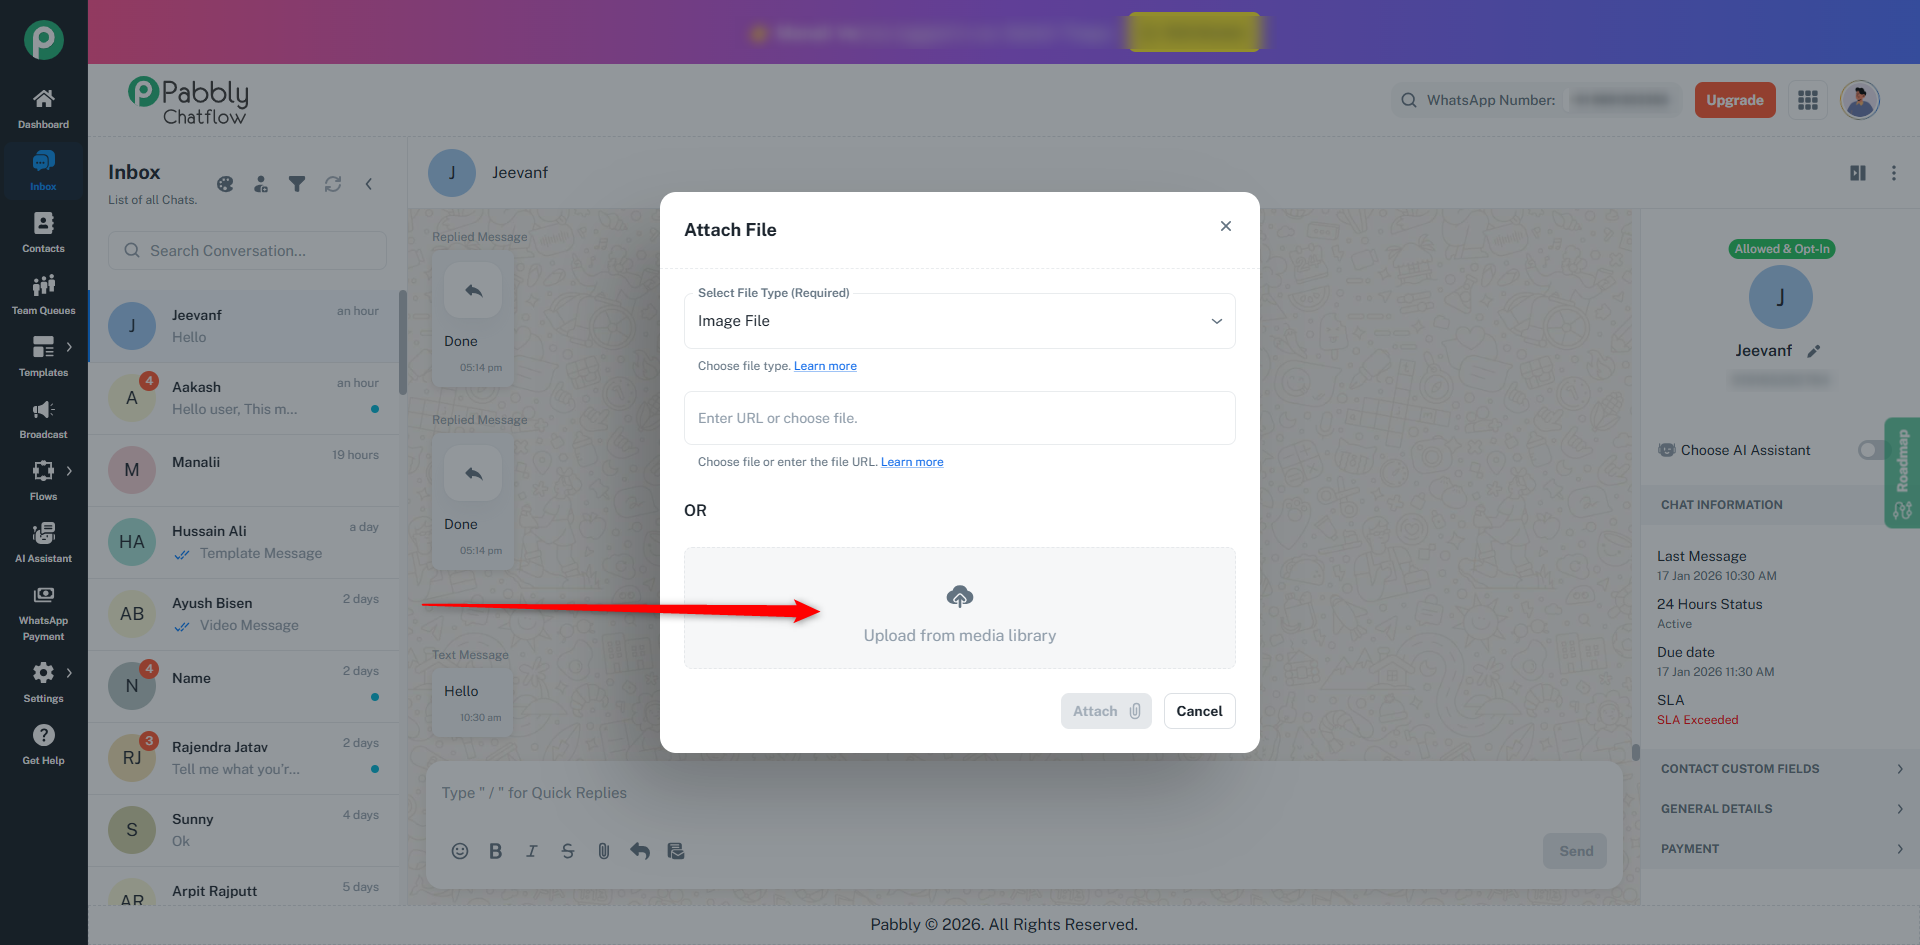
Click the attachment icon to choose and send various types of media:
Text
Allows you to compose a plain text message.
Simply type your message in the text input box.
Image
Add a caption along with the image.
You can:
Upload an image from the Media Library or directly from your system.
Or provide an image URL.
Size Limit: Less than 5MB
Accepted Formats: .png, .jpeg
Add a caption to accompany your video.
You can:
Upload a video from the Media Library or directly from your system.
Or provide a video URL.
Size Limit: Less than 16MB
Accepted Formats: .mp4
Add an optional caption with the audio file.
You can:
Upload an audio file from the Media Library or directly from your system..
Or provide a URL to the audio.
Size Limit: Less than 16MB
Accepted Formats: .mp3
Upload general-purpose files such as PDFs, documents, or spreadsheets.
No preview is sent; users receive a downloadable file.
Size Limit: Typically follows WhatsApp limits (recommended < 16MB).
Centralized Media Library
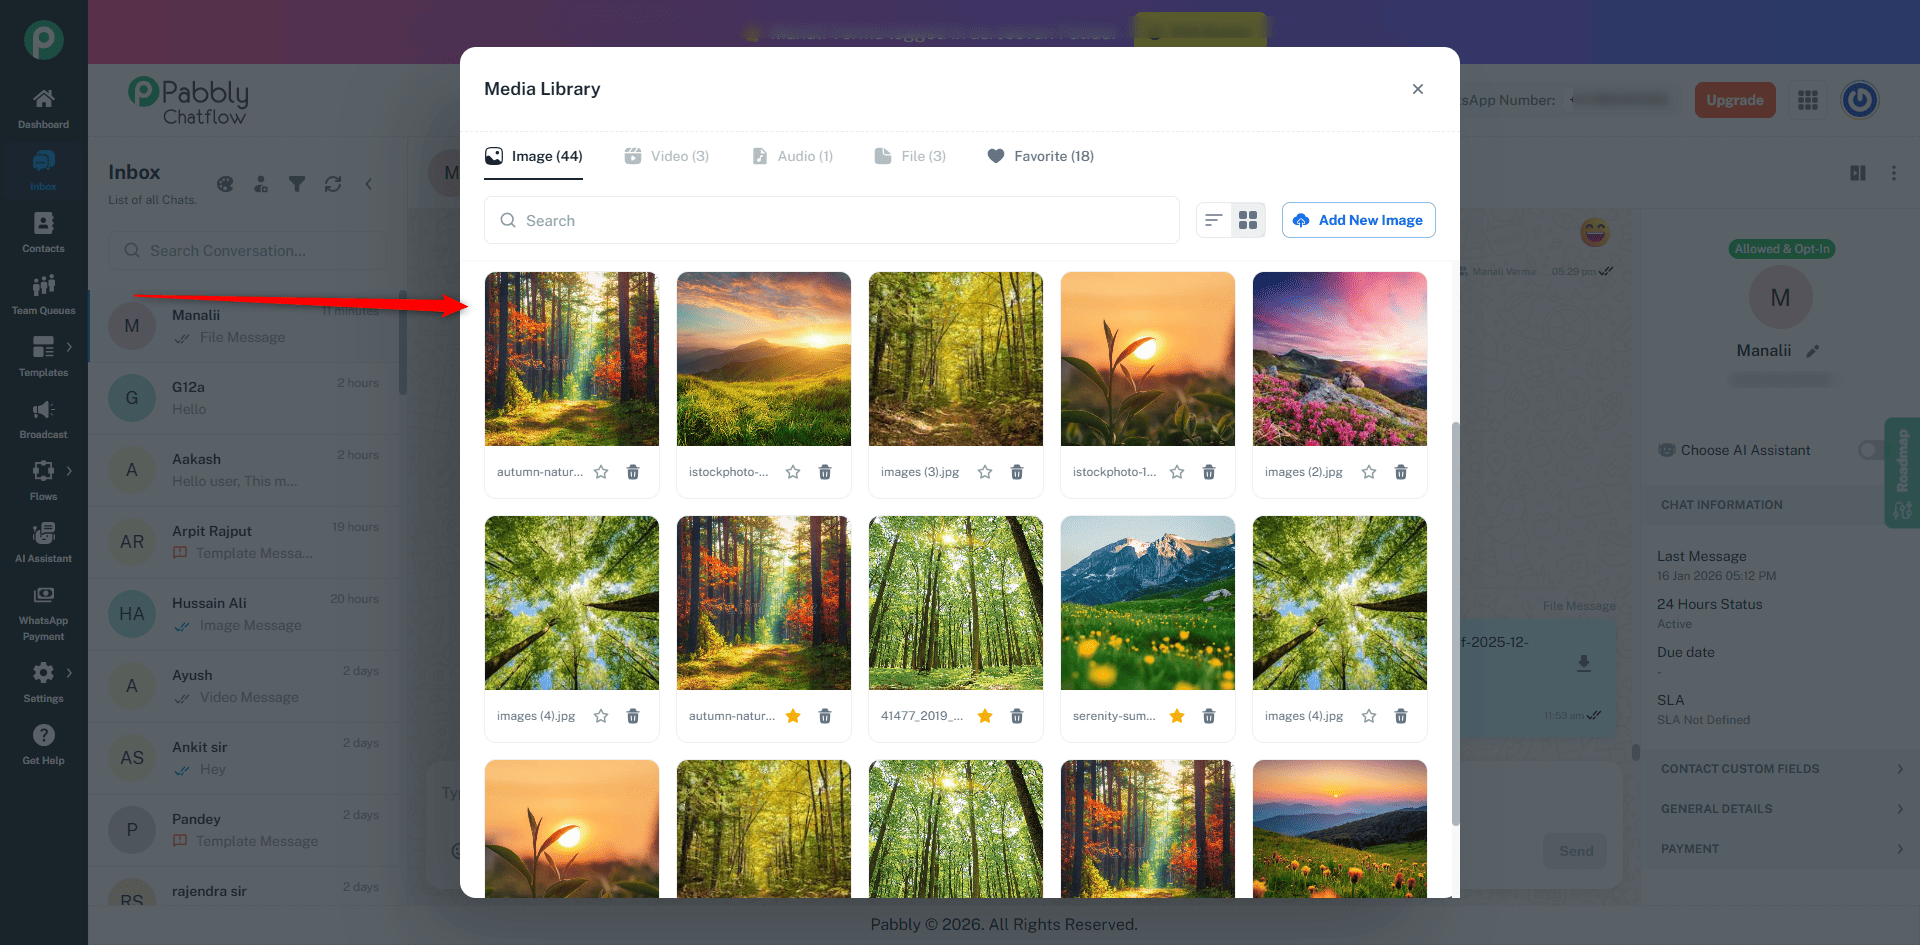
The **Centralized Media Library** in **Pabbly Chatflow** allows you to **upload, organize, manage, reuse, and add media directly from the Media Library**—all from a single, centralized location.
With this feature, you can easily select previously uploaded media while creating messages or workflows, eliminating the need to upload the same file multiple times.
## Media Upload Limits (Per File)
You can upload and manage media files with the following **per-file size limits**:
* **Image:** Up to **5 MB**
* **Video:** Up to **16 MB**
* **Document:** Up to **100 MB**
* **Audio:** Up to **16 MB**

For media messages received from the WhatsApp Business App (SMB Echo), media files such as images, videos, audio files, and documents are not automatically uploaded to Pabbly Chatflow.
Instead, a Download button is displayed within the conversation, allowing you to fetch the media only when needed.
When a media message is received from the WhatsApp Business App, the media file is not automatically downloaded or uploaded to Pabbly Chatflow.
A Download button is displayed alongside the media message in the Inbox.
The media is fetched and uploaded only after you click the Download button.
Once downloaded, the media becomes available within the conversation for viewing or access.
Media files must be downloaded within 7 days of receiving the message.
If the media is not downloaded within 7 days, it will no longer be available for download.
Send Emojis
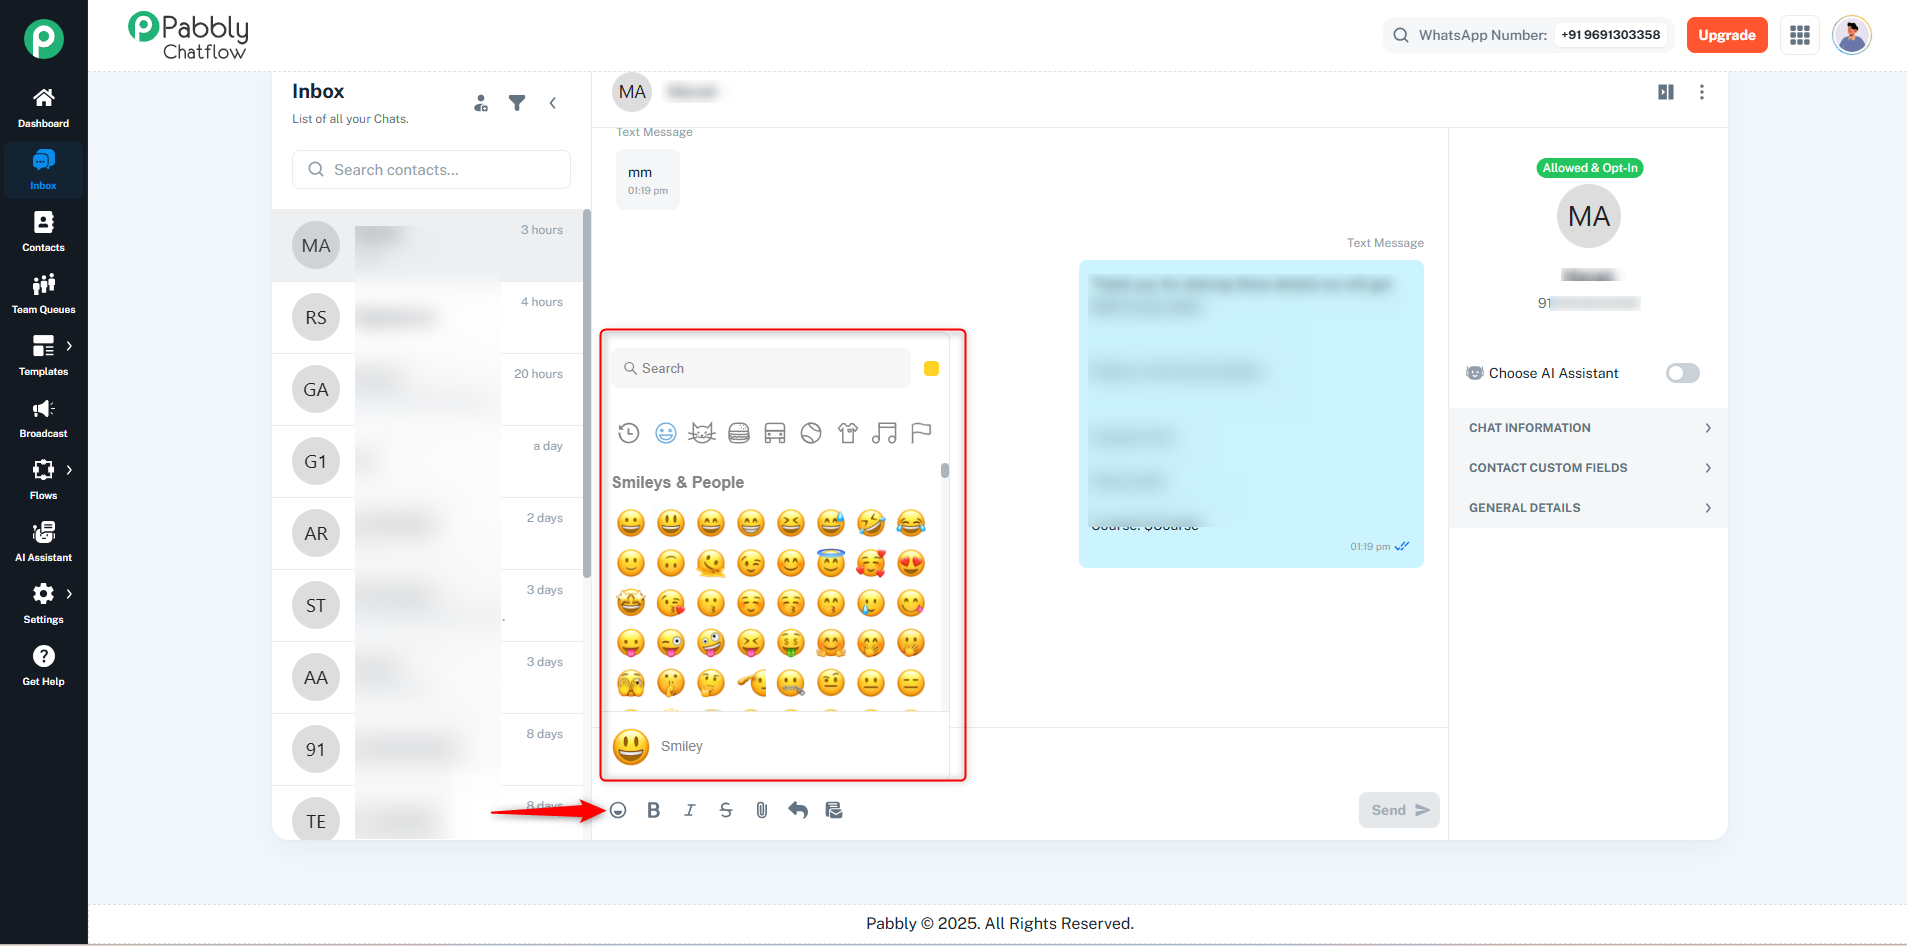
Click the emoji icon on the input bar to open a list of emojis.
Use emojis to add personality and engagement to your responses.
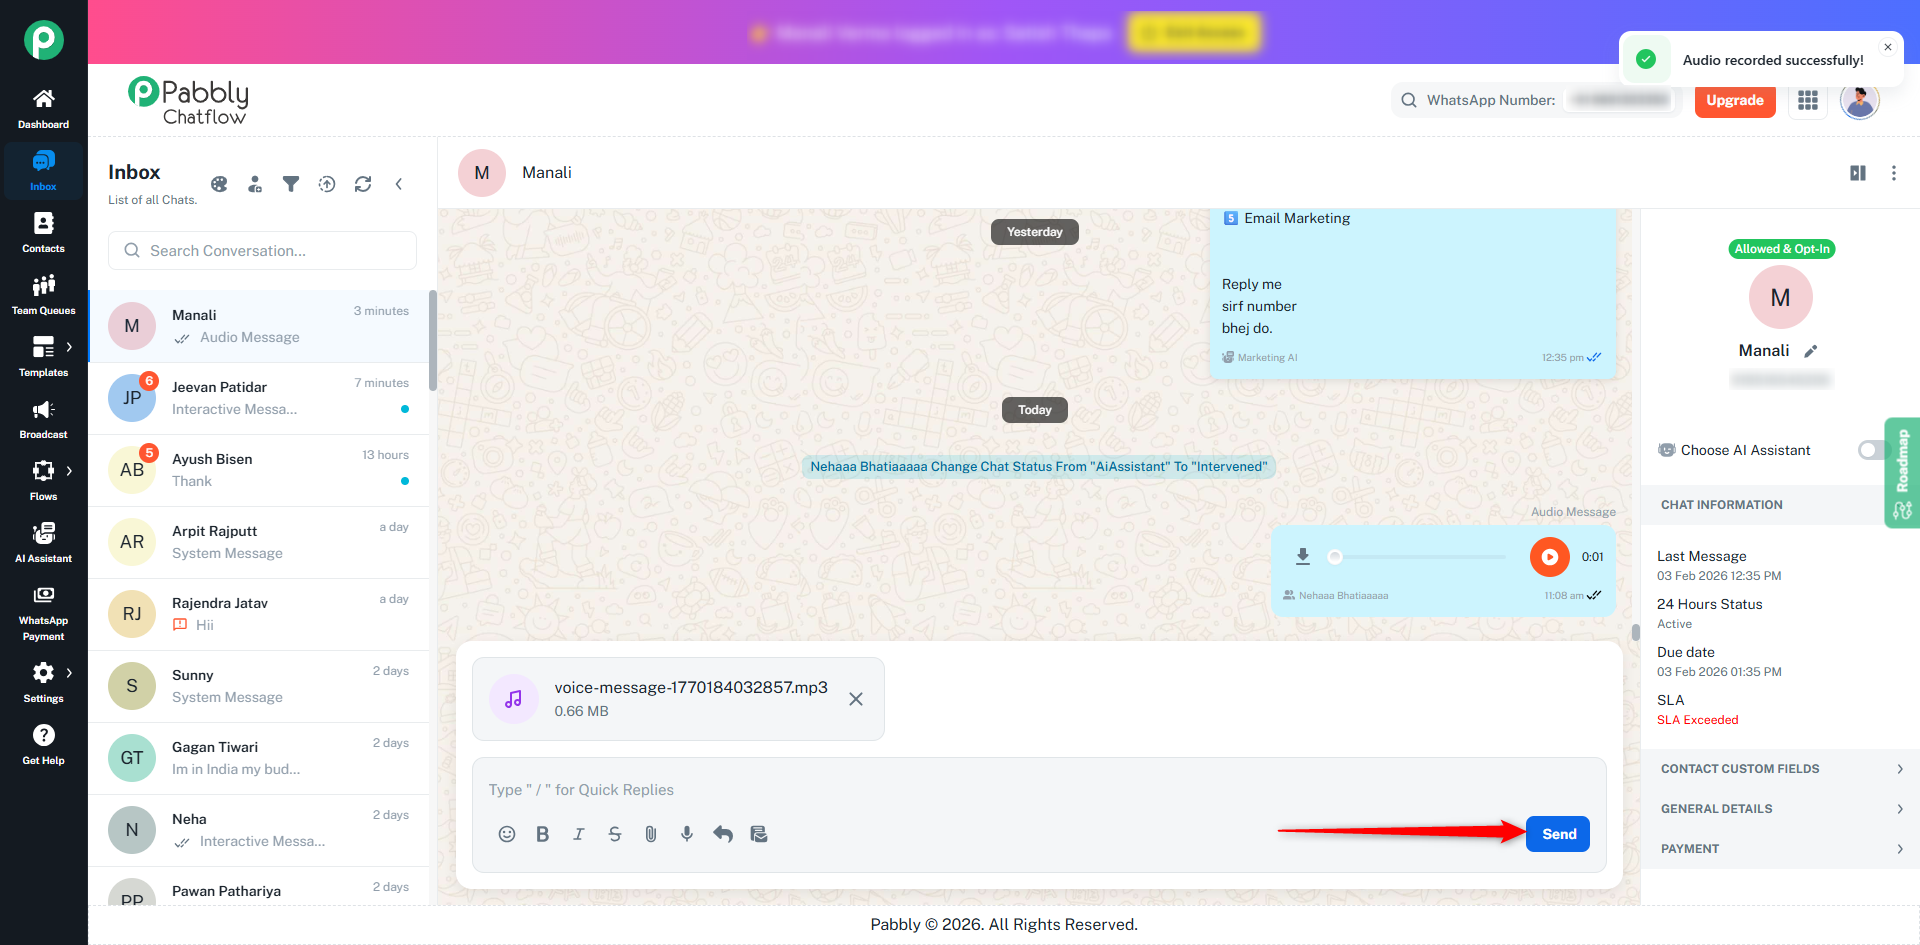
Pabbly Chatflow allows users to record and send audio messages directly from the Inbox.
You can record and send audio messages directly from the Inbox, without leaving the chat.
The audio recording option is available right inside the Inbox message composer and works smoothly end-to-end.
Open any active conversation in the Inbox.
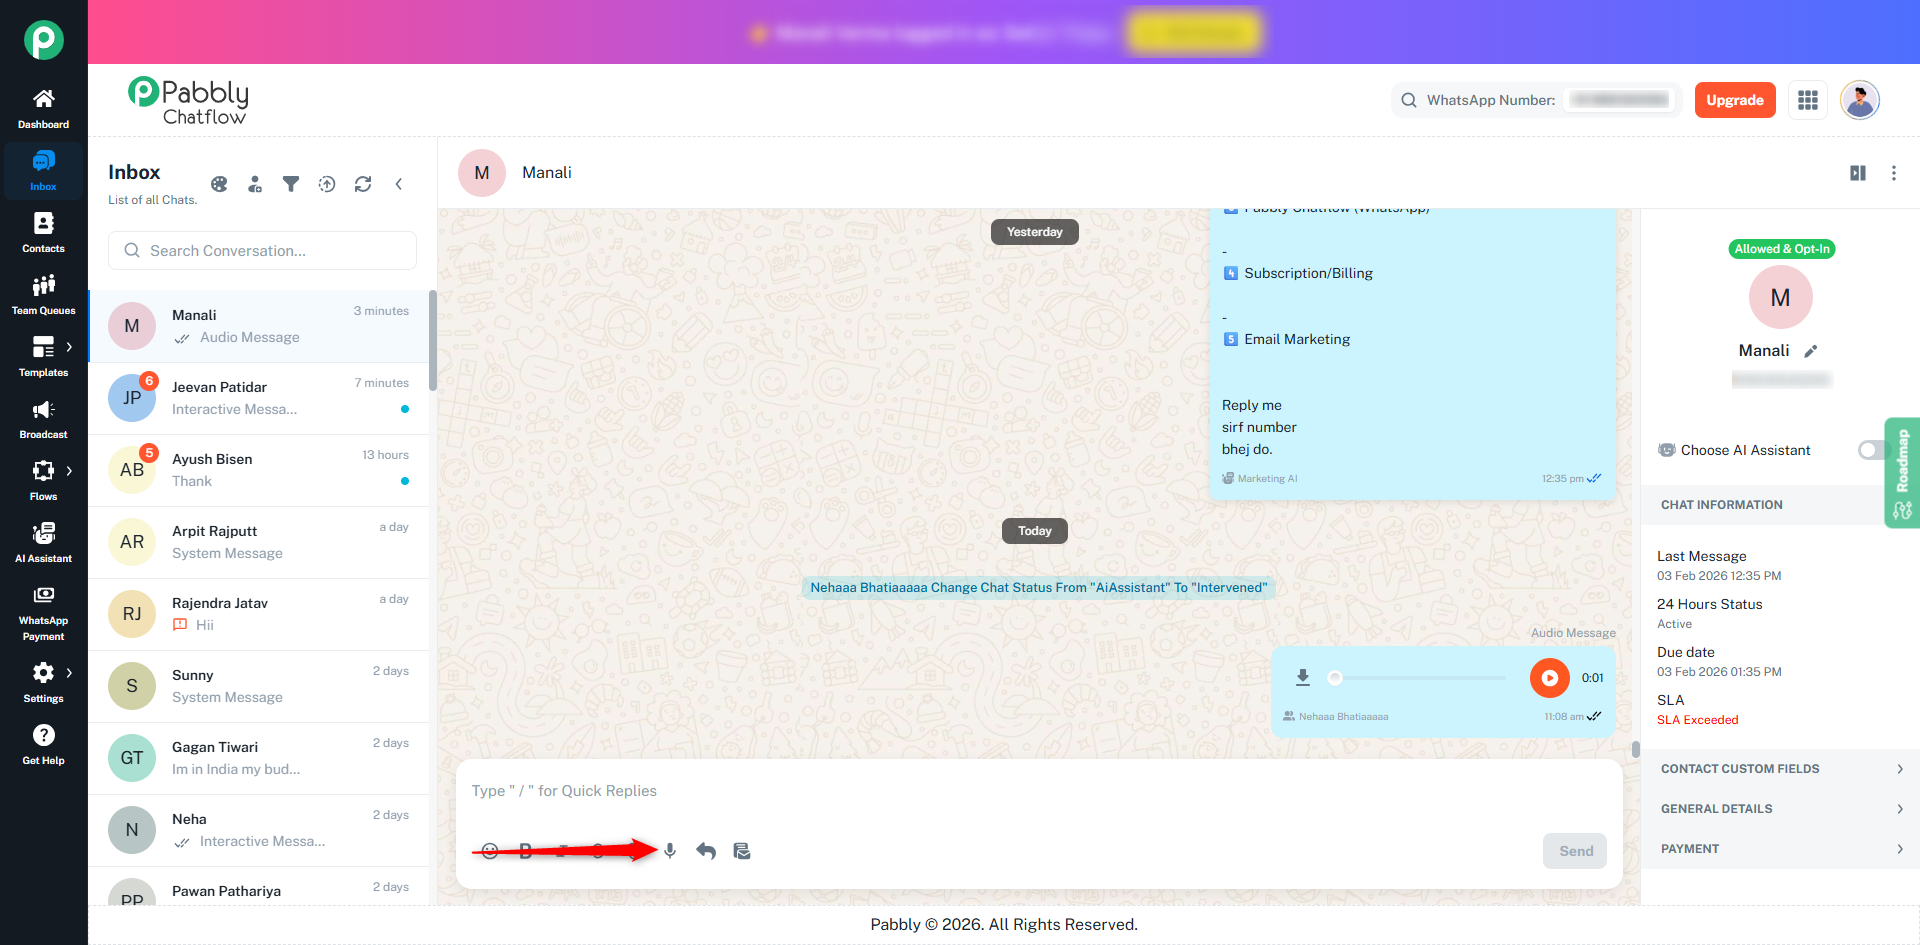
In the message composer at the bottom, click the microphone (🎙️) icon.
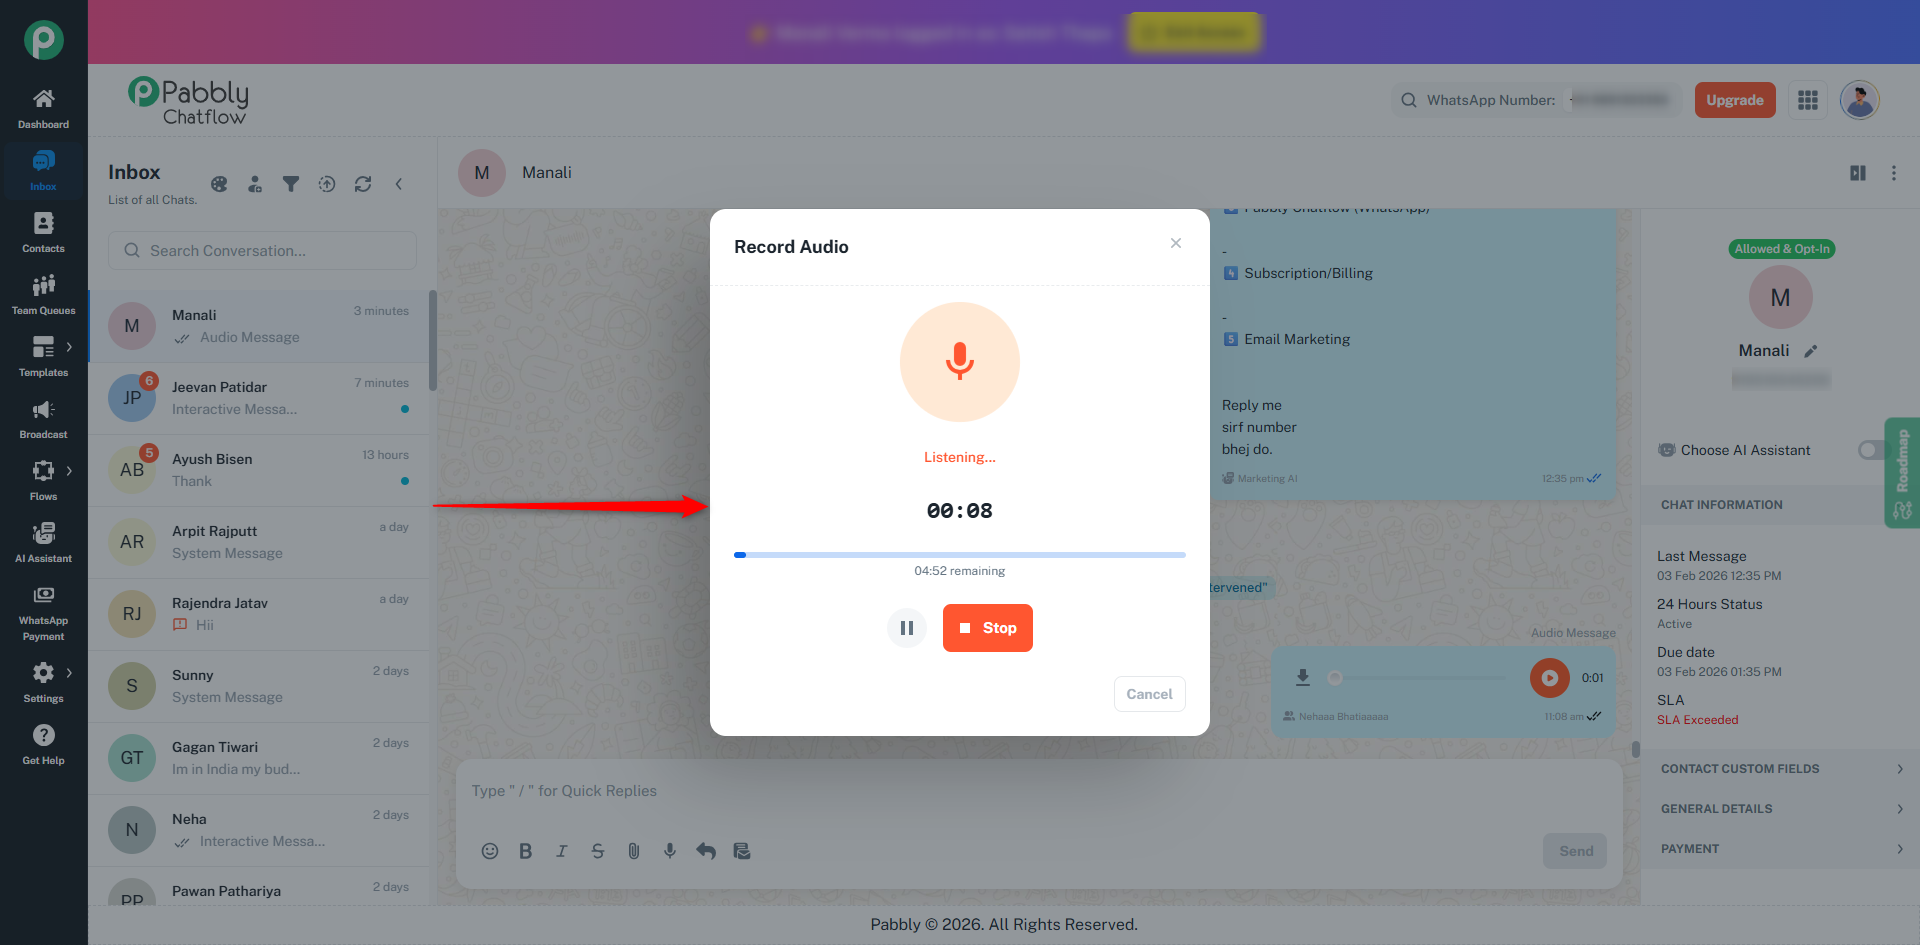
A Record Audio popup will open and start listening.
Speak to record your voice message.
Click Stop once recording is complete.
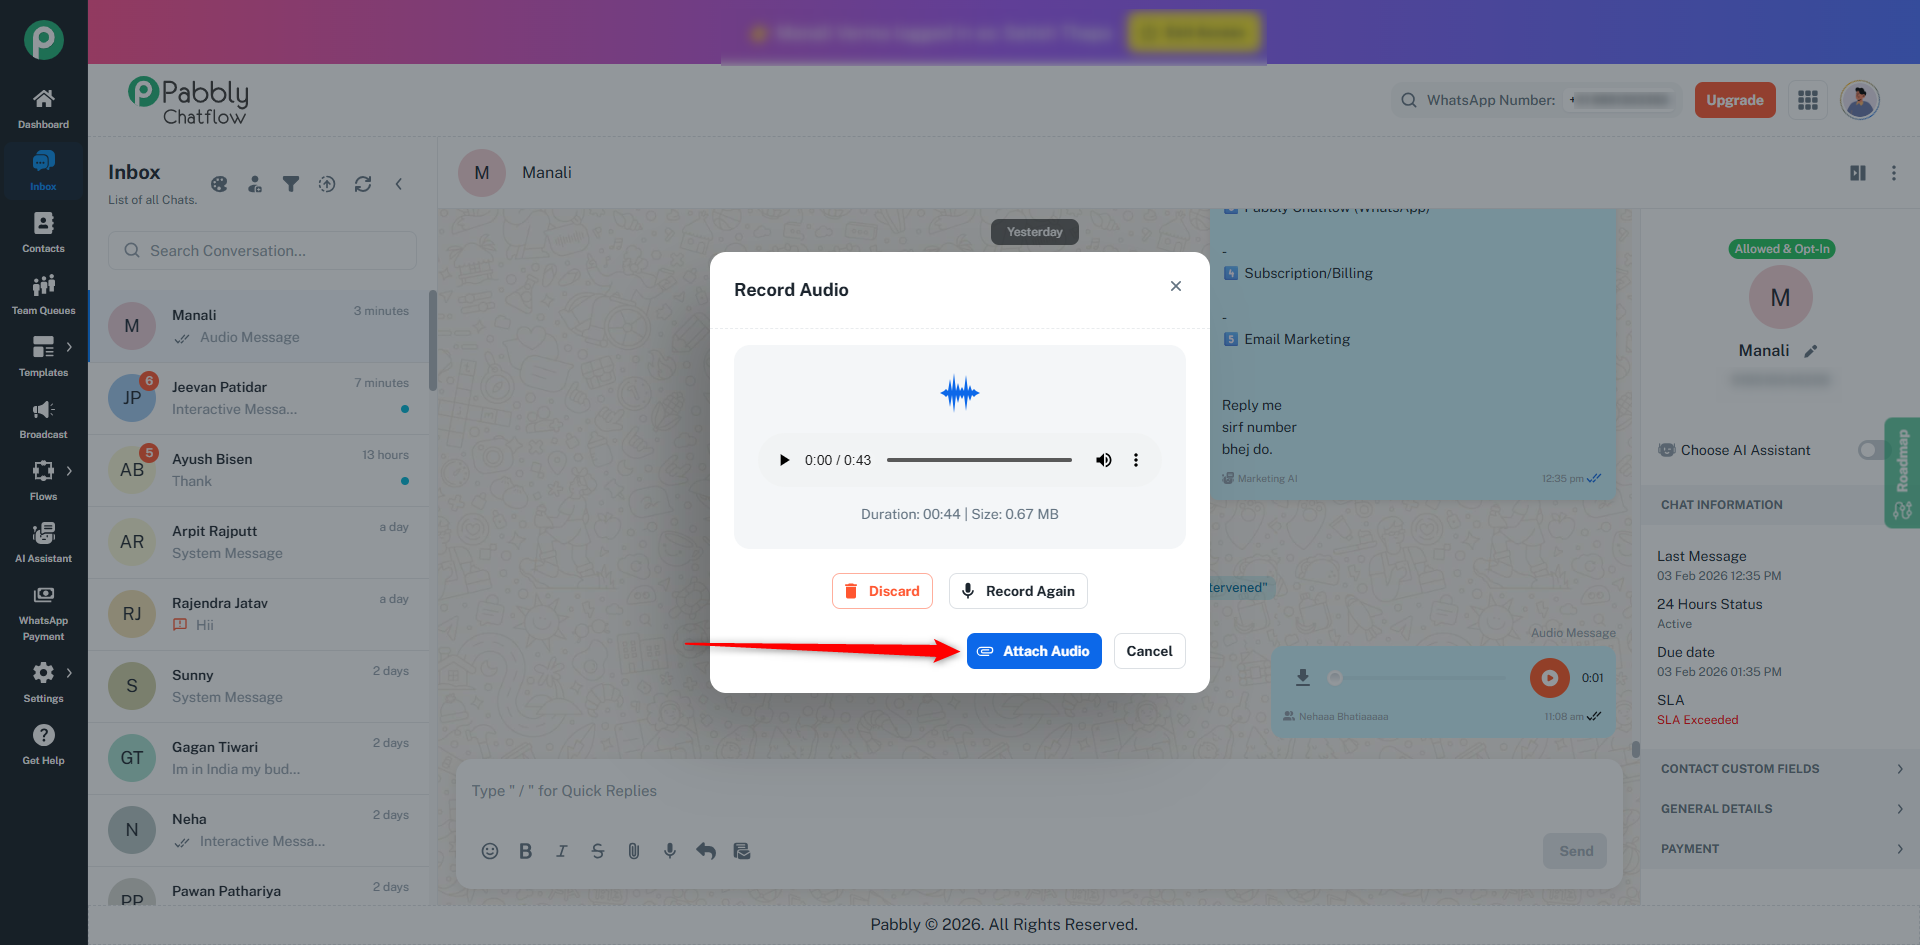
Preview the recorded audio:
Click Play to listen.
Click Record Again to re-record.
Click Discard to delete the recording.
Click Attach Audio to add the voice message to the chat.
Click Send to deliver the audio message to the user.
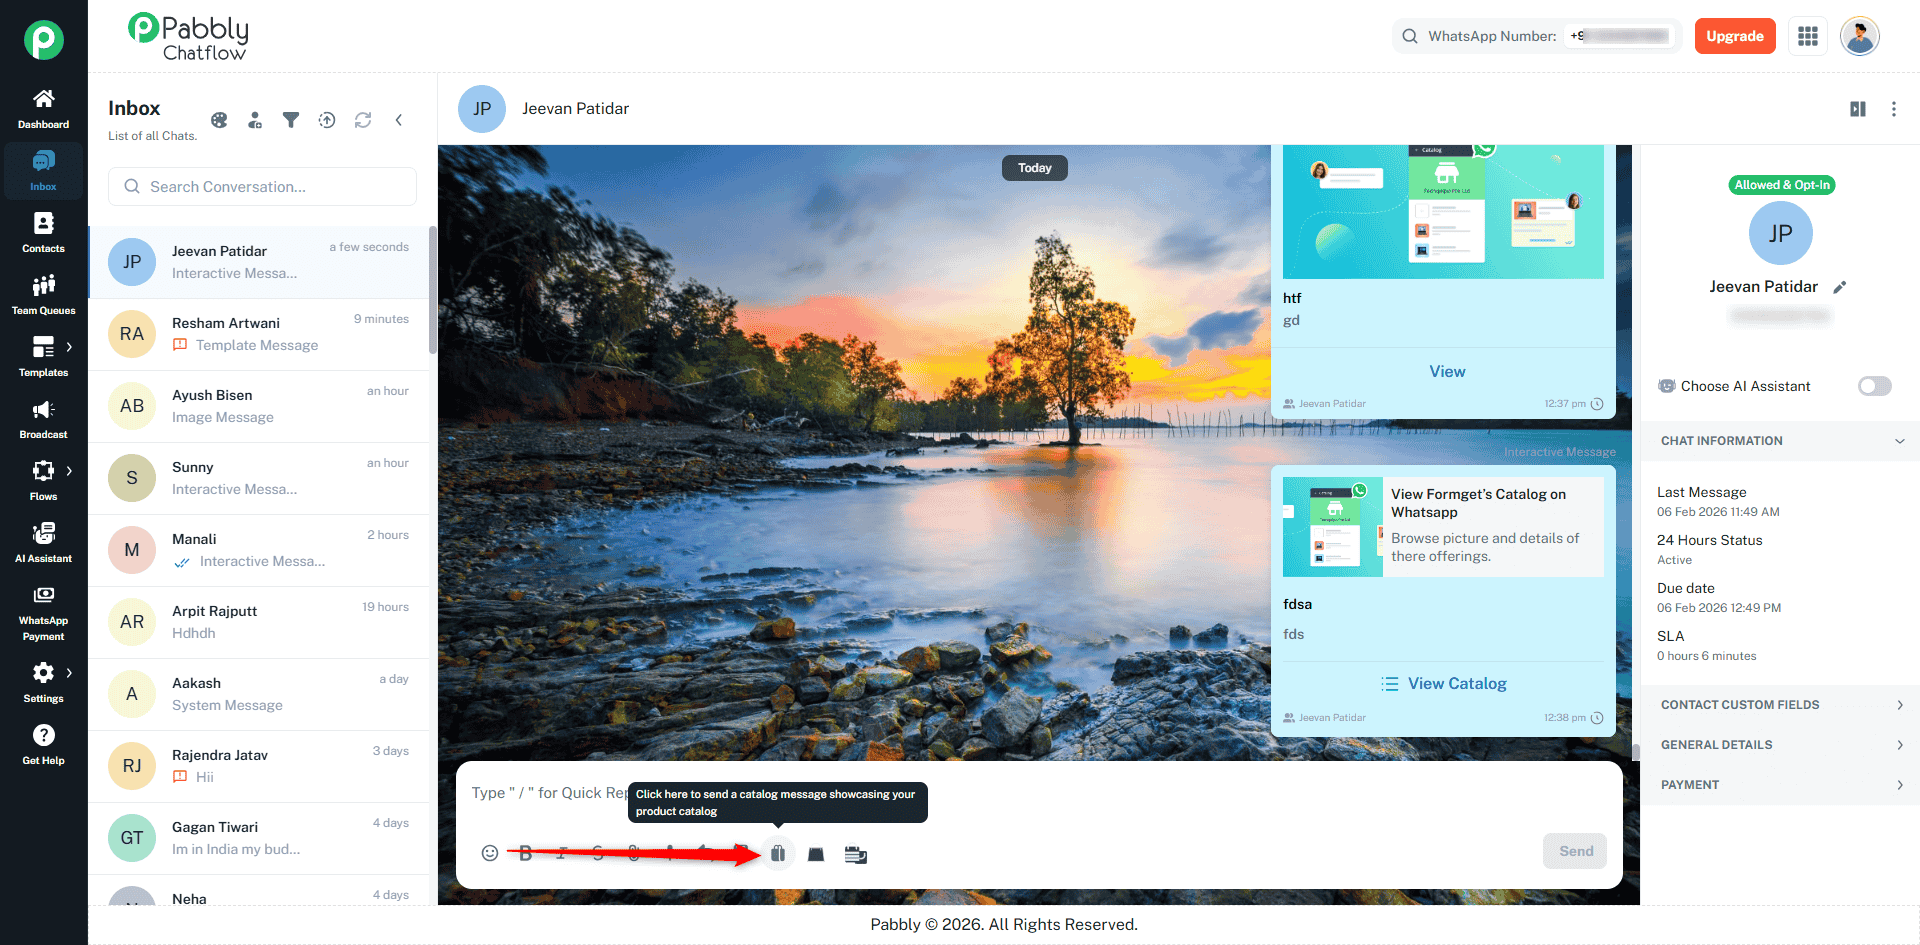
Catalog Messages allow you to showcase your product catalog directly inside WhatsApp chats, making it easy for users to browse products and take action.
Catalog messages are ideal when you want to share multiple products or your complete collection in a single interactive message.
Open an active conversation in the Inbox.
Select Catalog Message.
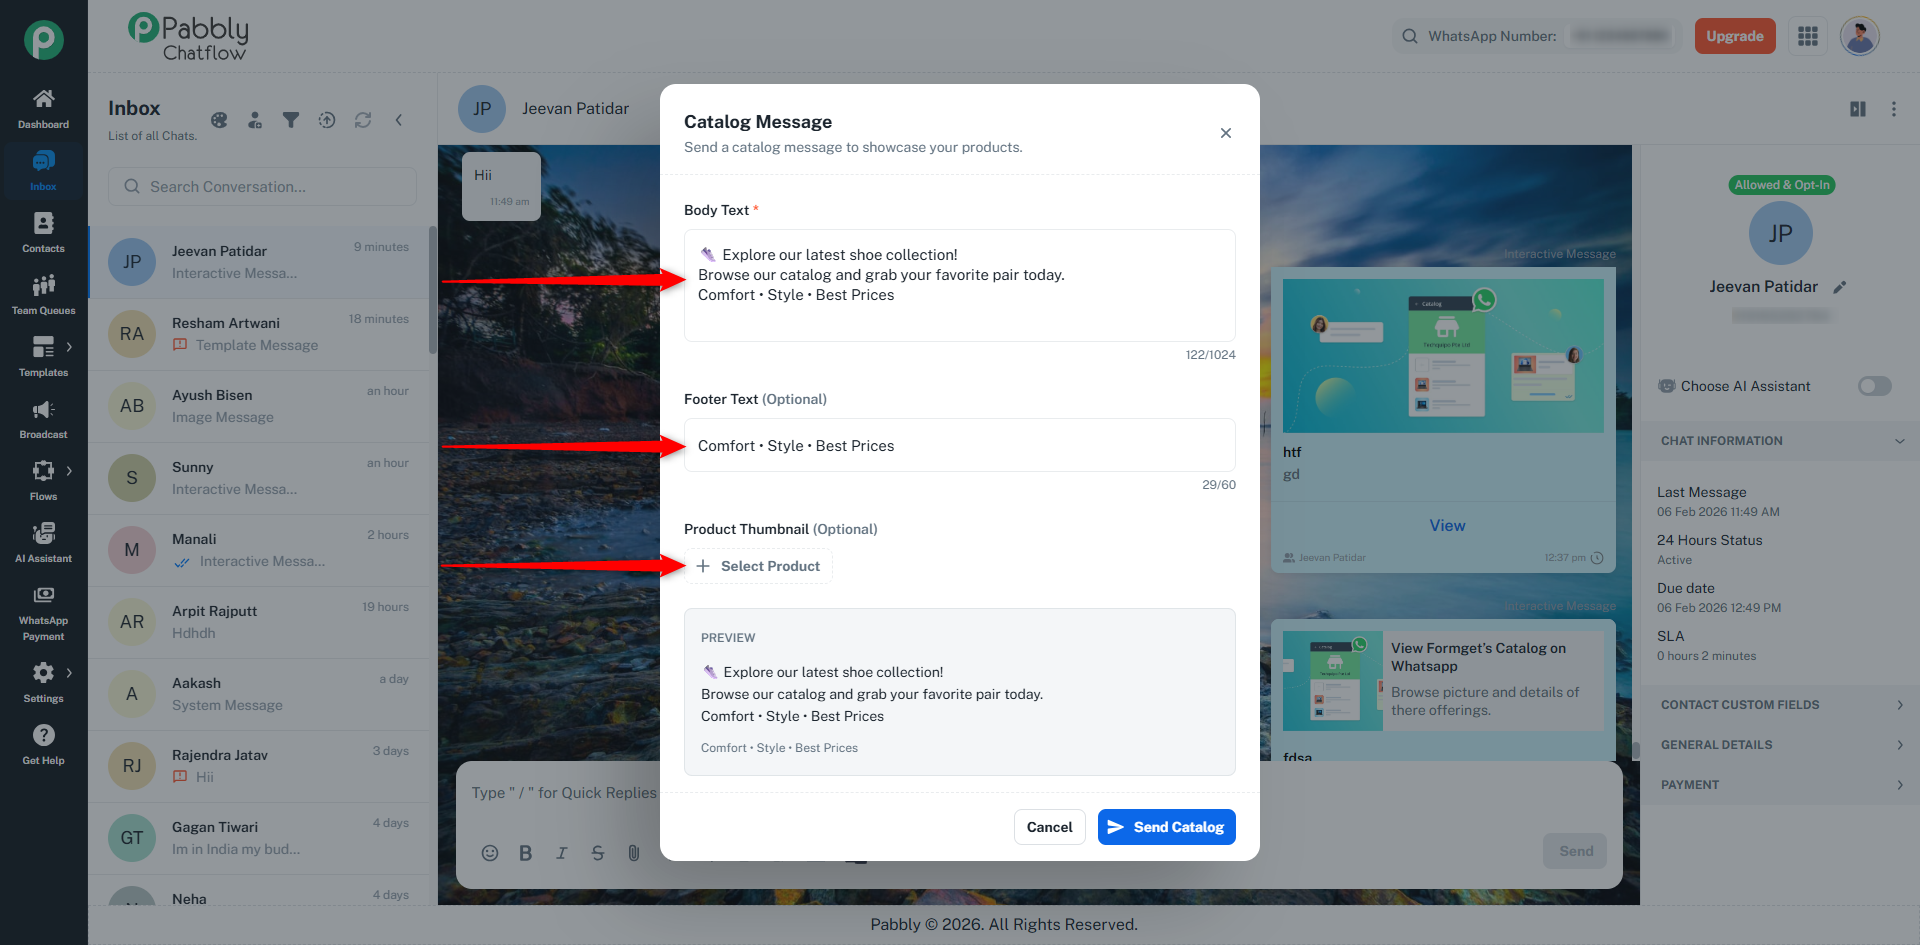
Enter the Body Text to describe your catalog.
(Optional) Add Footer Text for additional context.
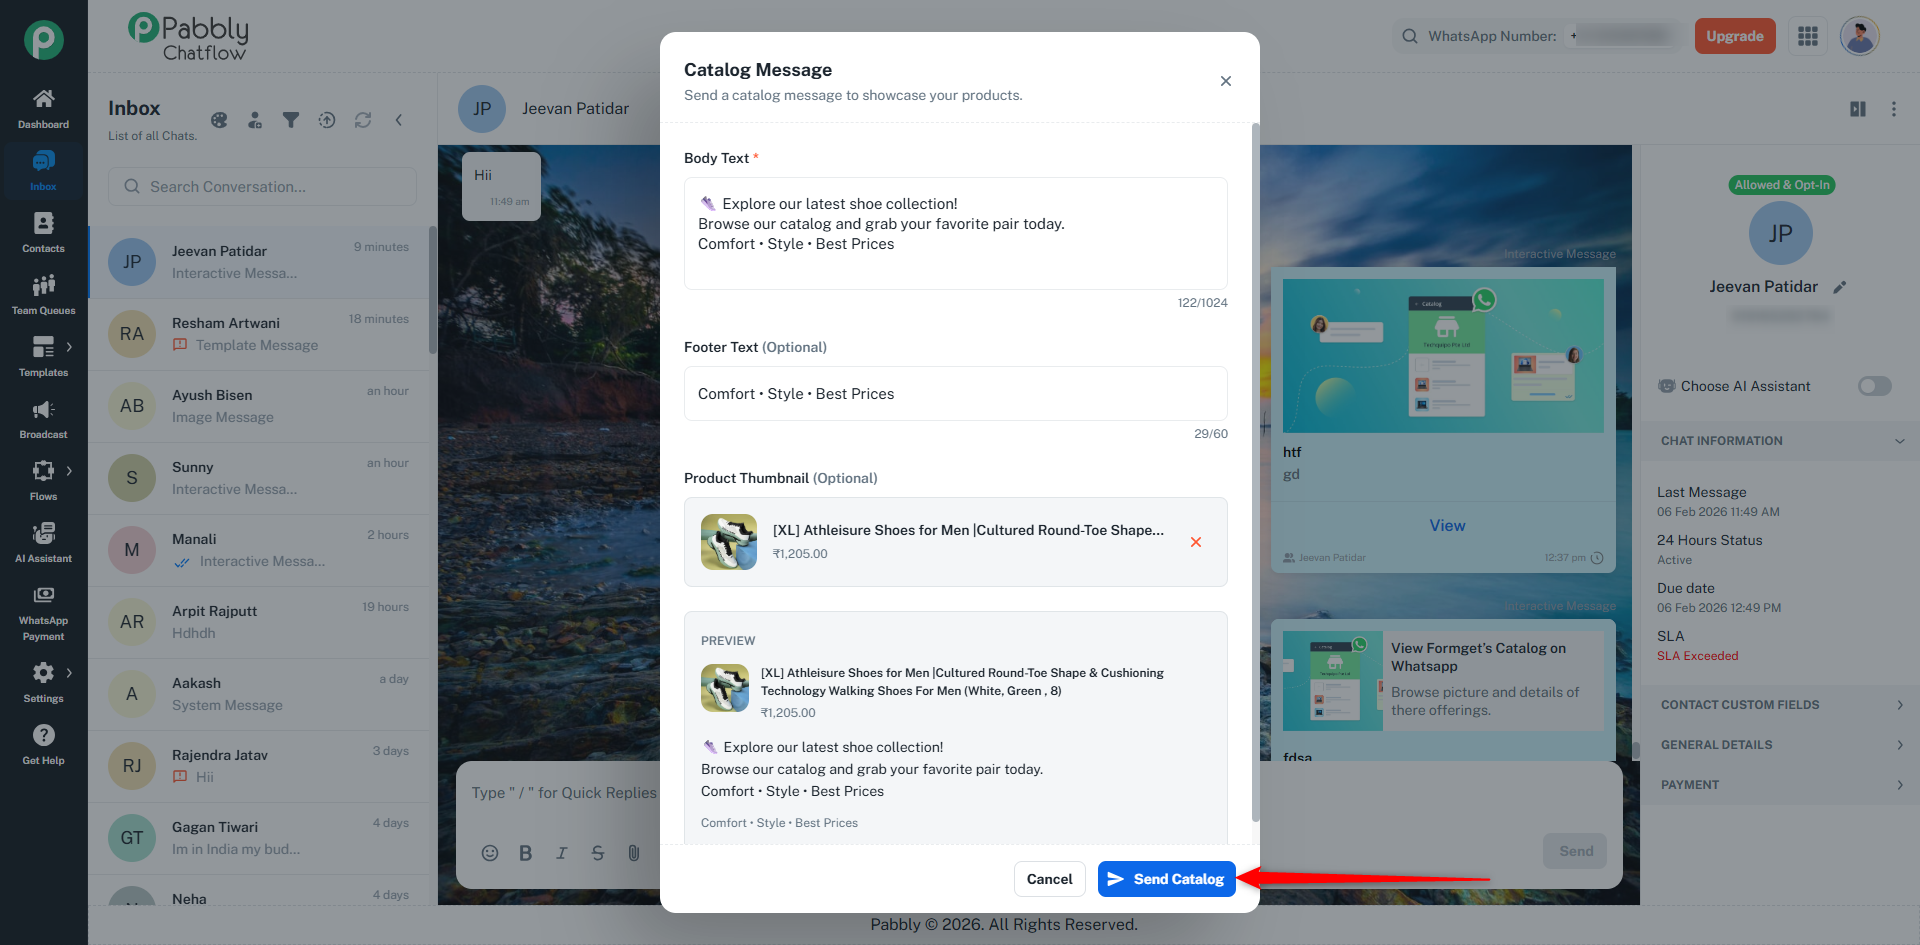
(Optional) Select a Product Thumbnail to highlight a product from the catalog.
Preview the catalog message.
Click Send Catalog to deliver it to the user.
Users will receive a View Catalog button and can browse products directly on WhatsApp.
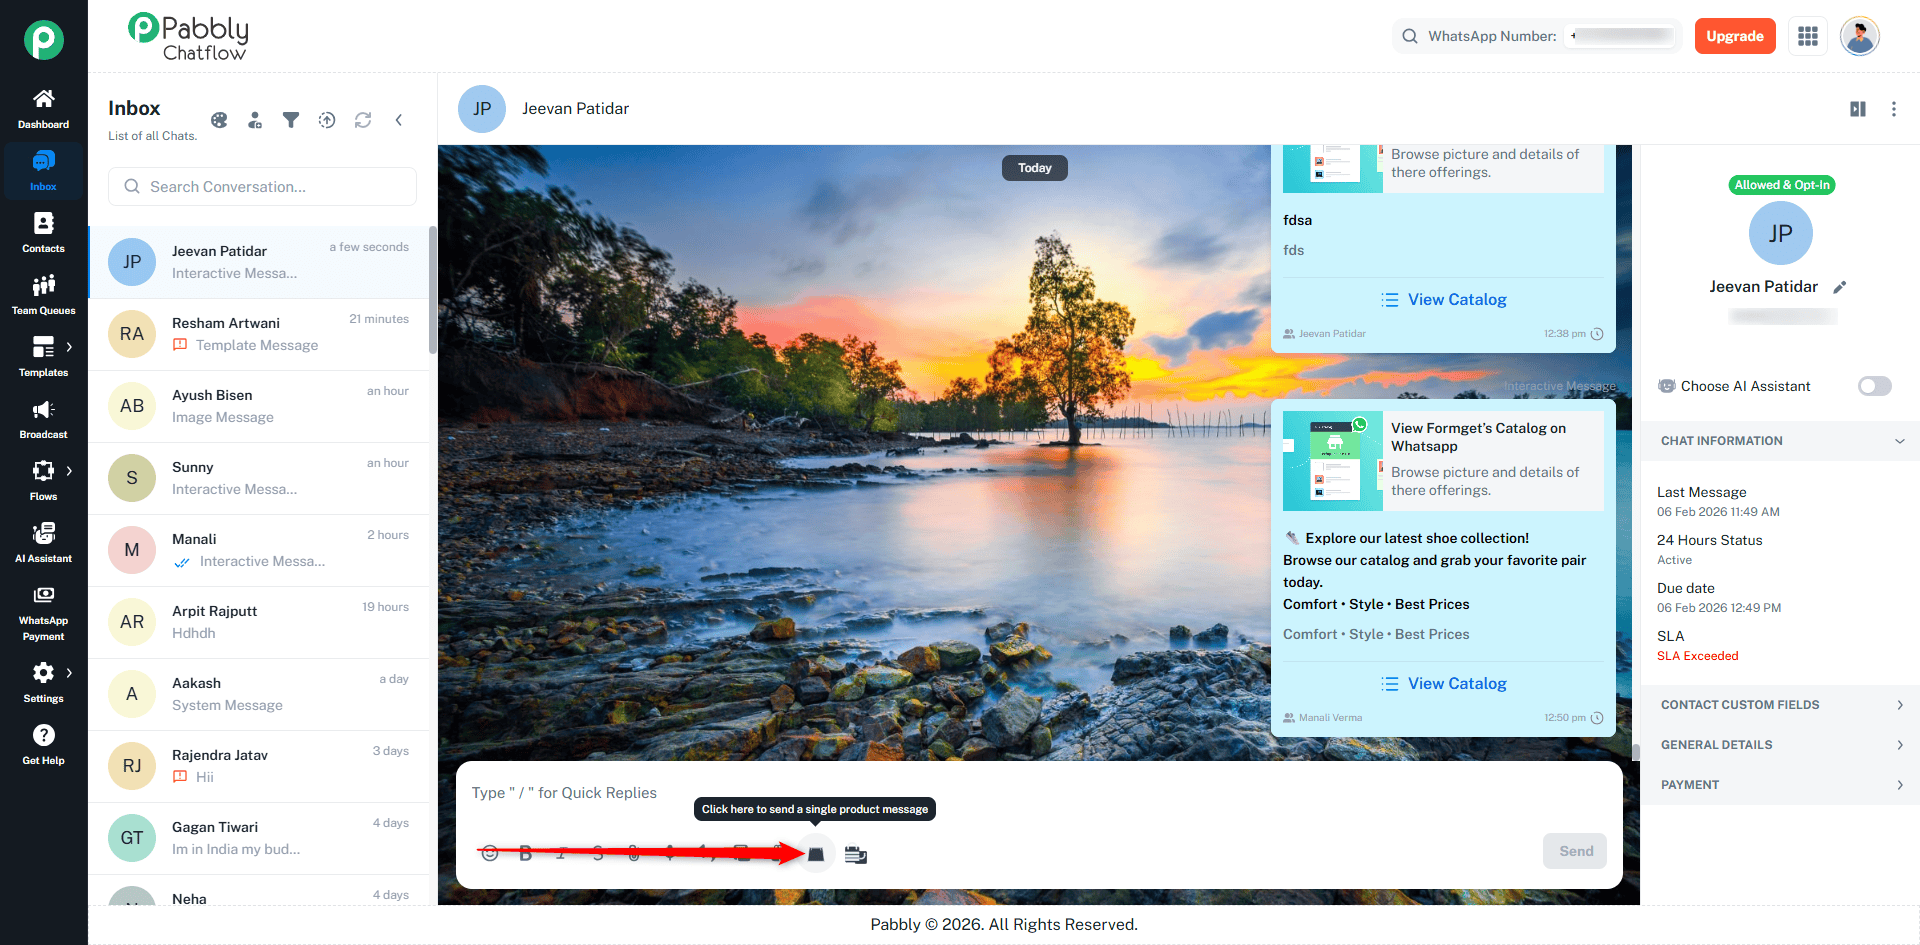
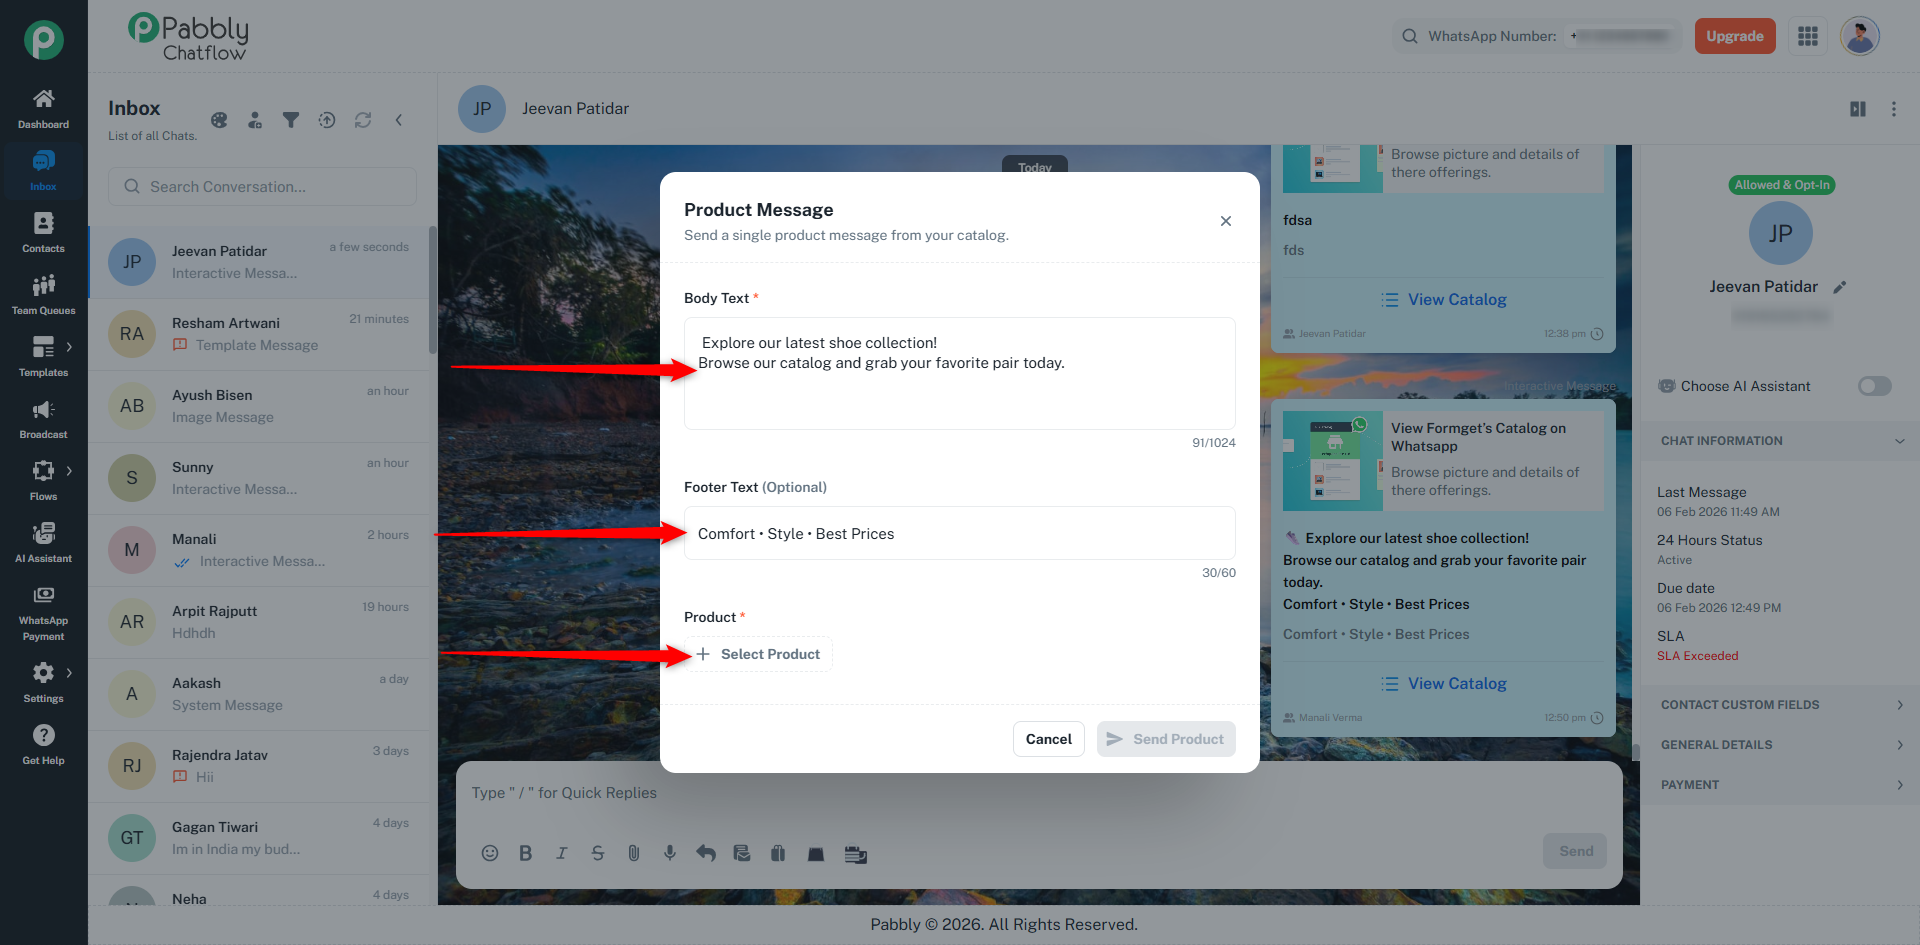
Single Product Messages allow you to highlight one specific product from your catalog during a conversation.
This is useful when a user asks about a particular item or you want to recommend a specific product.
Open an active chat in the Inbox.
Choose Catalog / Product Message from the message options.
Select one product from your catalog.
Enter the Body Text to describe your catalog.
(Optional) Add Footer Text for additional context.
Preview the product message.
Click Send to share the product with the user.
The user will see product details like image, price, and a direct action button on WhatsApp.
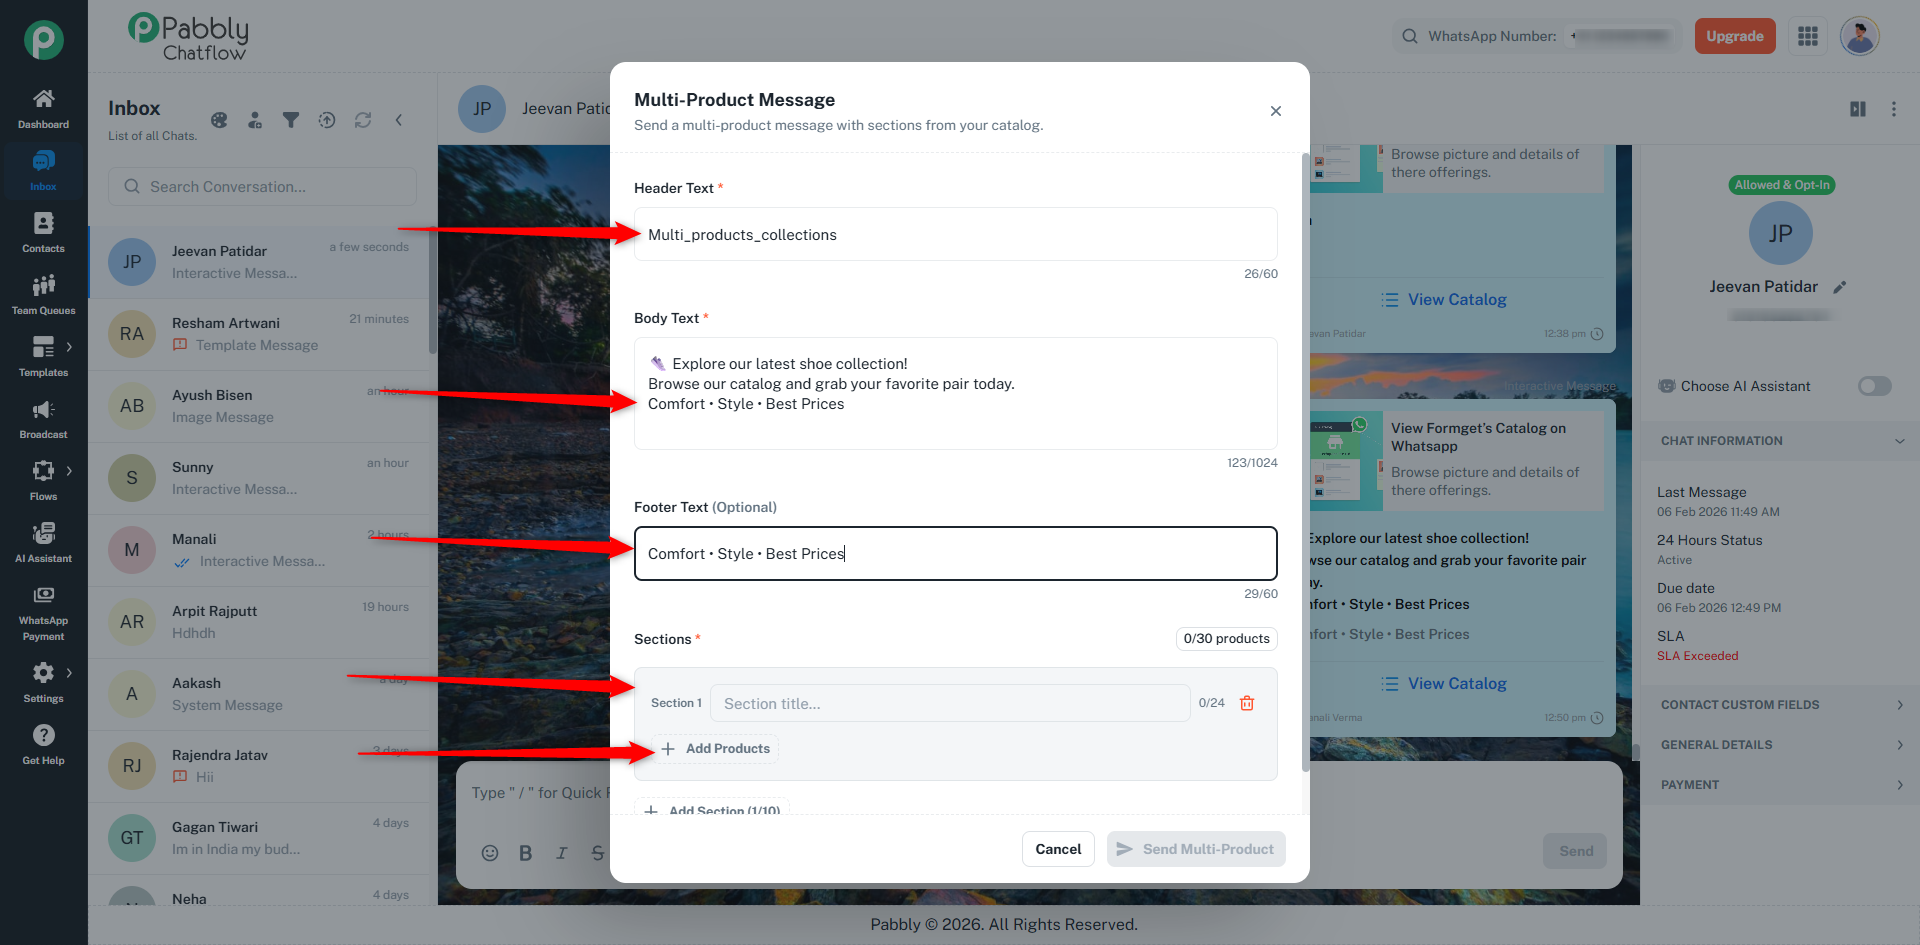
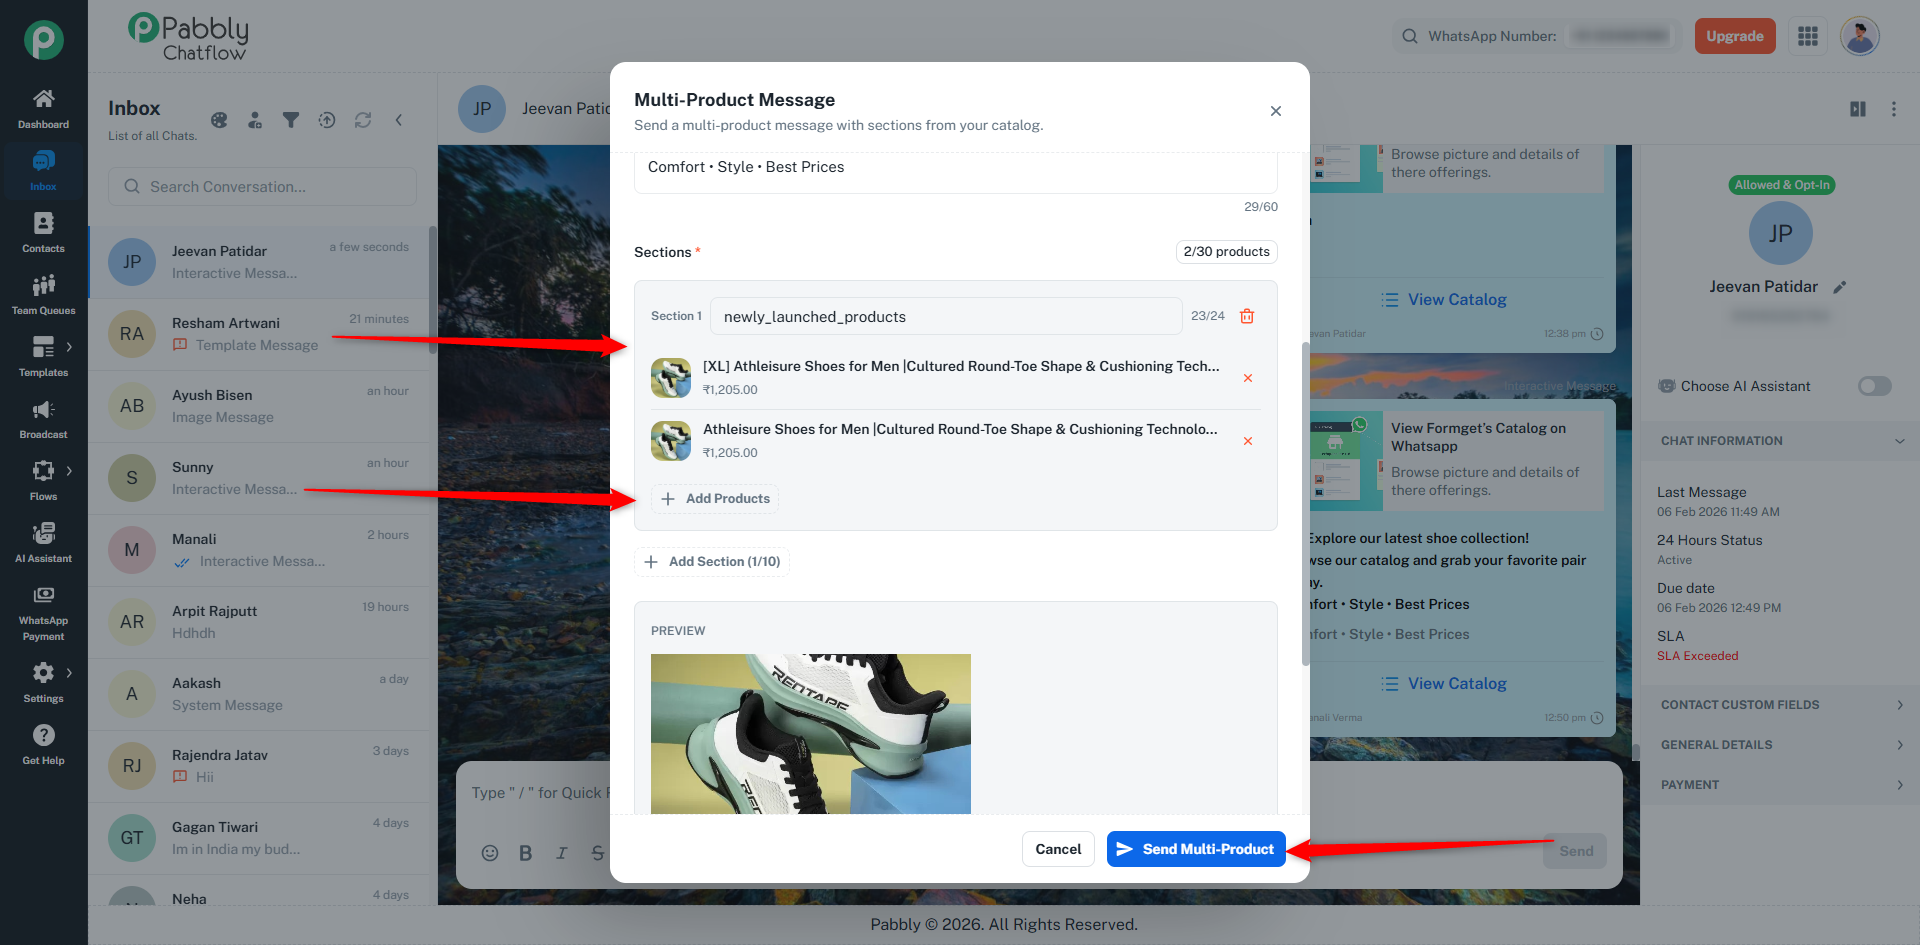
Multiple Product Messages let you send more than one product in a single interactive message, making it easy to compare or explore options.
This works well for collections, recommendations, or category-based sharing.
Open a conversation in the Inbox.
Select Catalog / Product Message.
Choose multiple products from your catalog.
Add a message describing the product selection.
Preview the message layout.
Click Send to deliver the multi-product message.
Users can tap on each product to view details and continue their purchase journey seamlessly.
A List Message is an interactive WhatsApp message that lets users select one option from a list instead of typing a reply.
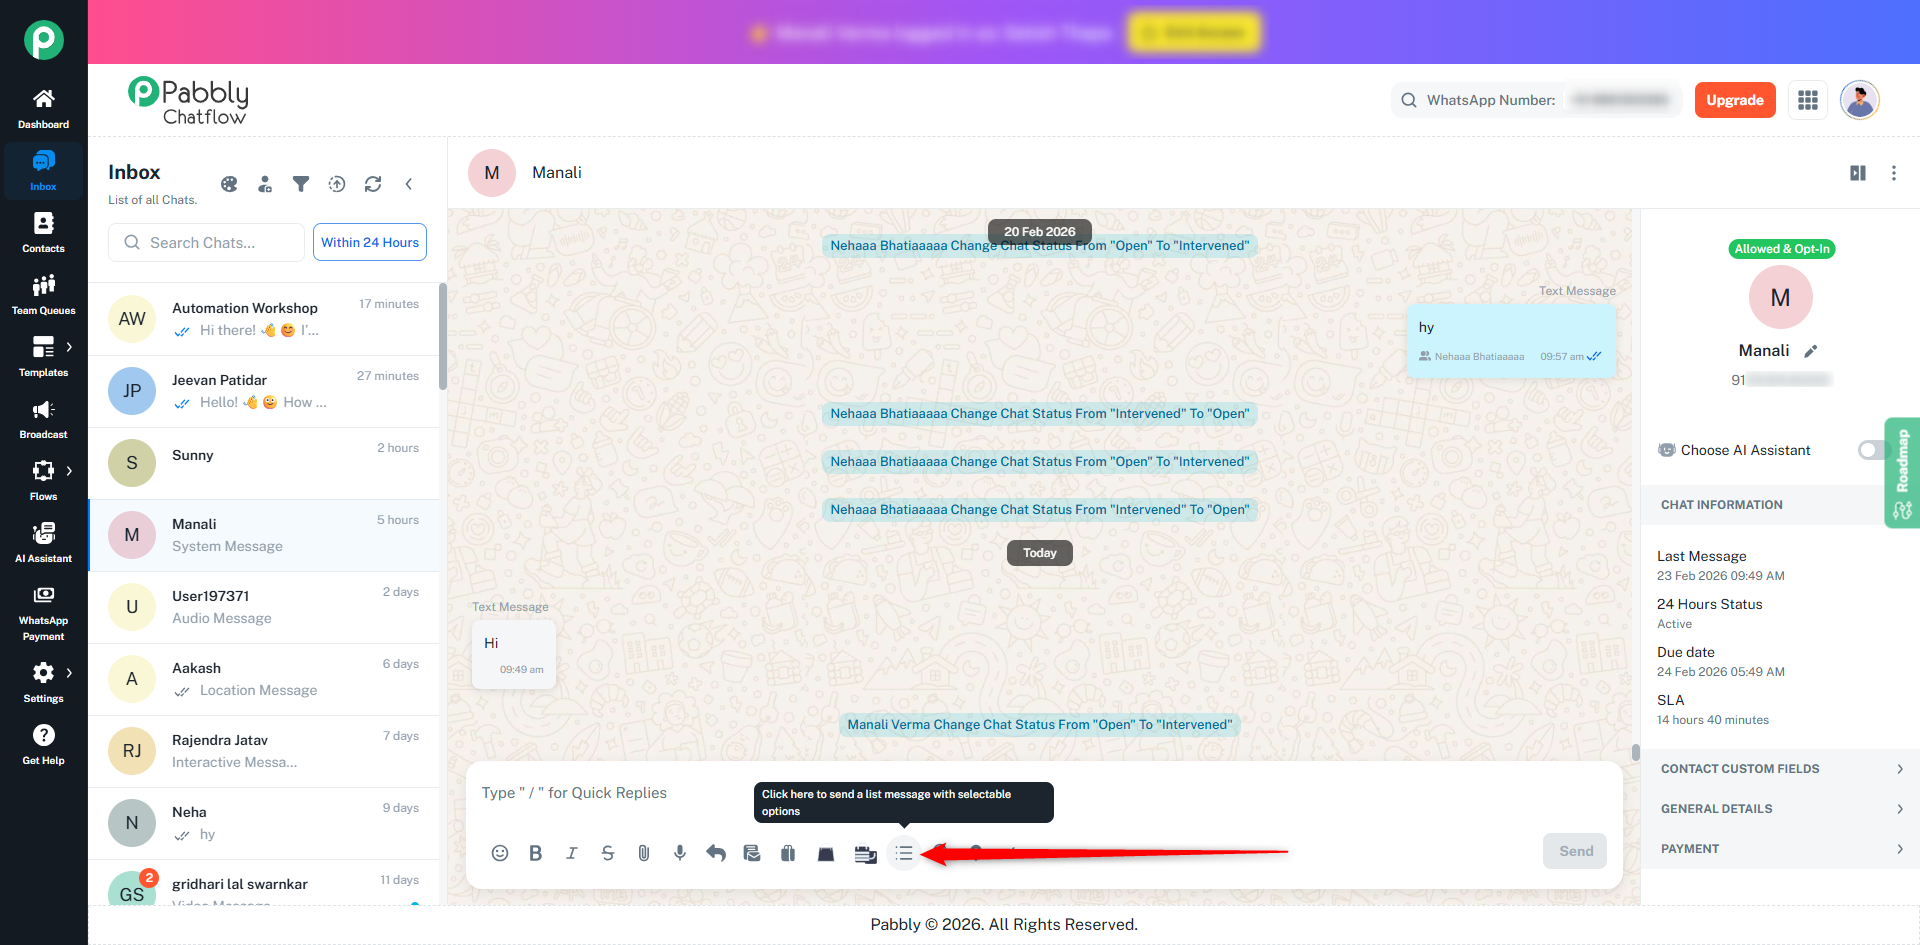
Go to Inbox and open a chat.
Click the List Message icon in the message toolbar.
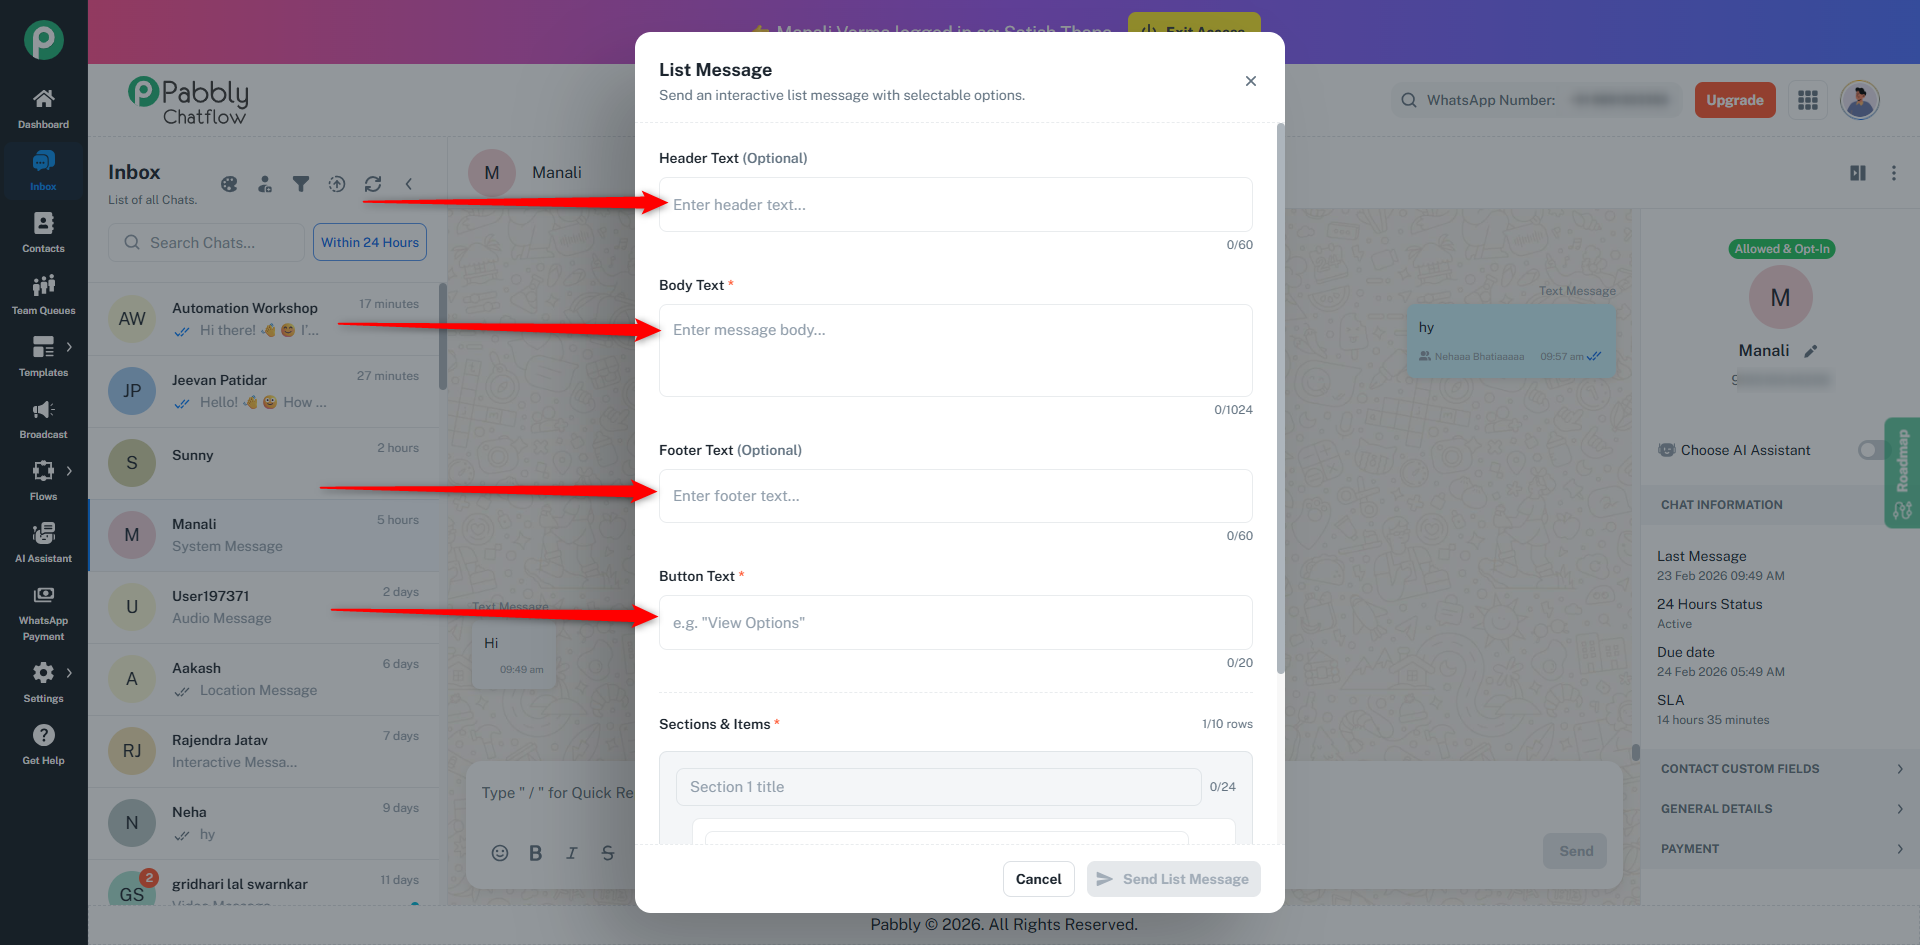
Fill the required fields.
Click Send List Message.
Header Text (Optional) – Title (Max 60 characters)
Body Text (Required) – Main message (Max 1024 characters)
Footer Text (Optional) – Small bottom text (Max 60 characters)
Button Text (Required) – Button label (Max 20 characters)
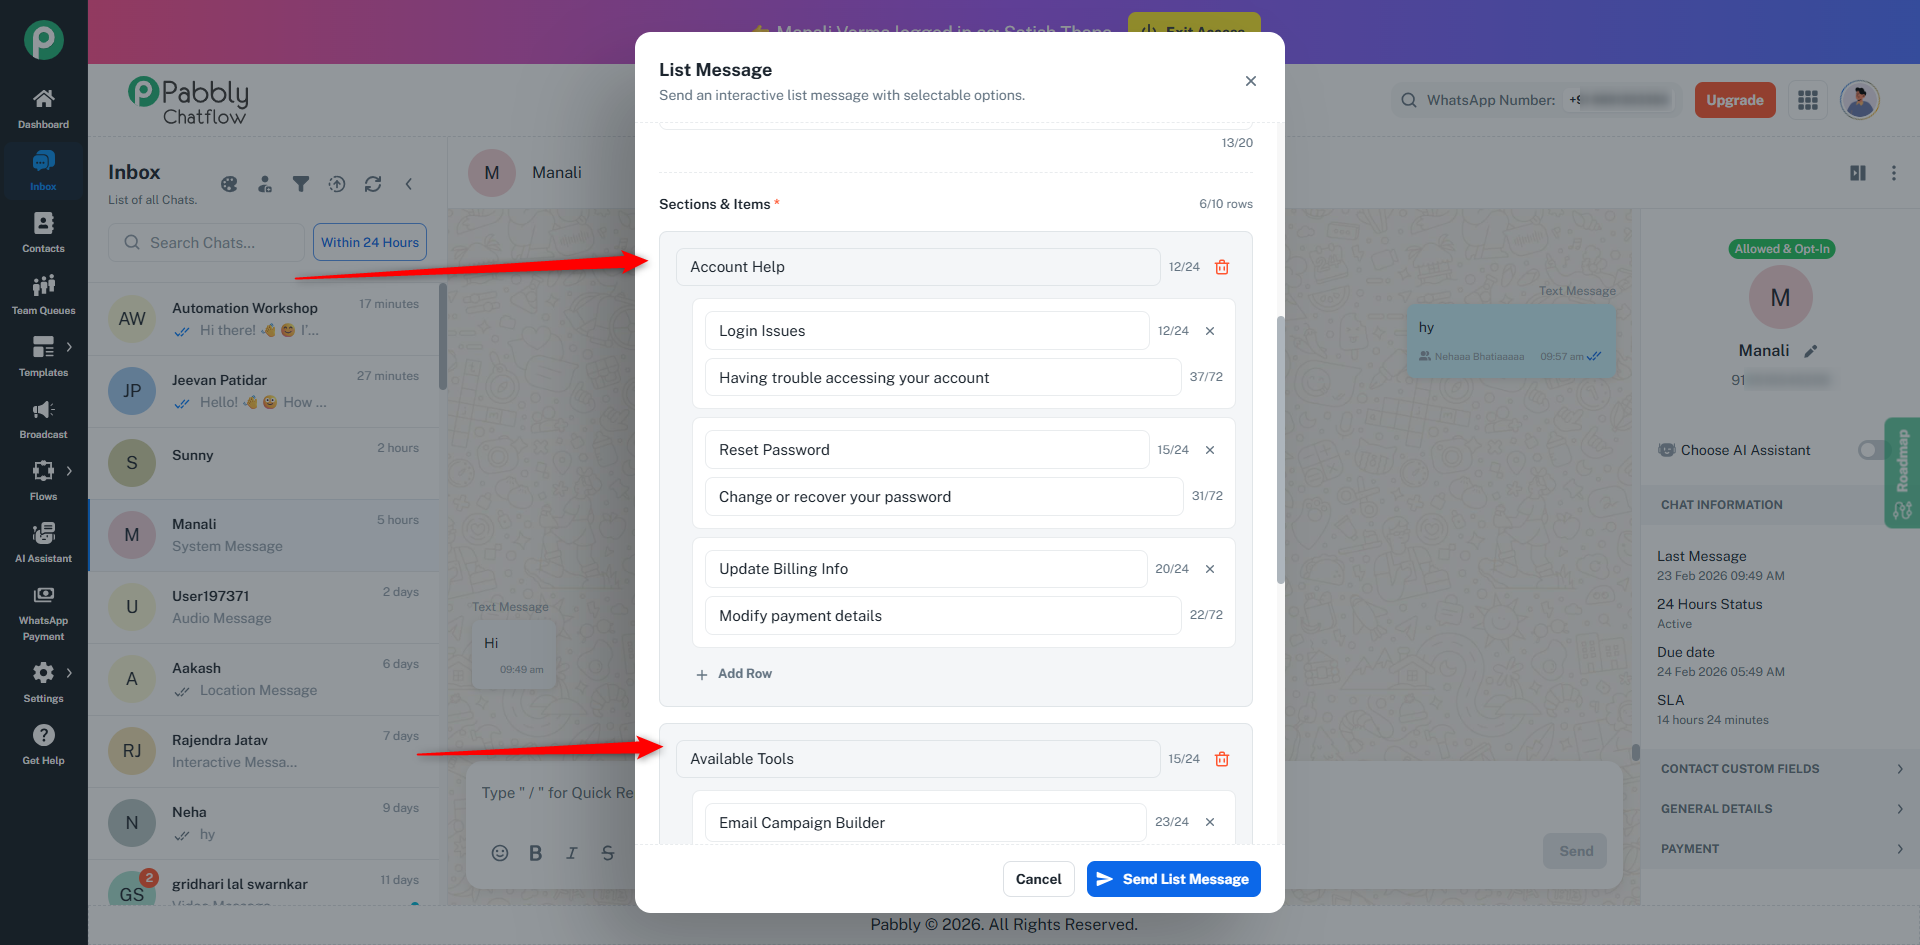
Sections & Items (Required)
Add at least 1 Section
Add at least 1 Row (Option) inside the section
A live preview is shown before sending so you can see how the message will appear in chat.
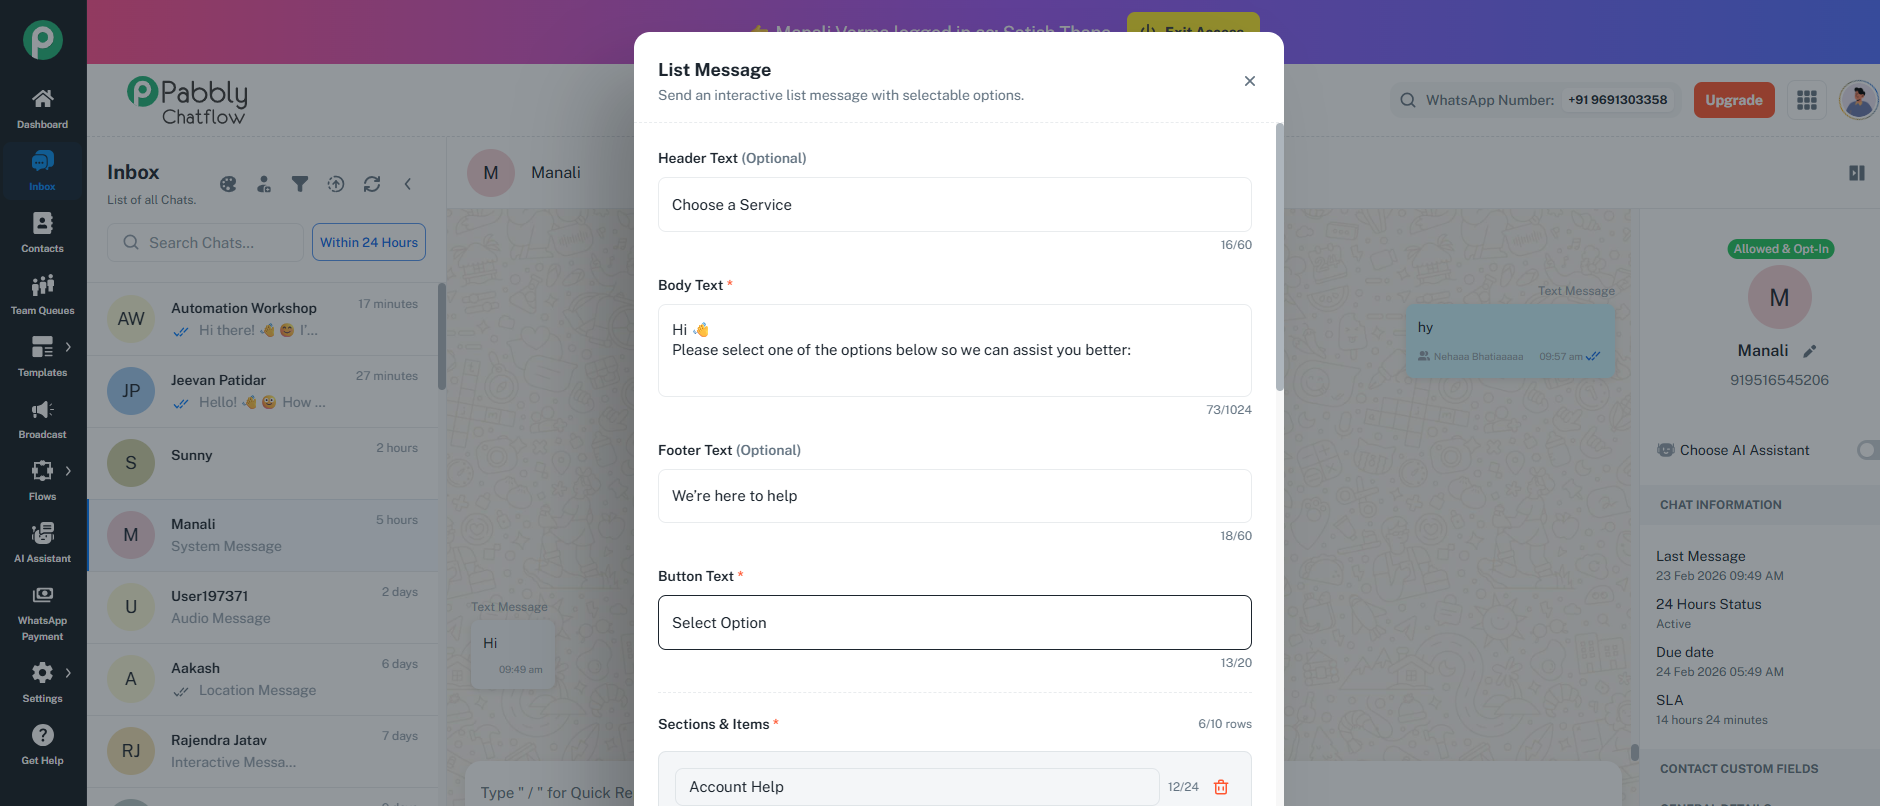
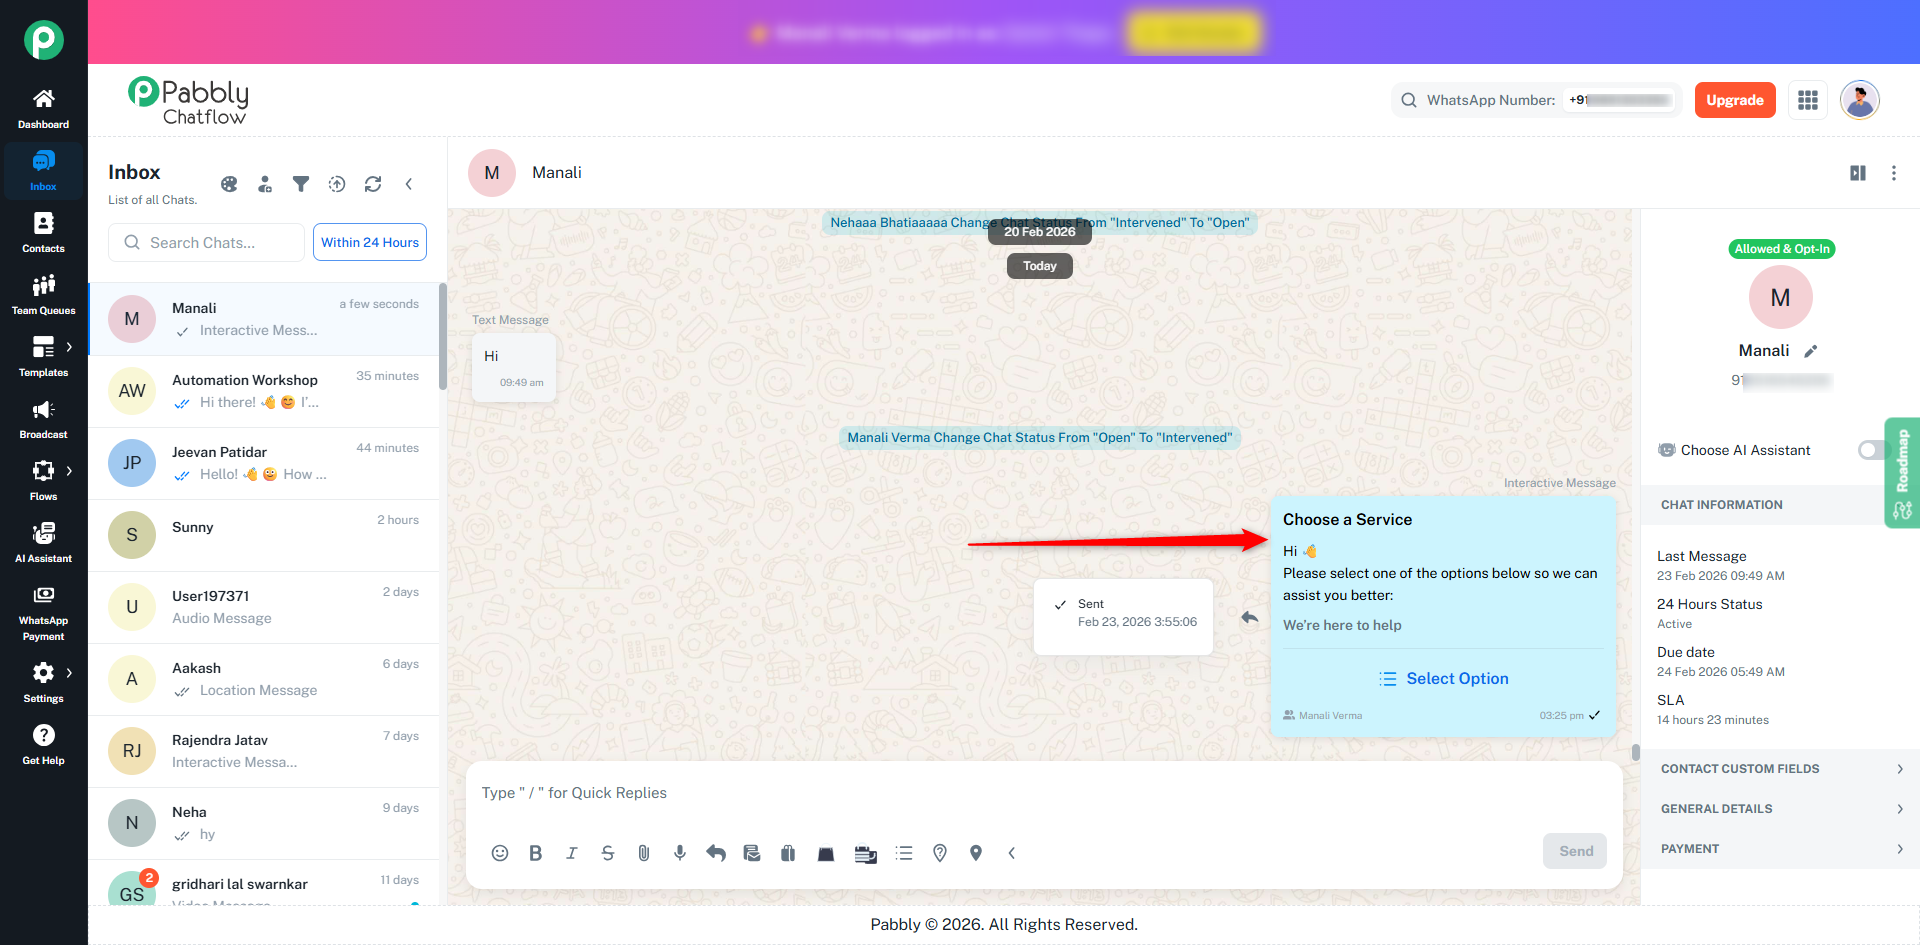
Service selection
Support options
Product categories
Department routing
⚠️ Note: Body Text, Button Text, and at least one section with one option are mandatory.
List Messages help create structured and interactive conversations.
You can now send an address request message directly from the Inbox without leaving the conversation screen. This helps you quickly collect customer delivery details during live chats.
The Ask Address option allows you to:
Send a predefined or custom message requesting the customer’s address
Collect address details within the same chat
Improve order processing and delivery coordination
Avoid switching between screens or workflows
Follow these steps:
Open the Inbox.
Select the conversation where you want to request the address.
Click on the Address Request (Location/Address icon) in the message composer toolbar.
The Ask Address popup will appear.
Enter your message in the Message field.
Example:
"Please share your complete delivery address with landmark and PIN code."
Click Send.
The address request message will be sent directly in the chat.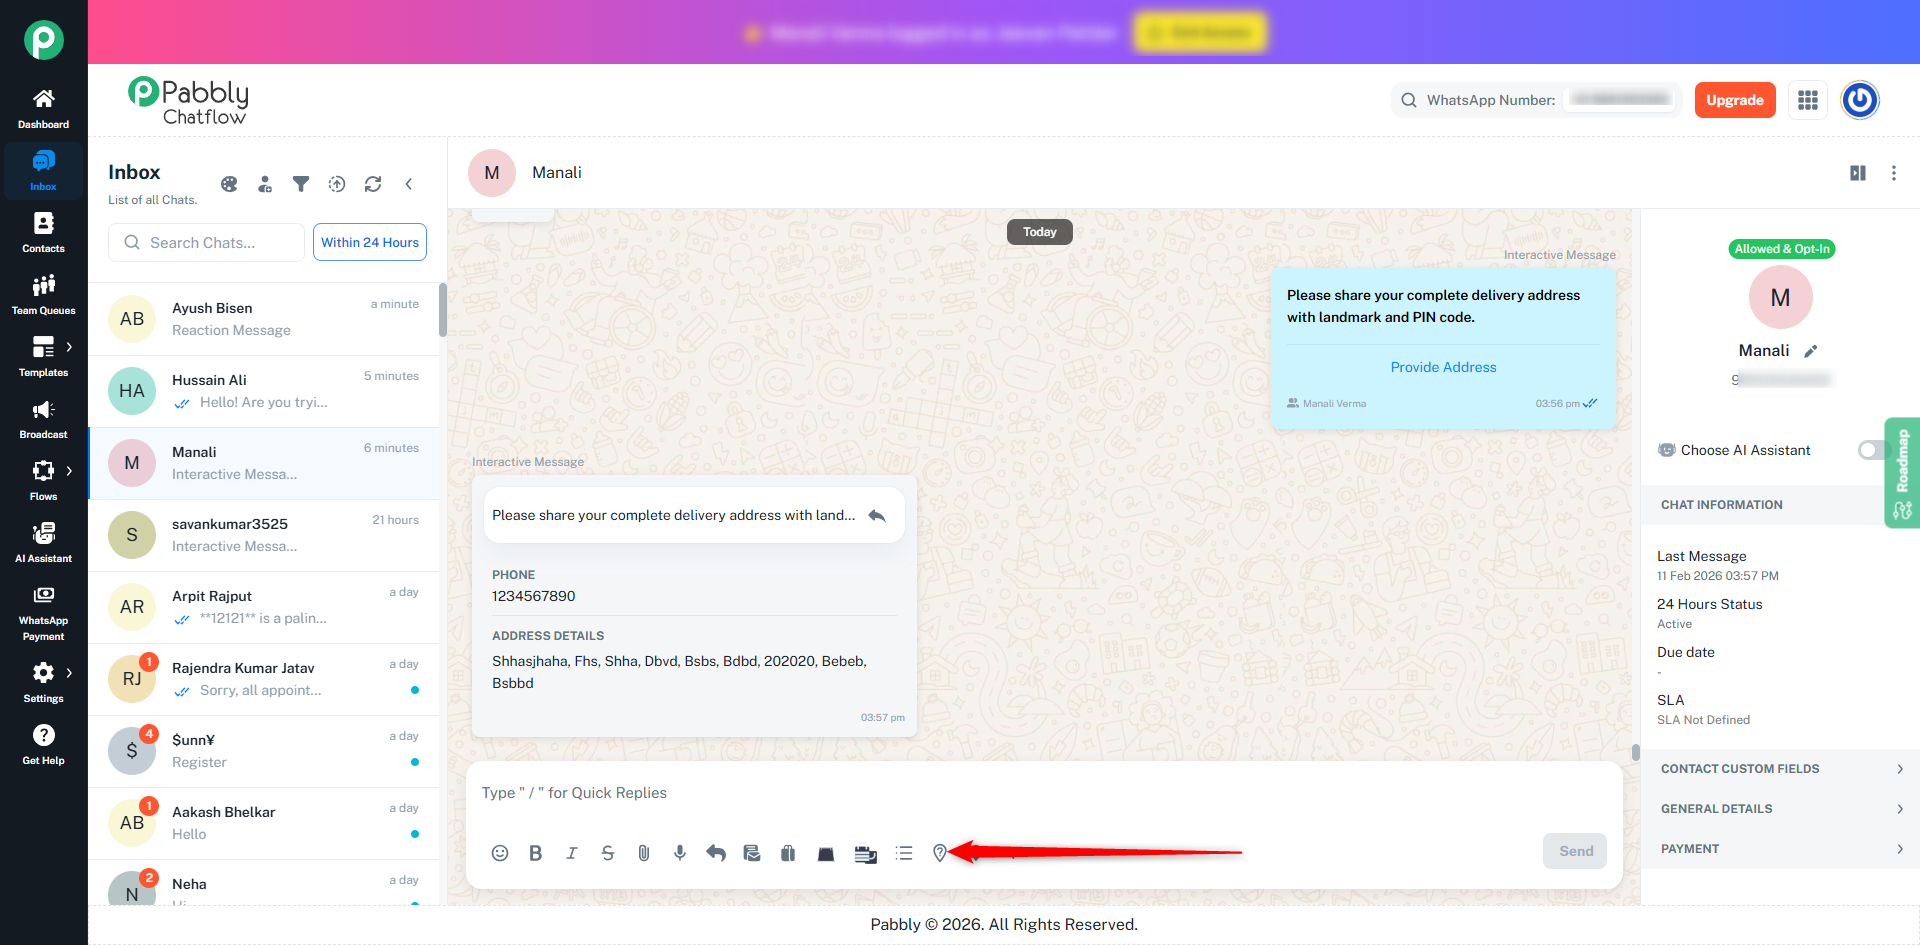
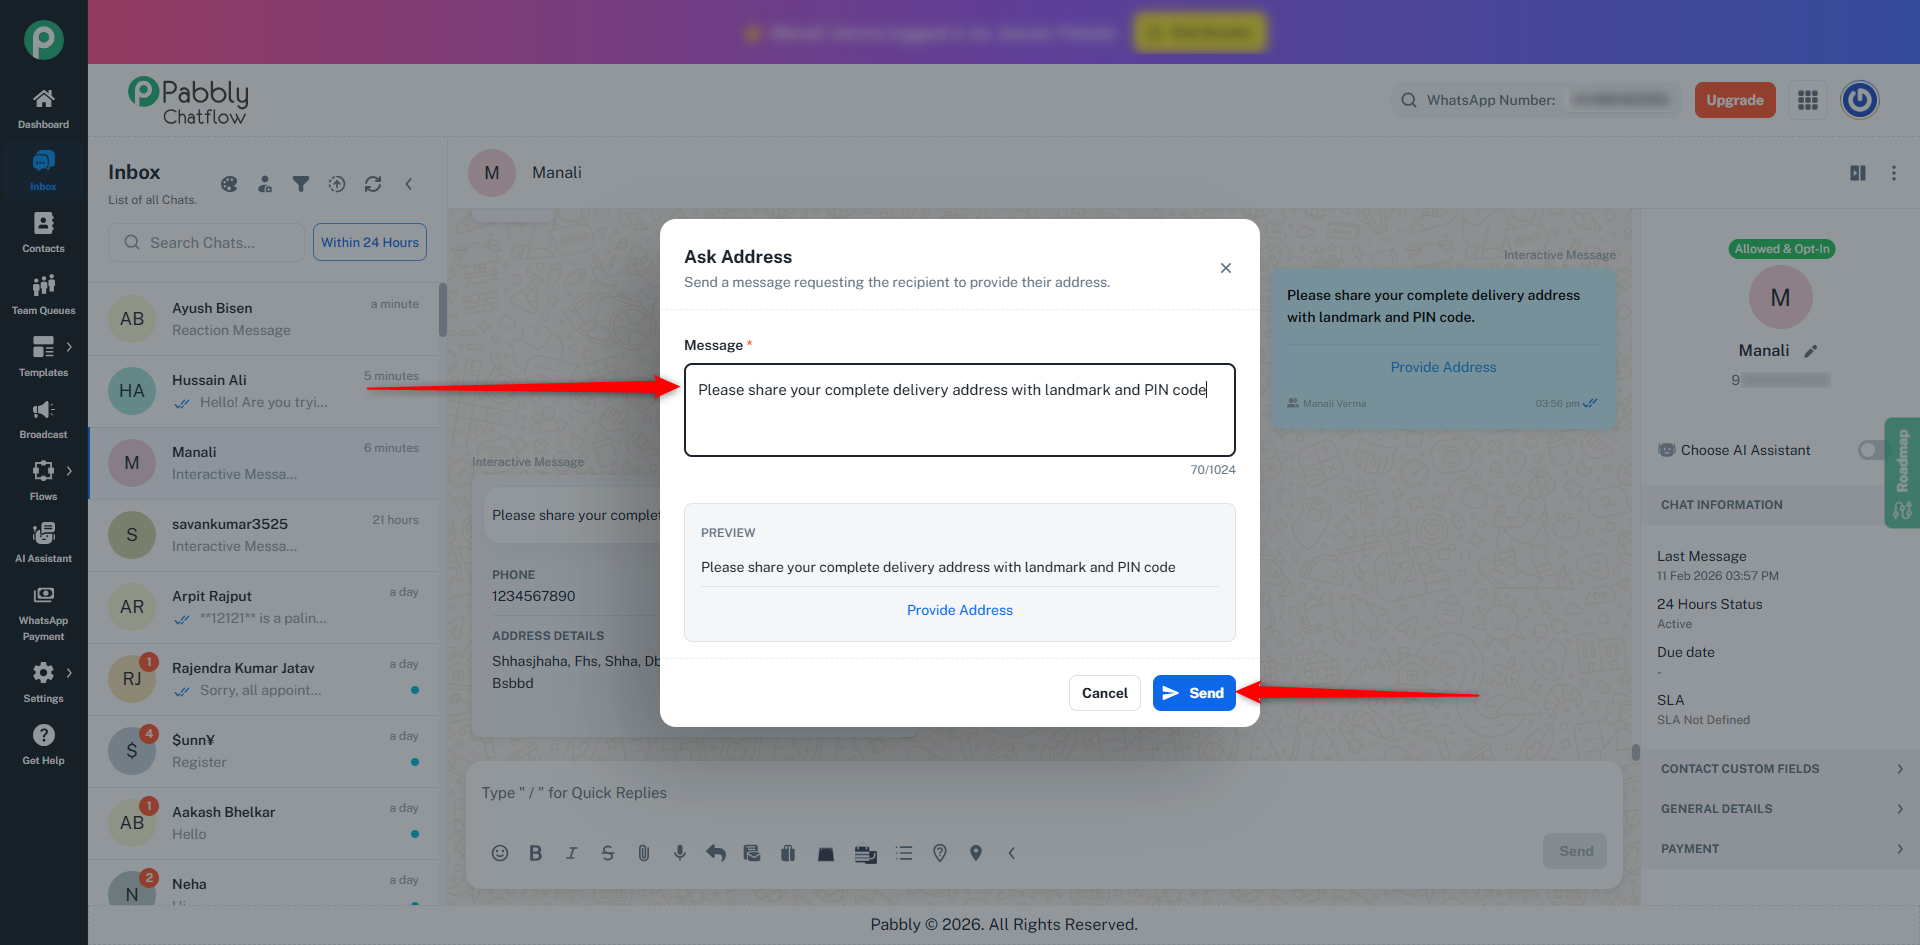
You can send your current or custom location directly to the customer from the Inbox.
This is useful for sharing store locations, pickup points, service areas, or live visit locations.
Go to Inbox.
Open a conversation.
Click the Location icon in the message composer.
The Send Location popup will appear.
Enter location details or use current location.
Click Send.
The location will be sent as a structured location message inside the chat.
The popup includes:
Get My Location – Automatically fetches your current coordinates
Latitude (Required) – Enter valid latitude value
Longitude (Required) – Enter valid longitude value
Location Name (Optional) – Name of the place (e.g., Office, Store)
Address (Optional) – Full address for clarity
Send – Sends the location message
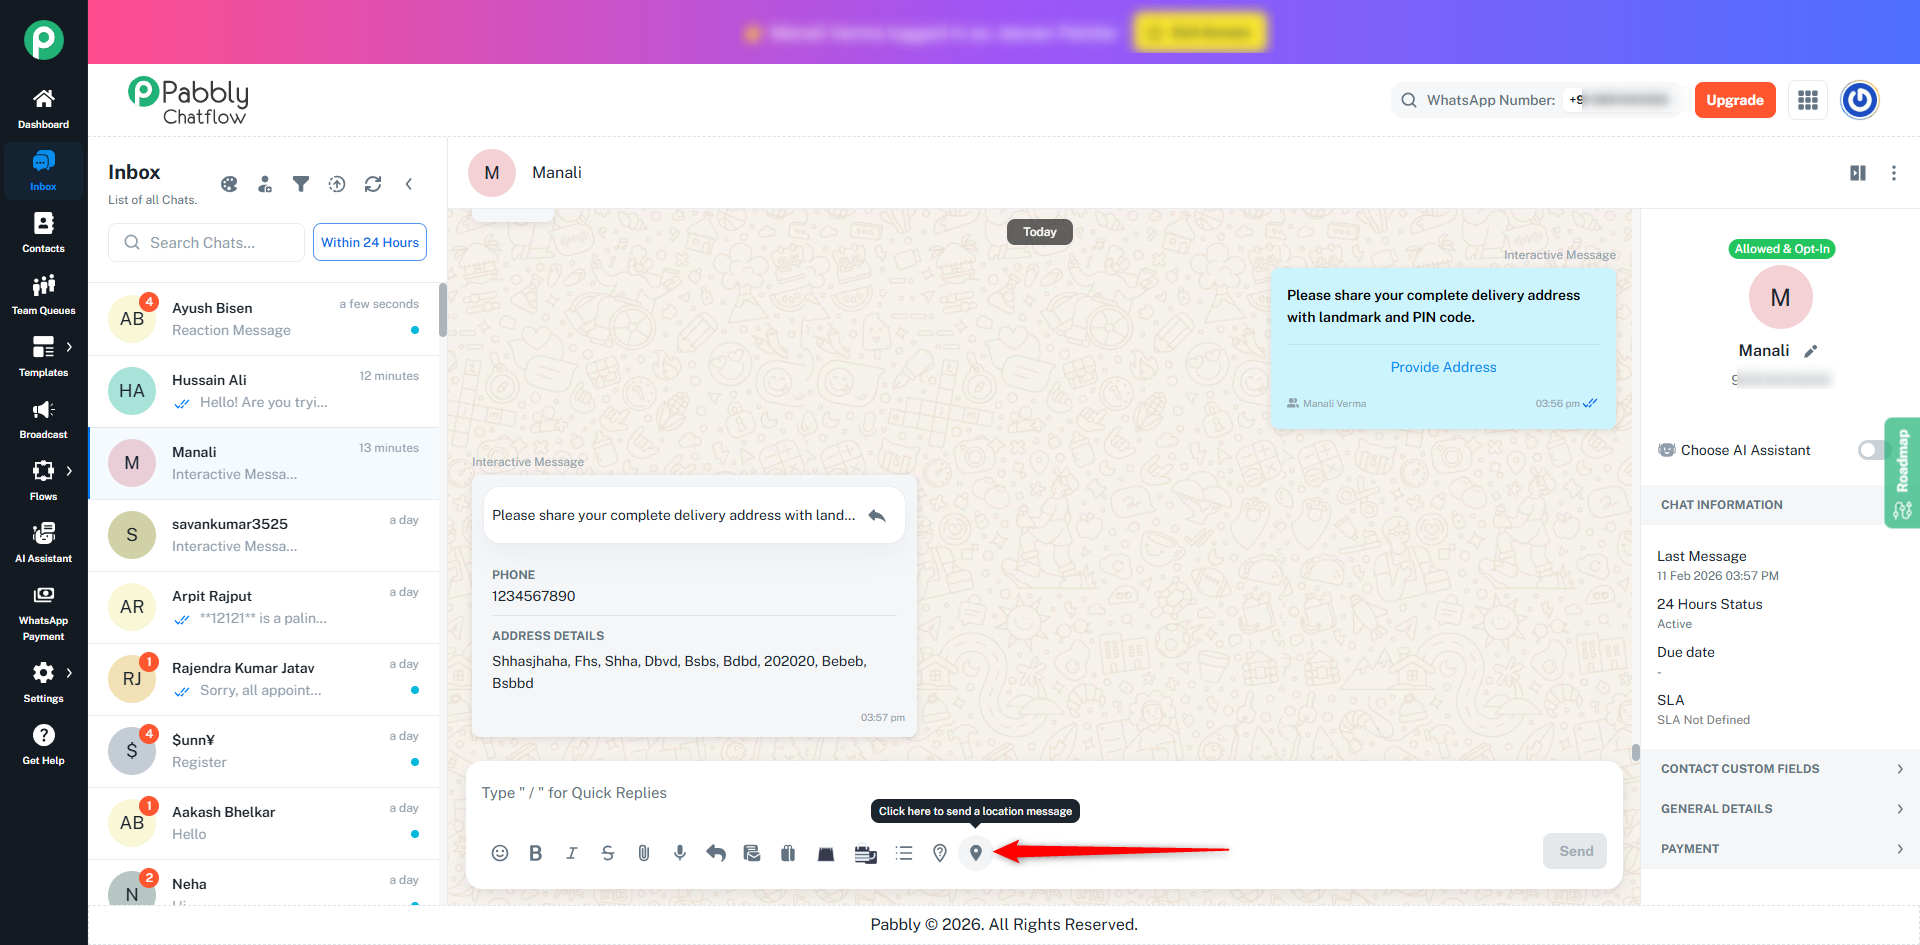
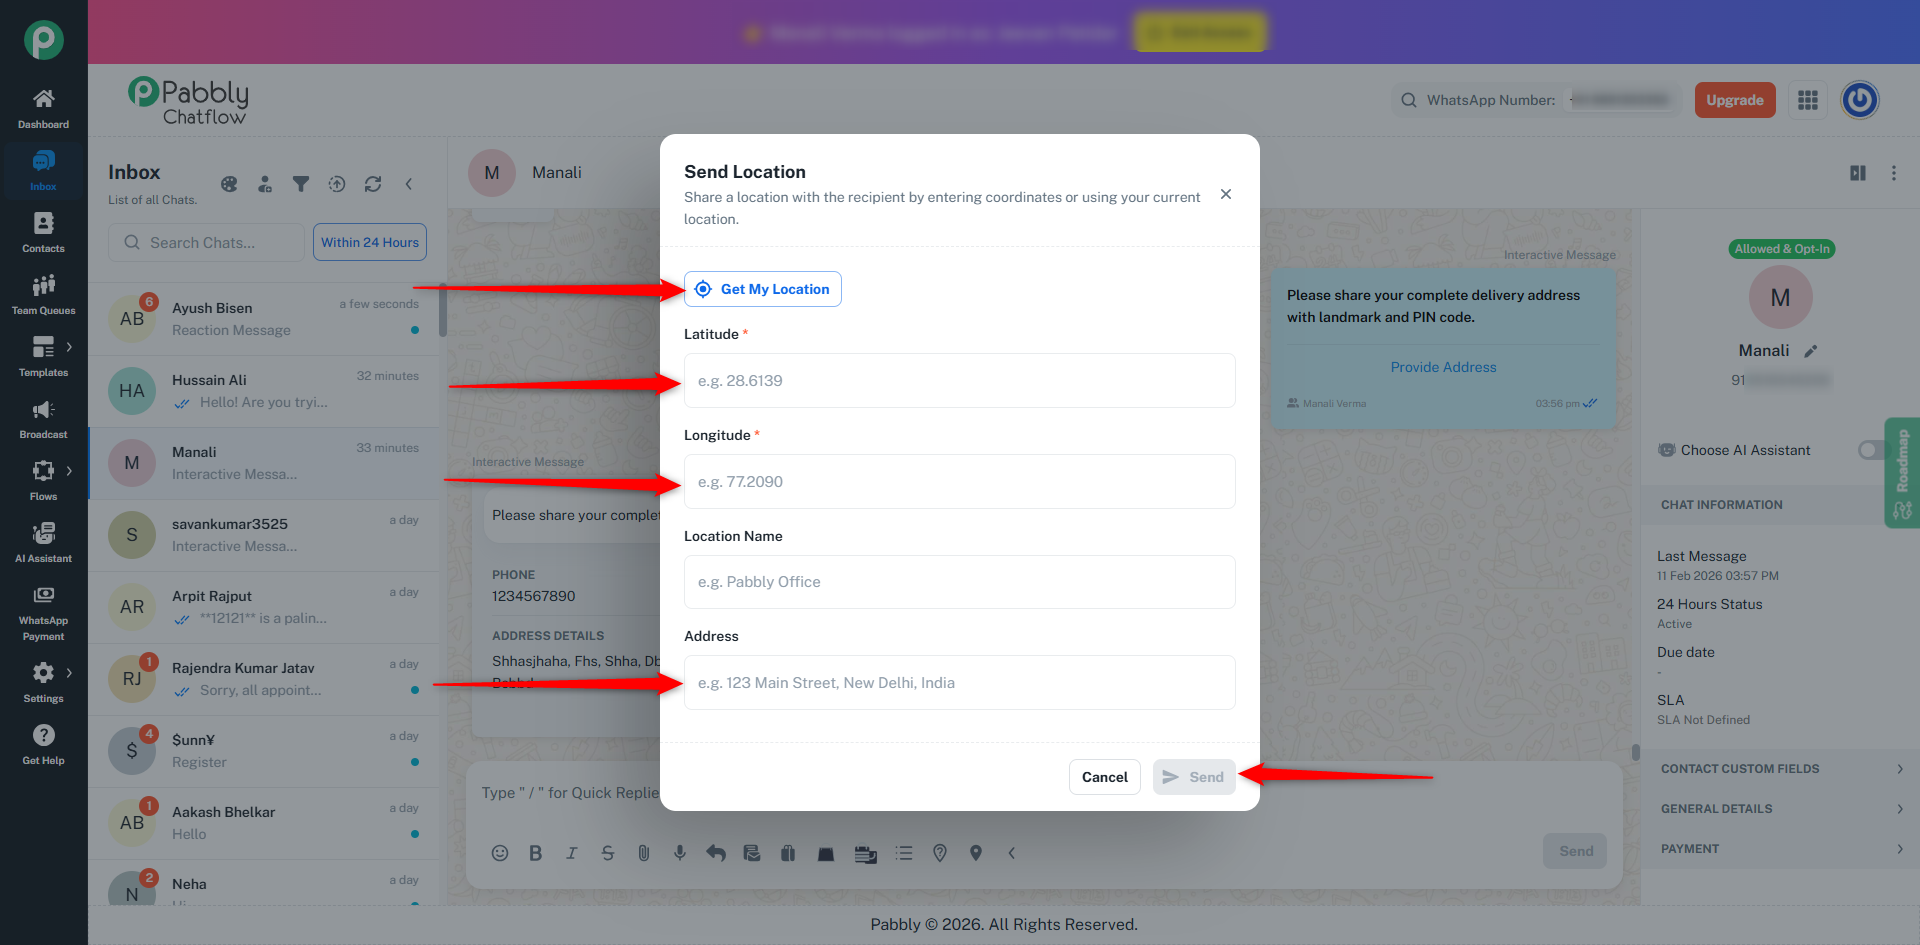
Click Get My Location to auto-fill latitude and longitude.
You can manually enter:
Latitude (e.g., 28.6139)
Longitude (e.g., 77.2090)
Location Name
Address
Share store or office location
Provide pickup point
Guide customers to your location
Order Messages allow you to create and send an interactive order message directly from the Inbox. You can select an existing Order Message, review or edit its products, prices, and quantities, and then send the order to the customer.
Open an active conversation in the Inbox.
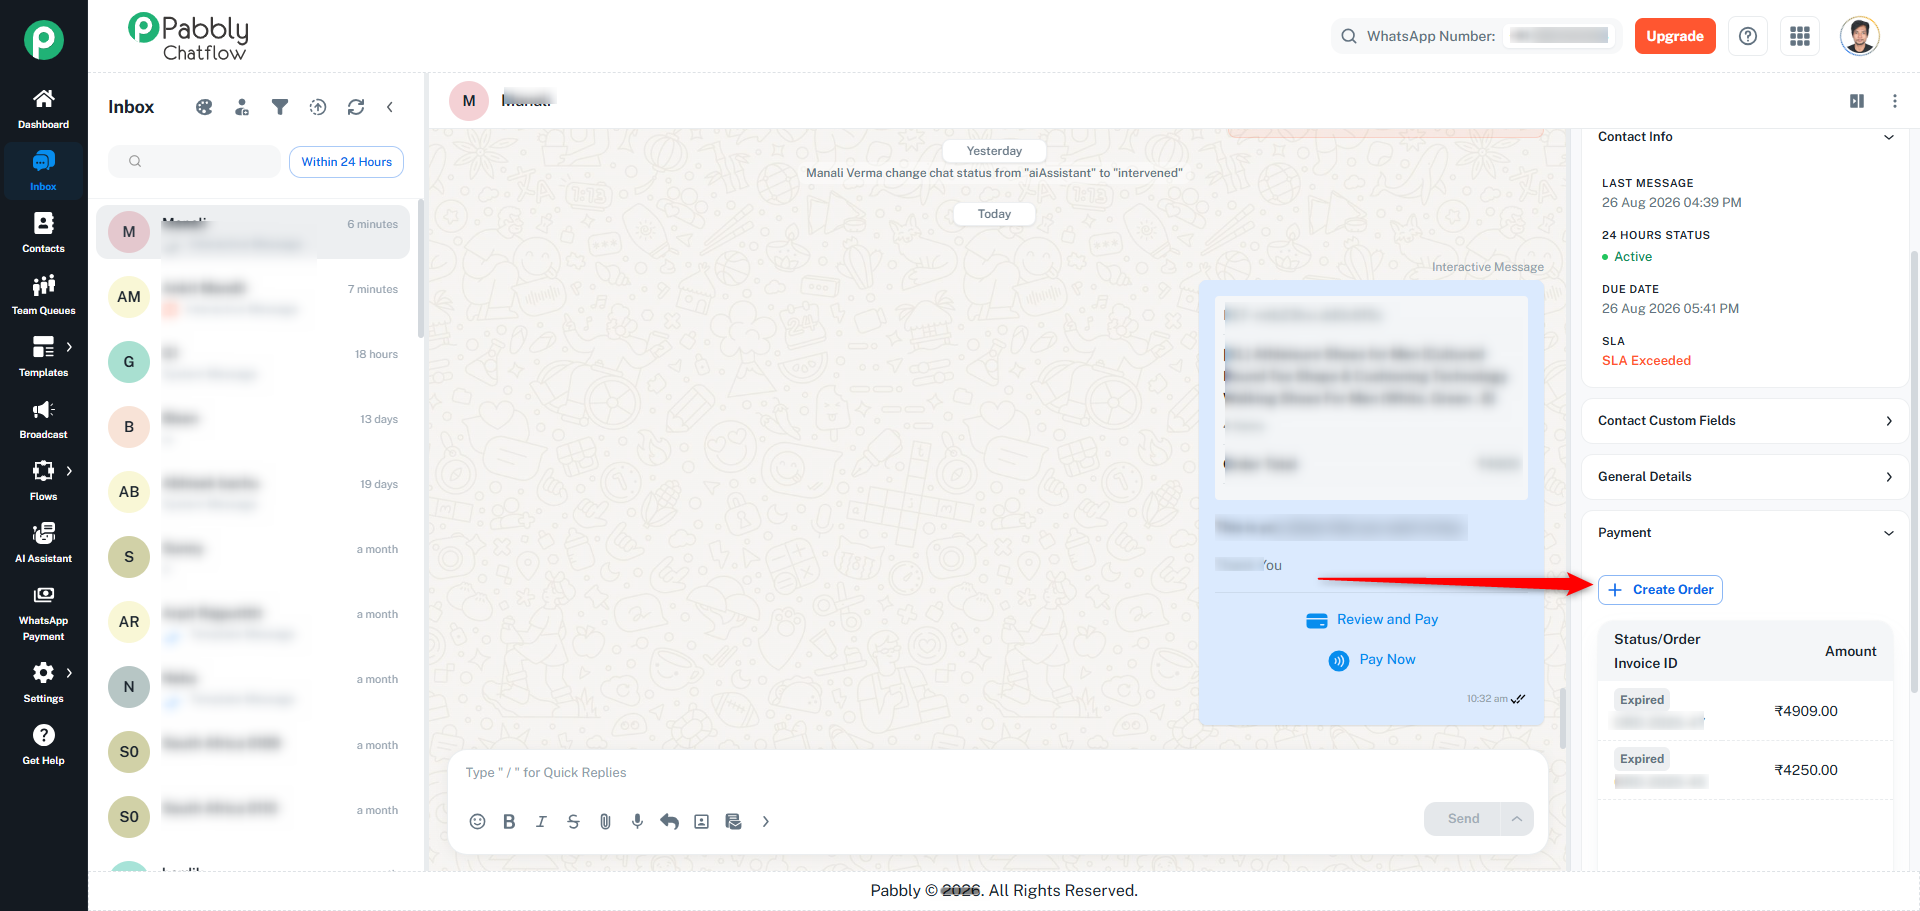
In the right sidebar, go to the Payment section.
Click Create Order.
The Create Order popup will open.
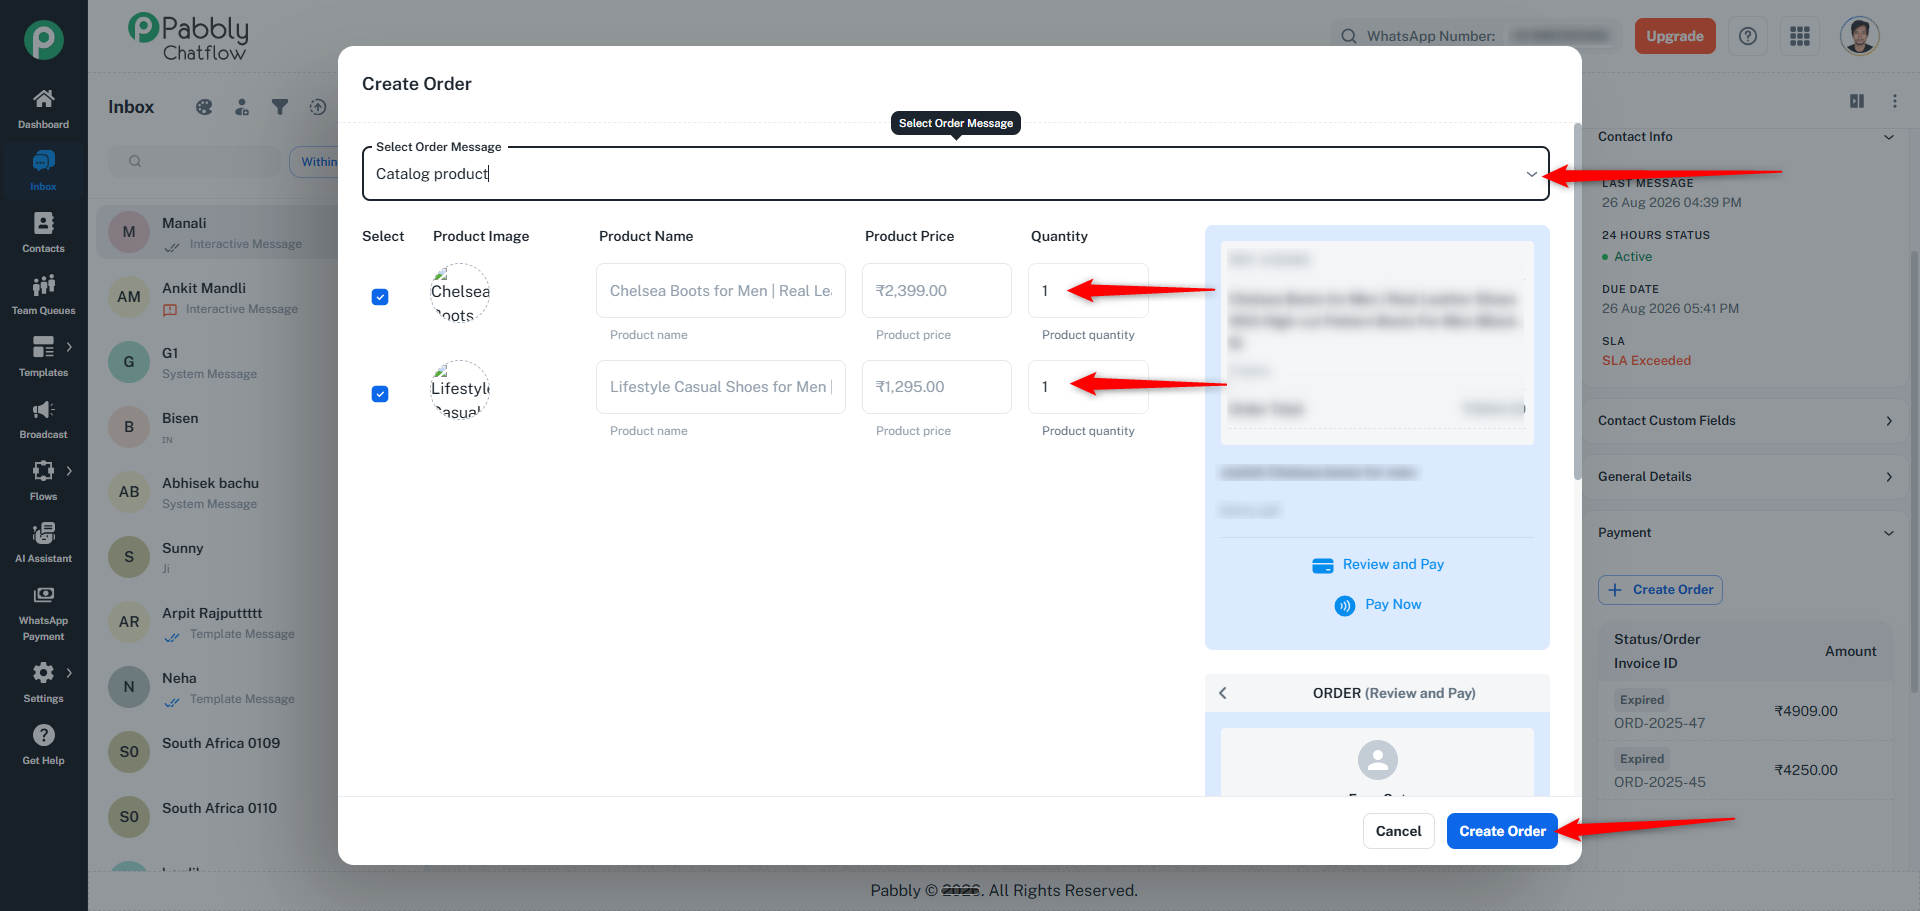
From the Select Order Message dropdown, choose the Order Message you want to send.
Review the products included in the order.
Update the Quantity of the selected products as required.
Review the order preview, including the Order Total and order message details.
Click Create Order.
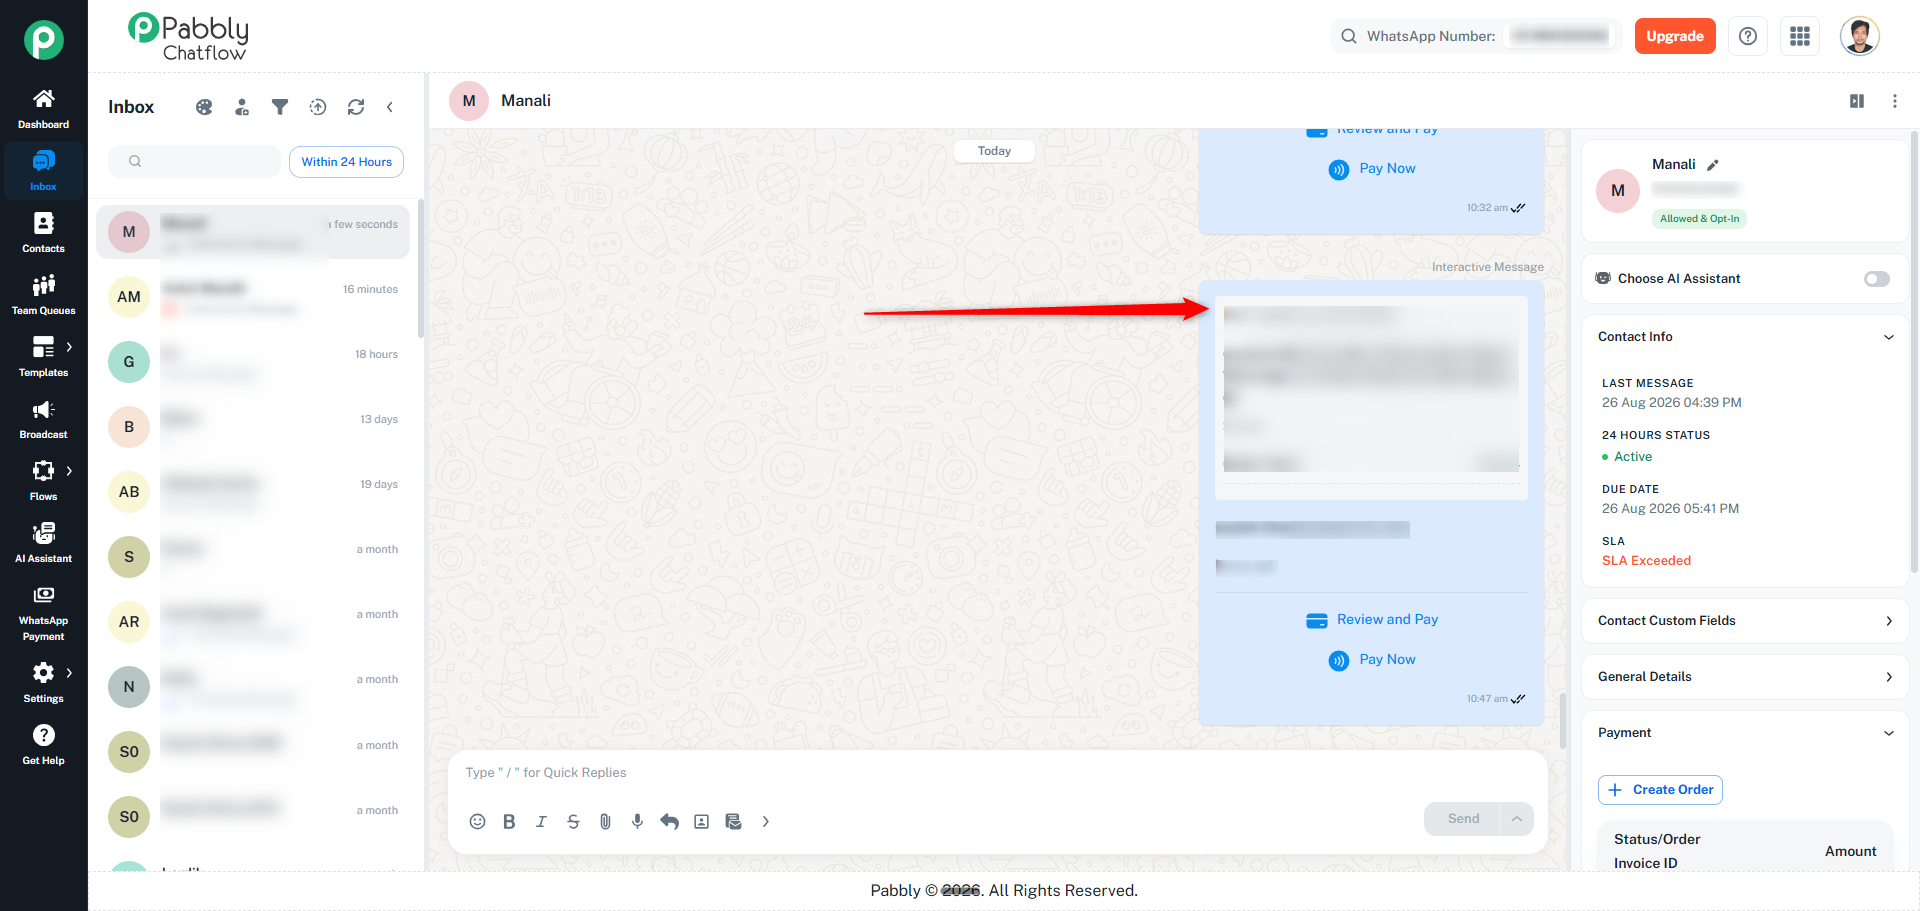
The order message will be created and sent directly to the customer in the conversation. The customer can view the products, order total, and available payment actions directly in WhatsApp.
Note: Before creating an order, you must first create an Order Message from the Payment module.
You can schedule a text message directly from the Inbox and have it sent automatically after a specified delay.
Open an active conversation in the Inbox.
Type your message in the message composer.
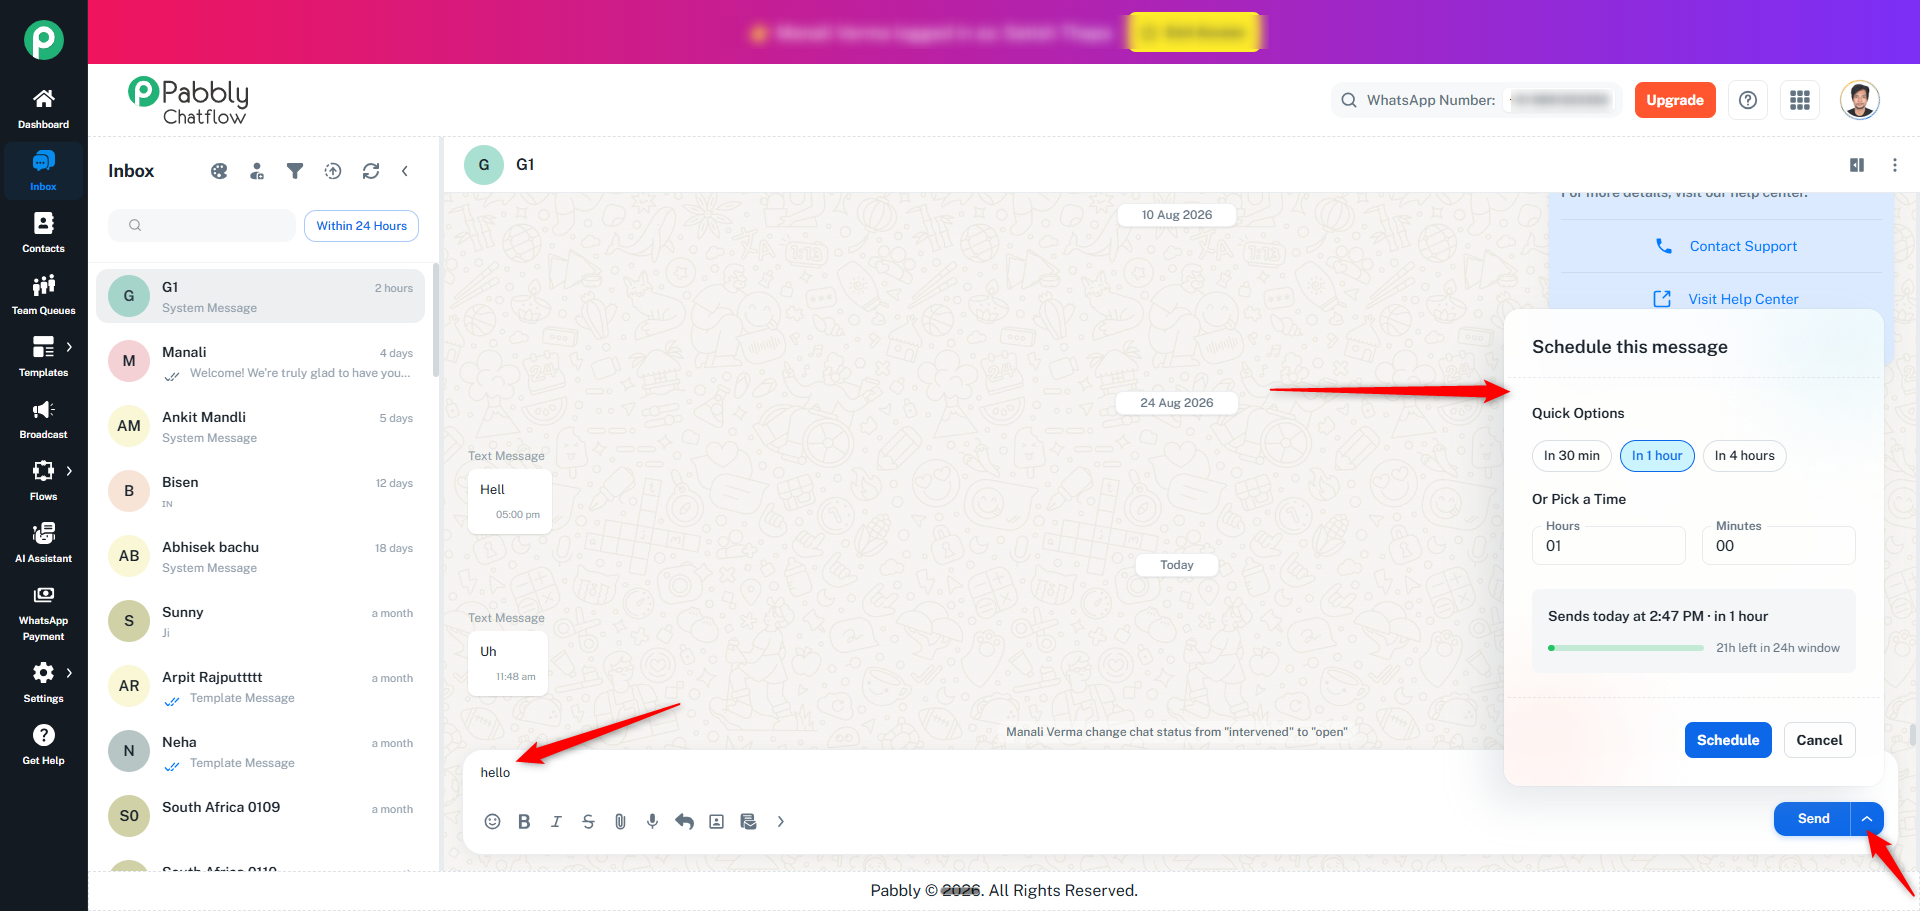
Click the dropdown arrow next to the Send button.
The Schedule this message popup will open.
Choose a scheduling option:
Quick Options: Select In 30 min, In 1 hour, or In 4 hours.
Pick a Time: Enter the required Hours and Minutes for the delay.
Review the scheduled send time and the available 24-hour conversation window shown in the popup.
Click Schedule.
The message will be sent automatically after the selected delay.
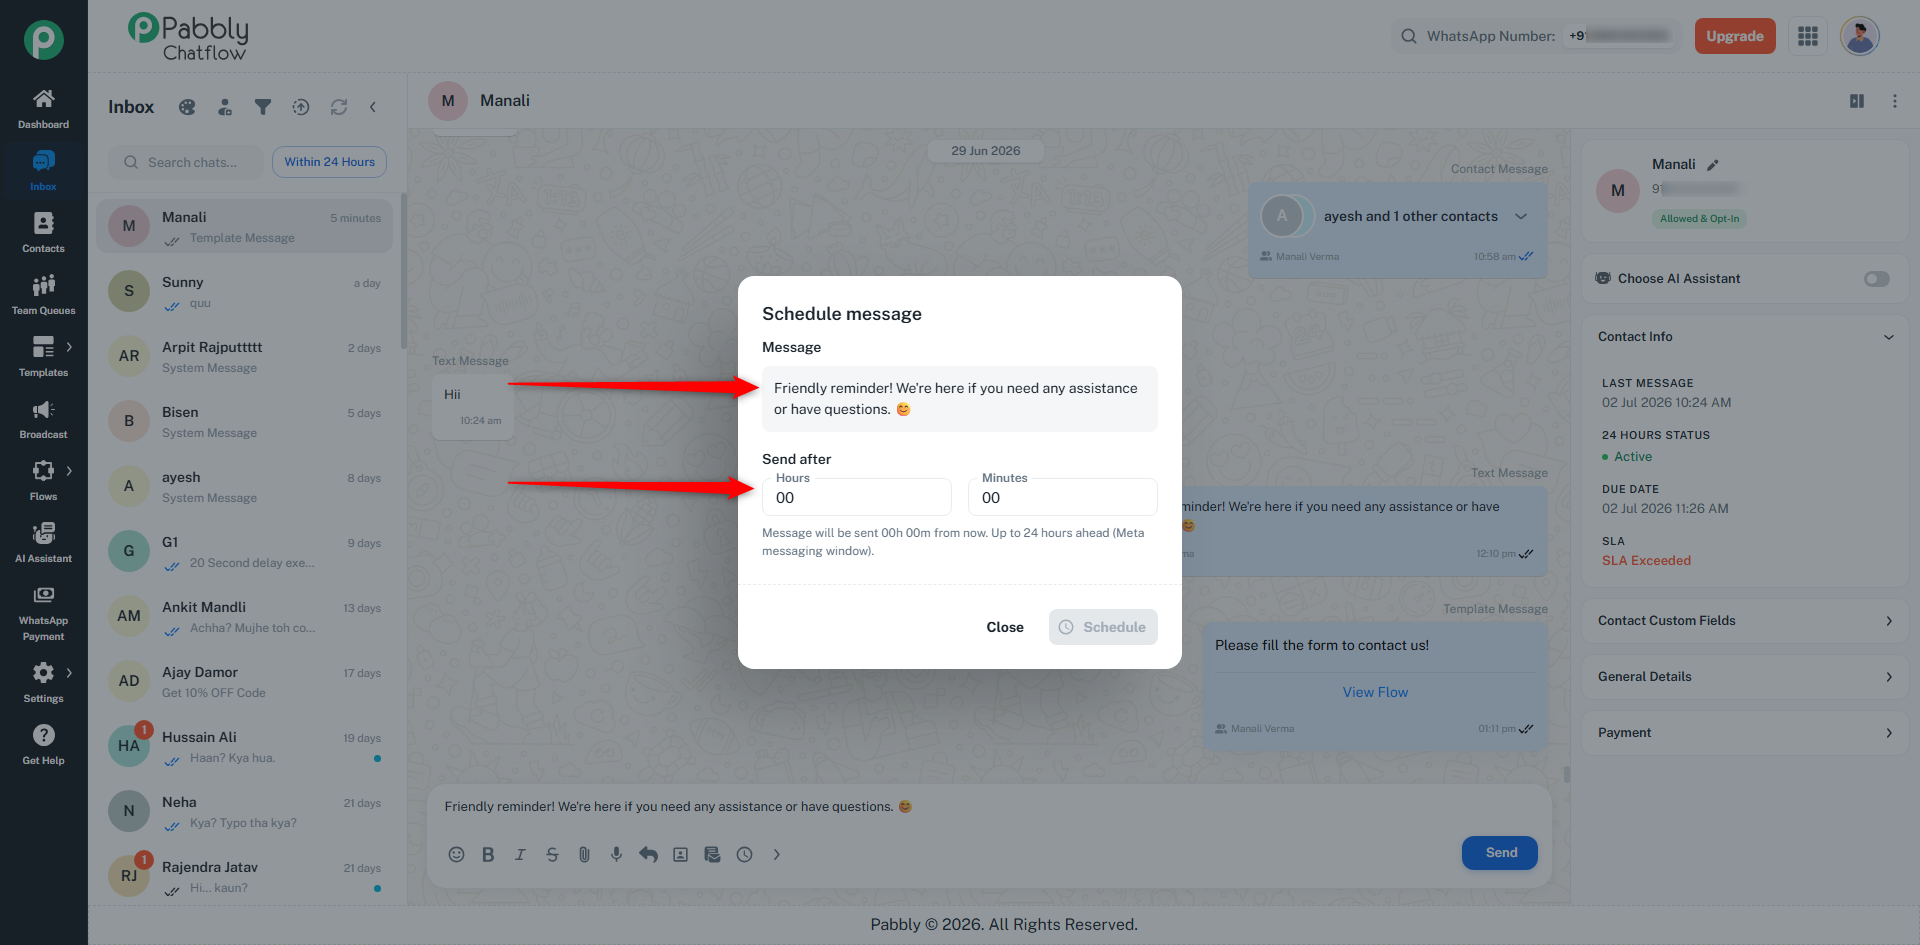
The popup includes the following fields:
Message
Displays the text entered in the message composer.
Send After
Specify when the message should be sent.
Hours – Number of hours before sending the message.
Minutes – Additional minutes before sending the message.
A preview of the calculated send time is displayed below the fields.
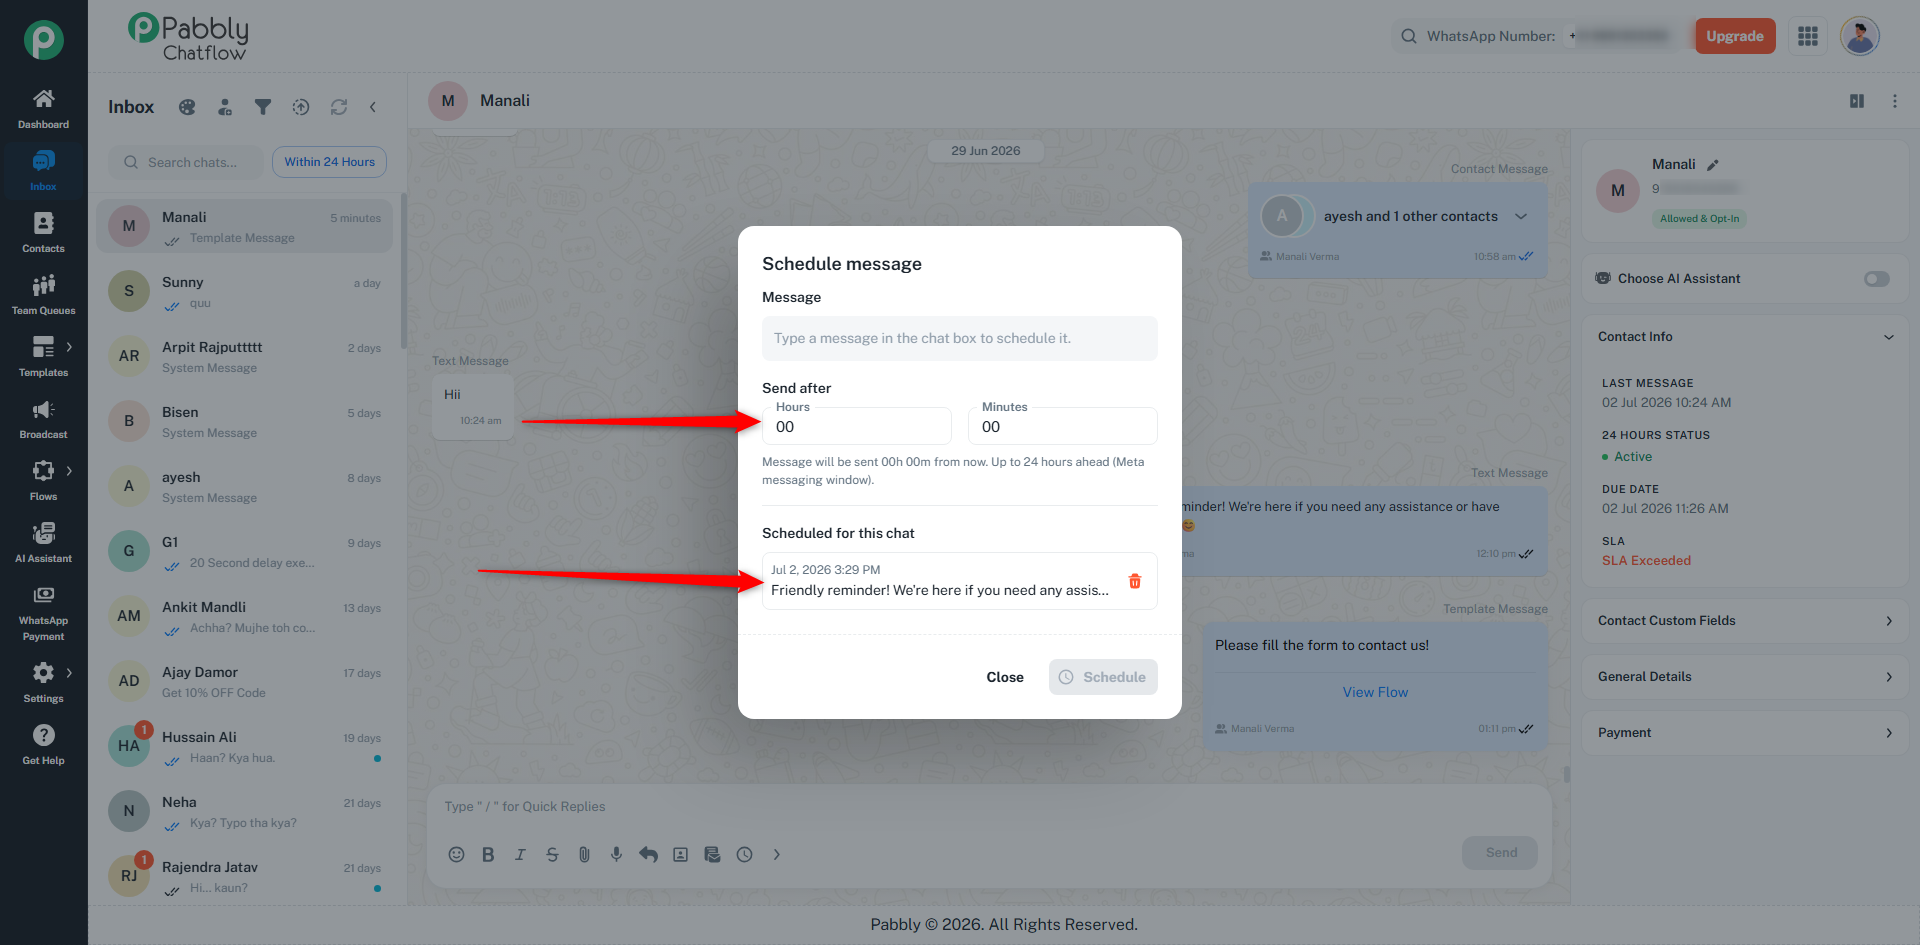
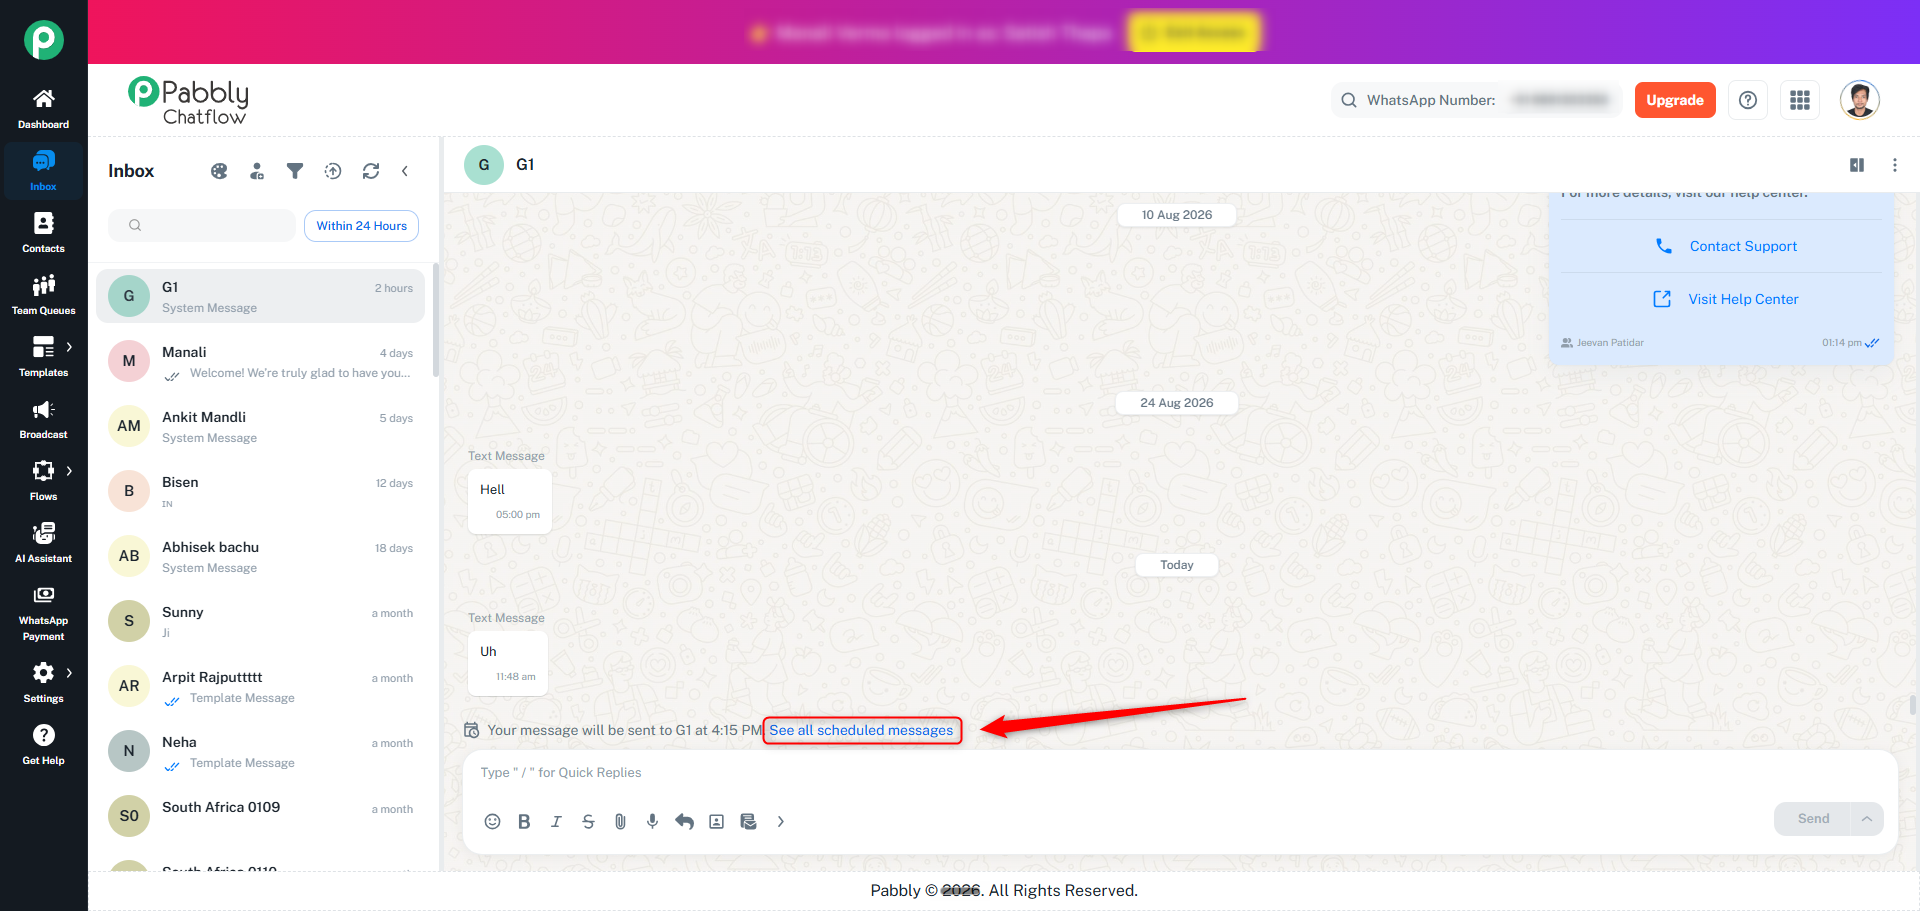
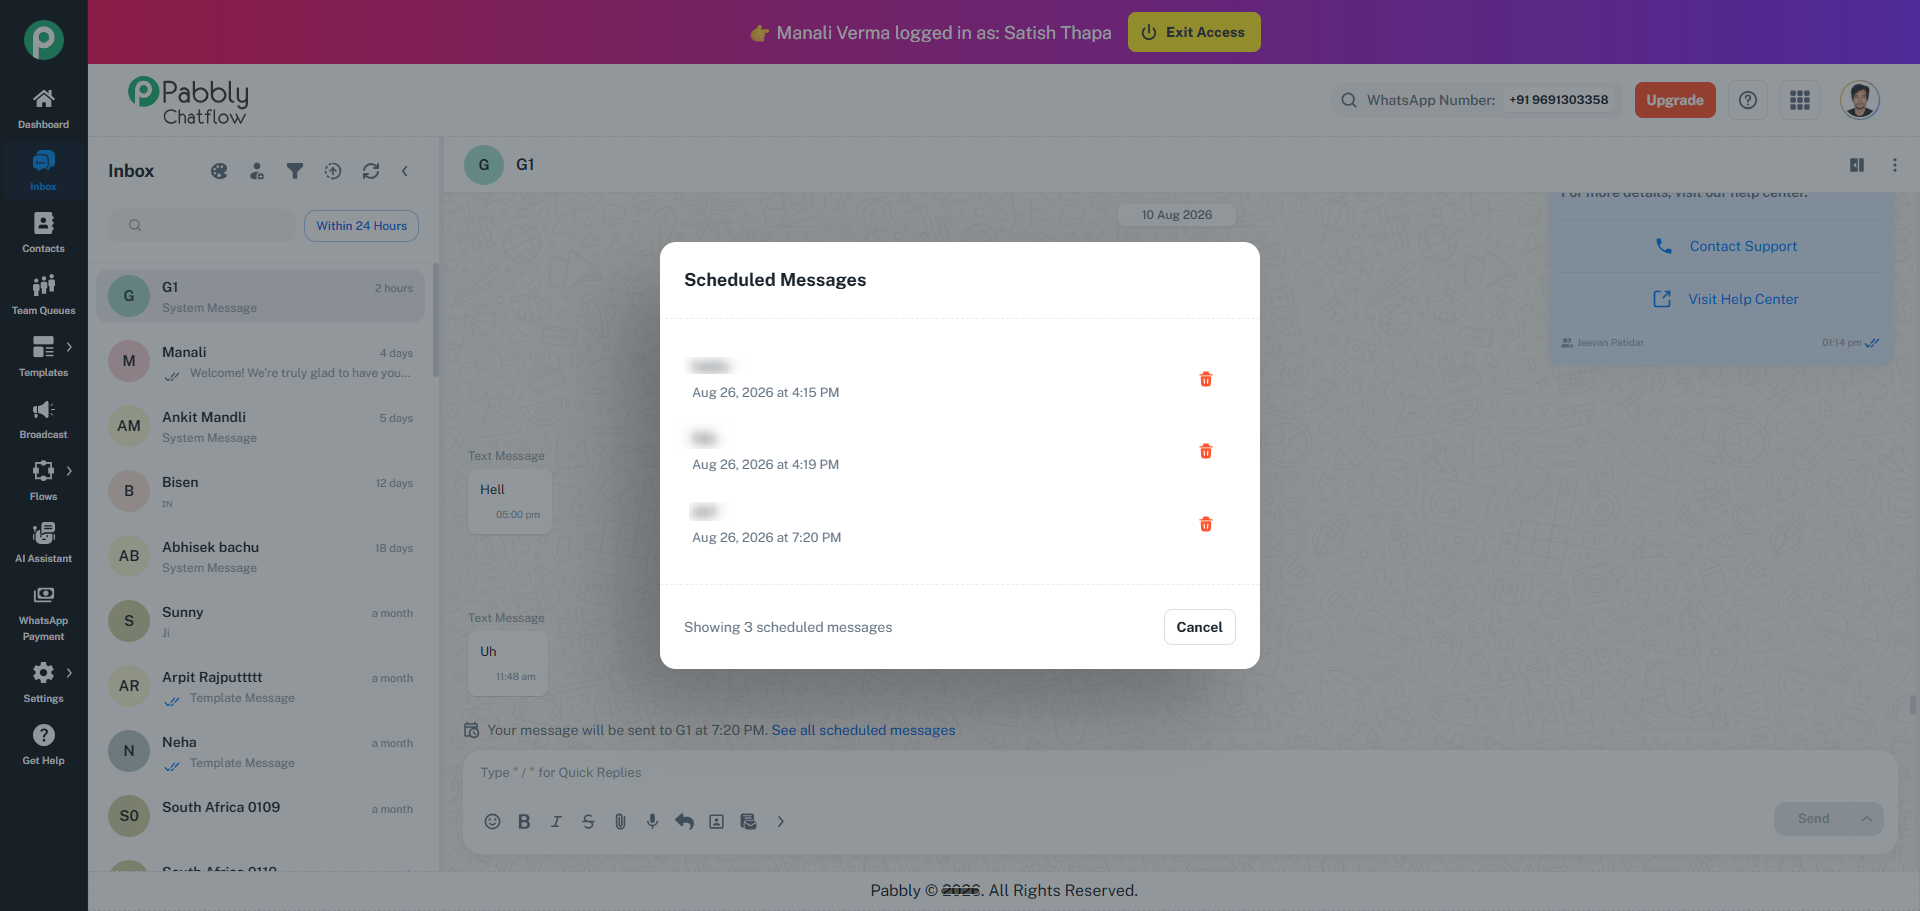
After scheduling a message, a notification will appear in the conversation showing when the message will be sent.
To view your scheduled messages:
Click See all scheduled messages.
The Scheduled Messages popup will open.
The popup displays the scheduled message along with its scheduled date and time.
To cancel a scheduled message, click the Delete icon next to the message.
Click Cancel to close the popup.
Note:
Only Text Messages can be scheduled.
Messages can be scheduled up to 24 hours in advance.
Scheduling is available only within WhatsApp's active 24-hour customer service messaging window.
Scheduled messages can be cancelled anytime before they are sent.
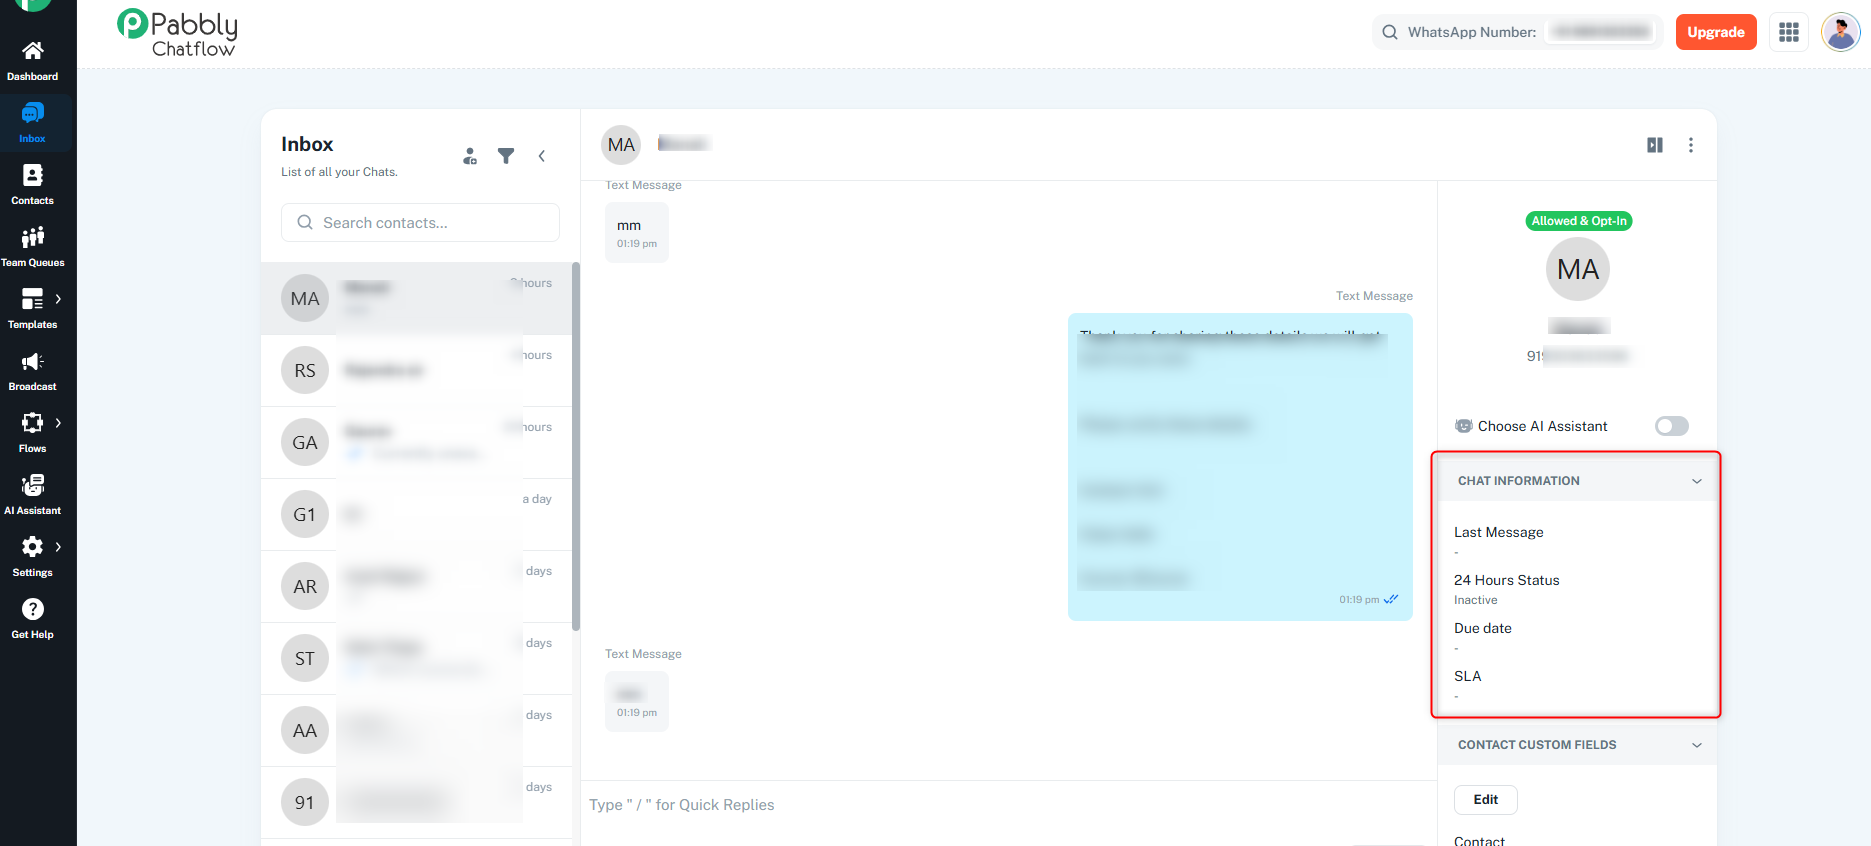
Last Message: View the latest message from the customer.
24 Hours Status: Shows the current status of the chat (Active or Inactive).
Due Date: This is set based on your SLA and shows when the response is due.
SLA: If an SLA is configured, it will appear here, showing the expected response time.
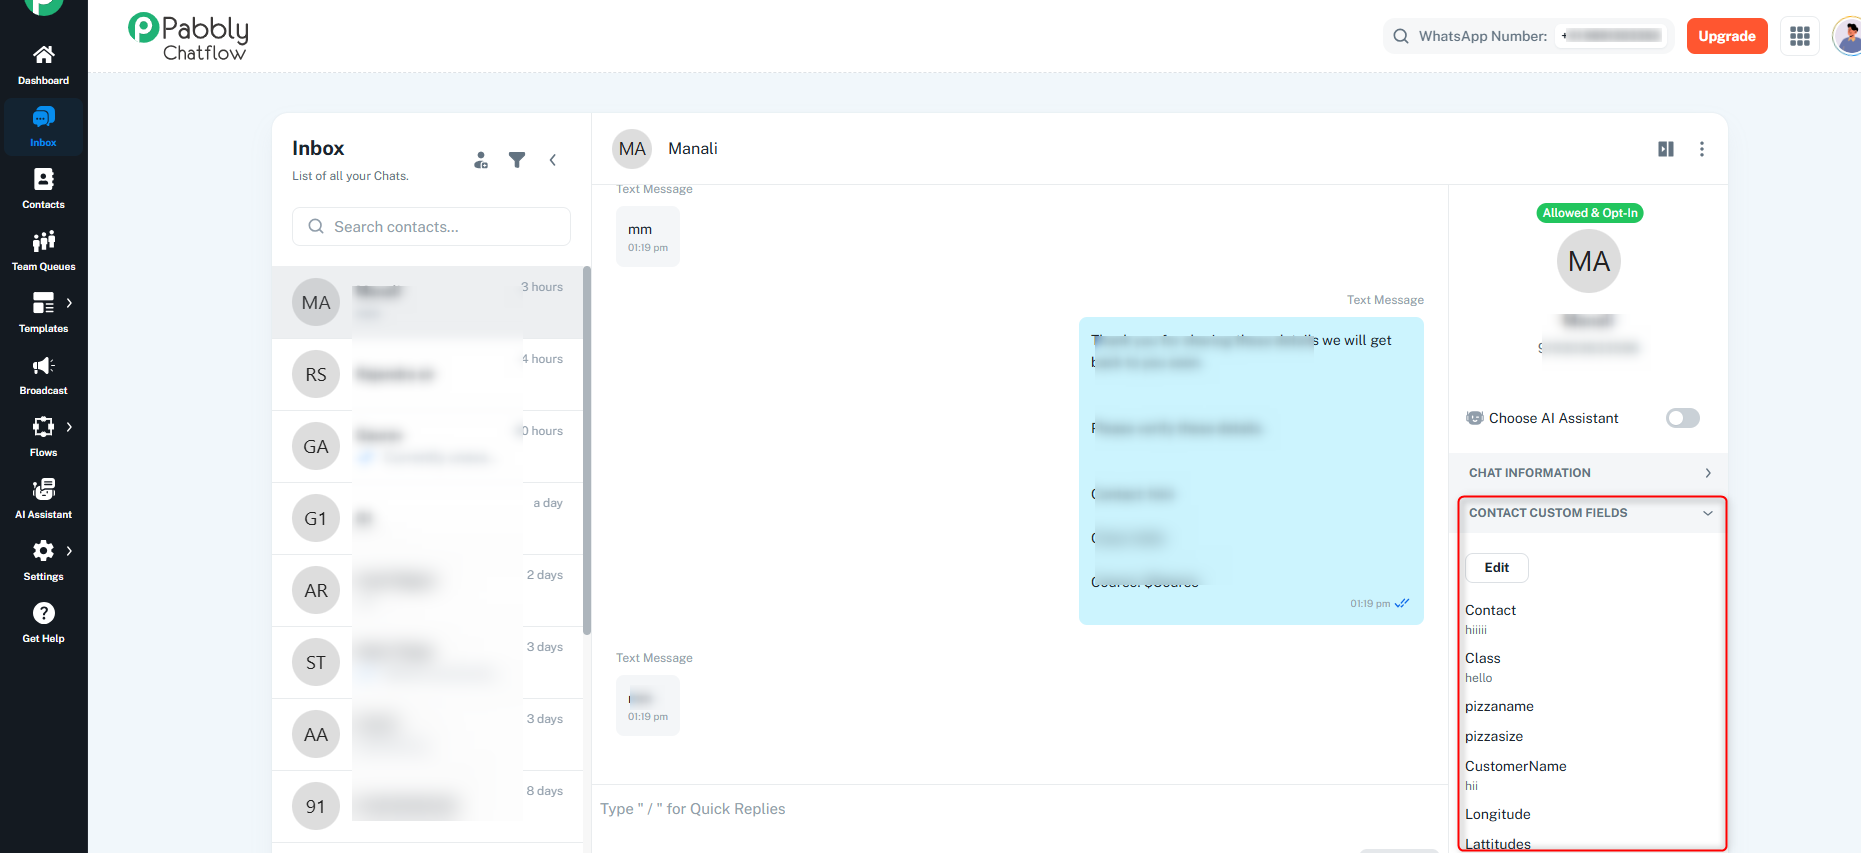
Here, you can add or view additional details specific to the contact.
These can include custom data such as Location, Order ID, Membership Level, etc.
Custom fields help you keep track of important customer information and improve your responses.
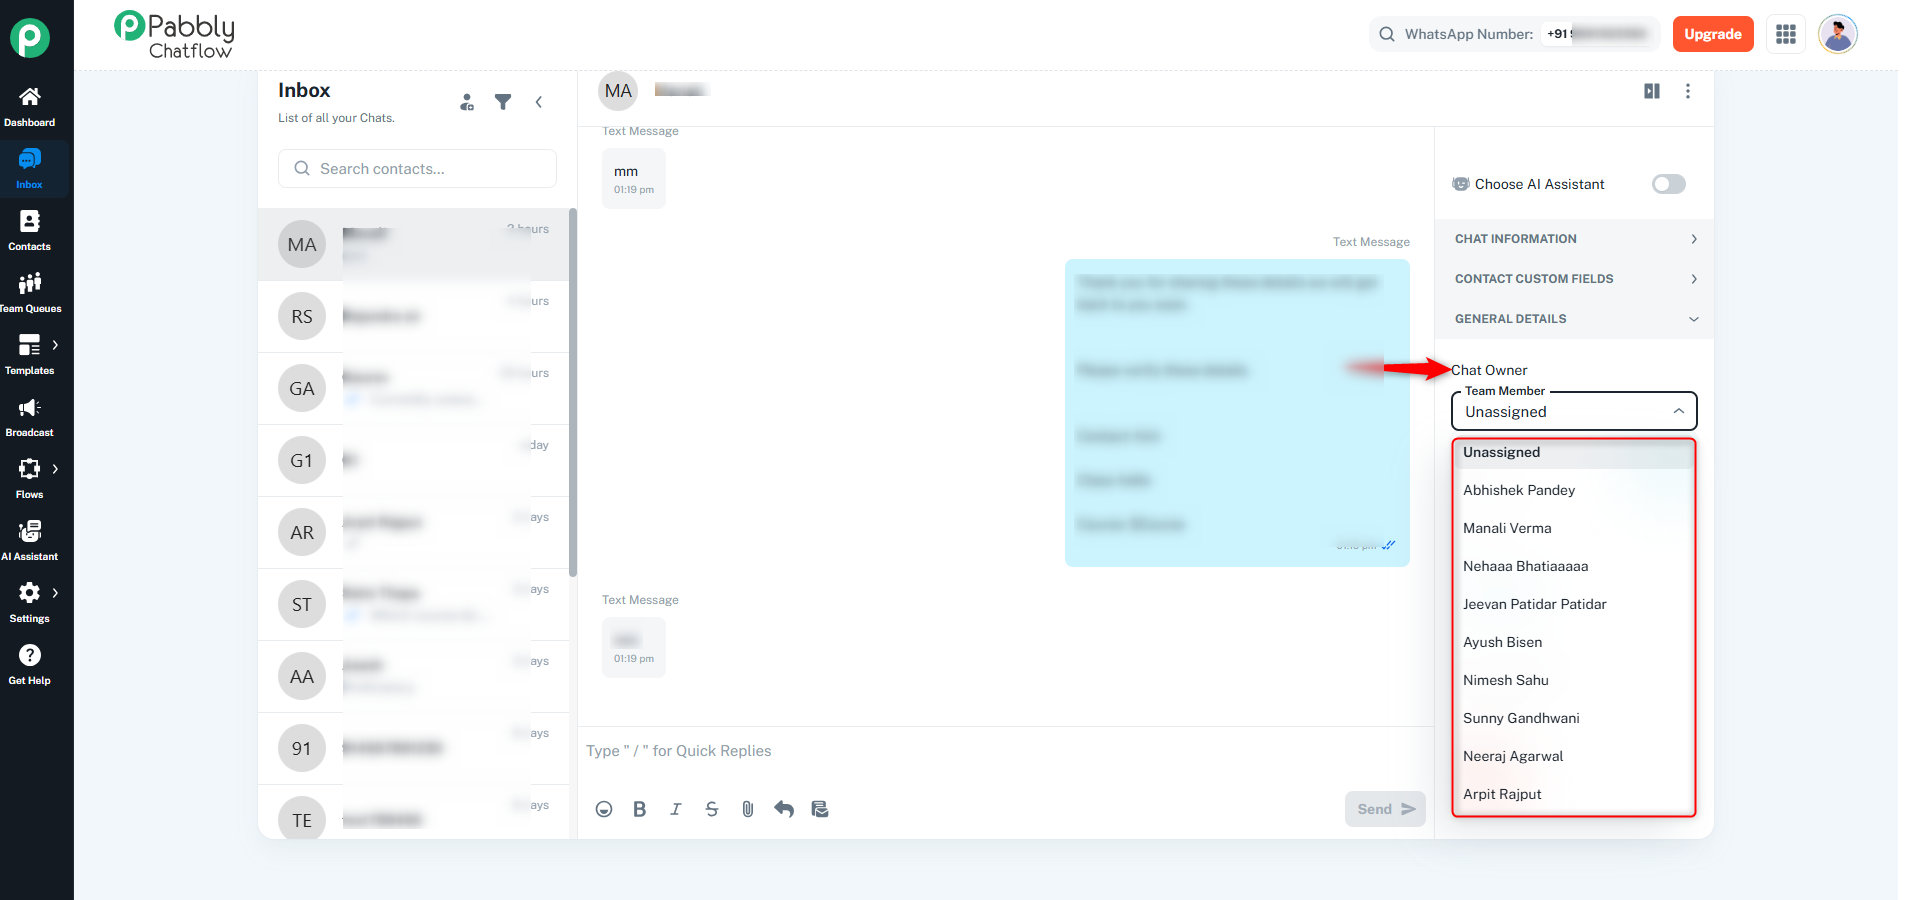
This section provides vital options to manage the ownership and details of the conversation:
Chat Owner: You can assign or change the Chat Owner(the person responsible for replying) directly from this section.
Click to assign or change the owner to another team member or yourself.
If the chat is currently unassigned or needs to be re-assigned, you can use this option to delegate the chat to the correct team member.
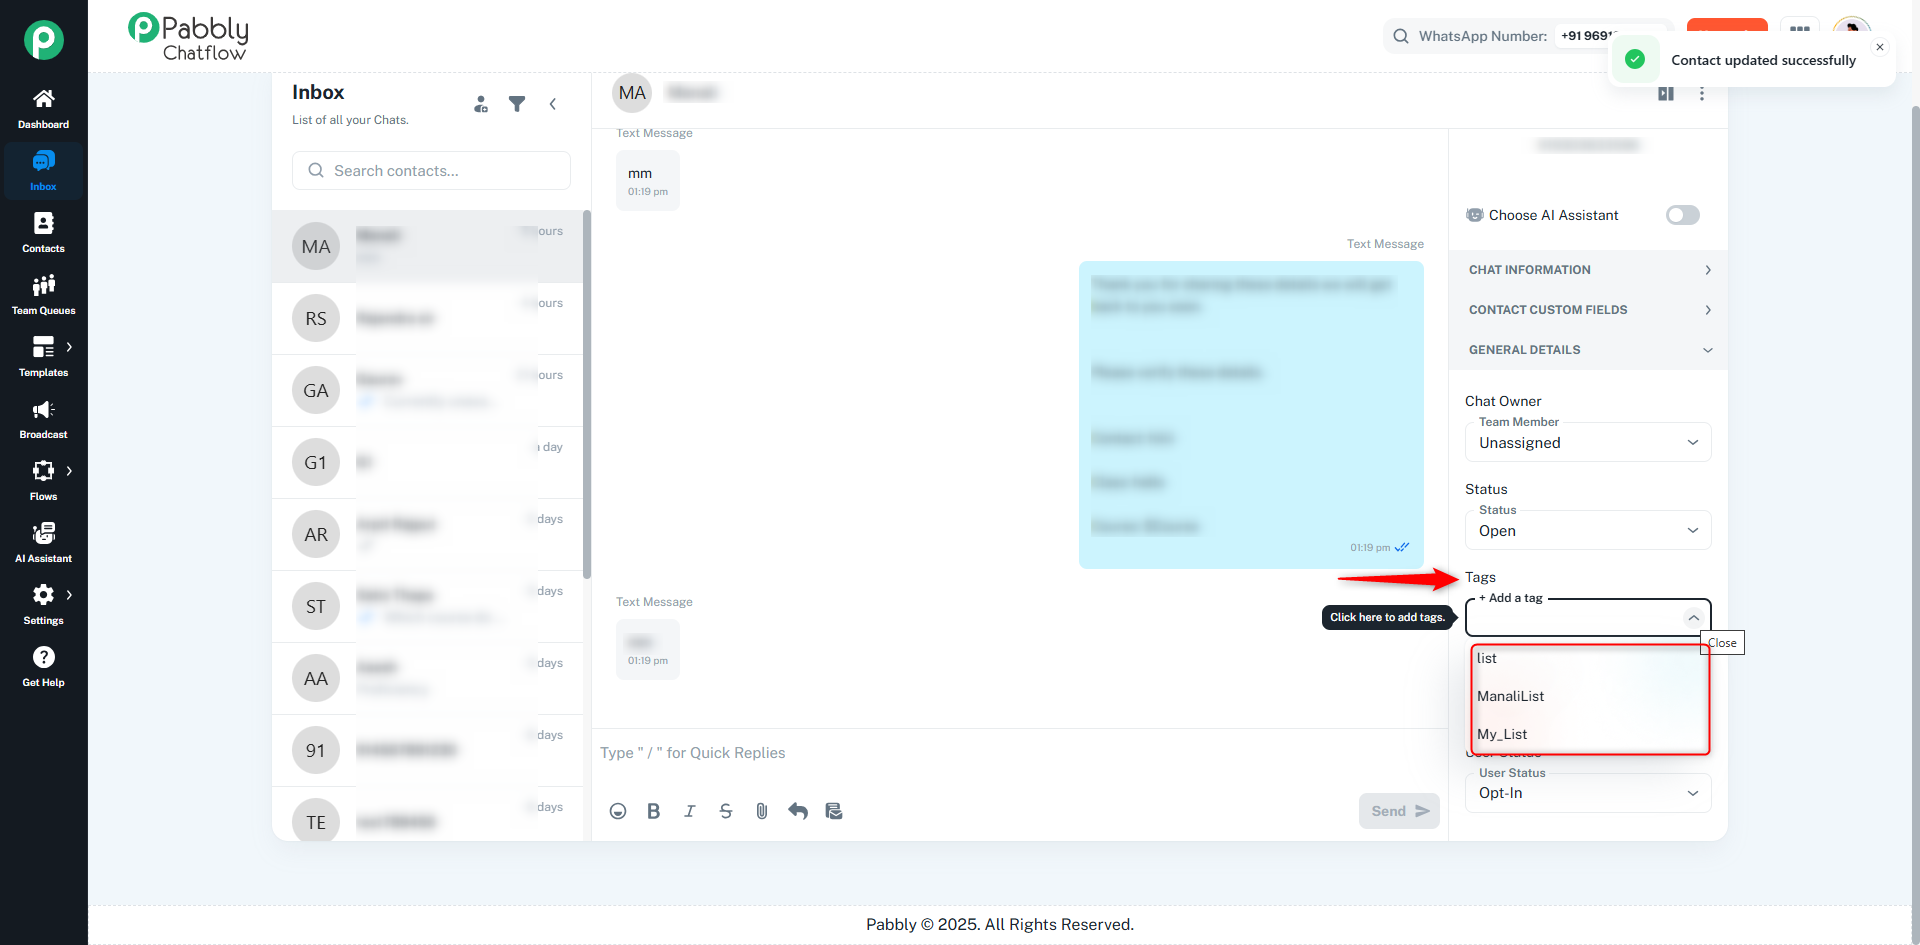
Tags: Add tags to help categorize chats based on customer type, urgency, or any other internal metrics (e.g., “High Priority,” “Sales Lead”).
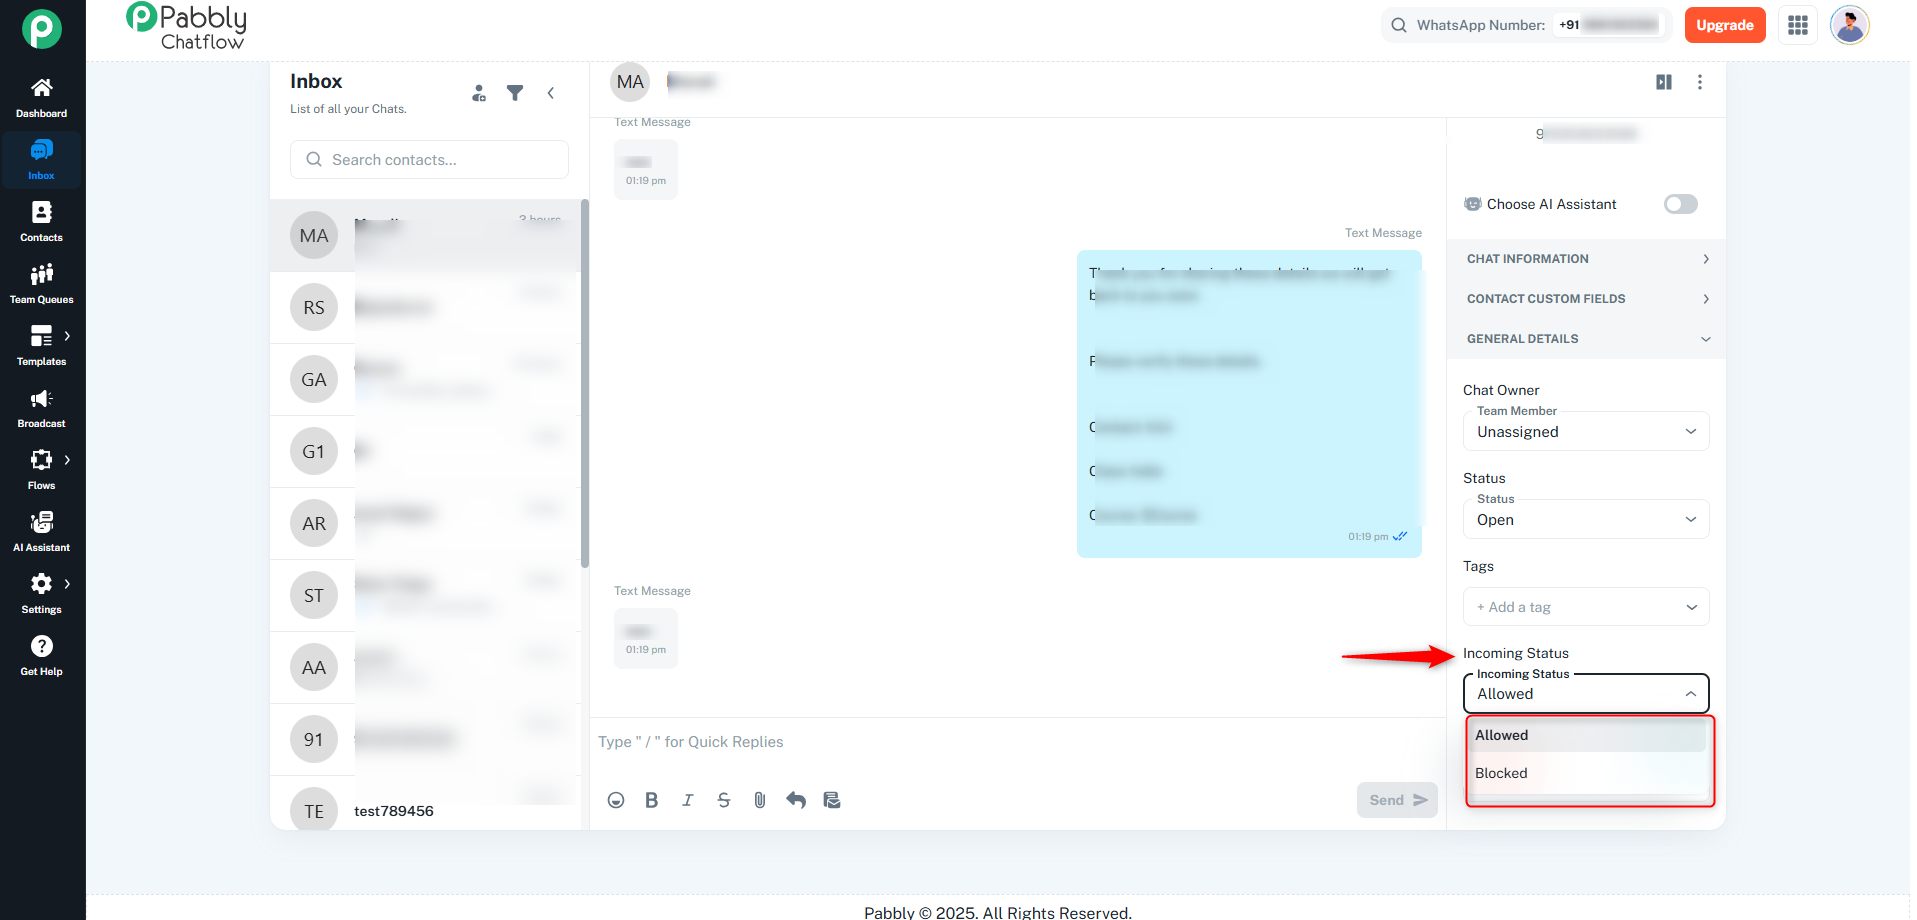
Incoming Status: Displays whether the chat is allowed or blocked by WhatsApp, helping you manage active communication lines.
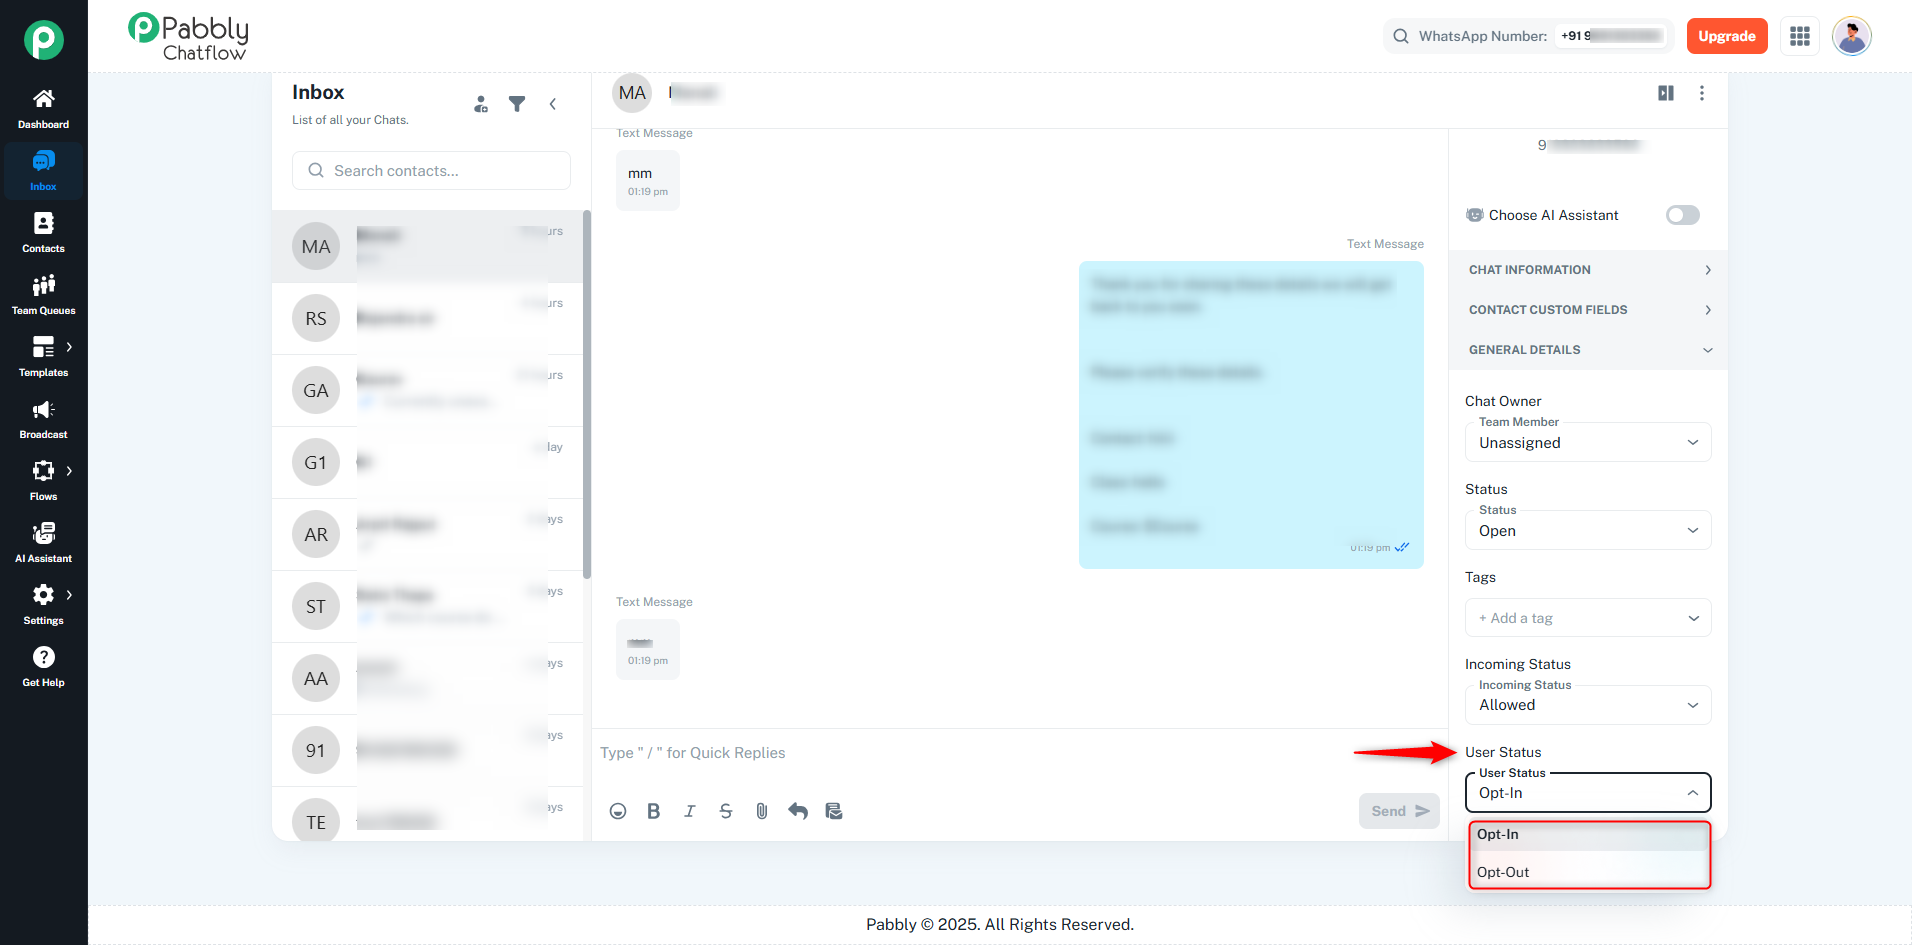
User Status (Opt-In/Opt-Out):
Opt-In: The customer has given explicit consent to receive messages from your business.
Opt-Out: The customer has opted out, and no further messages can be sent to them unless they opt back in.
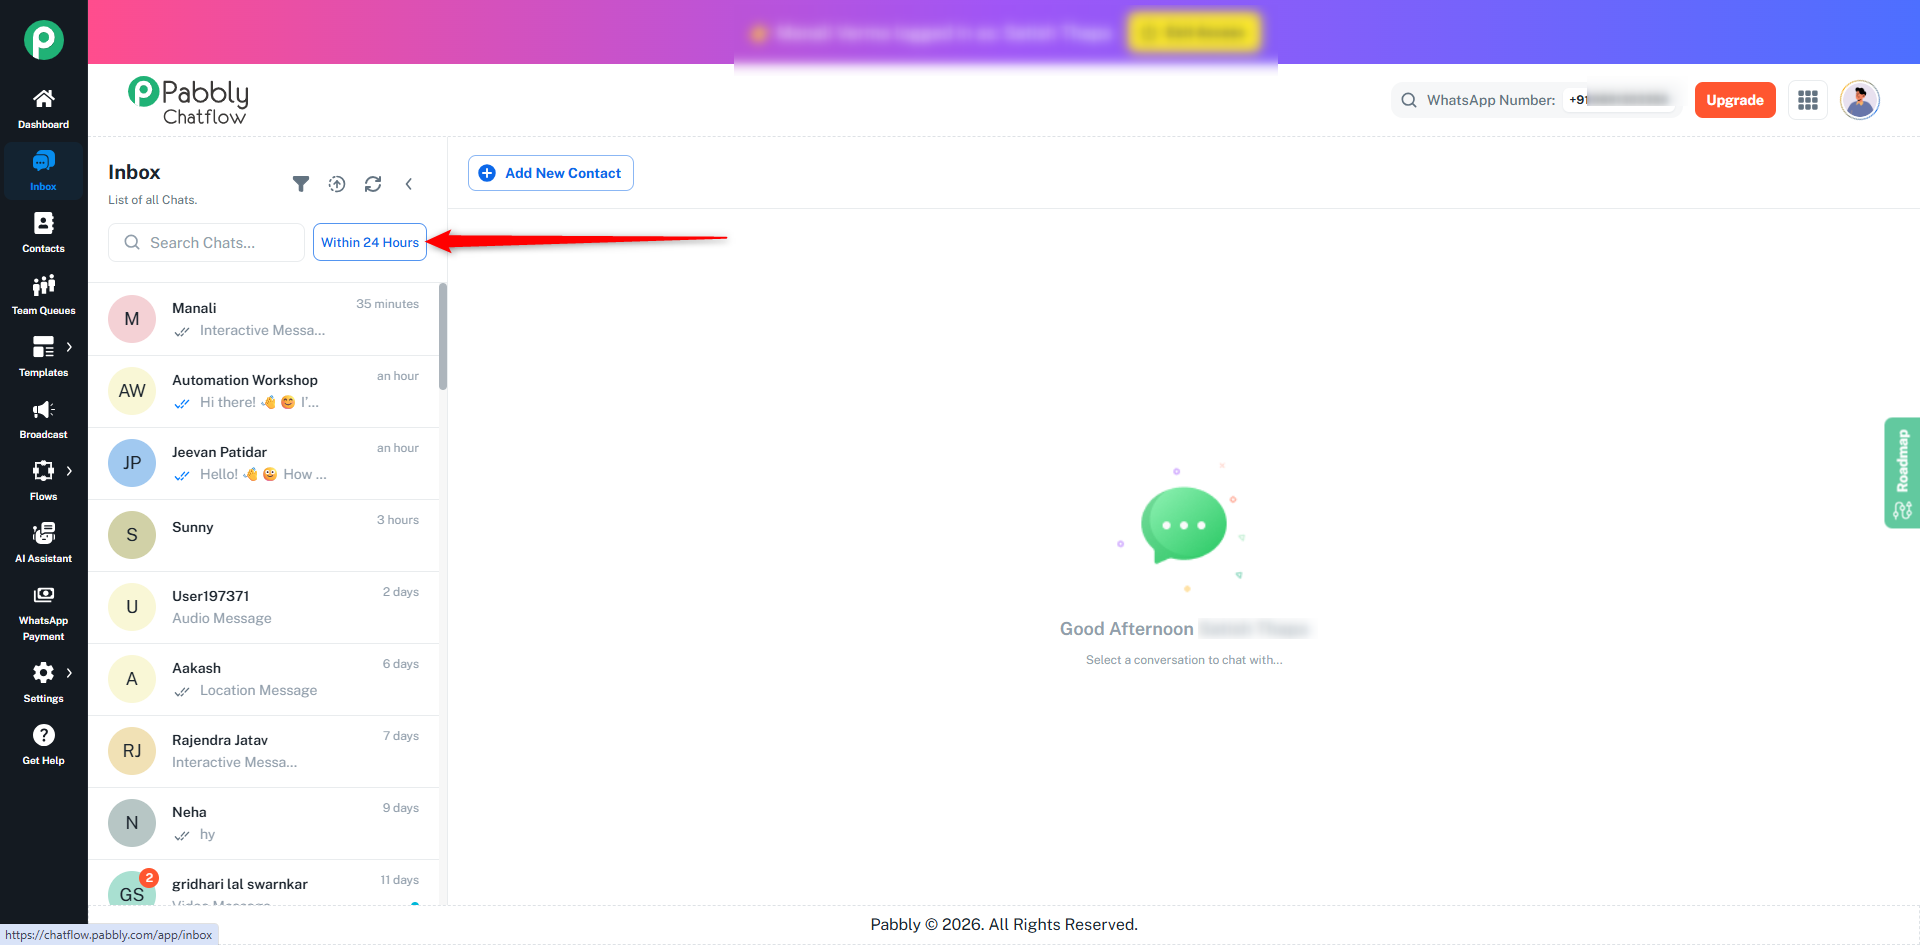
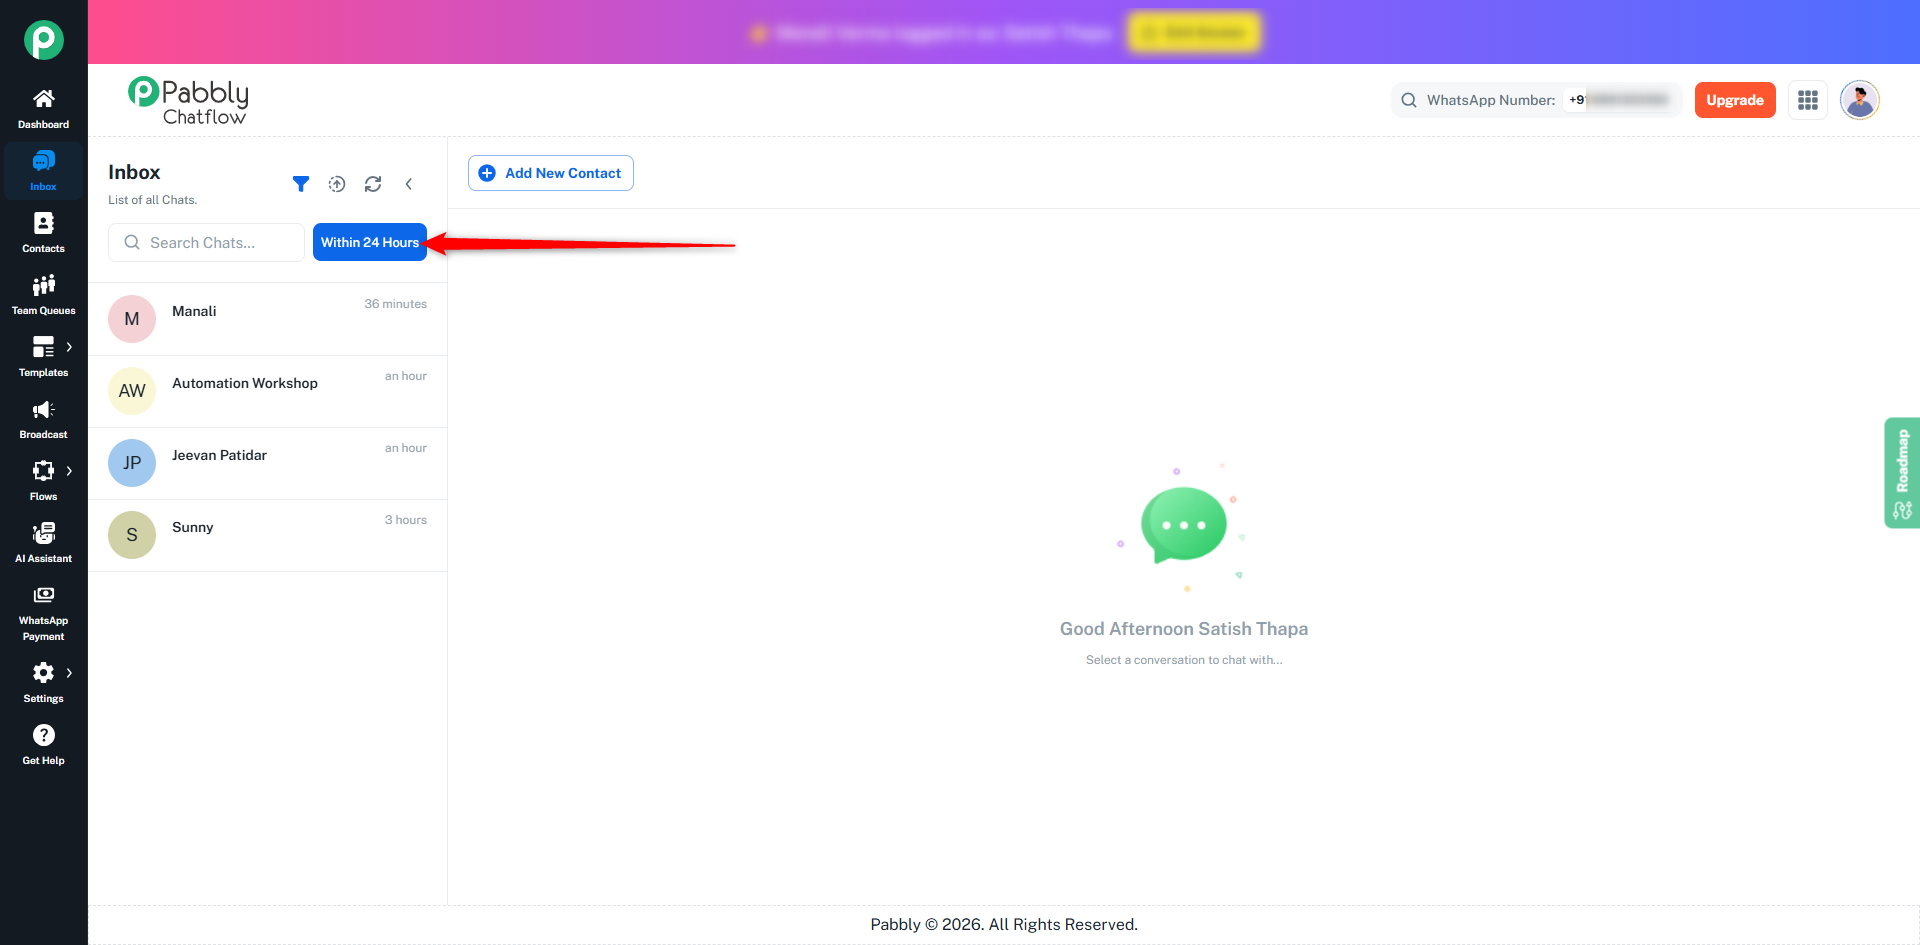
The Within 24 Hours filter helps you quickly view only those chats that are currently inside the active 24-hour WhatsApp messaging window.
Click the Within 24 Hours button available at the top of the chat list.
Once enabled, only chats that are currently in the active 24-hour session will be displayed.
Click the button again to remove the filter and view all chats.
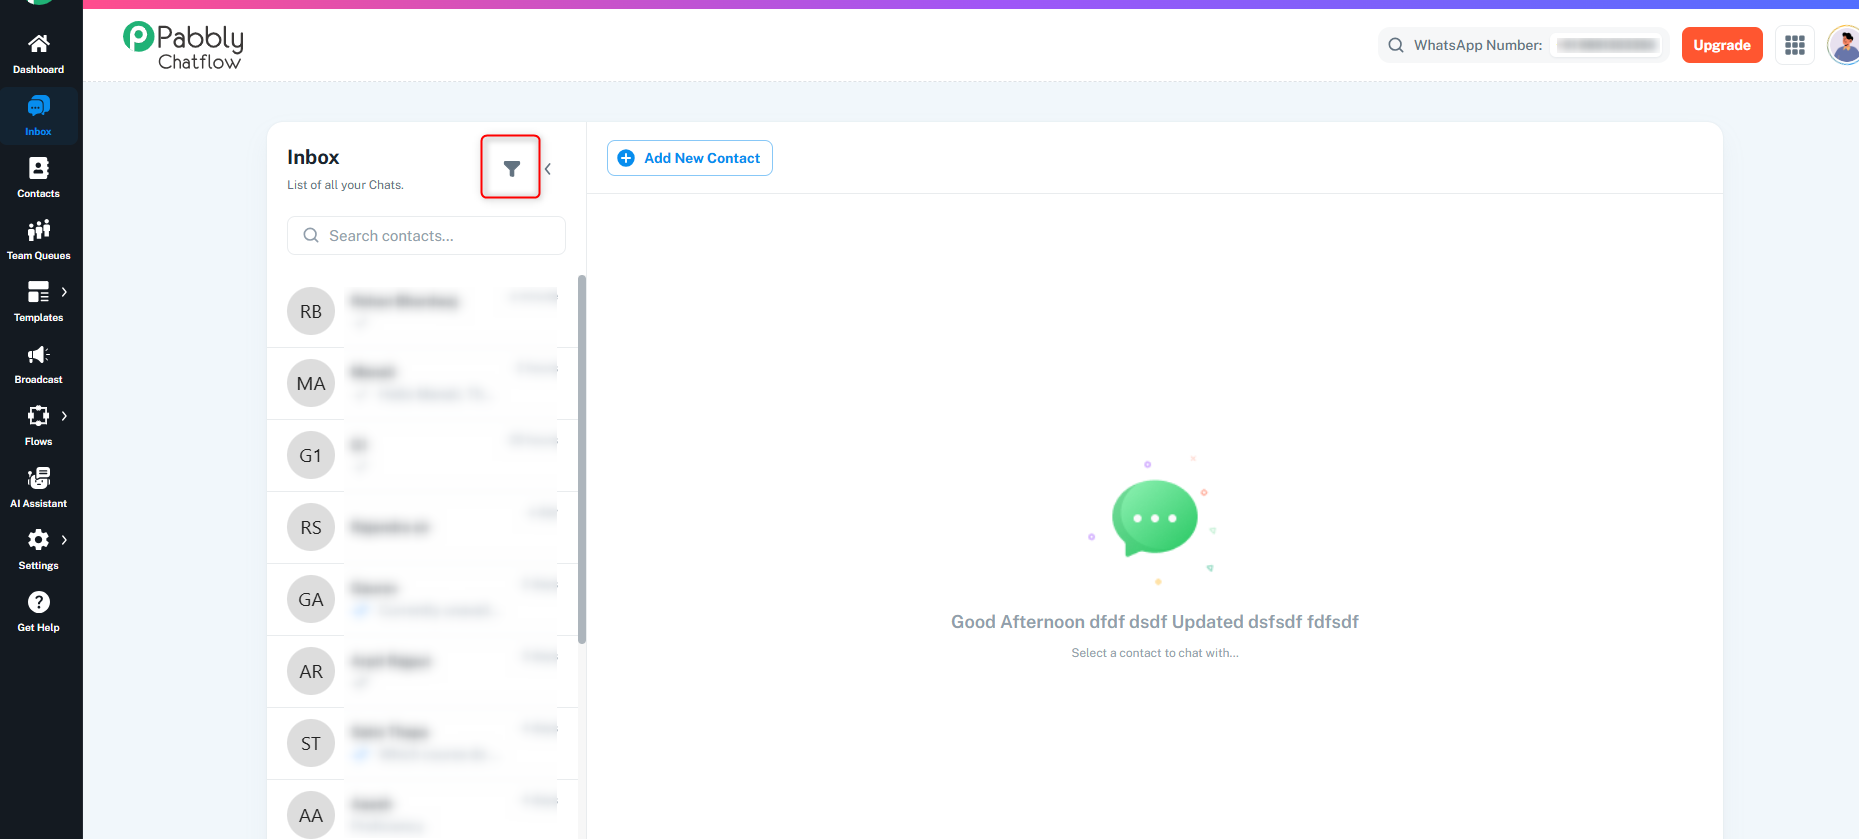
The Chat Filter allows you to organize and sort your chats based on several important conditions, which helps you stay efficient and prioritize the right conversations.
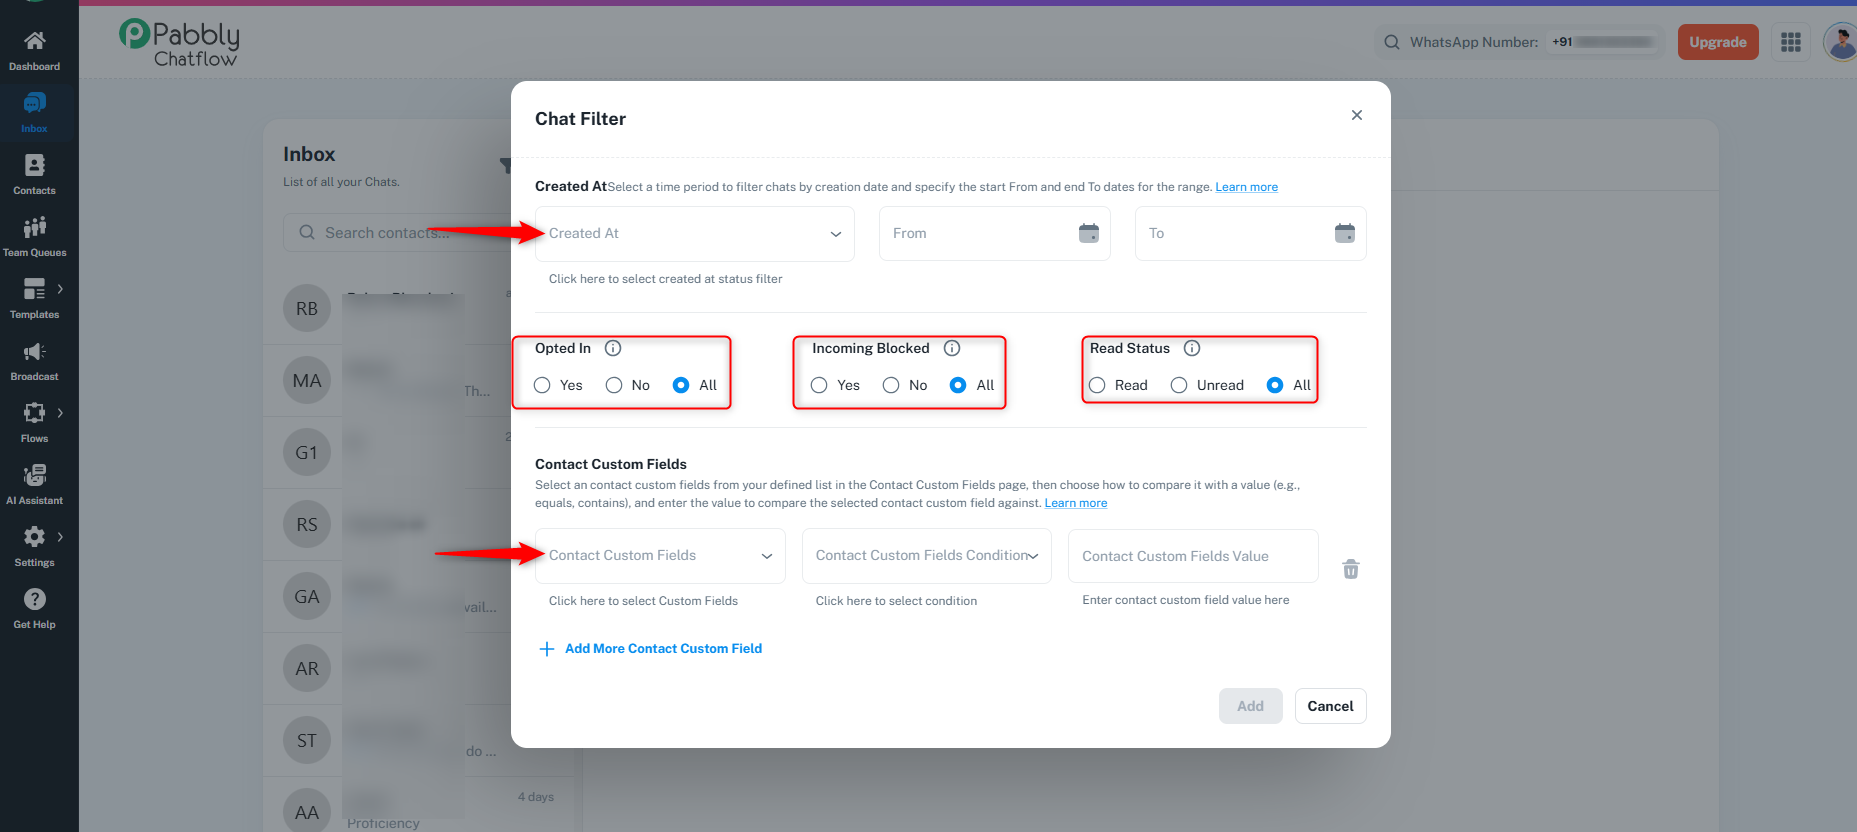
Created At: Filter chats based on the creation date (from and to date).
Opted In: Filter based on whether the contact has opted in or not (Yes/No).
Incoming Blocked: Filter based on whether the contact’s WhatsApp messages are blocked (Yes/No).
Read Status: Filter chats by whether they are marked as Read, Unread, or All.
Contact Custom Fields: Filter chats based on custom field values, such as Location, Customer Type, etc.
See all incoming WhatsApp messages instantly.
Conversations are organized in a left-hand column and open in the main chat panel when clicked.
Type responses manually or use:
Pre-approved WhatsApp templates (e.g., “Order confirmation”).
Quick Replies for repetitive messages.
Media attachments (images, documents, audio, video).
Assign a chat to yourself, a teammate, or a team.
If Round Robin is enabled for the team, new chats are auto-distributed.
Reassign chats if workloads change or escalation is needed.
On the right side of the screen, view:
Customer name and number.
Tags and labels.
Custom contact fields (like location, email, or order ID).
Use status indicators like:
Open
On Hold
Replied
Intervened
Pending
Resolved
Closed
These help your team prioritize and organize ongoing conversations.
Message statuses indicate the delivery progress of messages sent from Pabbly Chatflow to recipients.
Each status represents a specific stage in the message delivery process.
What it means:
The message has been submitted from Pabbly Chatflow and is waiting for Meta’s approval.
The message is under review by Meta (WhatsApp Business Platform).
Meta checks if the message content complies with its policies.
The message will only move to “Sent” status once Meta approves it.
If Meta rejects the message, it will show as Failed instead of “Sent.”
Status Updates:
The system automatically updates the message status as soon as the webhook is received from Meta.
Usually, Meta does not take too long to send the webhook.
What it means:
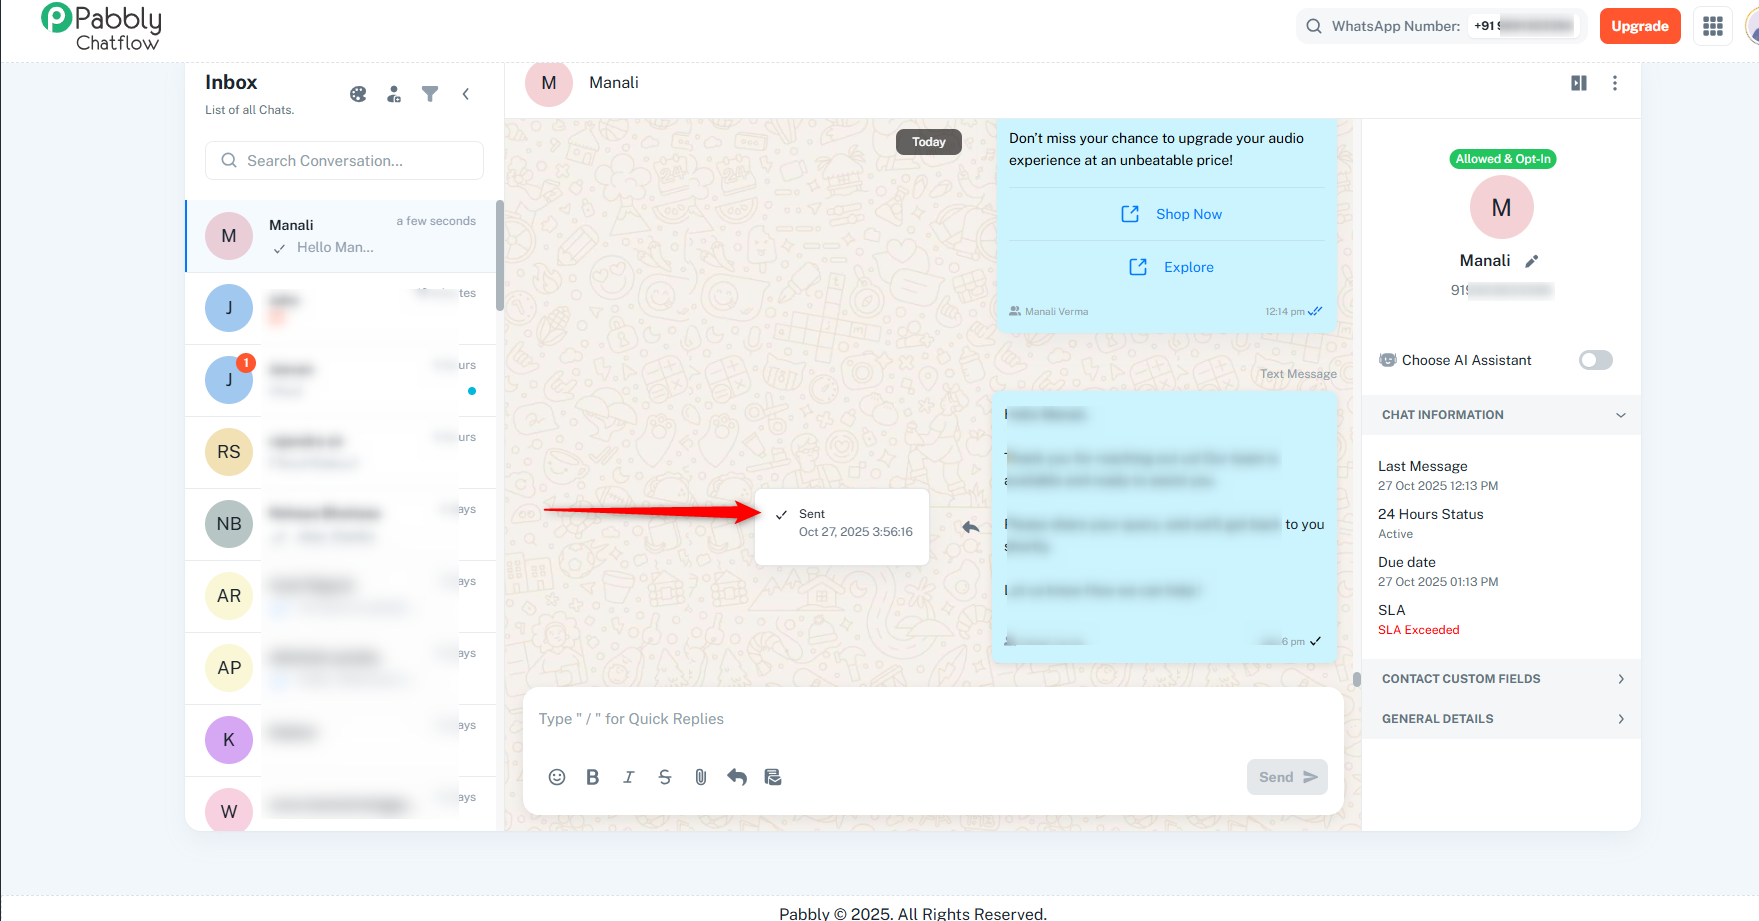
The message has been approved by Meta and successfully sent from Pabbly Chatflow to the recipient.
Meta approved the message content and accepted it for delivery.
The message has left the Pabbly Chatflow system.
It has been transmitted to the messaging platform (e.g., WhatsApp).
This does not mean the recipient has received it yet.
Timestamp: Displays when the message was approved and sent from Pabbly Chatflow via Meta.
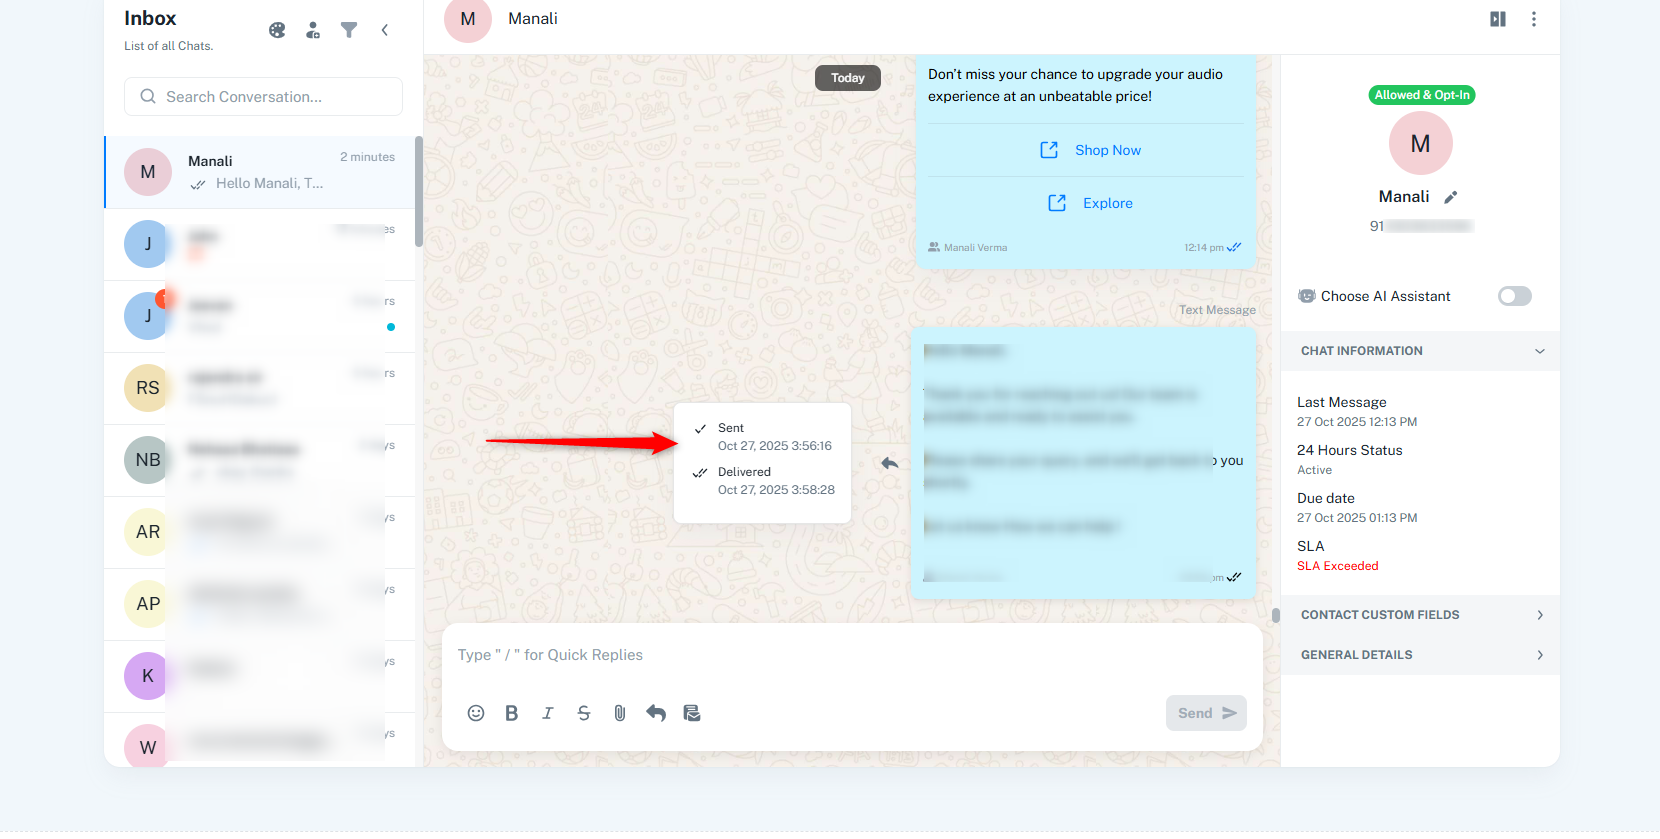
What it means:
The message has reached the recipient’s device.
Successfully delivered to the recipient’s phone or device.
Now visible in their inbox, but not necessarily opened yet.
Timestamp: Displays when the message was delivered to the recipient’s device.
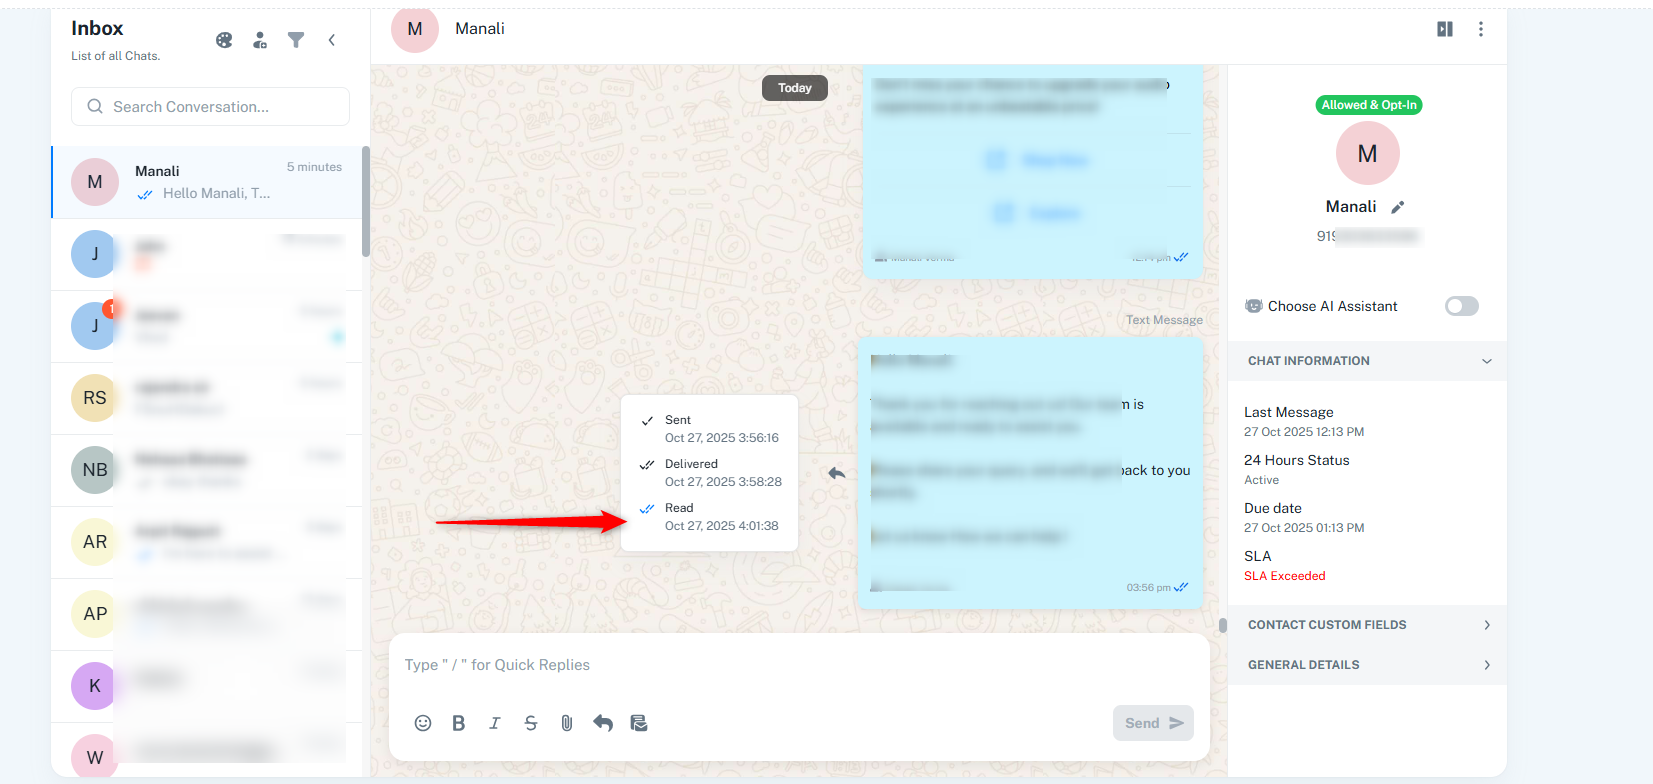
What it means:
The recipient has opened and read your message.
The recipient has opened the message.
Confirms they viewed the message content.
Timestamp: Displays when the message was read.
Note: Read receipts may not always appear if the recipient has disabled this feature in their privacy settings.
What it means:
The message could not be delivered or was rejected by Meta
Common Reasons:
Invalid phone number or contact details.
The recipient has blocked your number.
Network or connectivity issues.
Violation of Meta’s policies (e.g., prohibited content).
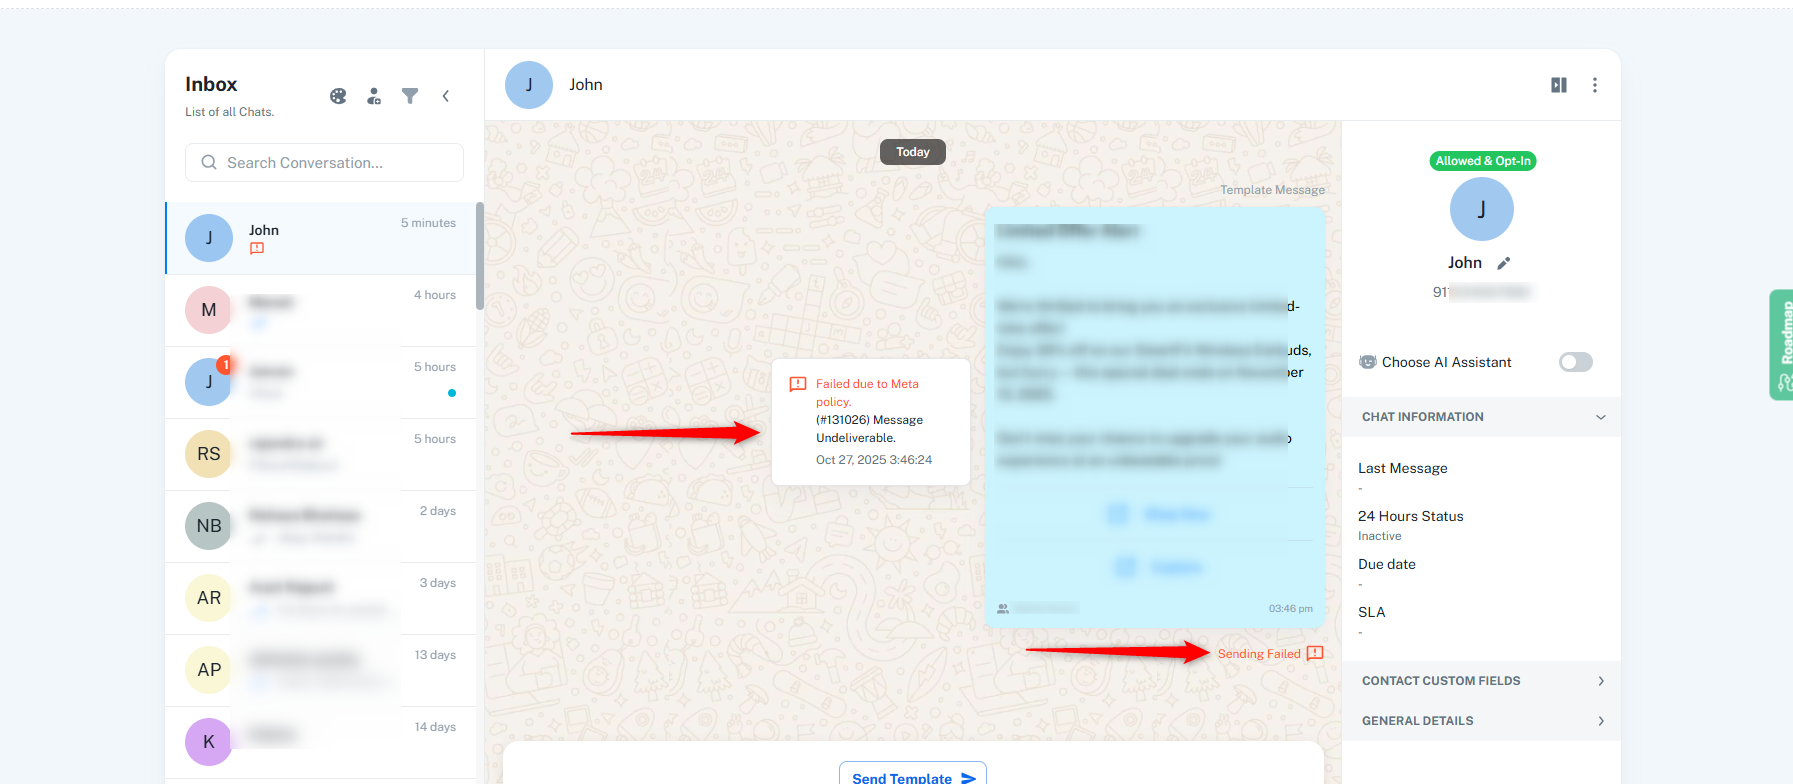
Error Details: Review the error message for the specific cause.
Action Required:
Verify the recipient’s contact information.
Check the error message for the specific issue.
Ensure your message content complies with platform policies.
Retry sending after resolving the problem.
The Chat Refresh feature helps reload the Inbox when chats fail to load after long inactivity.
By clicking Refresh, the Inbox is reloaded and the latest chats are fetched, allowing you to continue working smoothly.
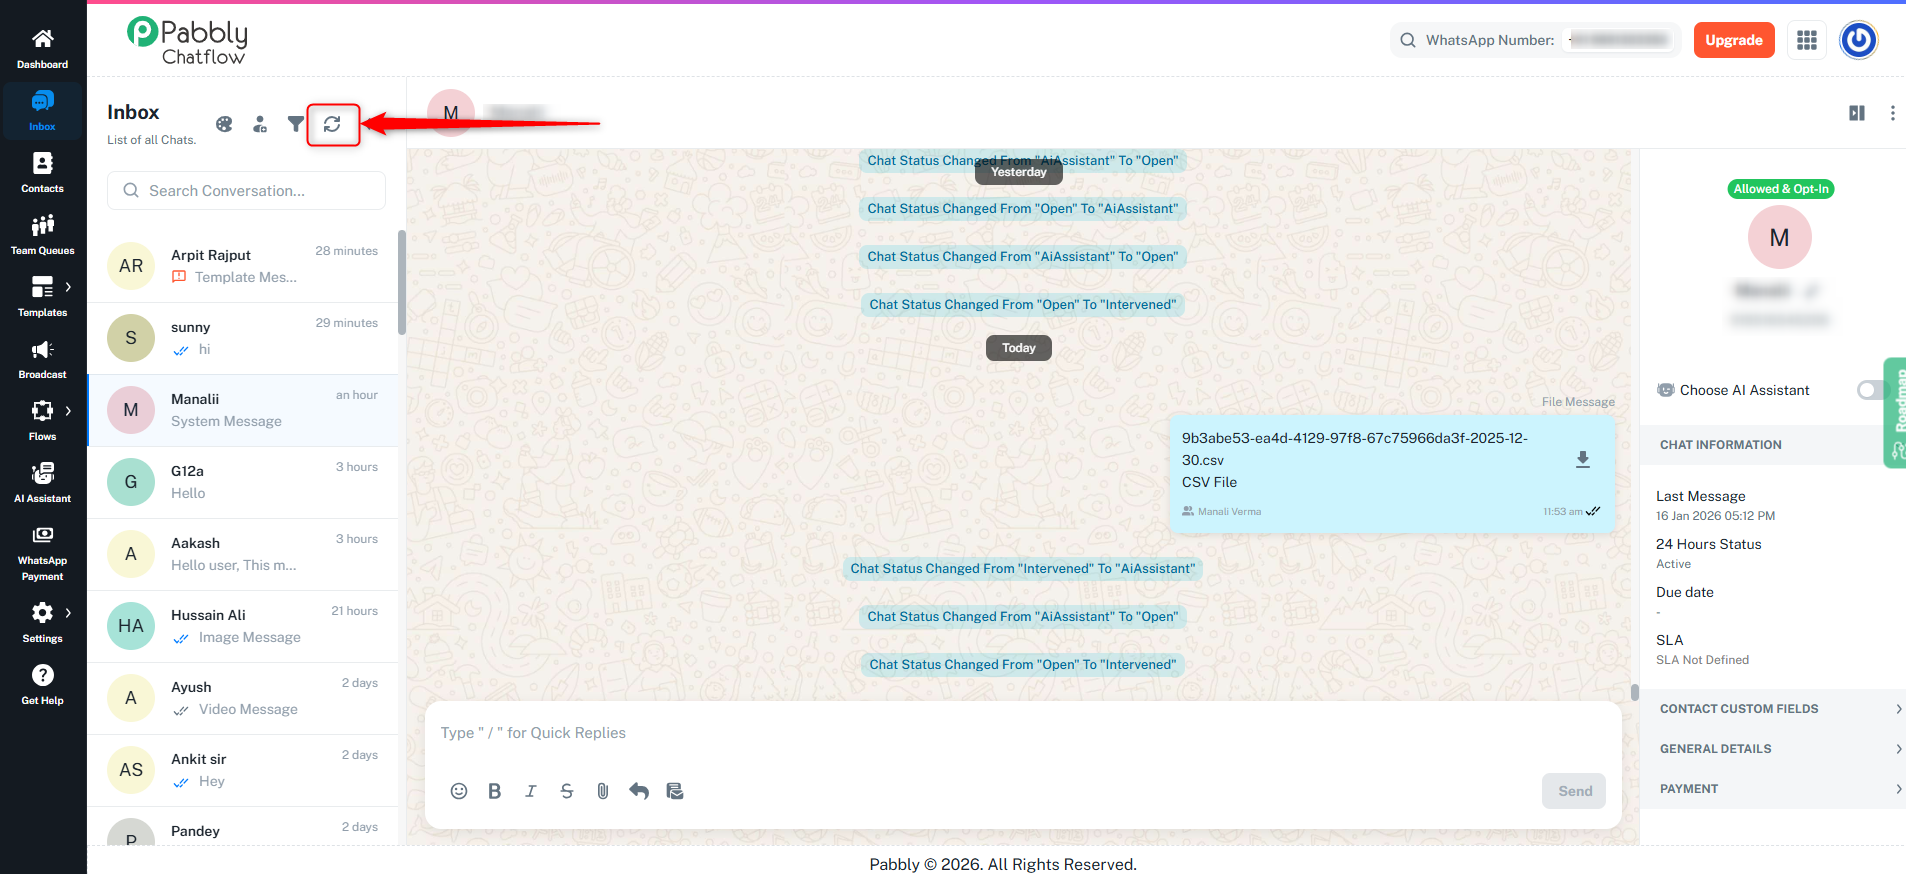
You should use the Refresh option when:
The Inbox chat list does not load after long inactivity.
Previously visible chats disappear or fail to fetch.
When you click the Refresh button in the Inbox:
The application reloads safely.
Any temporarily stored inbox data is cleared.
The system fetches the latest chats directly from the Inbox.
Your Inbox is restored with up-to-date conversations.
Important Note:
After a successful refresh, the Refresh button is automatically disabled for 24 hours.
This limitation is applied to:
Prevent repeated reloads.
Avoid unnecessary data resets.
Protect Inbox performance and stability.
Once the 24-hour window passes, the Refresh option becomes available again.
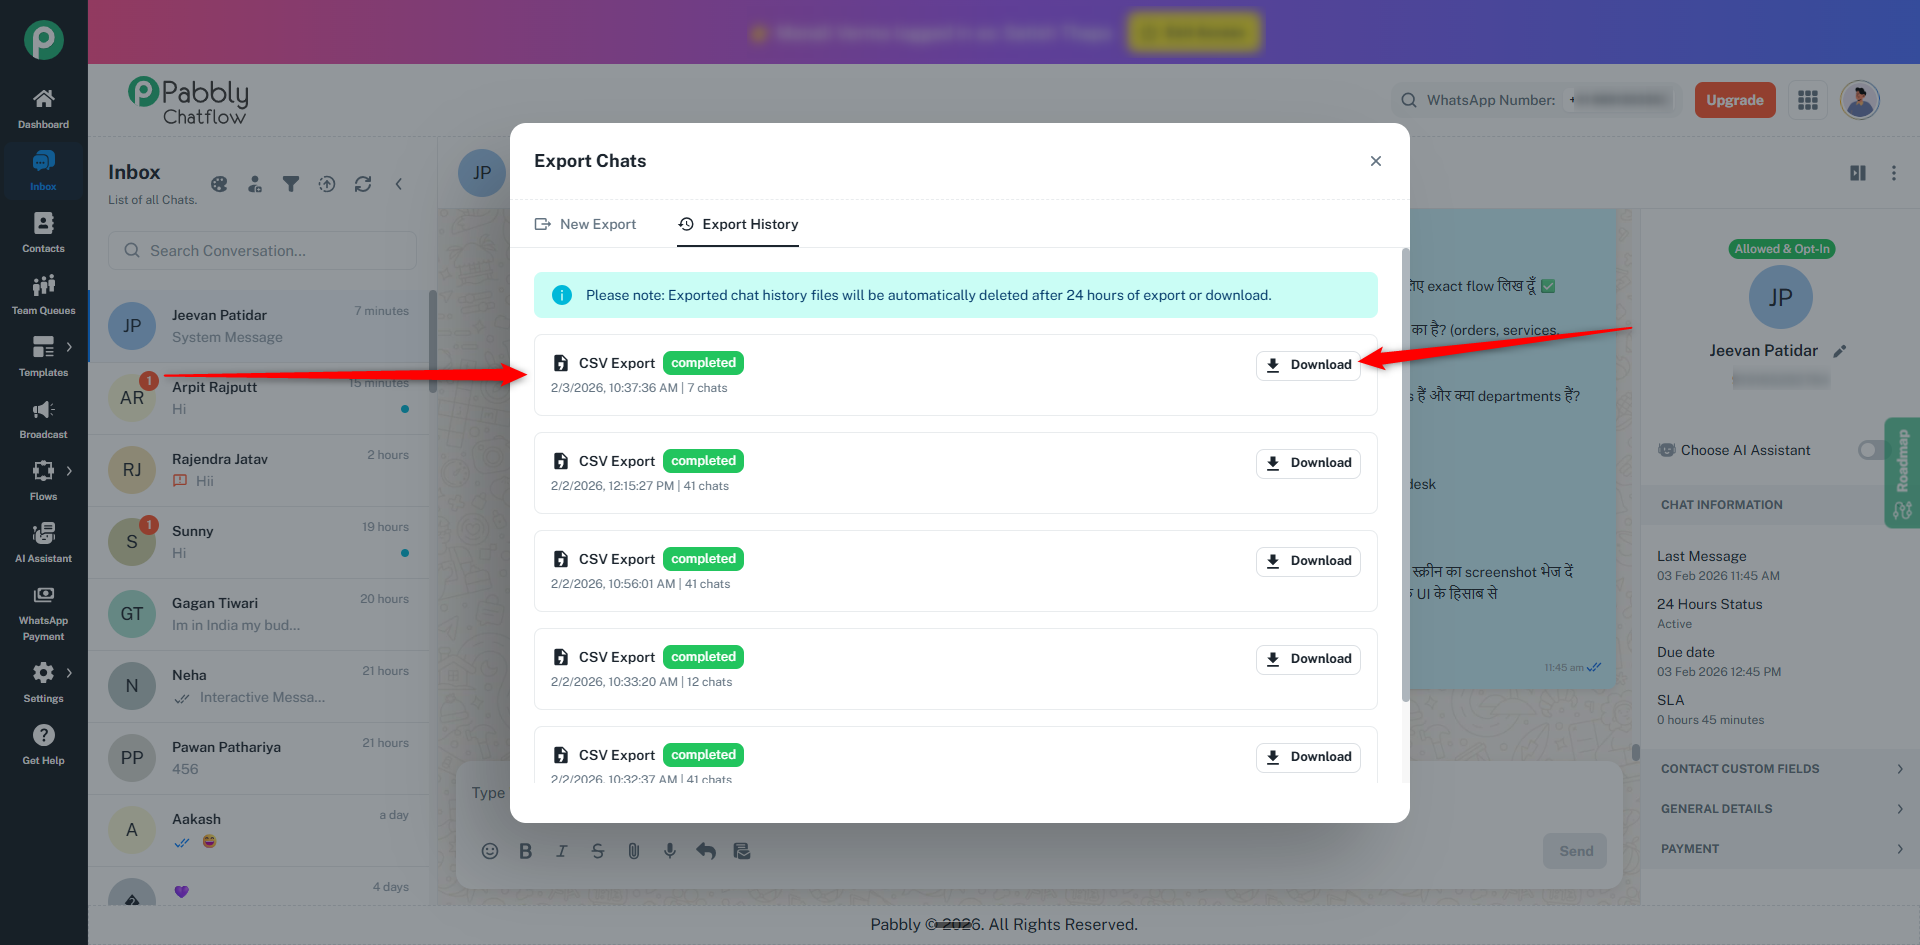
The Chat Export feature allows you to download your Inbox chat data in structured formats for reporting, analysis, or record-keeping. You can export chats based on date range and chat status, and also track previously generated exports using Export History.
To export chats from your Inbox:
Open the Inbox section.
Click the Export icon next to the Add New Contact button.
The Export Chats popup will open.
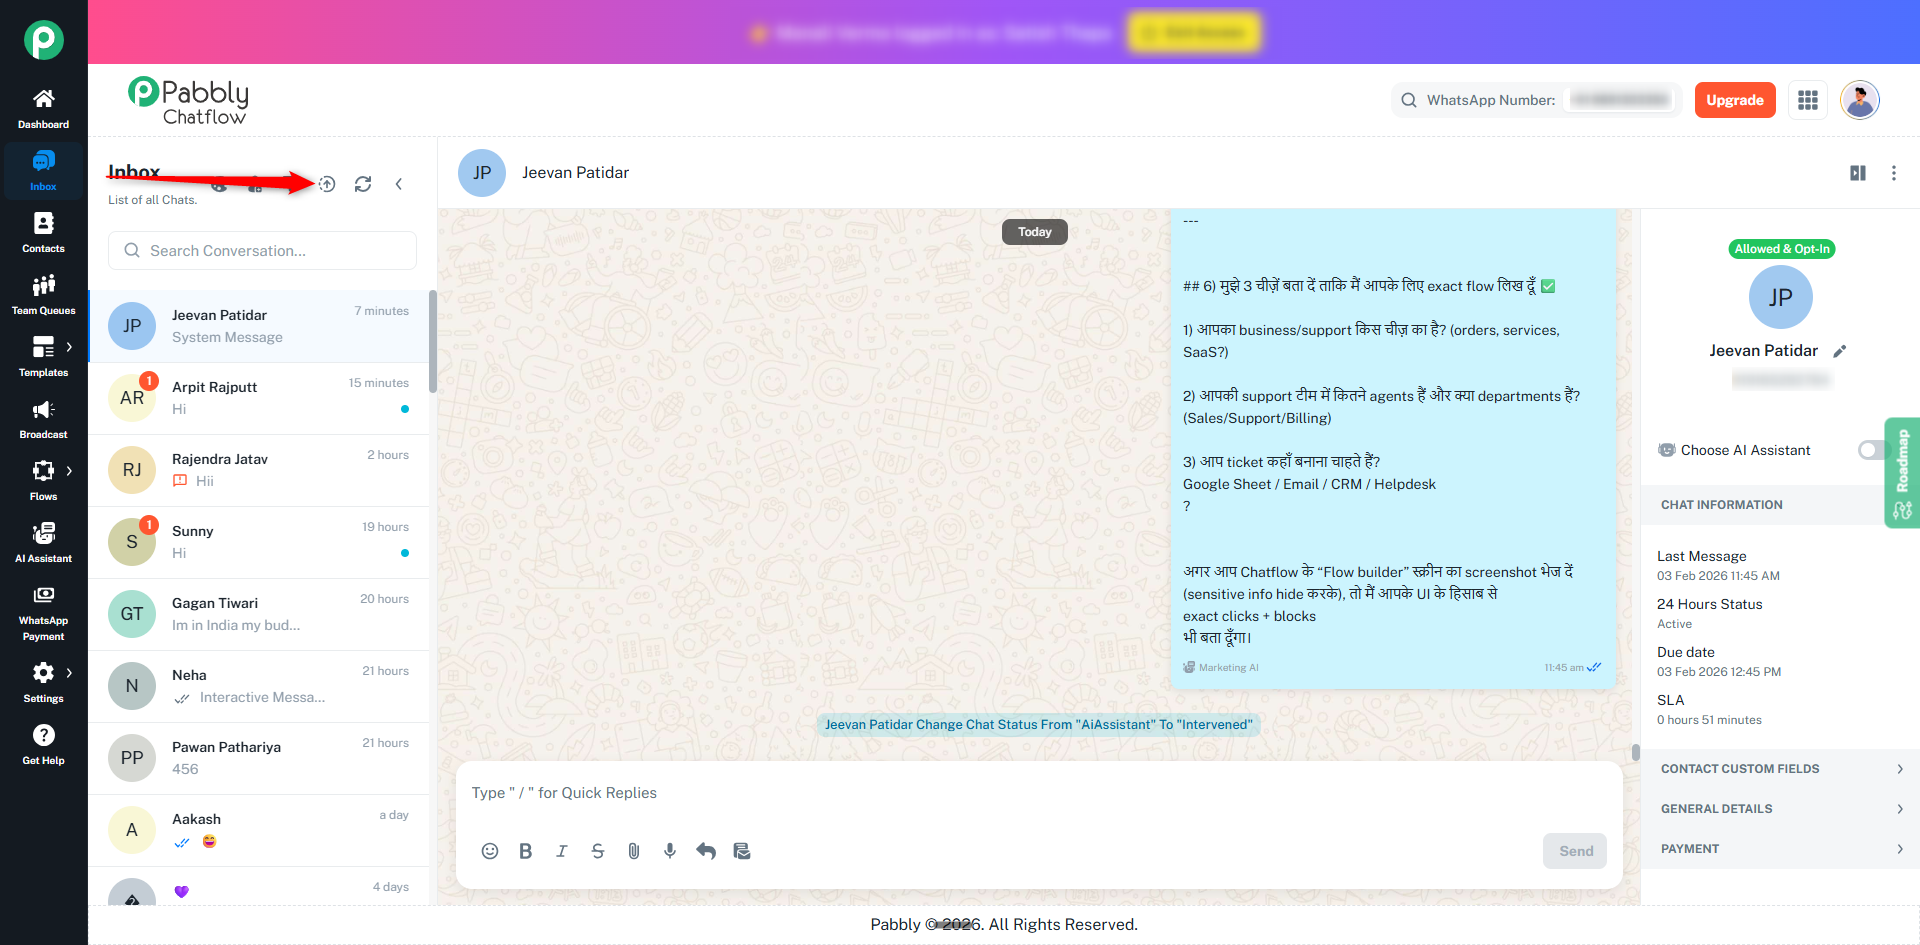
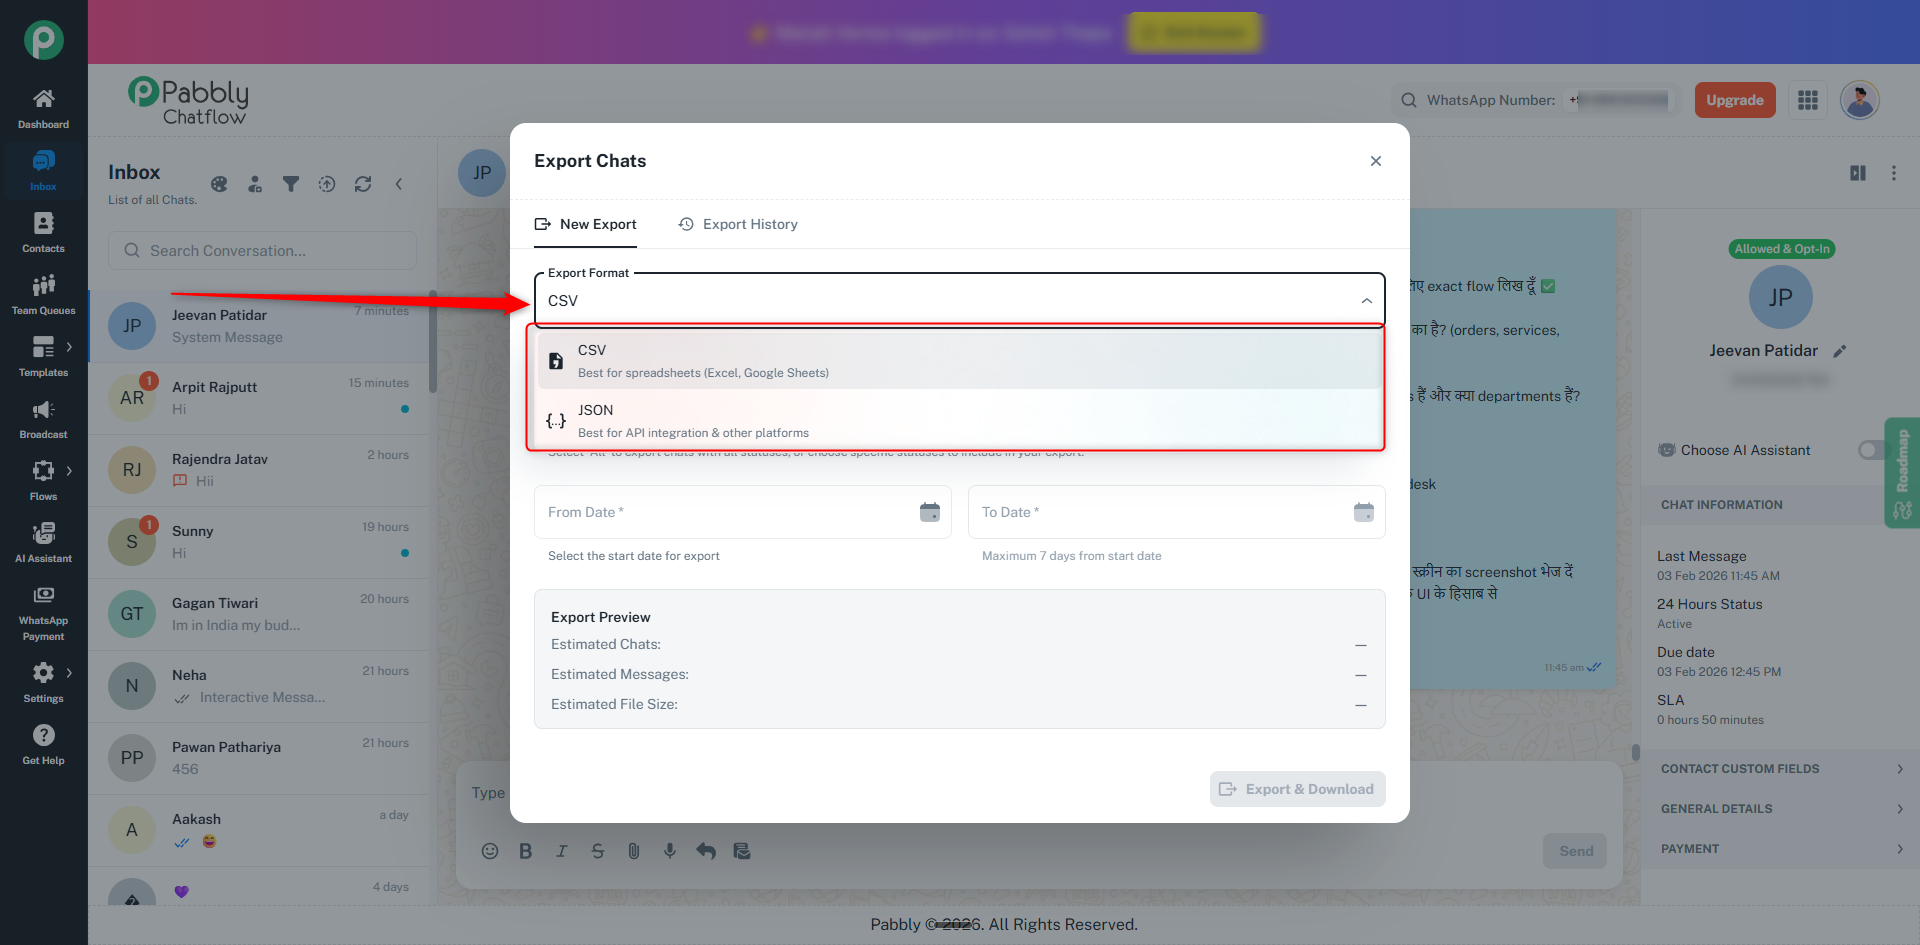
While exporting chats, you can configure the following options:
Choose the format best suited for your use case:
CSV – Ideal for spreadsheets (Excel, Google Sheets).
JSON – Best for API integrations and other platforms.
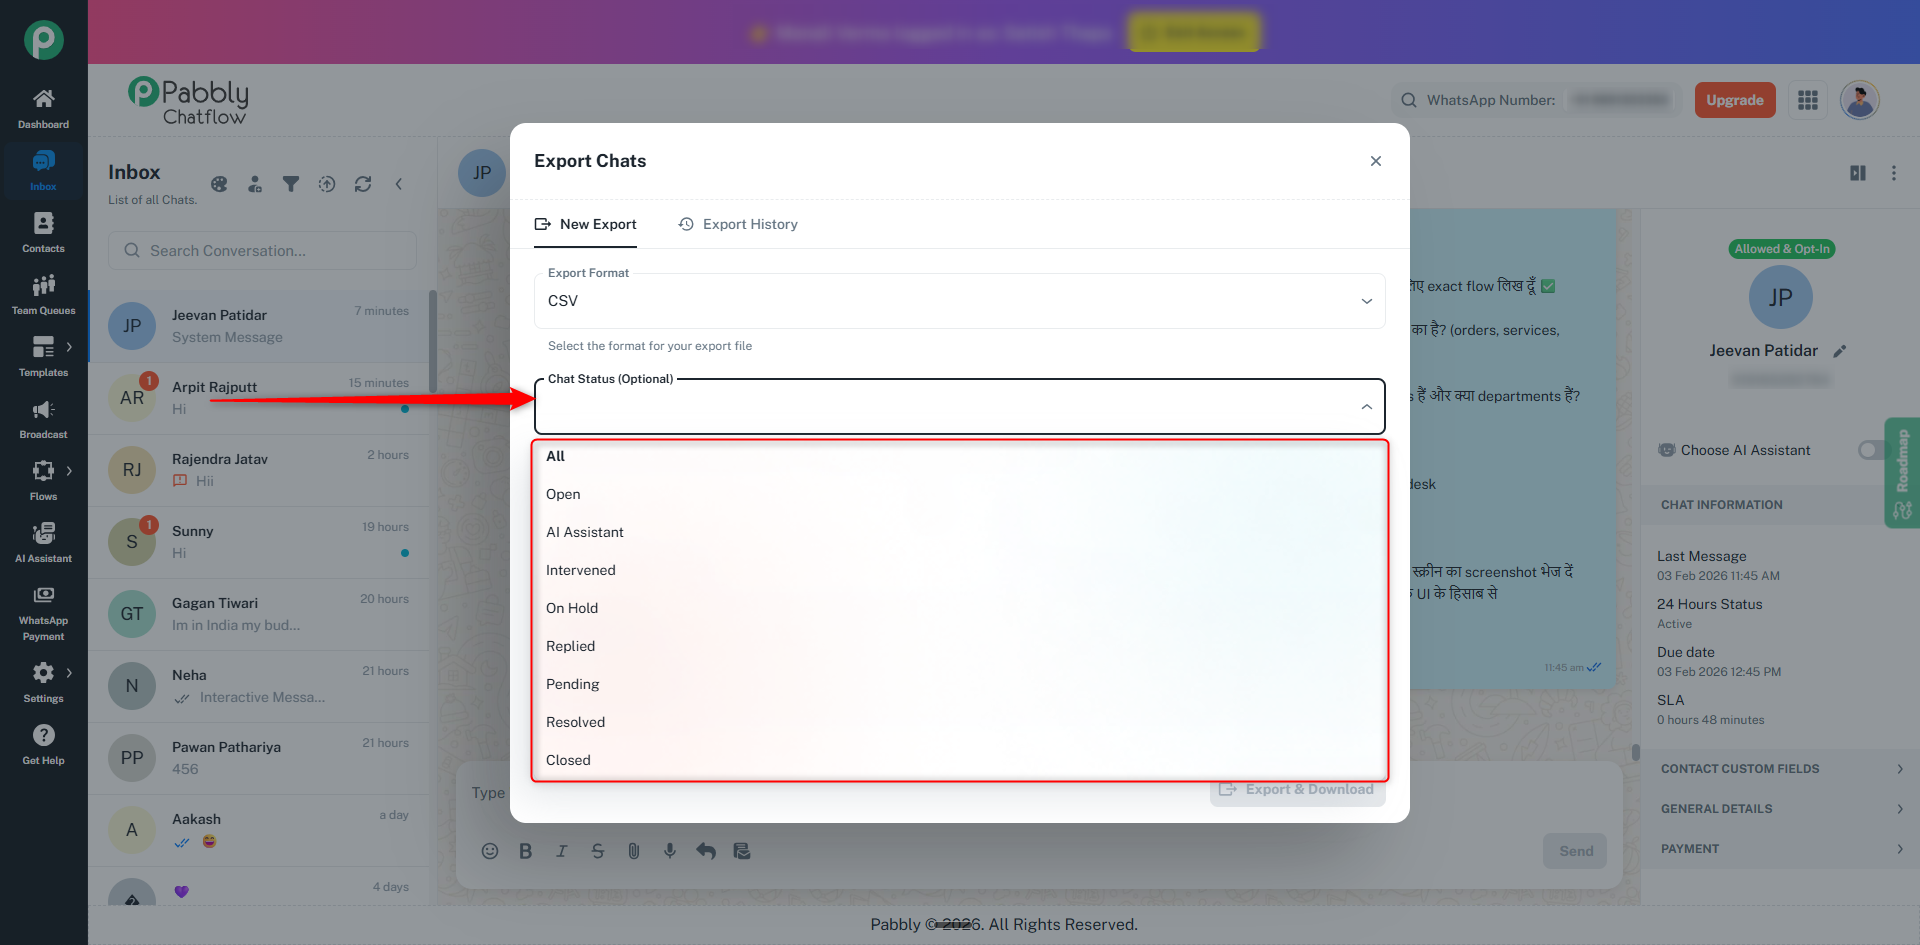
You can export chats based on their status:
All
Open
AI Assistant
Intervened
On Hold
Replied
Pending
Resolved
Closed
If no specific status is selected, chats from all statuses are included.
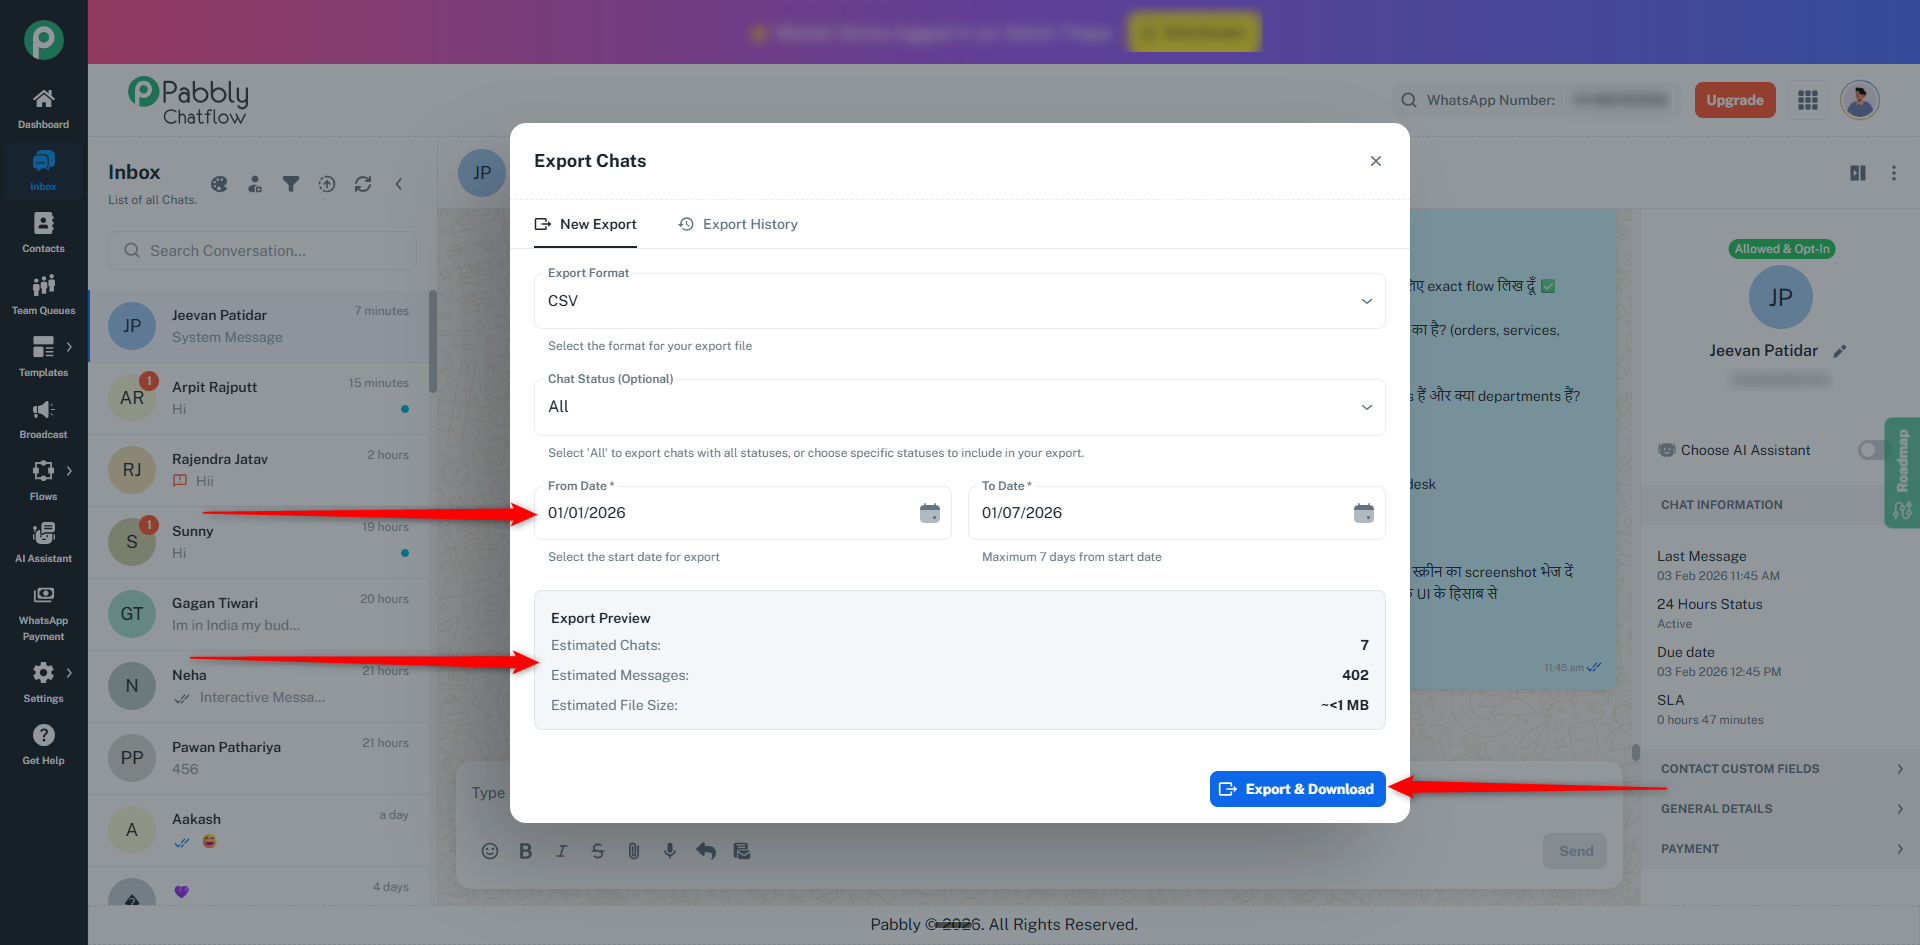
Select a From Date and To Date
Maximum export range is 7 days from the selected start date
Before downloading, the system shows an Export Preview, including:
Estimated Chats
Estimated Messages
Estimated File Size
This helps you understand the export scope before proceeding.
Once all required fields are selected:
Click Export & Download
The system generates your export file
The file is downloaded automatically
Export History
The Export History tab allows you to:
View previously generated exports
Track export date and time
Re-download past export files when needed
This ensures transparency and easy access to historical exports.
Important Notes:
Each export request supports a maximum 7-day date range
Exporting chats does not affect live Inbox data
Export History is available for reference and re-downloads
Please note: Exported chat history files are automatically deleted 24 hours after export or download
System Messages in Inbox
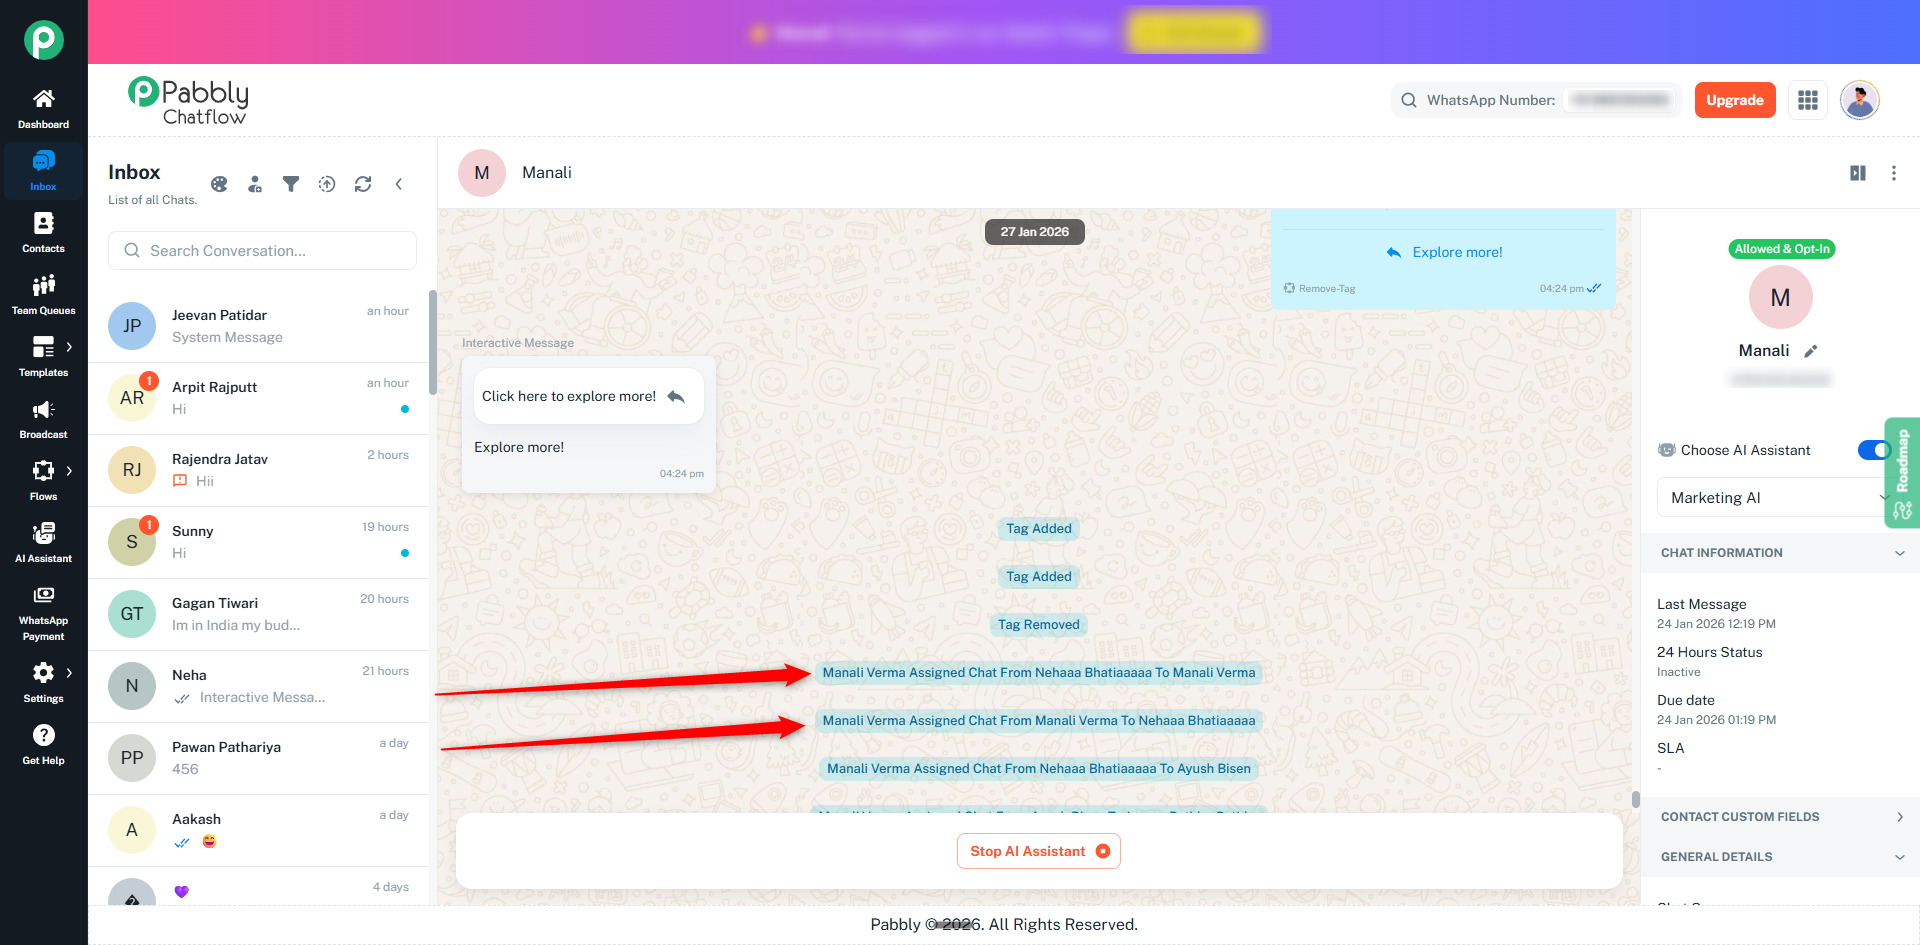
System Messages provide a clear activity log of important actions performed on a chat. They are automatically generated by the system to help teams track status changes, assignments, and other updates within a conversation.
System Messages appear directly in the chat timeline and are visually distinct from regular user messages, making them easy to identify.
System Messages are generated for the following actions:
Contact name updated
Contact number updated
Chat status changed
Tag added, updated, or removed
Custom field added, updated, or removed
User opt-in or opt-out status changed
Incoming status set to allowed or blocked
Chat assignment changes
These updates help you stay organized and keep track of all changes directly within the conversation.
All updates are available in one place — your Inbox.