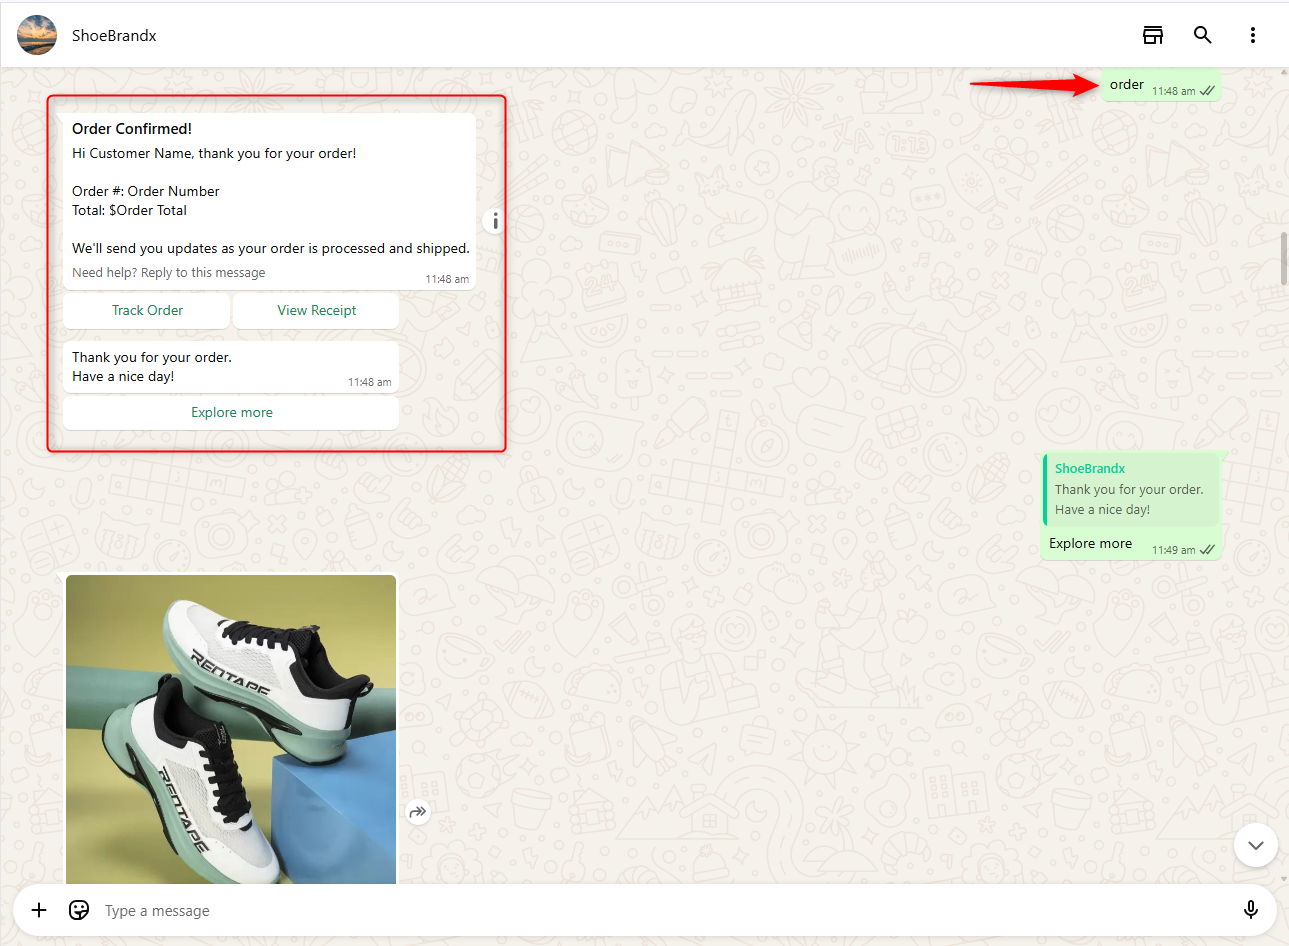
The Pabbly Chatflow Flow Builder enables you to create static chatbots effortlessly using an intuitive drag-and-drop interface. This guide will walk you through the process of building a chatbot in just 10 minutes.
The flow will only trigger if the chat status is not Intervened. If the chat status is Intervened, the flow will not execute. This is particularly applicable to the Keyword/Regex Match trigger event.
For other trigger events the flow will trigger regardless of whether the chat status is Intervened.
Trigger Events
The Trigger Events are defined to initiate actions or flows based on user interaction. You can choose different types of triggers to start your flow, such as keywords, regex patterns, or predefined events.
- Keyword/Regex Match
- Trigger the flow when a user's message matches any defined keyword or regex pattern.
- User Starts Conversation
- Trigger occurs when a user initiates a new conversation.
- Template Selected
- Trigger the flow when a user replies via a quick reply button on a sent template.
- WhatsApp Template Delivered
- Triggered when a WhatsApp message template is successfully delivered to a contact.
- Contact Added
- Trigger when a new contact is created manually or by lead.
- Contact Added to Contact List
- Trigger when a contact is added to one of the selected contact lists.
- Custom Field Updated
- Trigger when a custom field is added or updated for a contact.
- Tag Assigned
- Trigger the flow when a tag is assigned to a contact during an update.
- Payment Capture
- Triggers when a customer’s payment is successfully captured.
- Order Received
- Triggers when a customer adds a product to the cart.
- If you select this as the trigger event, make sure to set the order type as WhatsApp Cart in the WhatsApp Pay node.
Skip Trigger Matching
The Skip Trigger Matching toggle controls whether a flow should execute when an AI Assistant is already assigned to a conversation.
This toggle works only with Keyword/Regex Match triggers and does not apply to other trigger types.
How It Works
When Enabled
- If an AI Assistant is already assigned to the conversation:
→ The flow is skipped
- The AI Assistant continues responding normally
- No keyword or regex-based flow execution occurs
When Disabled (Default Behavior)
- Flow executes normally based on trigger conditions
- If user input matches:
- Defined keywords, OR
- Regex patterns
→ Flow will run
- This happens even if an AI Assistant is active
When to Use
1. AI-First Conversations
Use this when AI Assistant is the primary responder, and flows should not interrupt.
2. Ongoing Conversations
If a user is already engaged with AI, avoid restarting flows on every message.
Types of Messages You Can Create Using the Flow Builder
Important: The flow will only trigger if the chat status is not Intervened. If the chat status is Intervened, the flow will not execute. This is particularly applicable to the Keyword/Regex Match trigger event.
By default Flow Start shows Keyword/Regex, but you can choose any trigger from Trigger Events (keyword, template, webhook, schedule, contact added, tag, custom field, manual start, etc.).
1. Text Button Message
Text Button Messages allow you to send messages with Quick Reply buttons or Link buttons, and optionally continue the flow automatically.
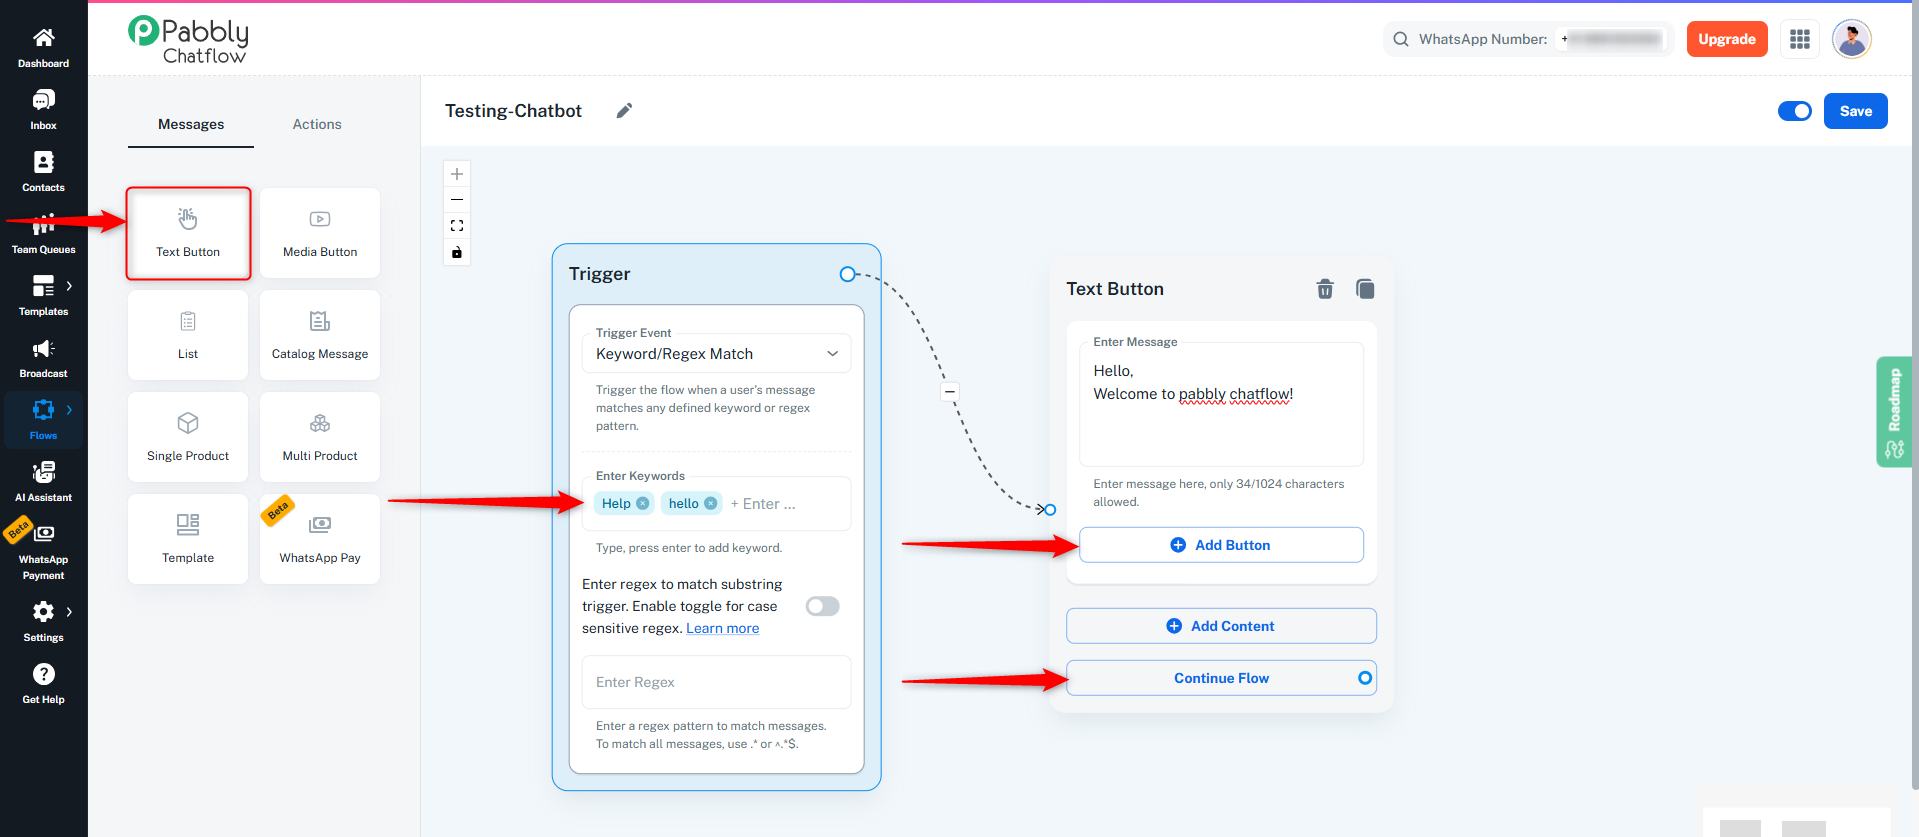
How to Create a Text Button Message:
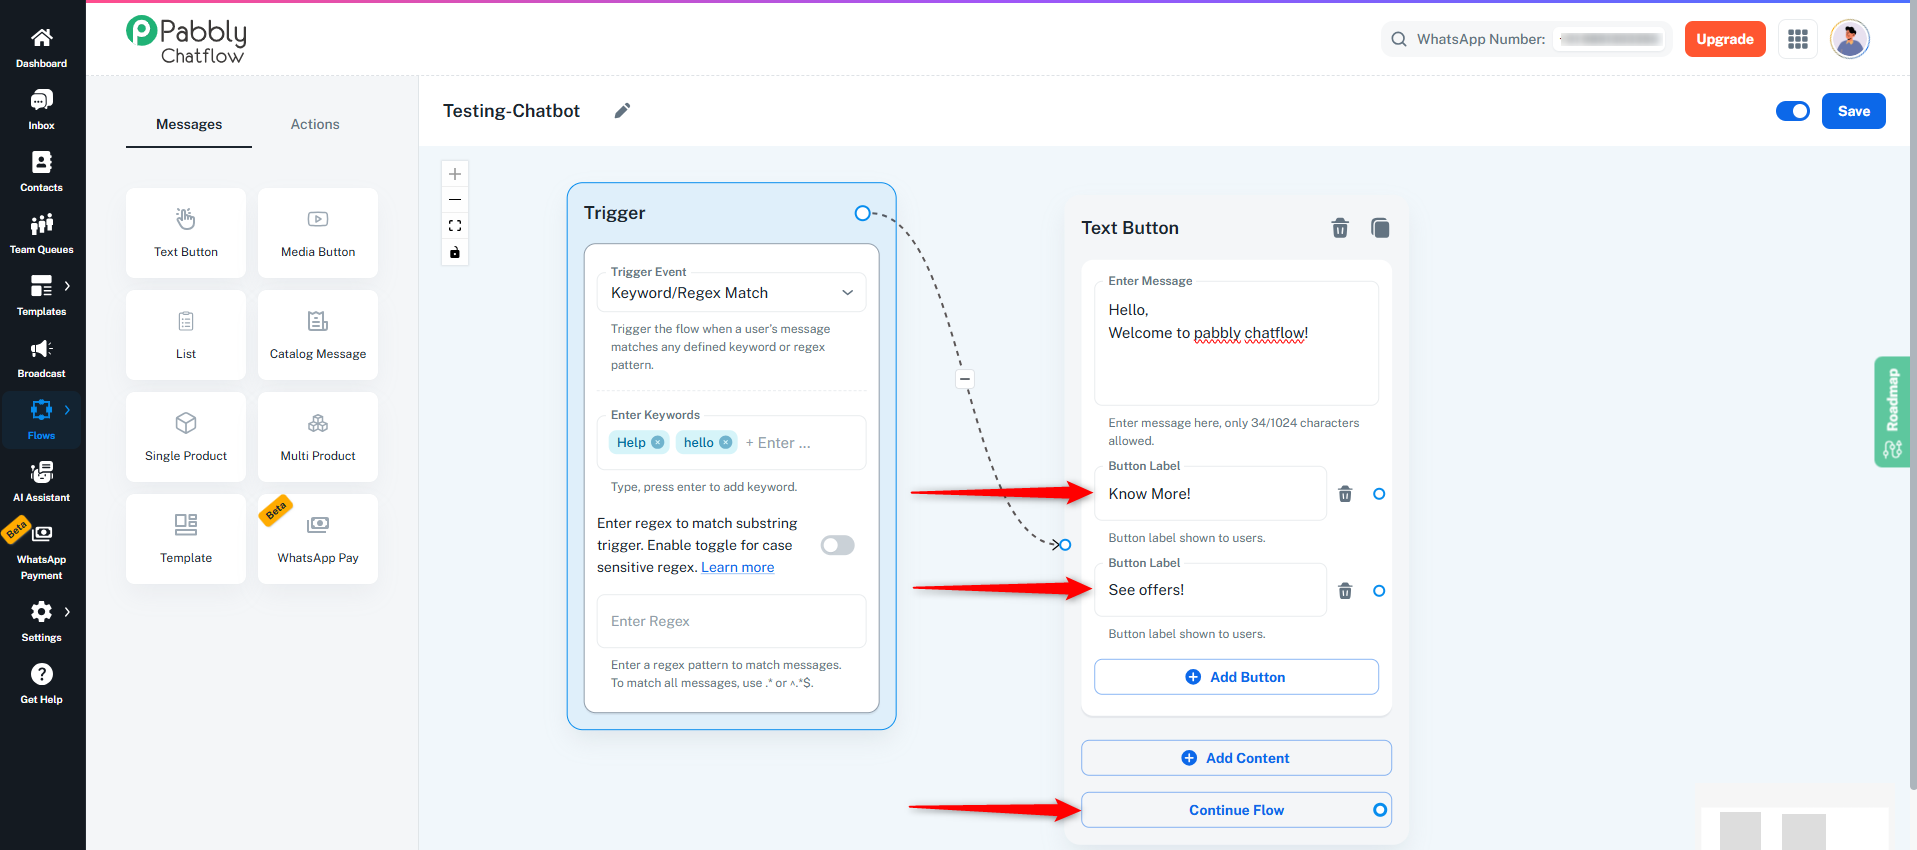
- Flow Start :
- Define keywords in the Flow Start to trigger the flow when users send a message containing these keywords.
- Connect to Text Button Message :
- Connect the Flow Start node to a Text Button message.
- Enter the message you want to send to the user.
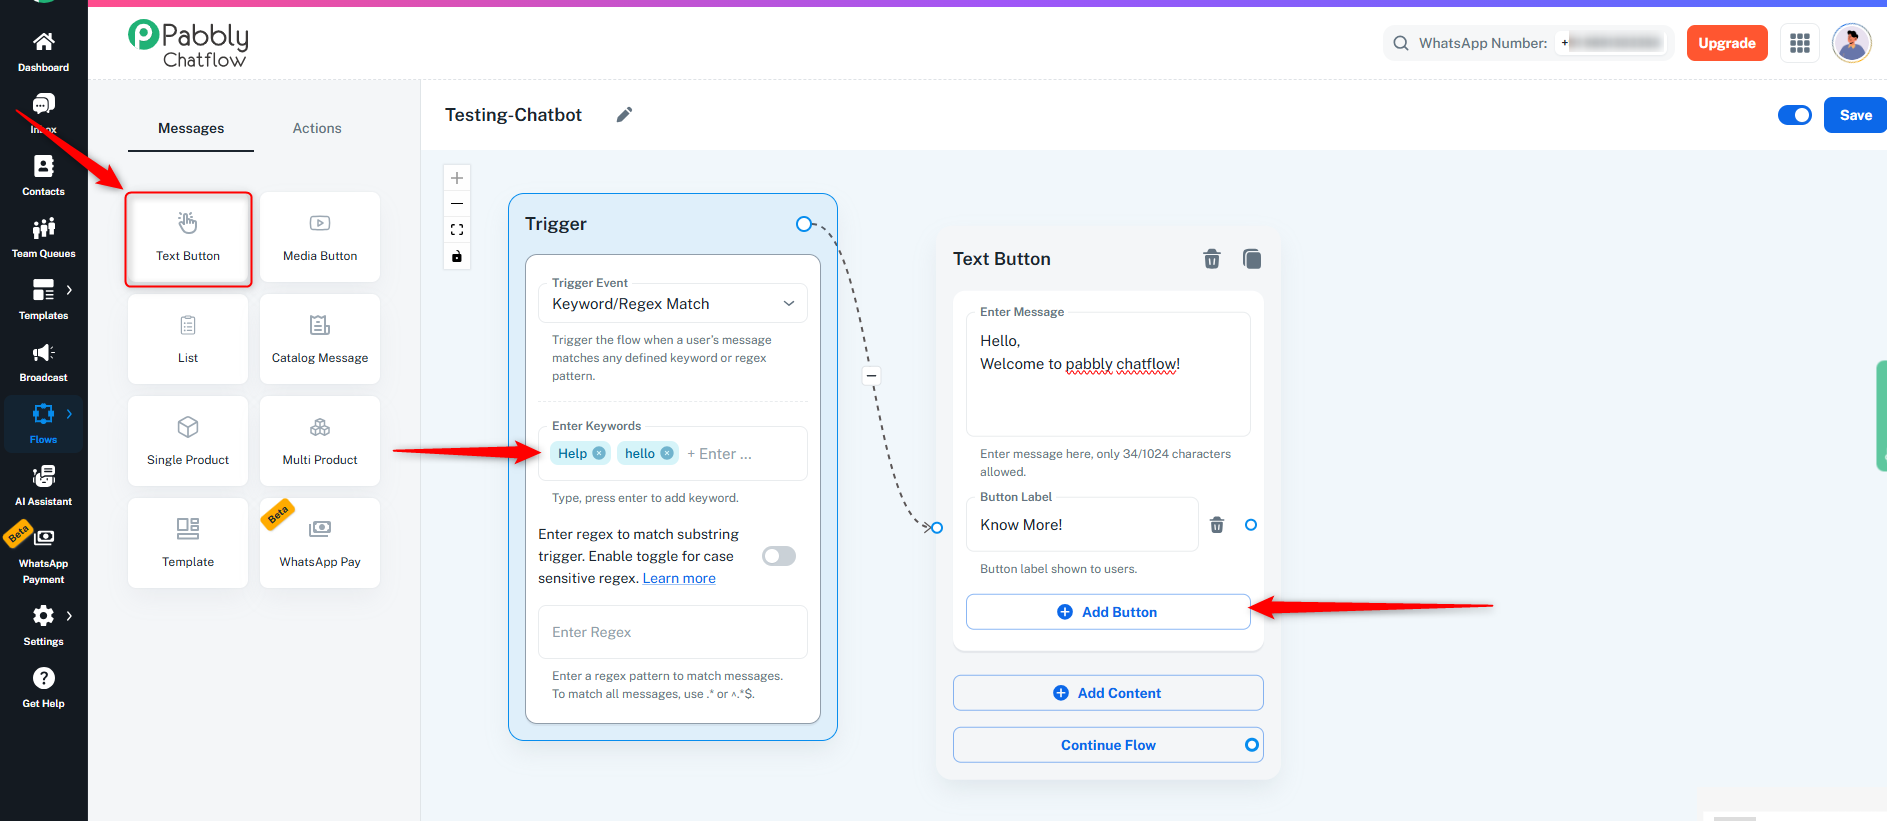
- Add Button :
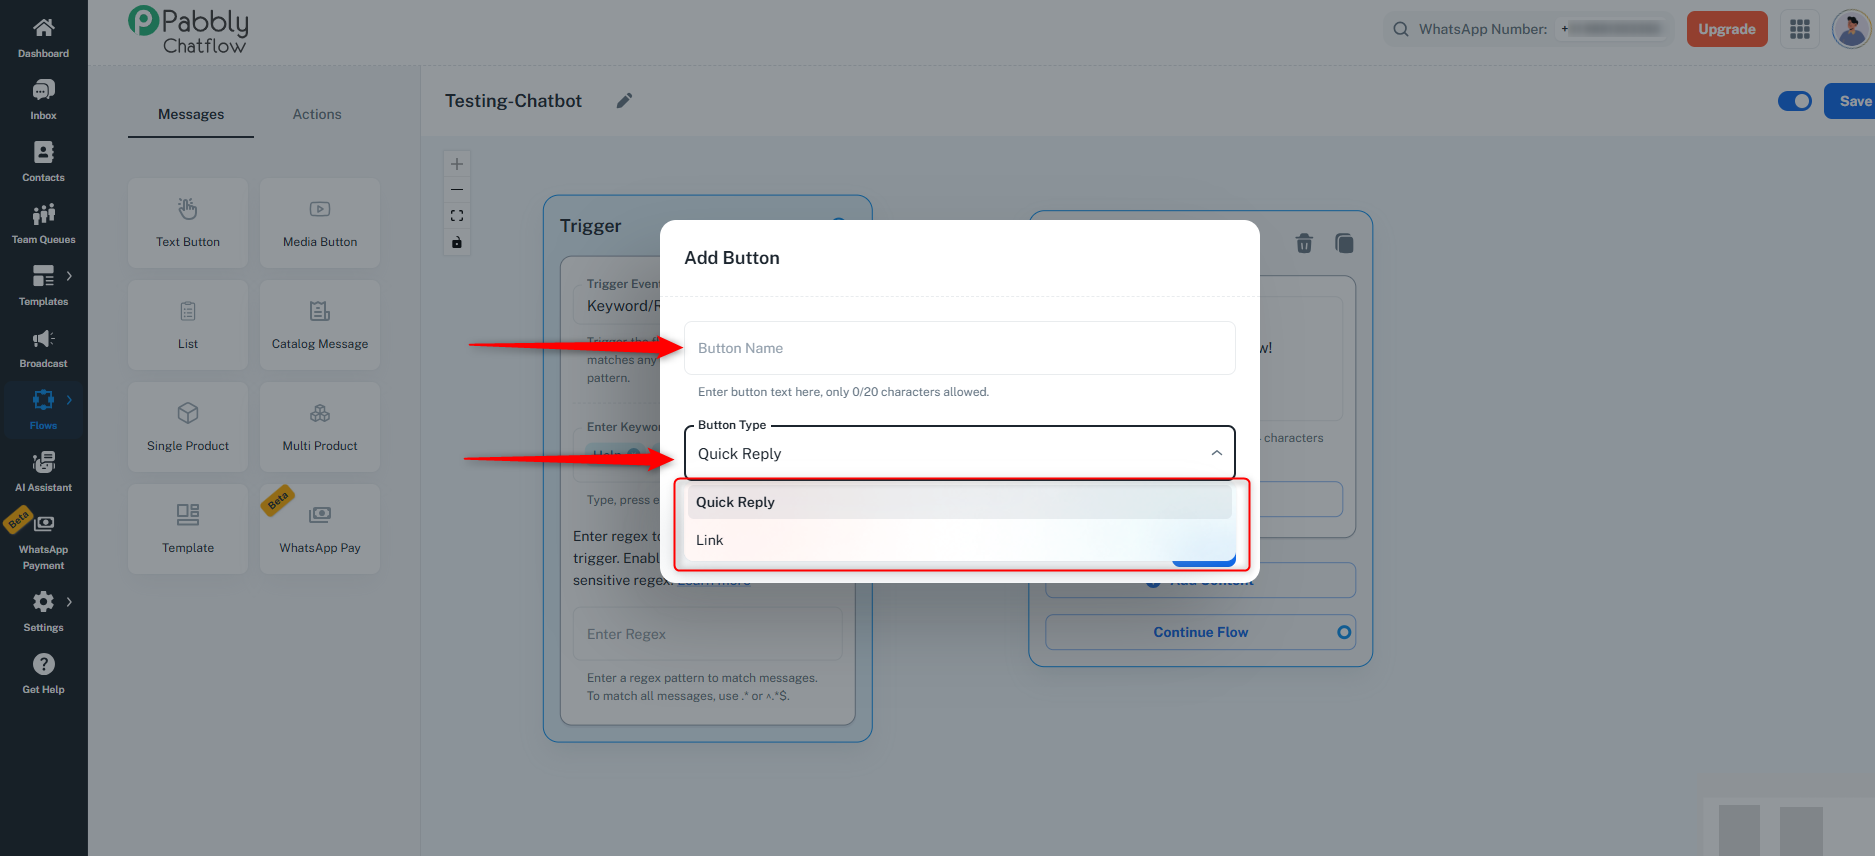
- Click on Add Button inside the Text Button message.
- An Add Button popup will appear.
- Configure Button Details :
- Enter the Button Name (up to 20 characters).
- Select the Button Type:
- Quick Reply – Allows user interaction (up to 3 buttons).
- Link – Redirects users to a URL (only 1 link button allowed).
- For Link buttons, enter a valid URL.
- Save the Button :
- Click Save to add the button to the message.
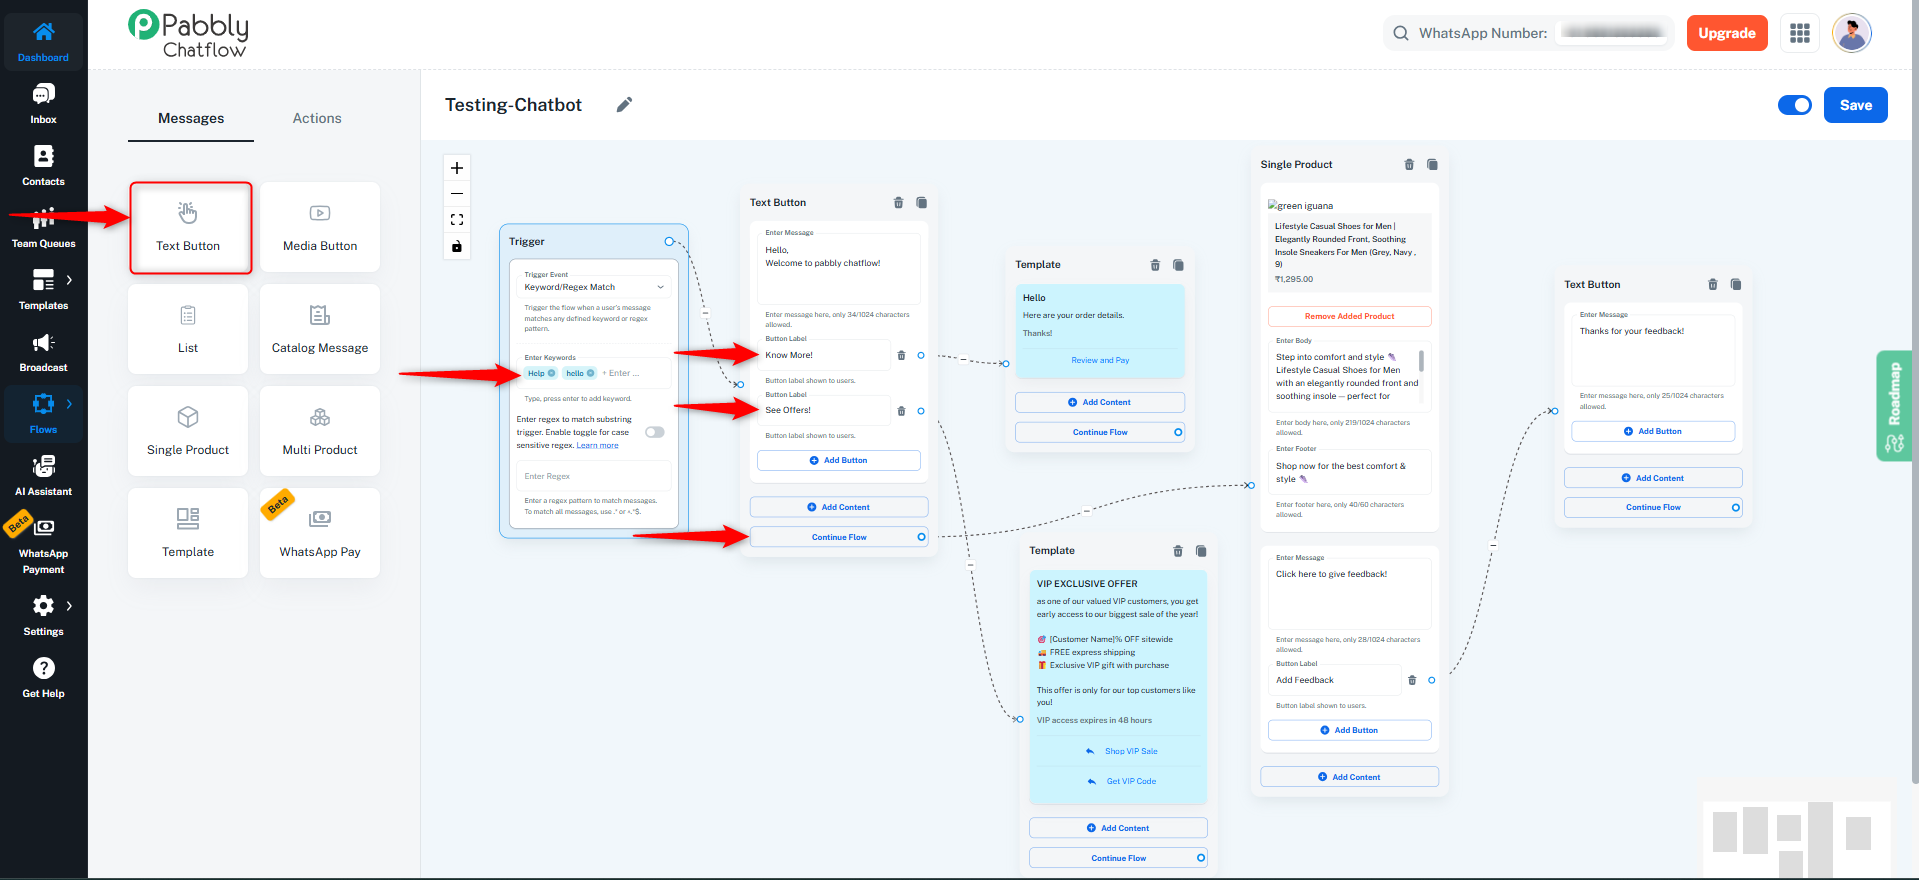
- Continue Flow (Optional) :
- If any messages or actions are connected via Continue Flow, they will execute automatically without waiting for user interaction.
- All connected messages and actions execute immediately after the message is sent.
Key Points
- You can add up to 3 Quick Reply buttons in one Text Button message.
- Only 1 Link button is allowed.
- You can add either Quick Reply buttons or a Link button in a message.
- Quick Reply buttons can be linked to the next step in the flow.
- Link buttons open external URLs and do not trigger any flow action.
- Any messages or actions connected through Continue Flow are executed automatically, without requiring user interaction.
Continue Flow is available only for Text Button, Media Button, List Message, Catalog Message, and Template messages.
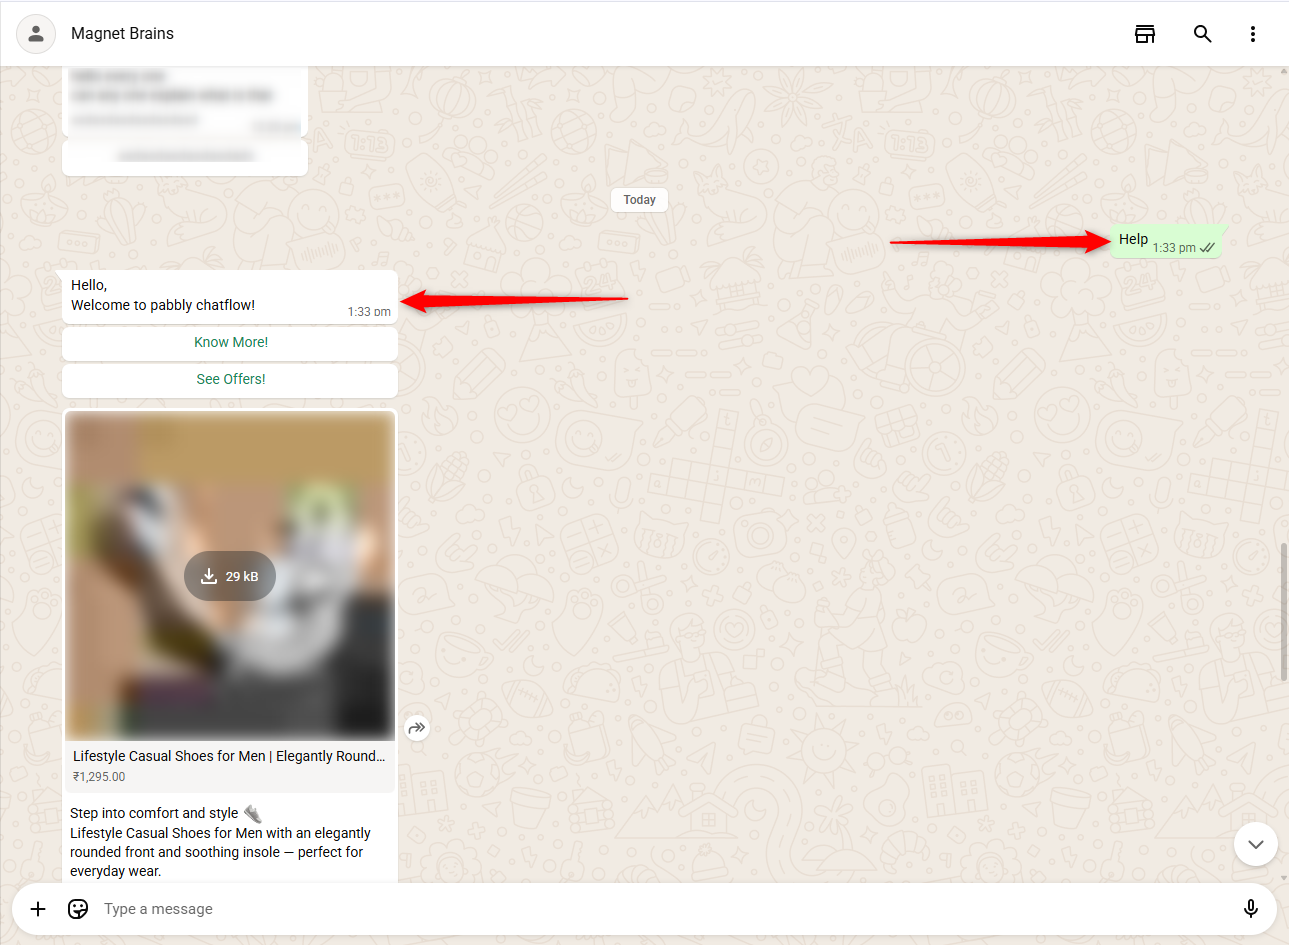
4. Trigger the Flow When a User Sends a Message
- Once the flow is created, it will trigger automatically when a user sends a message containing one of the defined keywords.
- After the flow is triggered:
- If the user clicks a Quick Reply button, the connected flow will execute based on the selected button.
- If the user does not reply, and the message is connected using Continue Flow, the flow will still execute automatically.
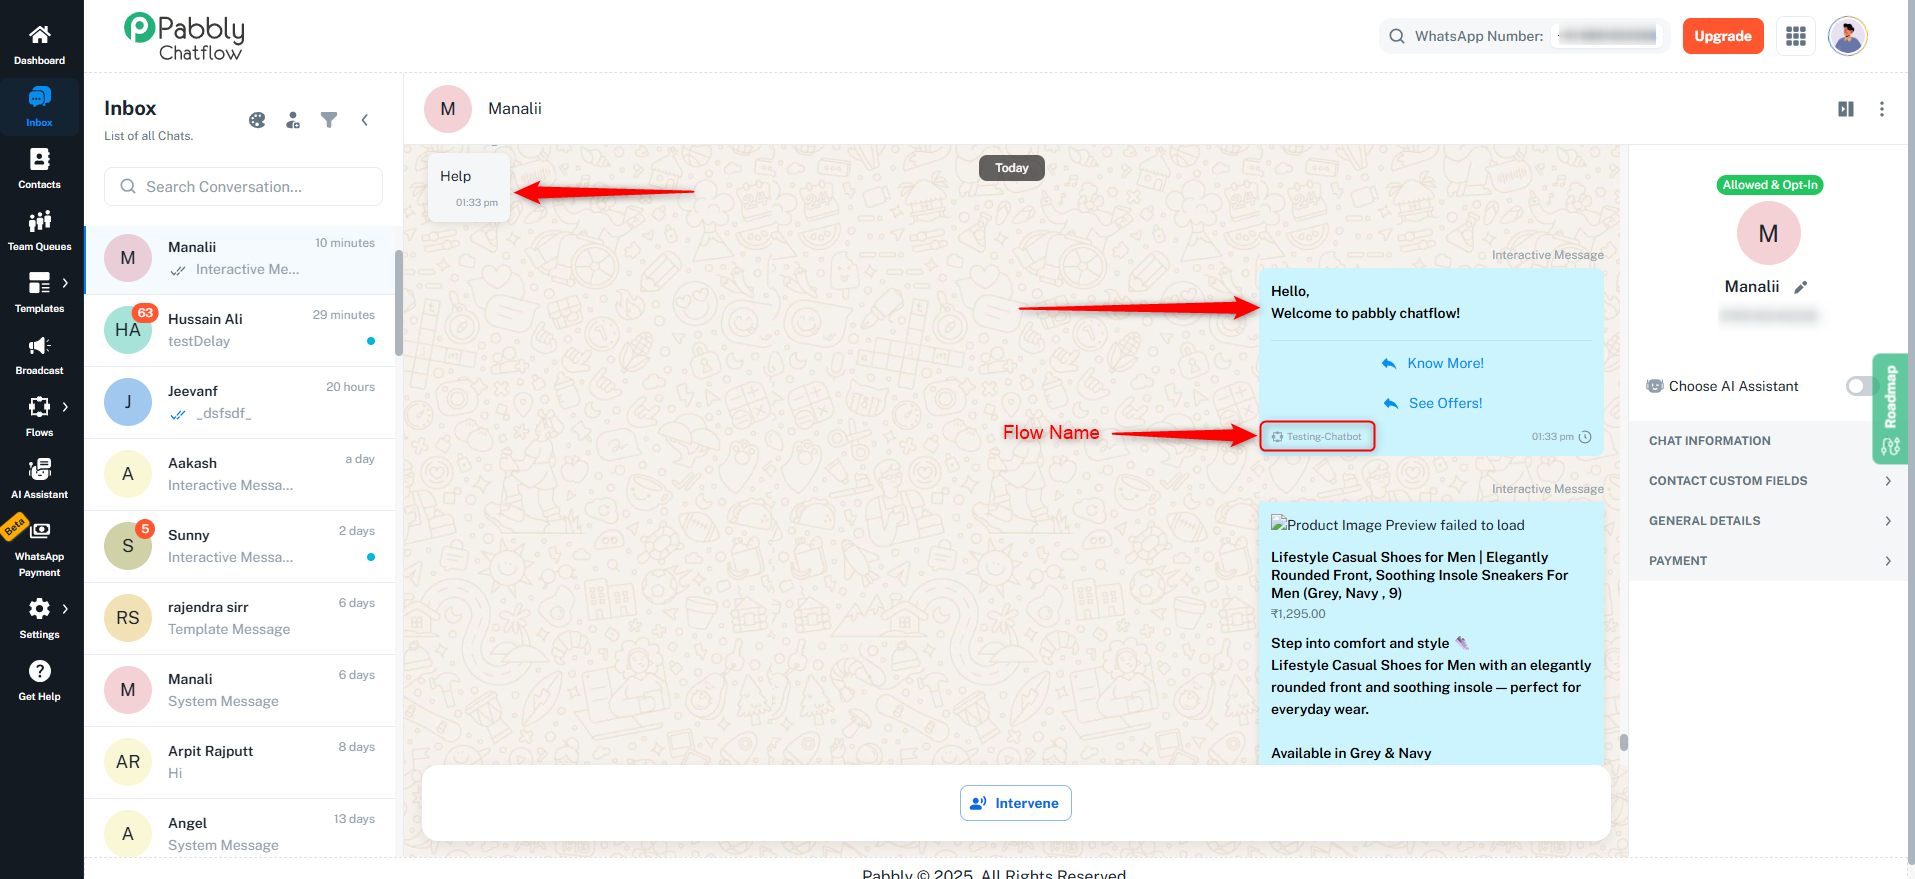
- When the flow runs:
- The trigger name is displayed in the Chat.
- The flow name appears in messages and actions, making it easy to identify which flow is executing.
This message enables the inclusion of images, videos, audio, and documents. You can either upload files via drag-and-drop or provide a URL. Captions and buttons can also be added to enhance interactivity.
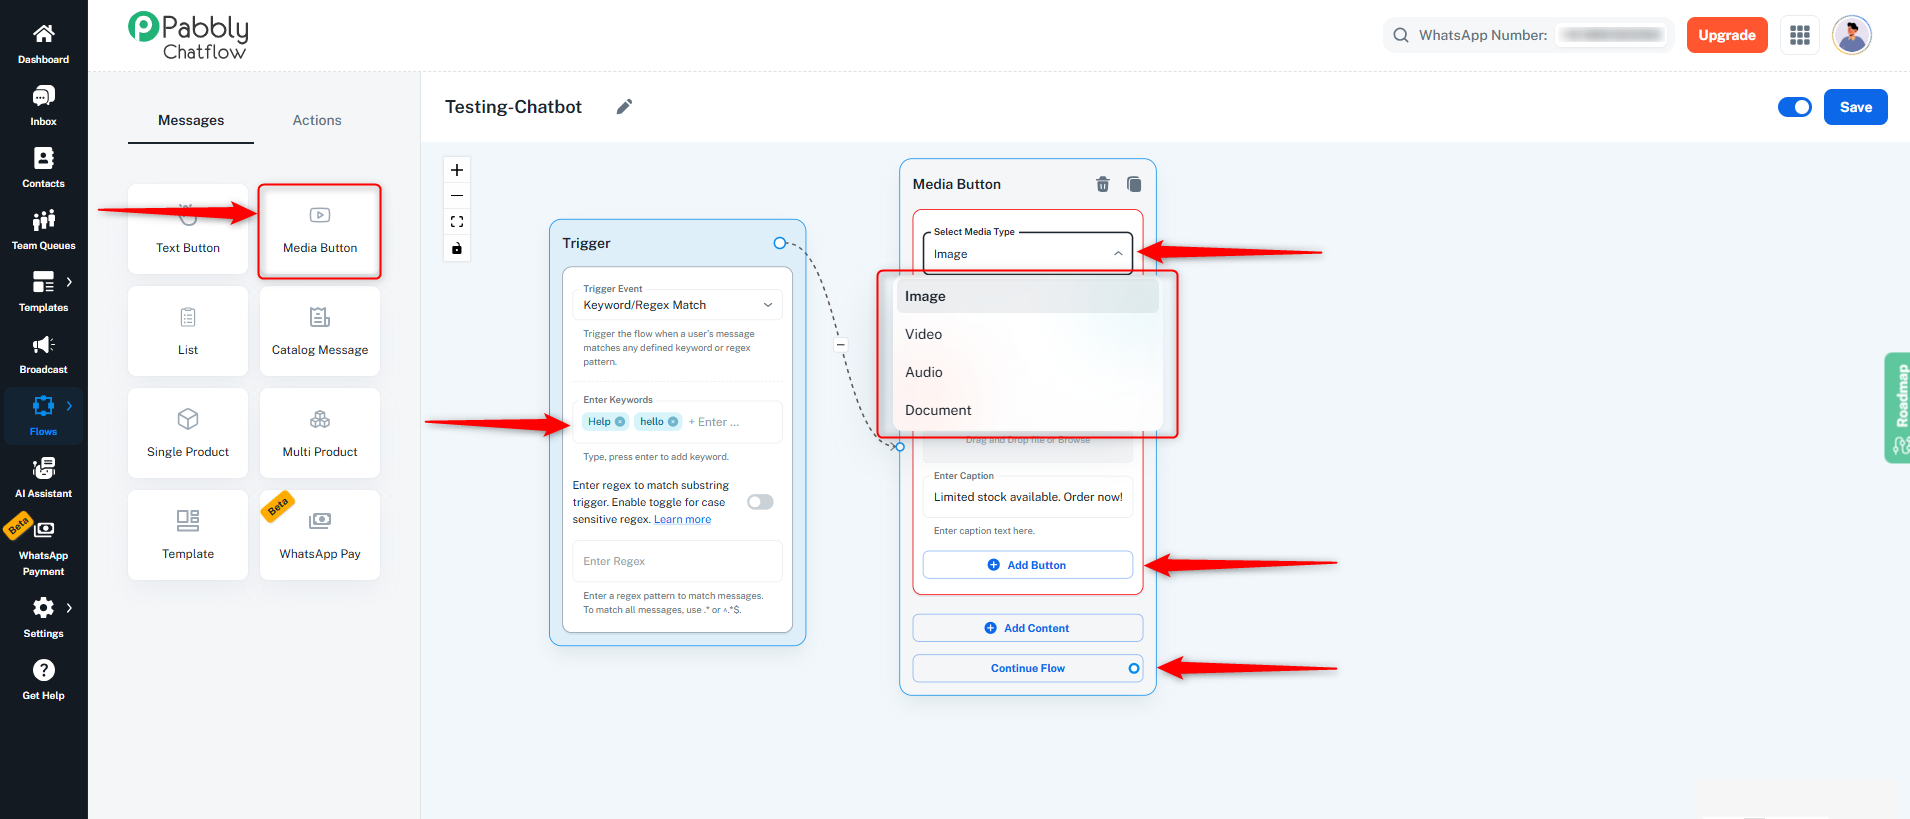
How to Create a Media Button Message
- Flow Start
- Define keywords in the Flow Start to trigger the flow when users send a message containing these keywords.
- Connect to Media Button Message
- Connect the Flow Start node to a Media Button message.
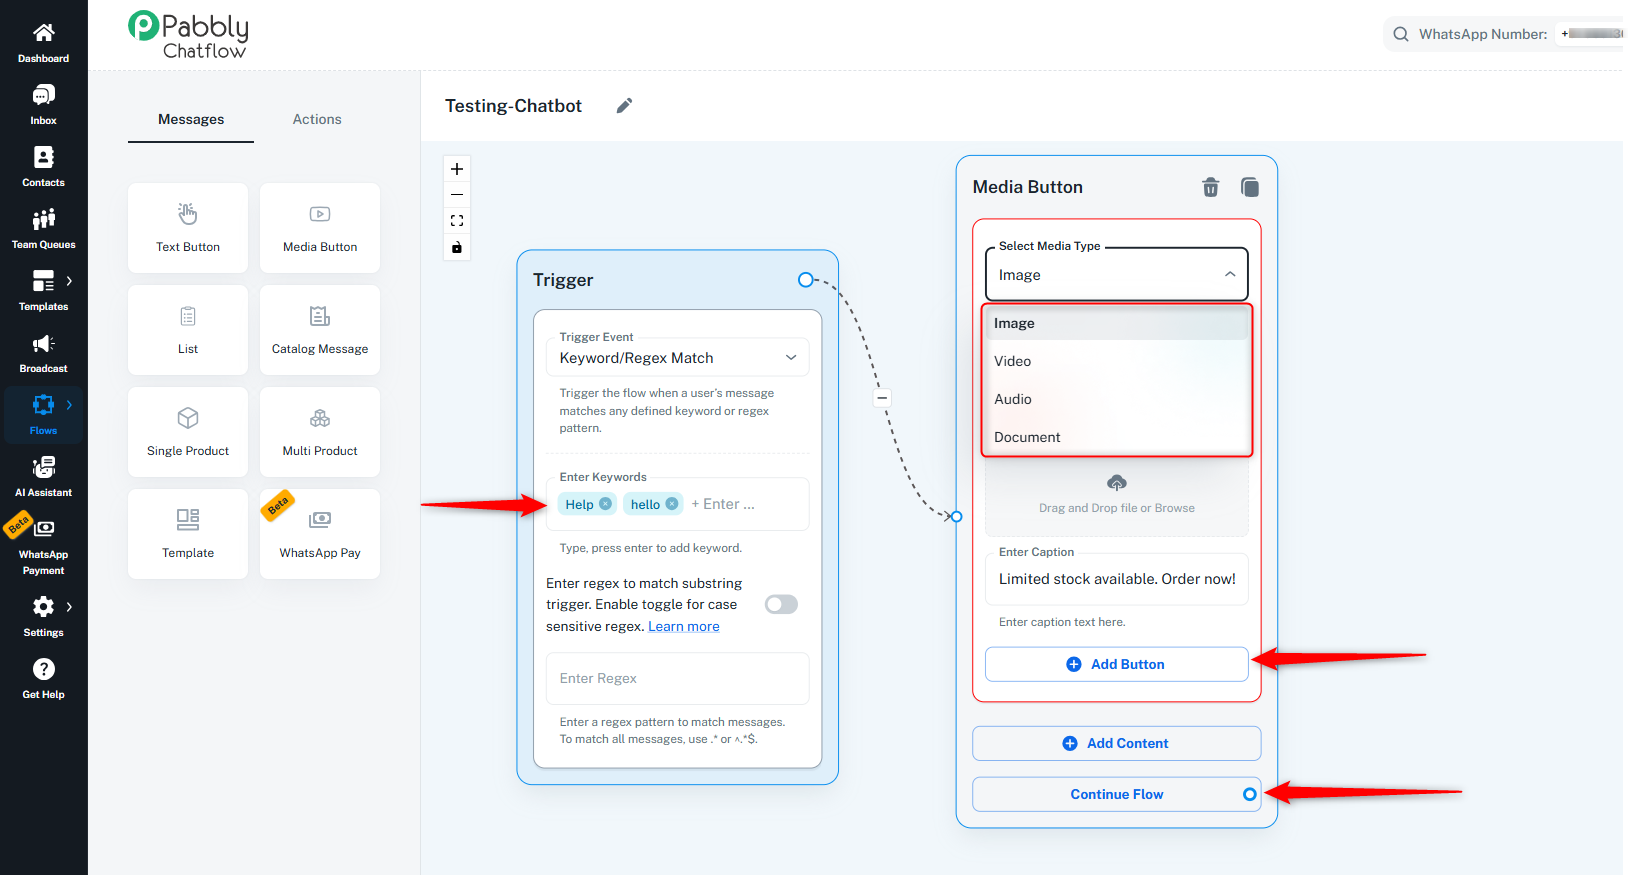
- Select the media type (Image, Video, Audio, or Document).
- Upload the media file using drag-and-drop or provide a media URL.
- (Optional) Add a caption for the media.
- Add Button
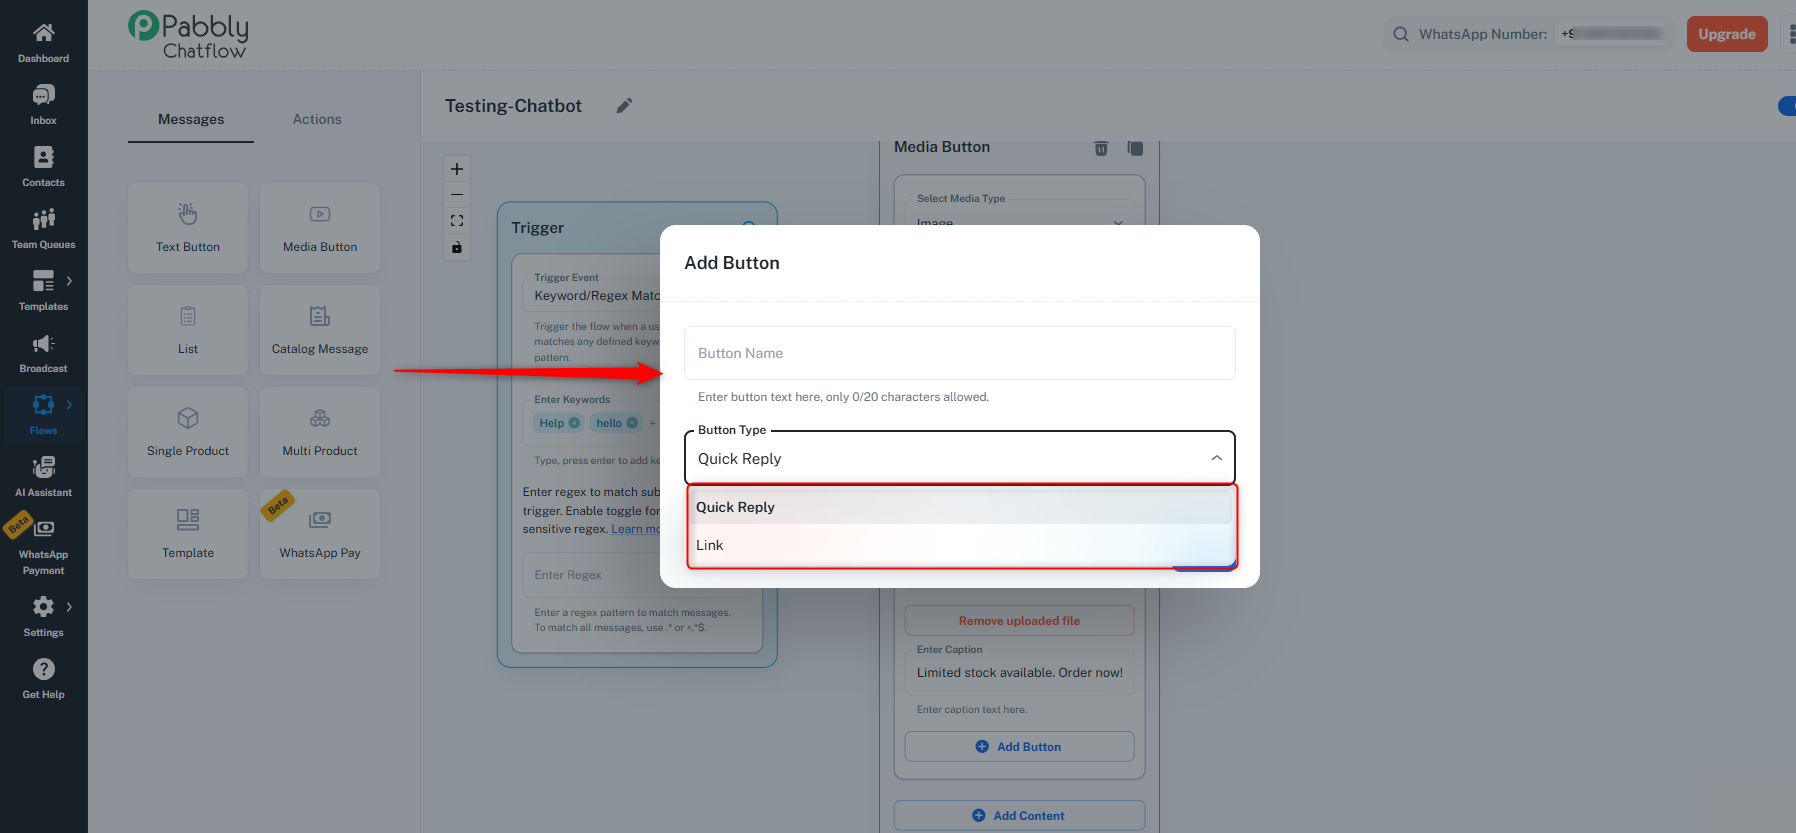
- Click on Add Button inside the Media Button message.
- An Add Button popup will appear.
- Configure Button Details
- Enter the Button Name (up to 20 characters).
- Select the Button Type:
- Quick Reply – Allows user interaction (up to 3 buttons).
- Link – Opens an external URL (only 1 link button allowed).
- For Link buttons, enter a valid URL.
- Save the Button
- Click Save to add the button to the Media Button message.
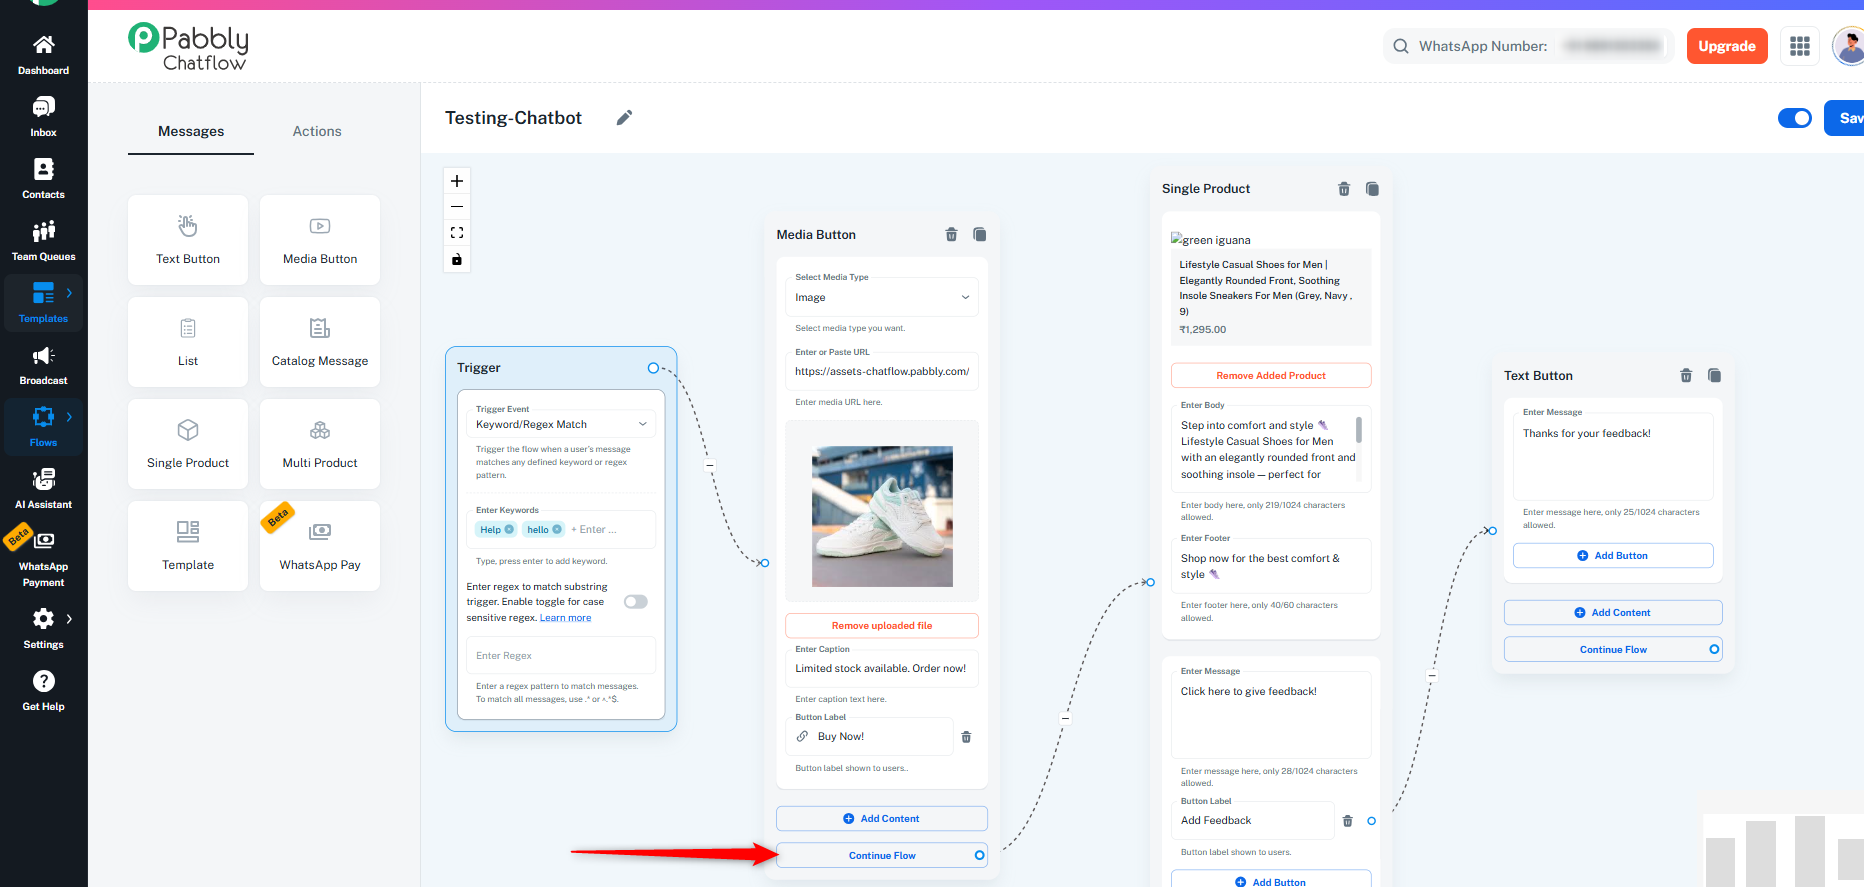
- Continue Flow (Optional)
- If any messages or actions are connected via Continue Flow, they will execute automatically without waiting for user interaction.
- All connected messages and actions run immediately after the Media Button message is sent.
Key Points
- You can add up to 3 Quick Reply buttons in one Text Button message.
- Only 1 Link button is allowed.
- You can add either Quick Reply buttons or a Link button in a message.
- Quick Reply buttons can be linked to the next step in the flow.
- Link buttons open external URLs and do not trigger any flow action.
- Any messages or actions connected through Continue Flow are executed automatically, without requiring user interaction.
Trigger the Flow When a User Sends a Message
- Once the flow is created, it will trigger automatically when a user sends a message containing one of the defined keywords.
- After the flow is triggered:
- If the user clicks a Quick Reply button, the connected flow will execute based on the selected button.
- If the user clicks a Link button, the user is redirected to the configured URL and no flow action is triggered.
- If the user does not interact, and the message is connected using Continue Flow, the flow will still execute automatically.
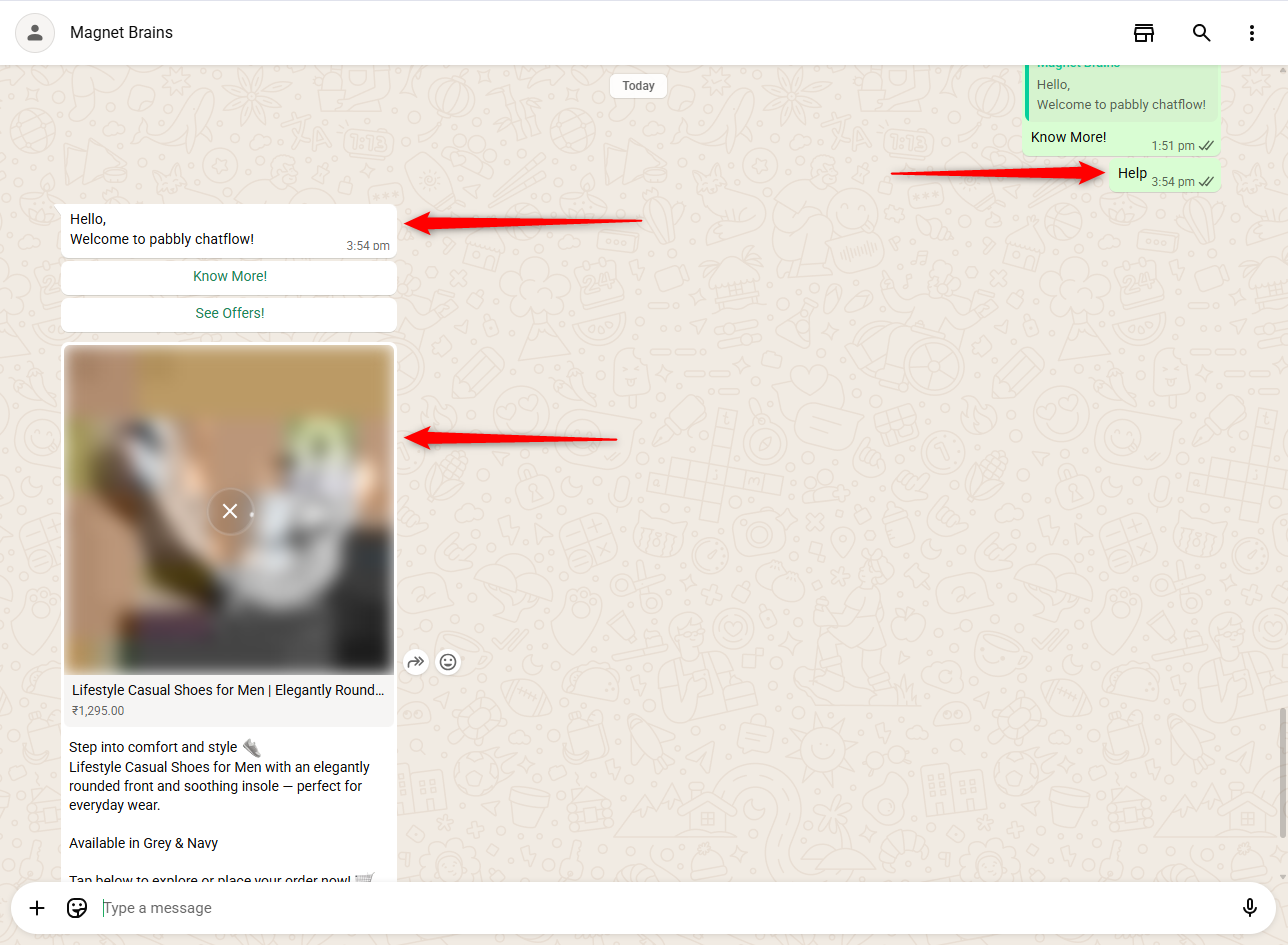
-
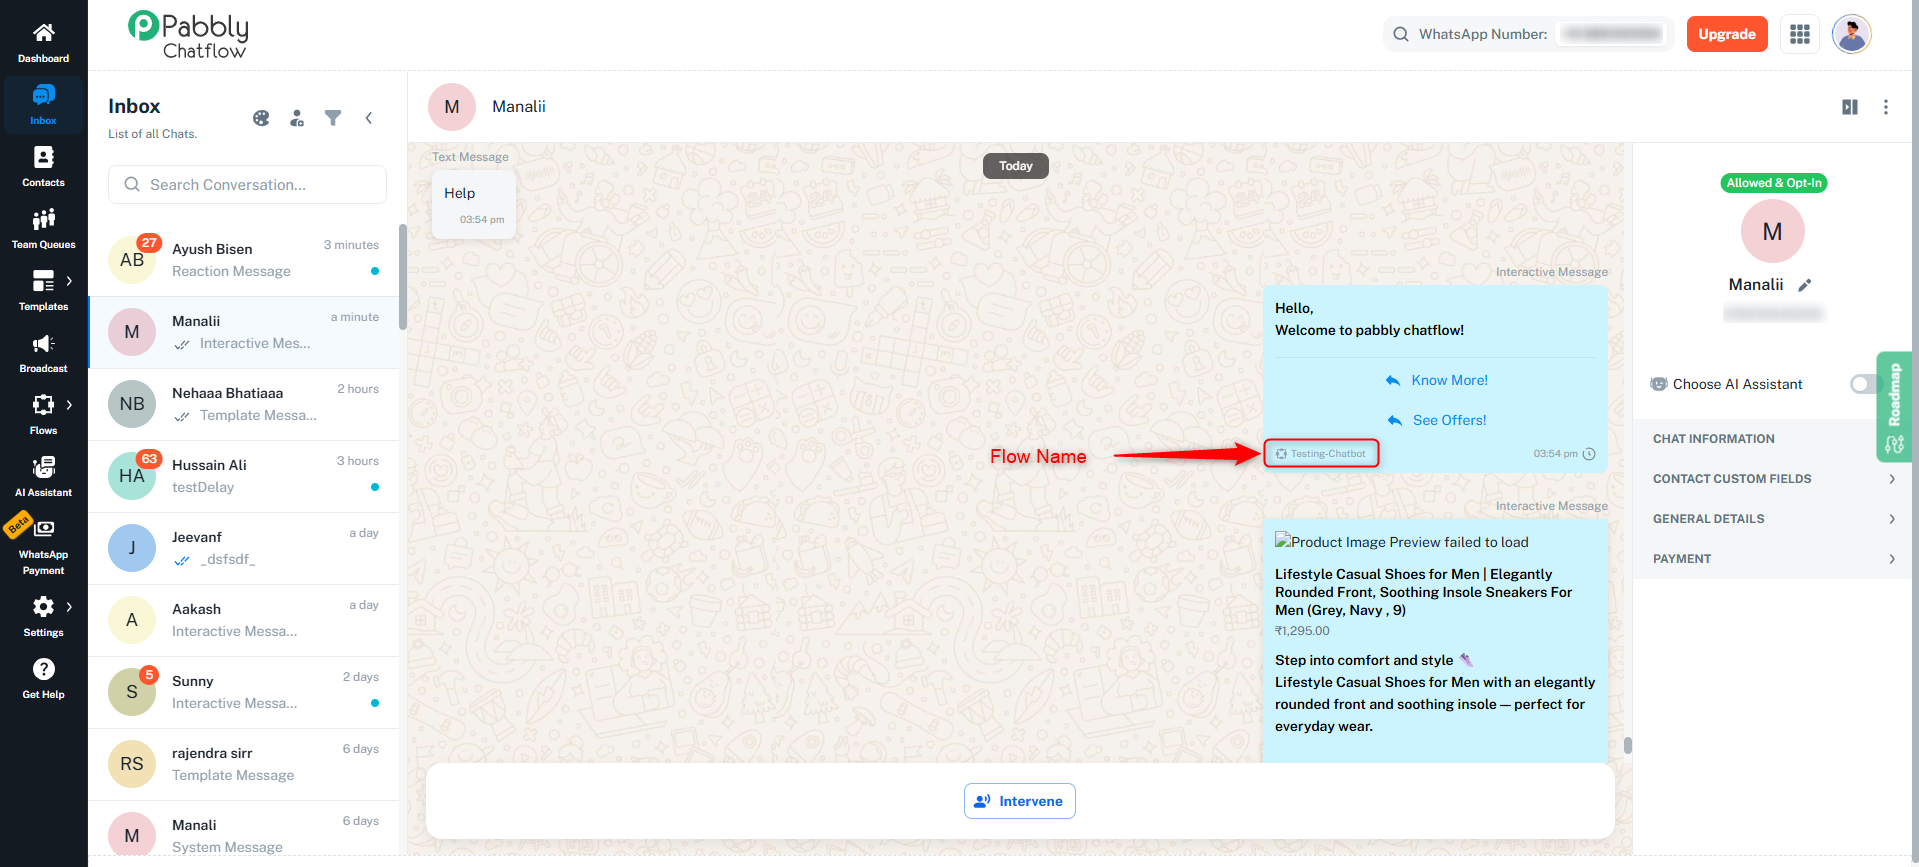
When the flow runs:
- The trigger name is displayed in the Chat.
- The flow name appears in messages and actions, making it easy to identify which flow is executing.
3. List Messages
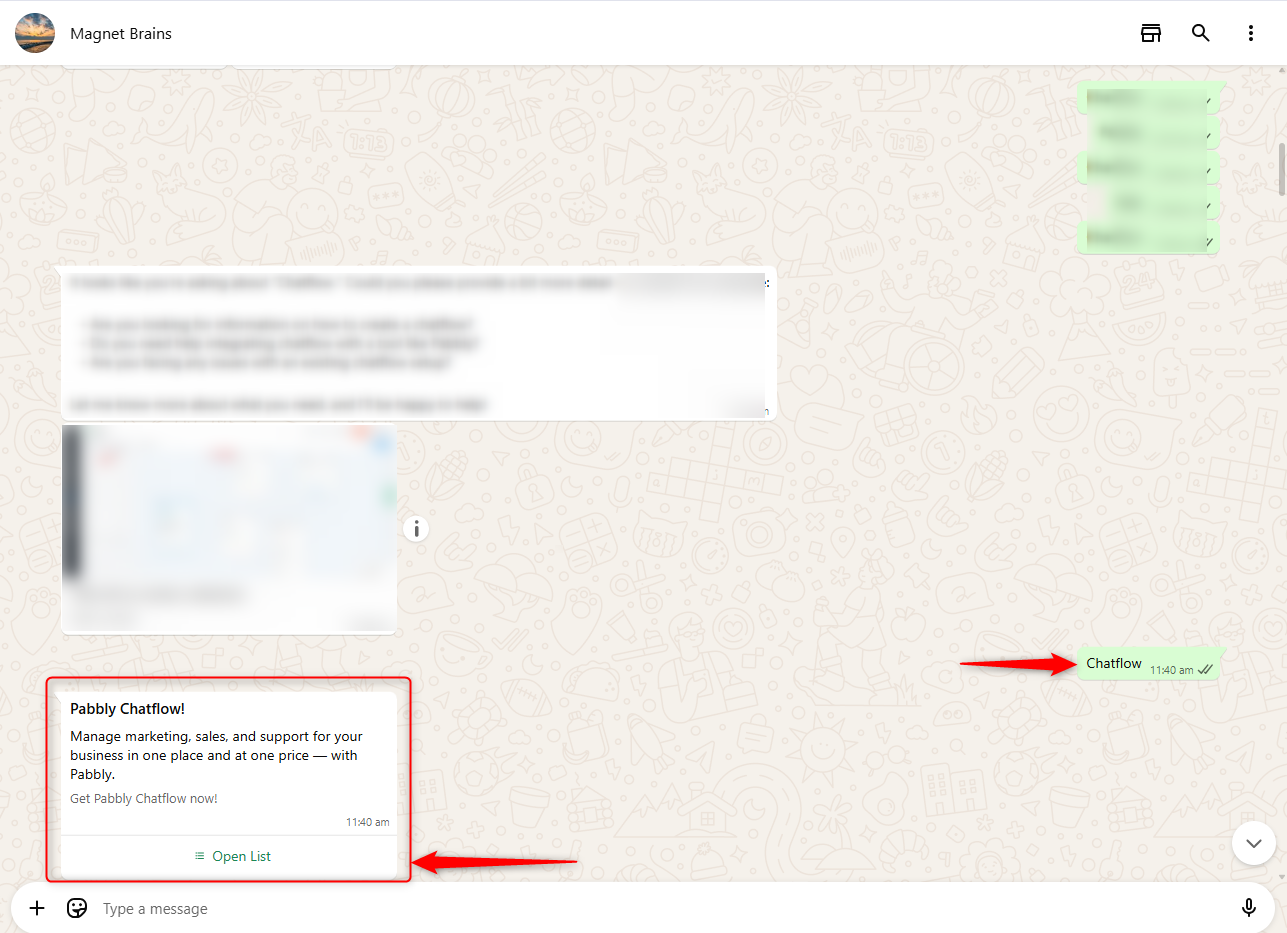
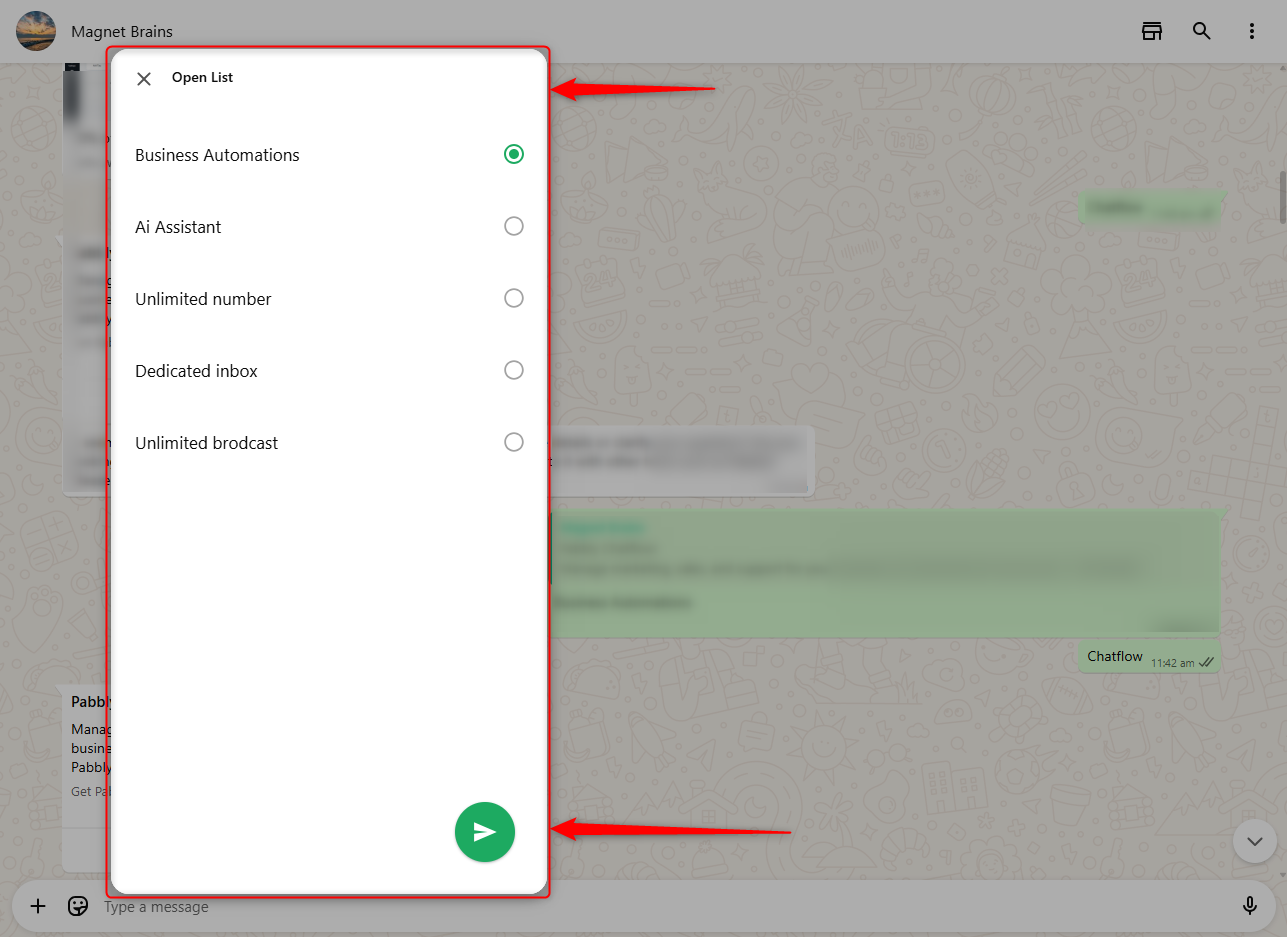
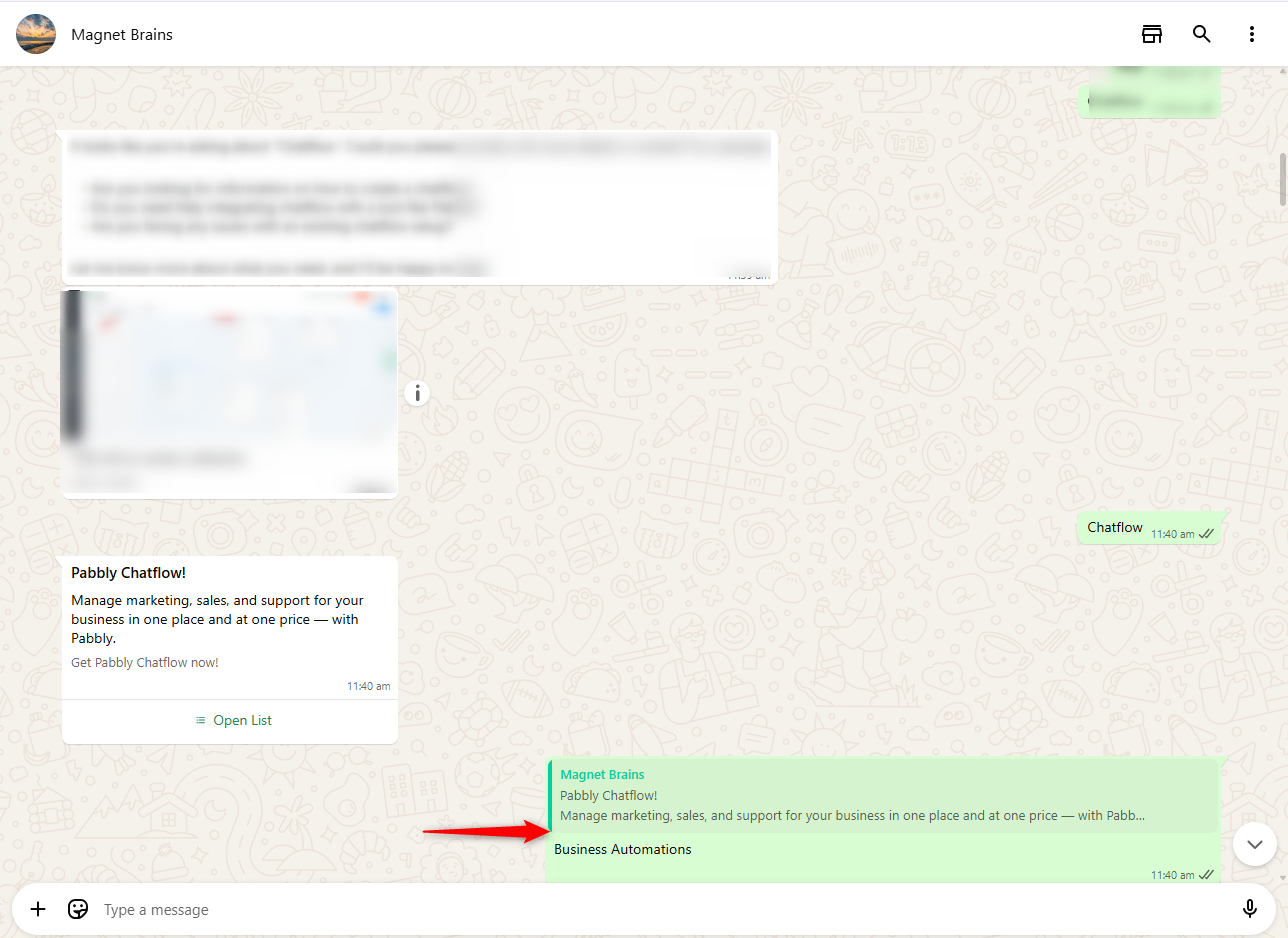
Use list messages to offer users multiple options to choose from. This feature is particularly effective for displaying a set of predefined choices.
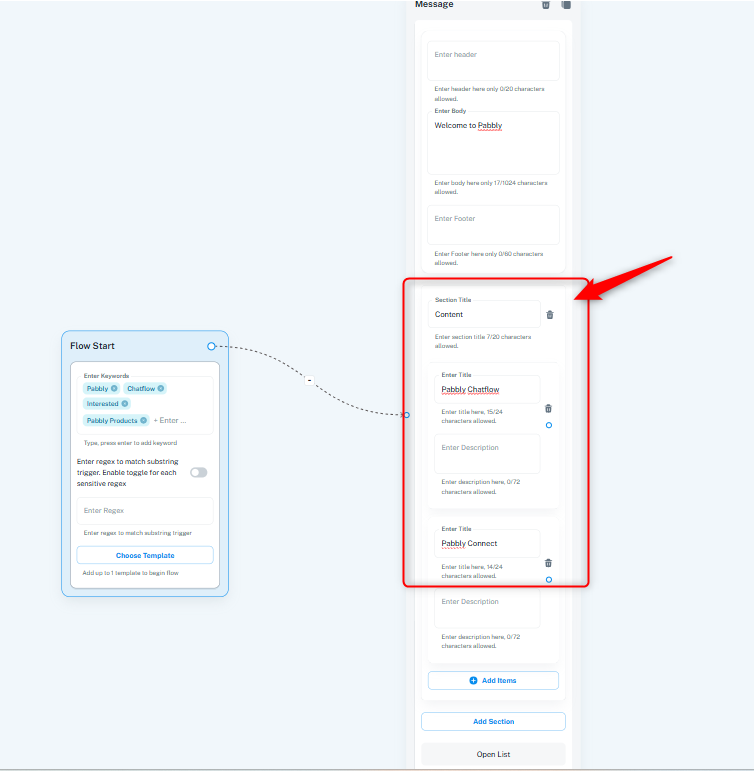
How to Create a Flow with List Message:
- Flow Start:
- Define keywords to trigger the flow.
- Connect to List Message:
- Add the List Message.
- Define the options (e.g., Option 1, Option 2, Option 3) you want users to choose from.
- Add Actions for Each Option:
- Define actions or messages for each option selected by the user.
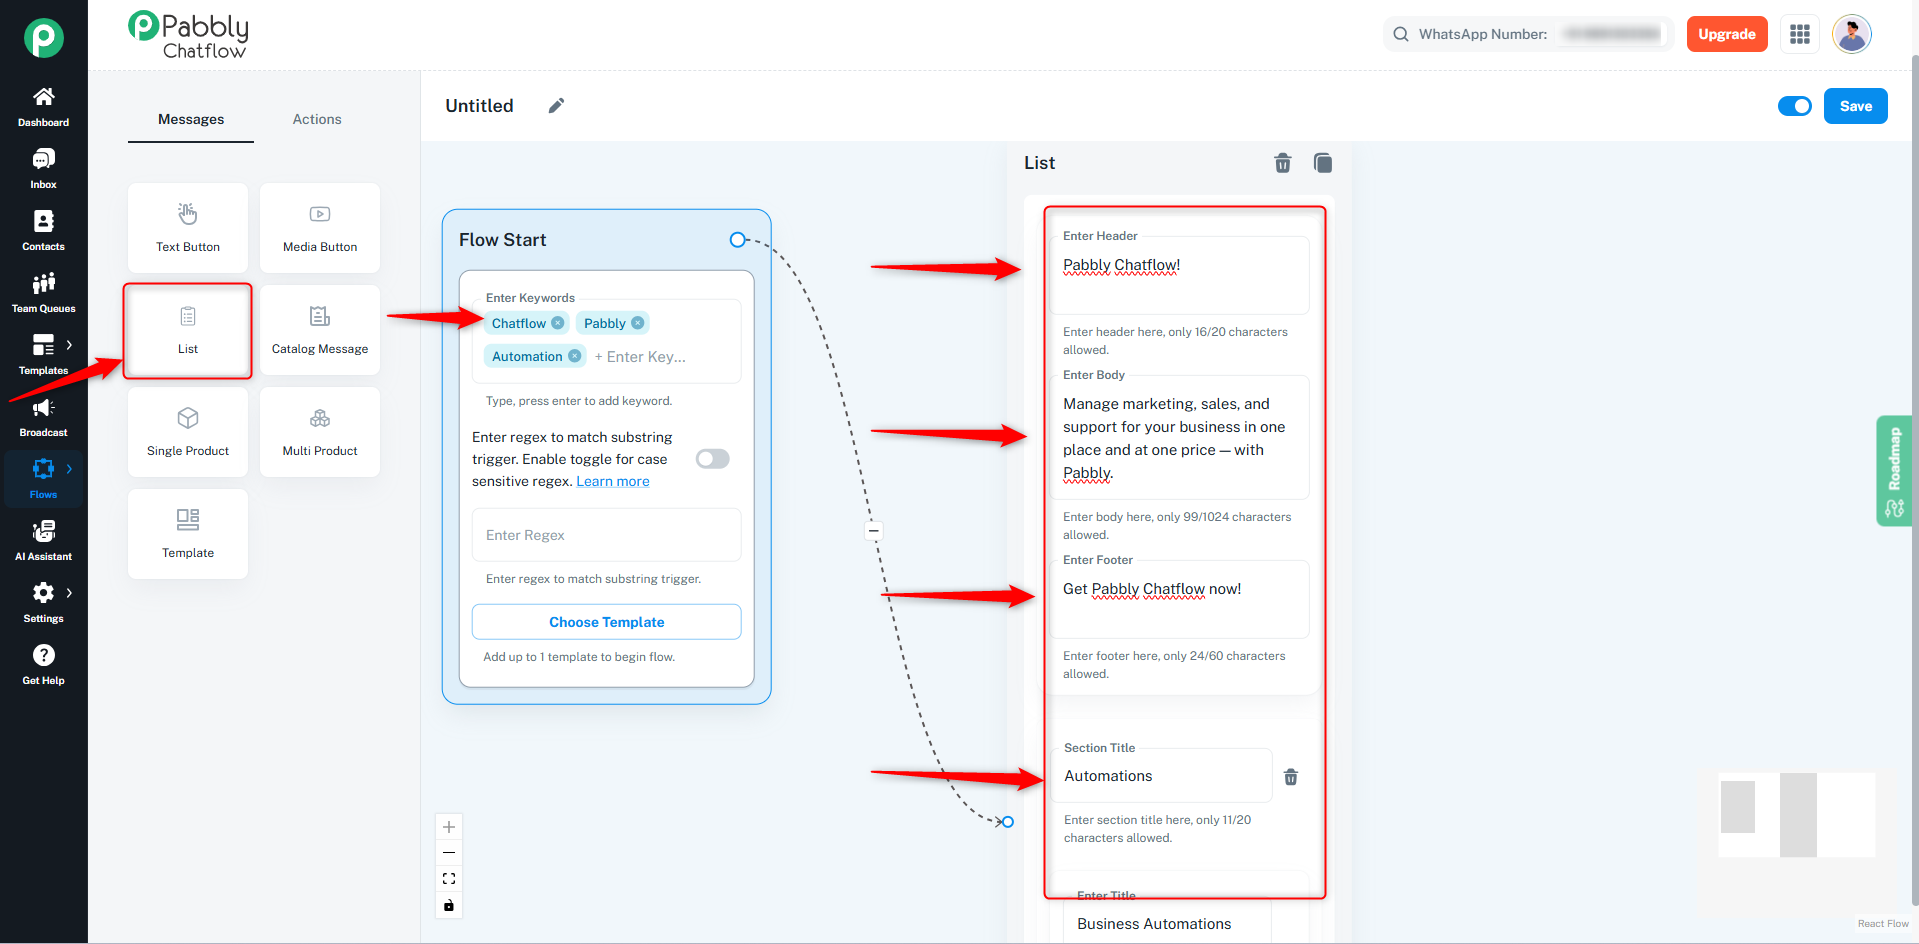
Trigger the Flow:
- The flow will be triggered when a user sends a message containing the defined keywords.
4. Template Messages
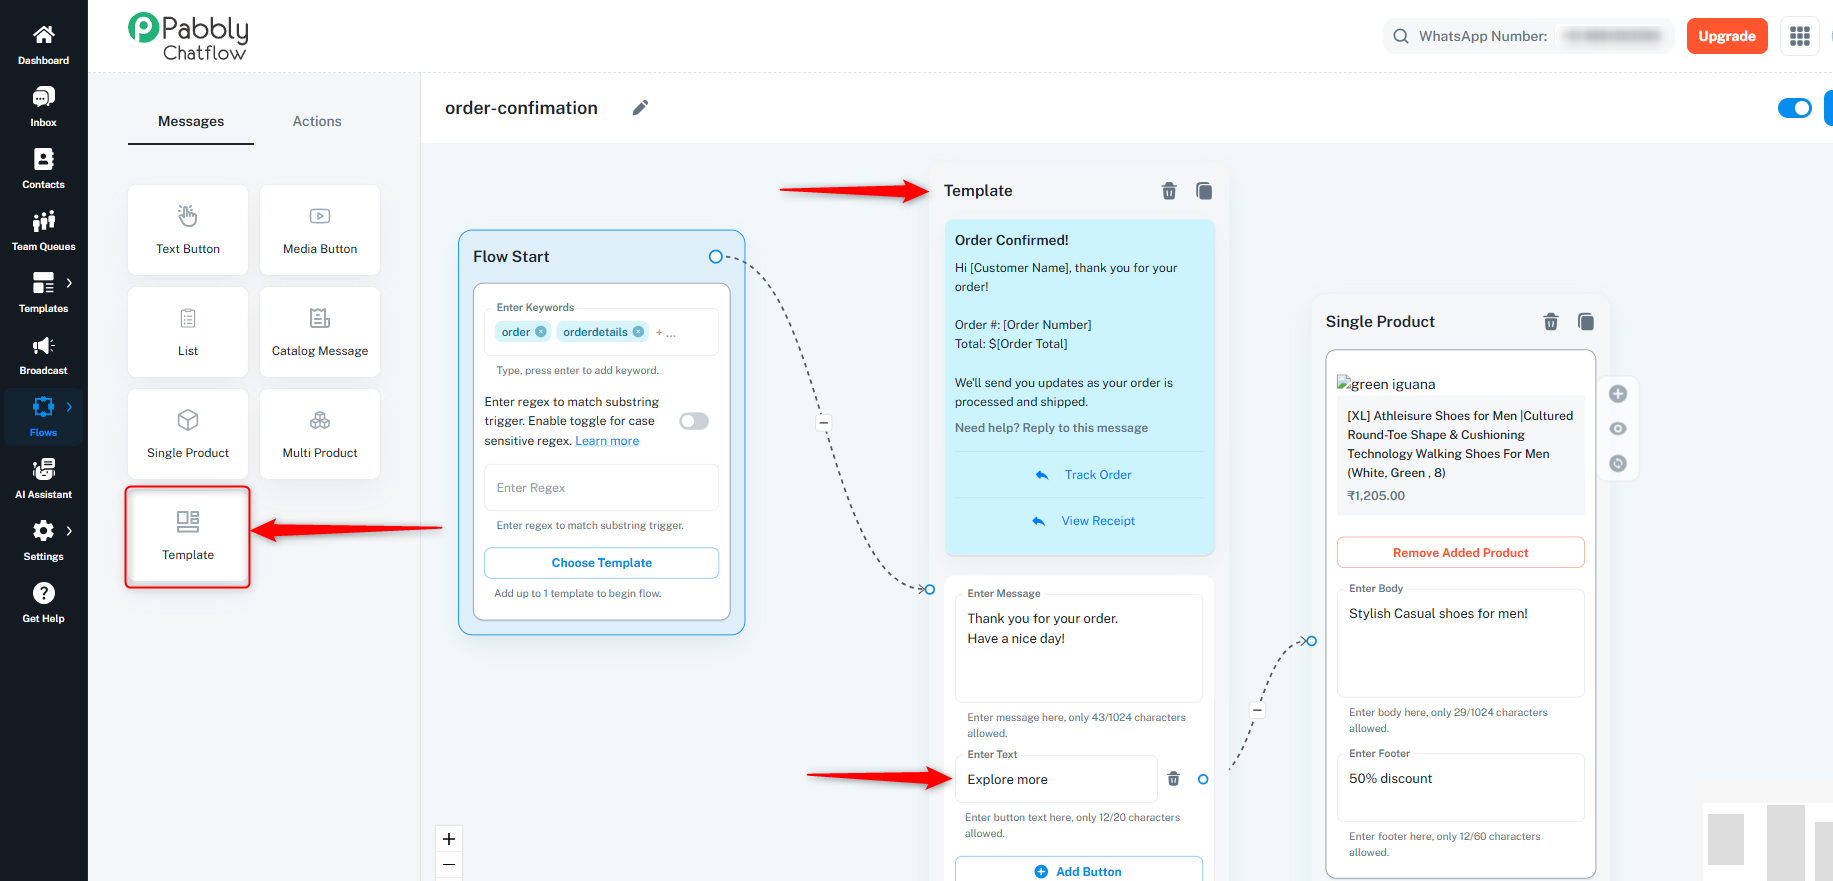
Chatbots can be programmed to trigger pre-approved template messages based on specific keywords sent by users. Note that templates must be created in the Template Module before being used in the flow.
Note : Templates must be created in the Template Module before being used in the flow.
How to Create a Flow with Template Messages:
- Flow Start:
- Define keywords to trigger the flow.
- Connect to Template Message:
- Link the Flow Start to the Template Message.
- Select the pre-approved template from the Template Module to send when the flow is triggered.
- Add Further Actions:
- Define actions or messages that will follow after the template message is sent.
Trigger the Flow:
5. Single Product Messages
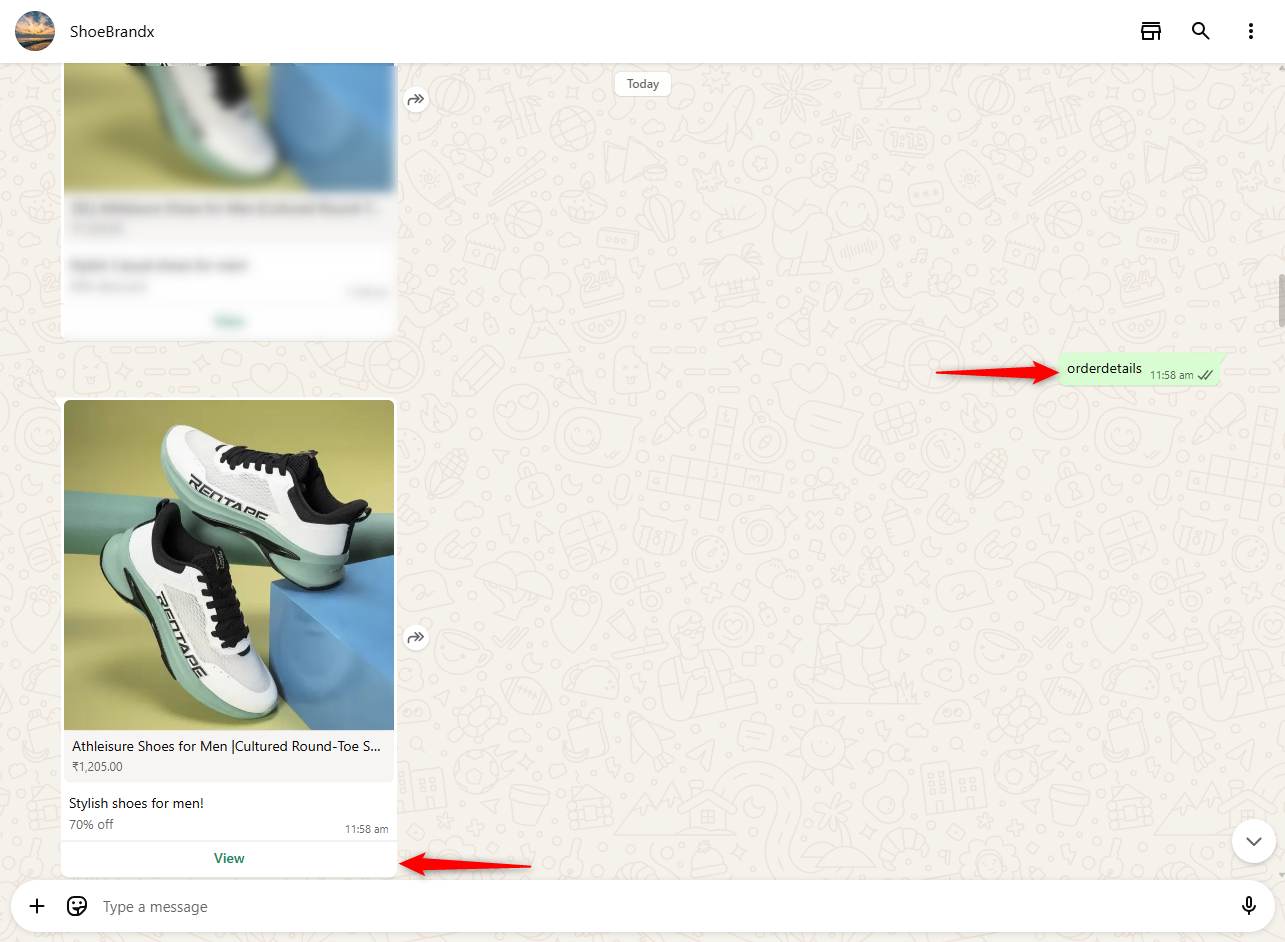
The Single Product Message is used to showcase a single product's details such as its name, description, price, and additional actions like adding the product to the cart. This feature is particularly useful for e-commerce businesses or services offering product recommendations directly through the chat interface.
How to Create a Flow with Single Product Messages:
- Flow Start: Define keywords to trigger the flow (e.g., "order" or "product").
- Connect to Template Message (optional): Use a pre-approved template from the Template Module.
- Add Single Product Message:
- Enter the Product Name, Description, Price, Body Message, and Footer.
Add Action Buttons: (e.g., "Add to Cart", "More Details").
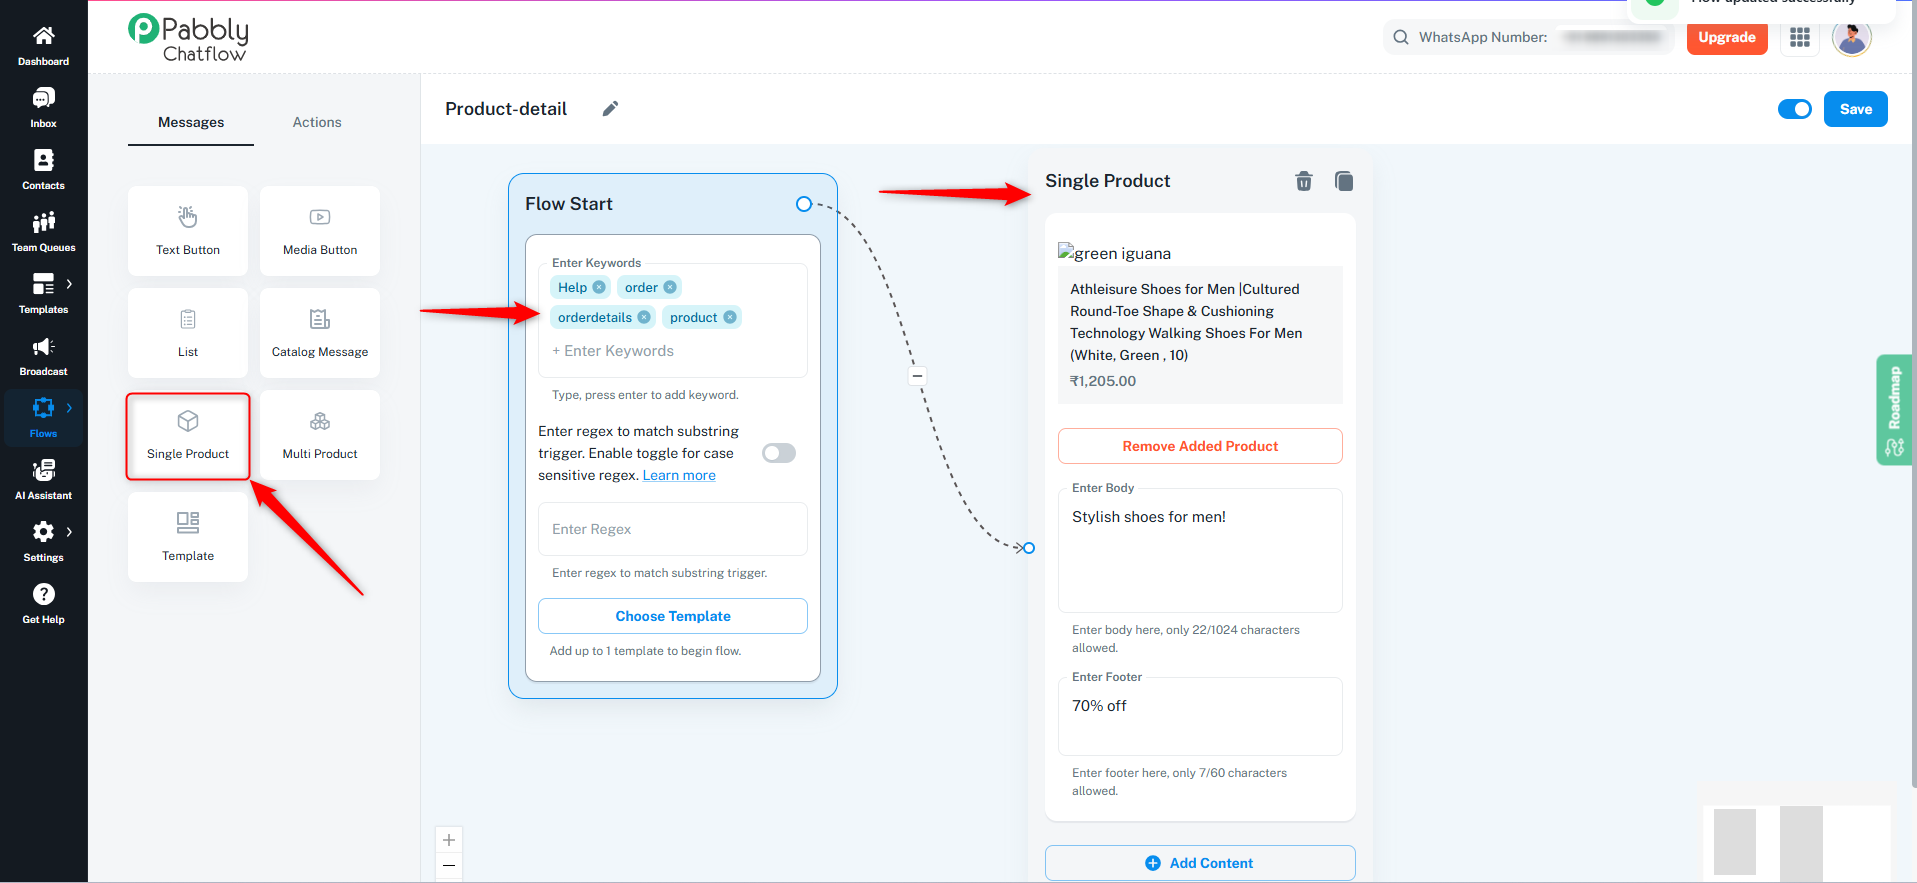
- The product details will be shown to the user once the flow is triggered.
6. Multi Product Messages
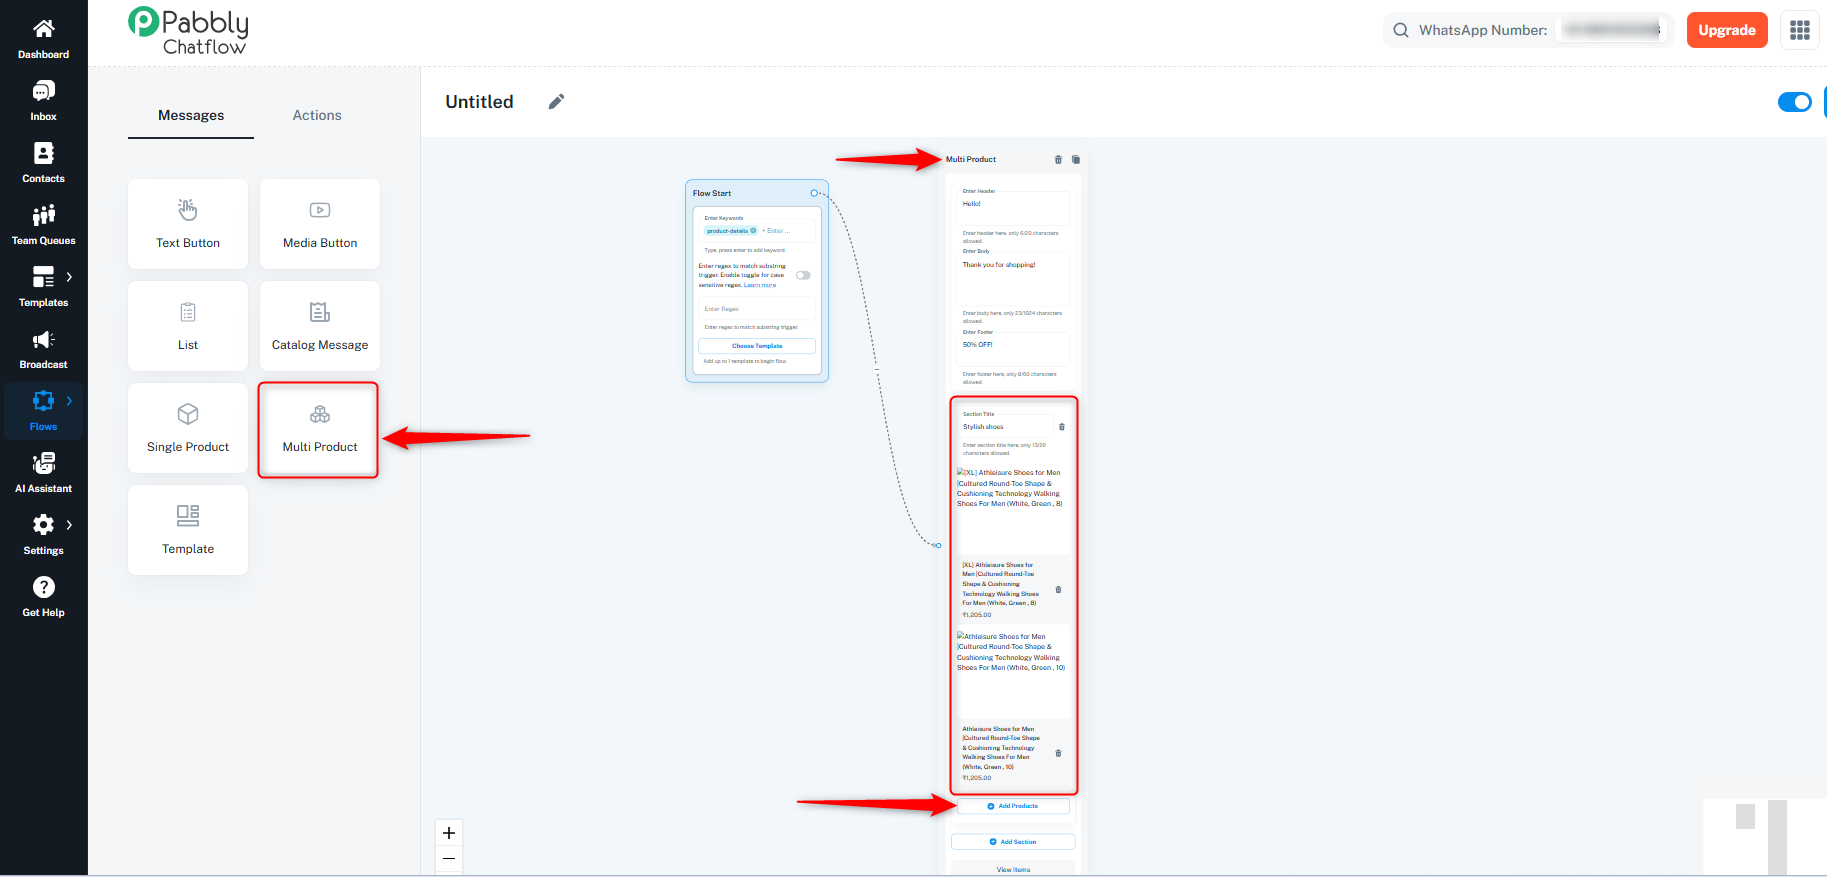
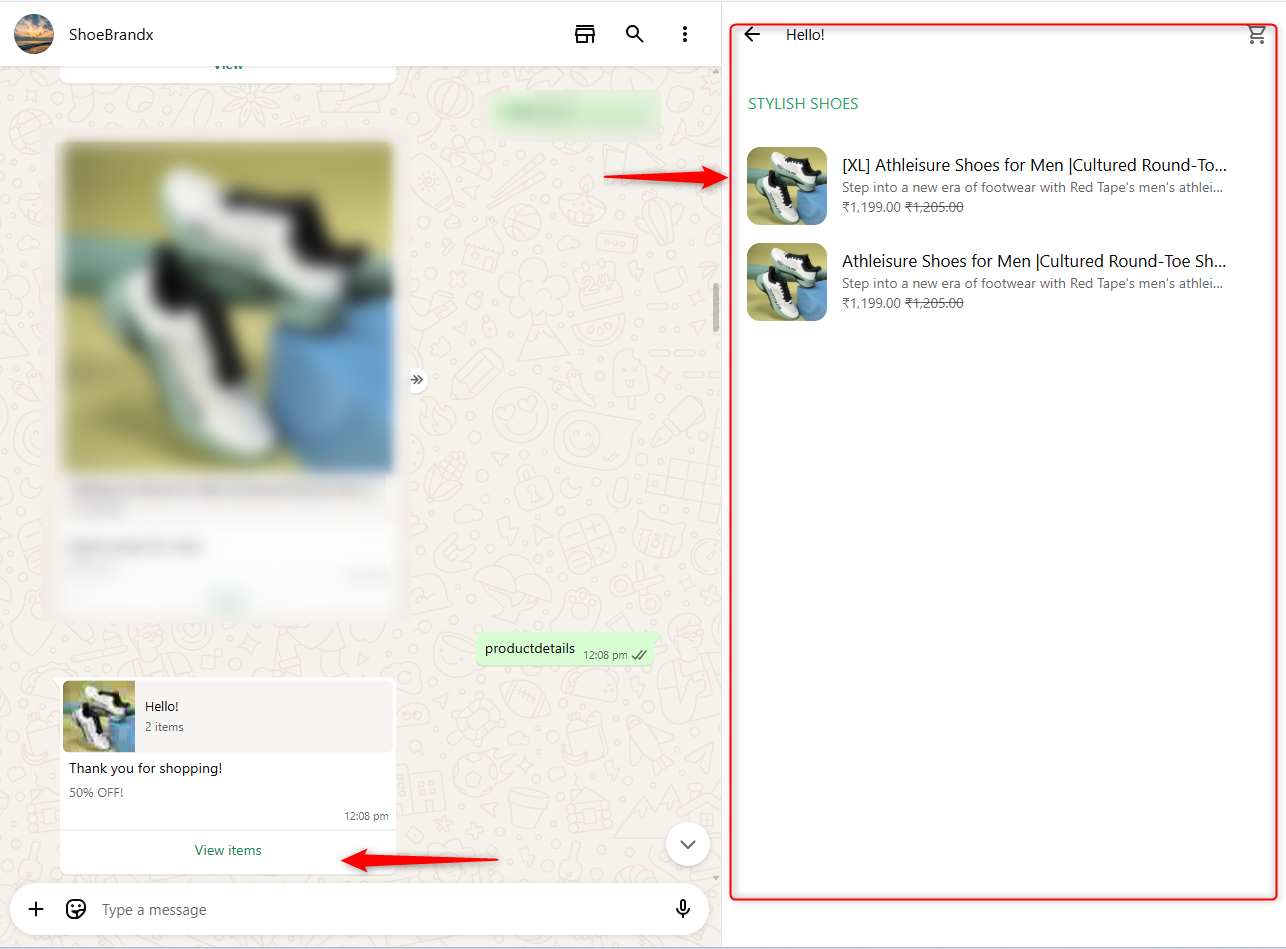
The Multi Product Message allows you to showcase multiple products in a single WhatsApp message. It’s ideal for product catalogs, combo offers, or showcasing multiple items under one message block.
How to Create a Flow with Multi Product Messages:
- Flow Start: Define keywords to trigger the flow (e.g., "order" or "product").
Add Multi Product Message:
- Enter Header, Body, and Footer: Customize the message content shown to users.
- Enter Section Title: This is mandatory and is used to group and label the list of products.
Click on Add Products:
→ Select from already created or approved product templates, which include pre-filled name, price, image, and description for quicker setup.
→ Add multiple products as needed for the message.
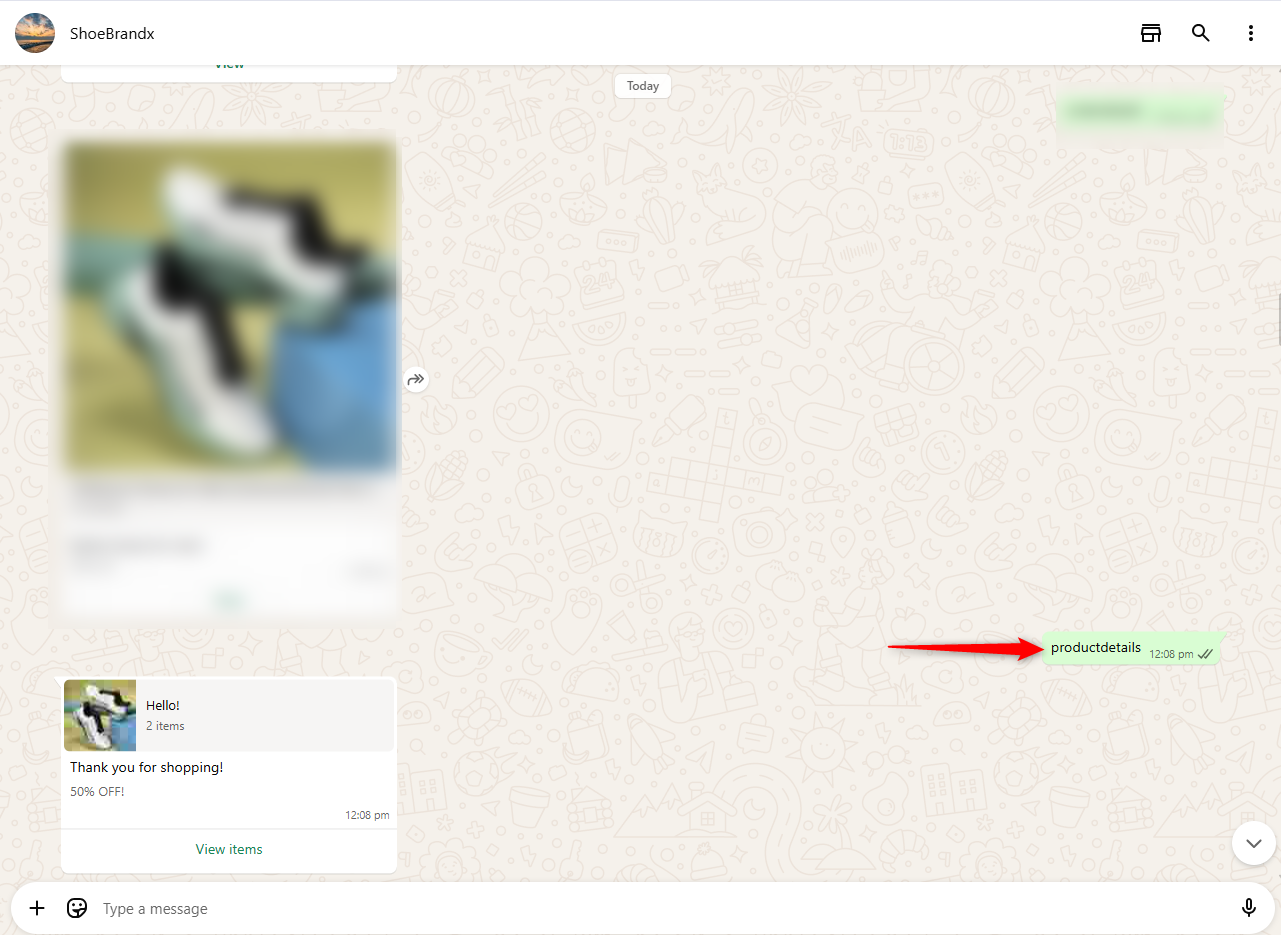
Trigger the Flow:
The flow will be triggered when a user sends a message containing the defined keywords.
7. Catalog Message
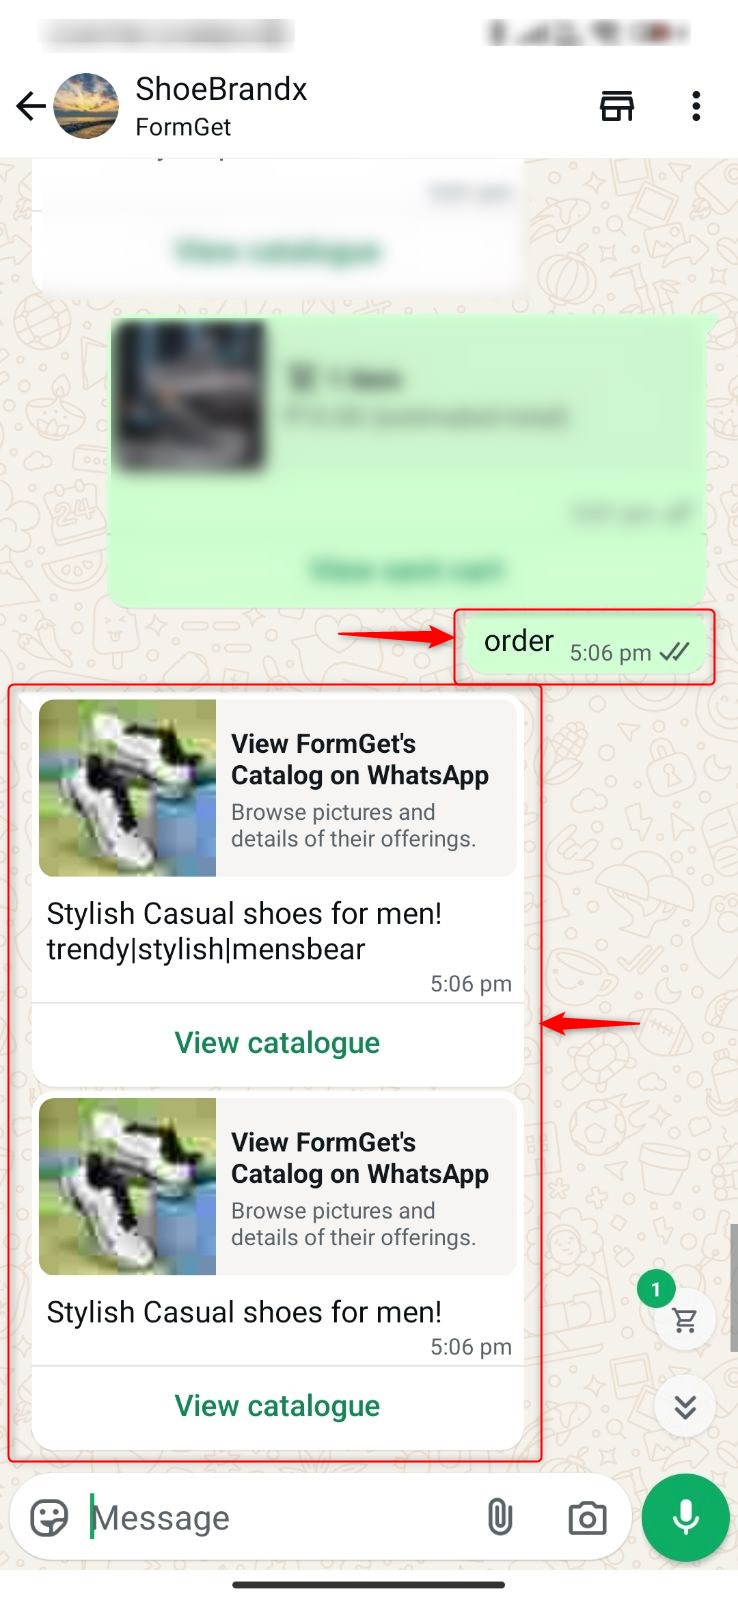
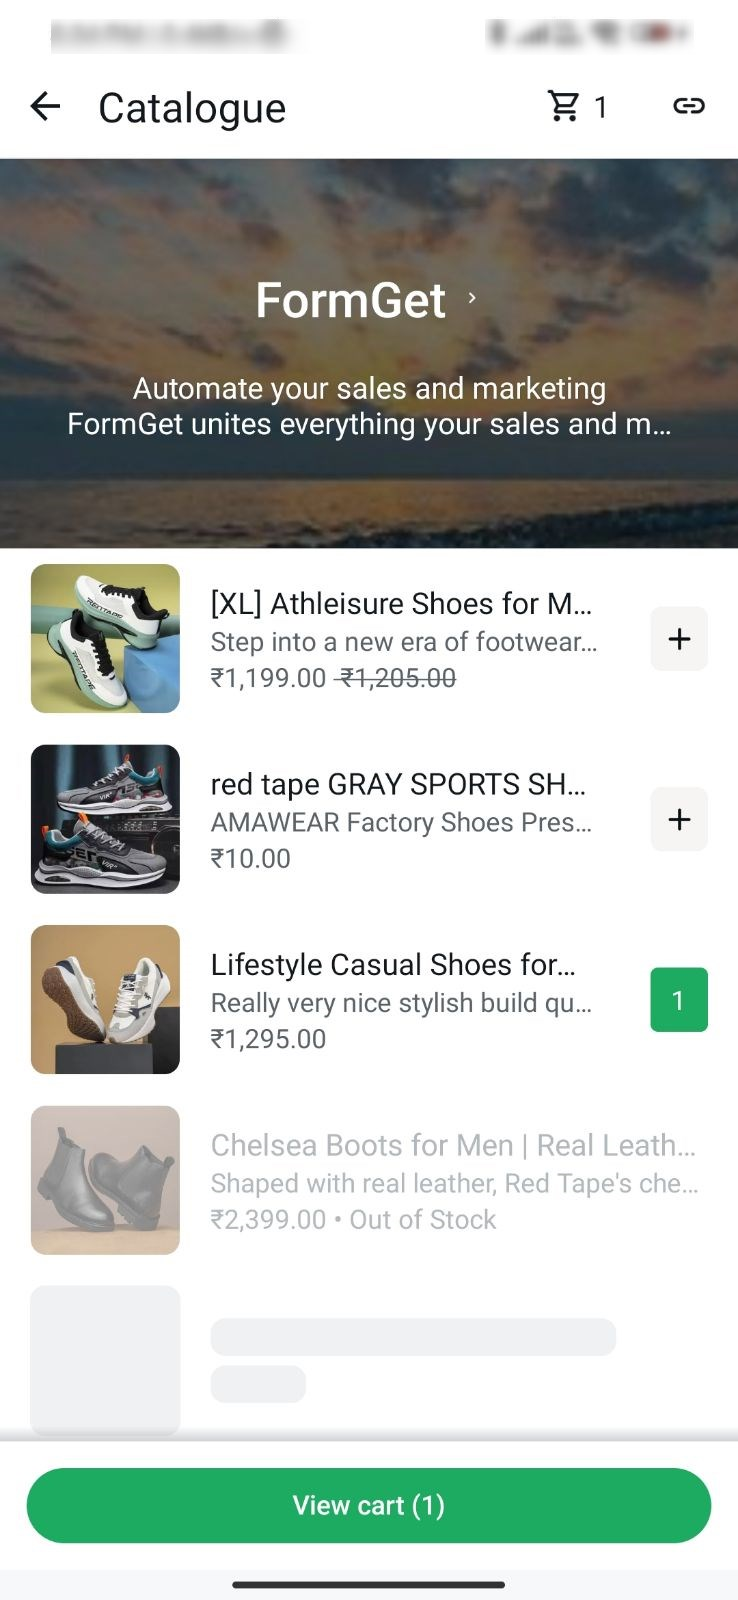
The Catalog Message enables businesses to send interactive product catalogs to customers via WhatsApp. This node allows you to trigger catalog displays based on keyword matches and send multiple catalog messages within a single flow.
How to Create a Flow with Catalog Message:
Flow Start:
- Define keywords to trigger the flow (e.g., order, producdetails).
Connect to Catalog Message:
- Add the Catalog Message node.
- Enter Body: Write descriptive text about your catalog.
- Enter Footer: Add brief footer message - optional.
Trigger the Flow:
The flow will be triggered when a user sends a message containing the defined keywords.
8.WhatsApp Pay Message:
How WhatsApp Payments Work with Flows
Step 1: Log in and Open the Flow Creation Page
- Log in to your Pabbly Chatflow account using your registered credentials.
- From the left-hand navigation menu, click on Flows.
- You will be redirected to the Flow List page. Here, locate the Add Flow button in the top-right corner and click on it.
- This will take you to the Create Flow page, where you can begin setting up your new flow.
Prerequisite: Enable WhatsApp Pay in Flows
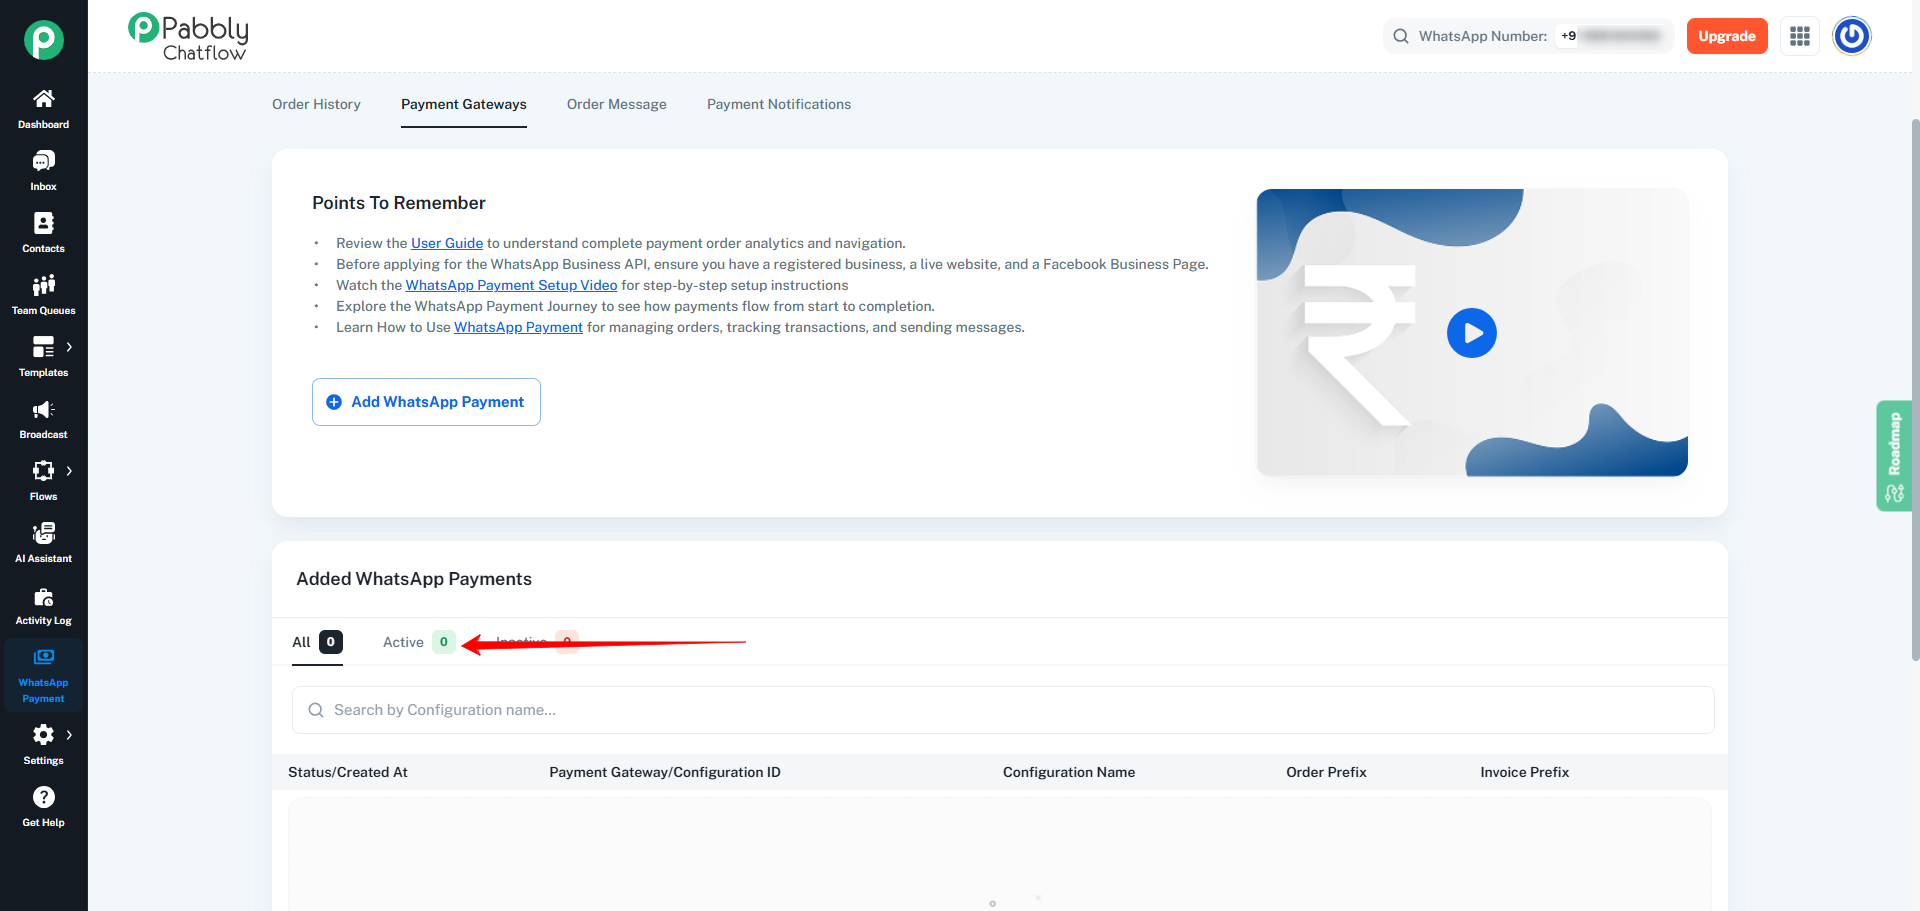
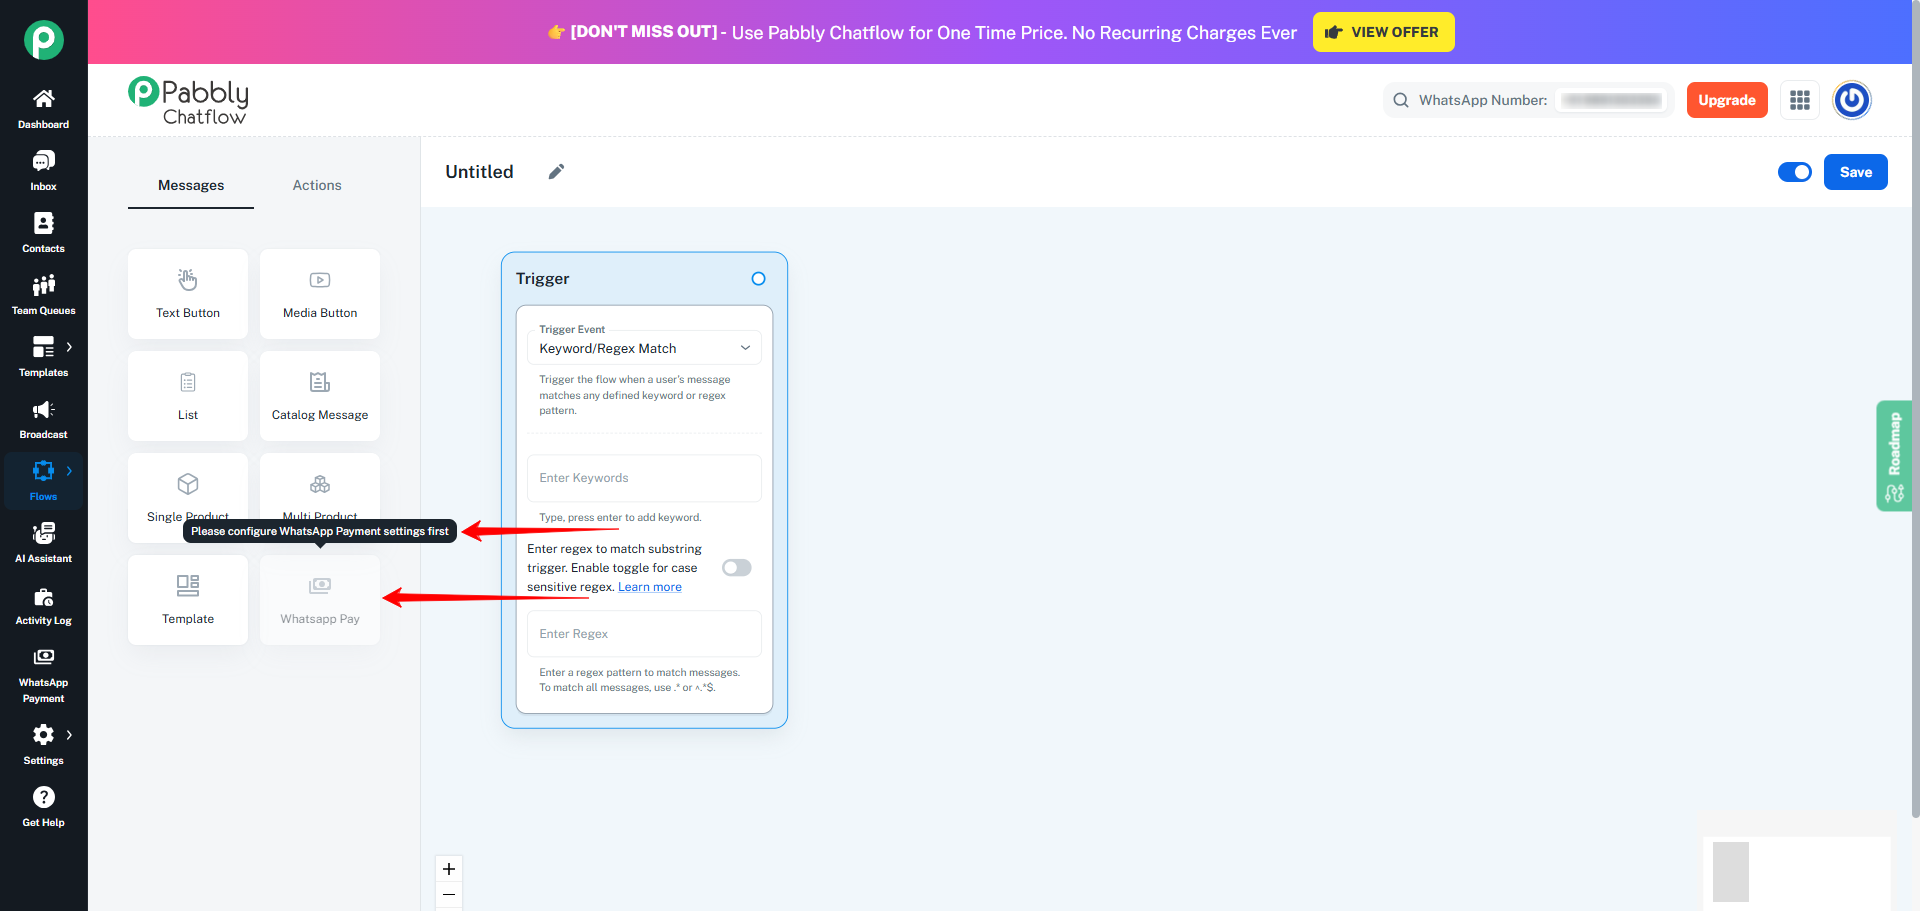
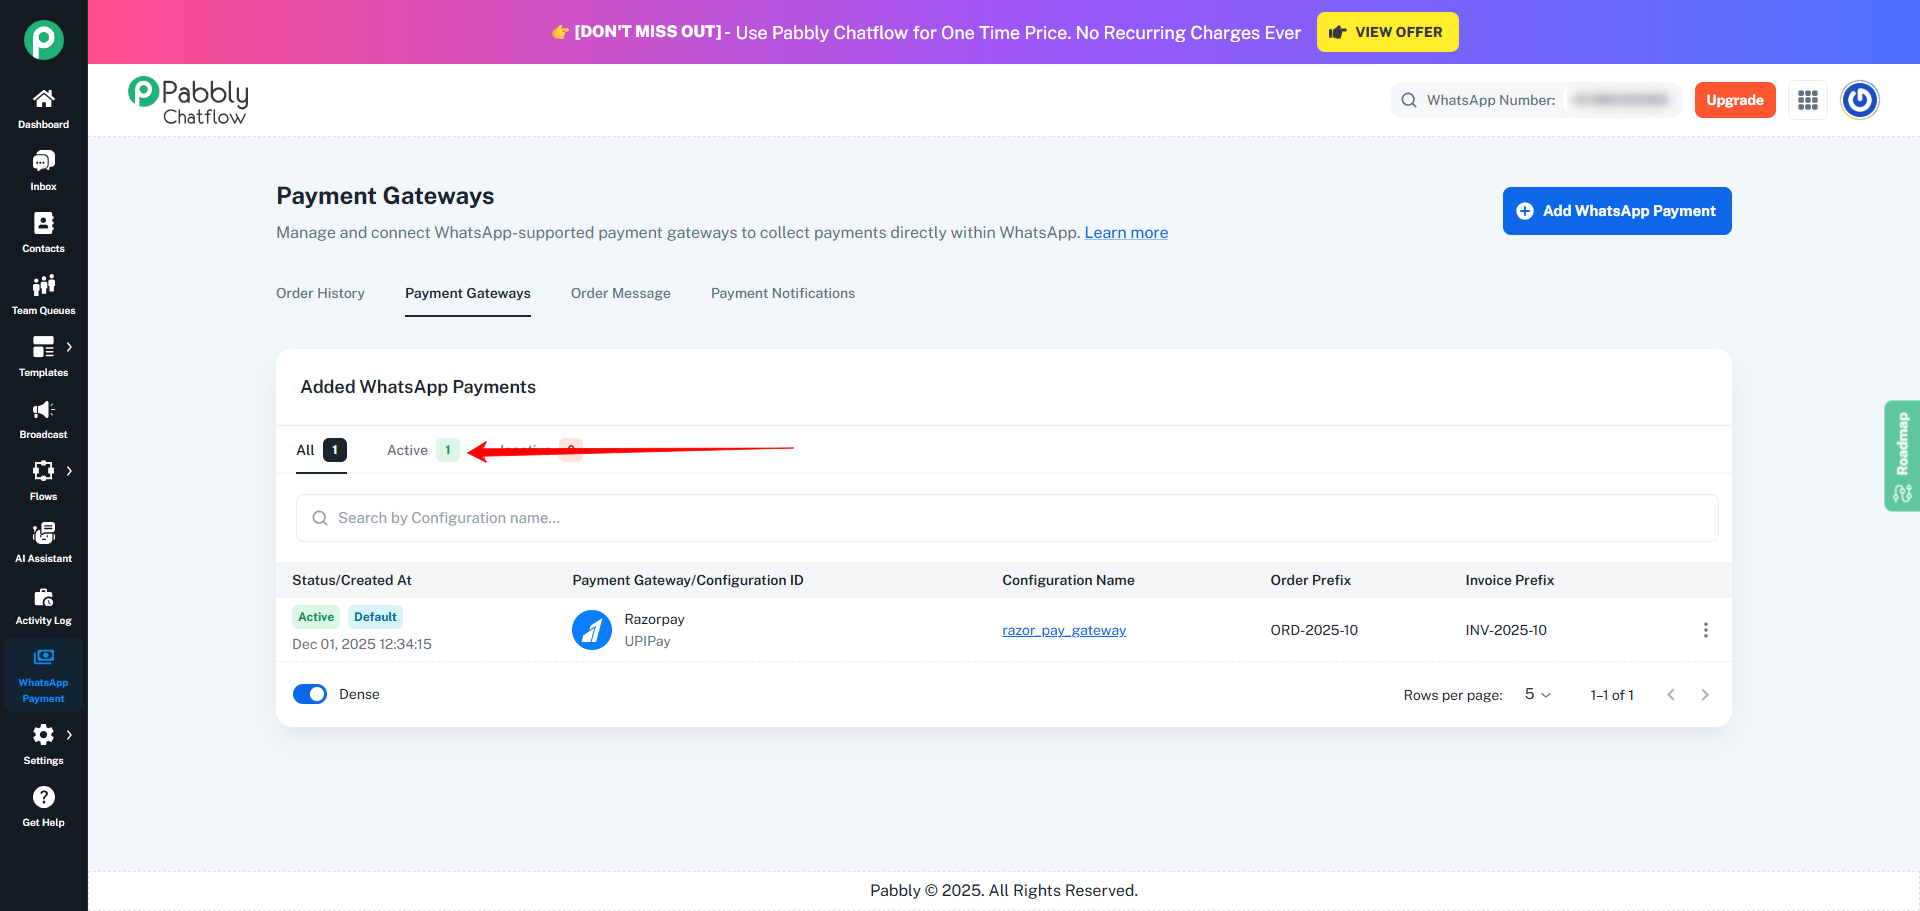
- To create a flow using WhatsApp Payment, you must first configure at least one Payment Gateway and create at least one Order Message (of any type) and both should be Active.
- Once your Payment Gateway is successfully configured and an Order Message is created, a new message called “WhatsApp Pay” becomes available inside Flows.
- Before completing this setup, the WhatsApp Pay message remains disabled in the Flow builder.
- As soon as your payment configuration is complete and an Order Message is available, the WhatsApp Pay message becomes enabled and ready to use.
The detailed steps for configuring the Payment Gateway and creating an Order Message are explained in separate documentation.
Please refer to the following guides to complete these prerequisites:
Make sure both the Payment Gateway and Order Message are active before using the WhatsApp Pay message in Flows.
-
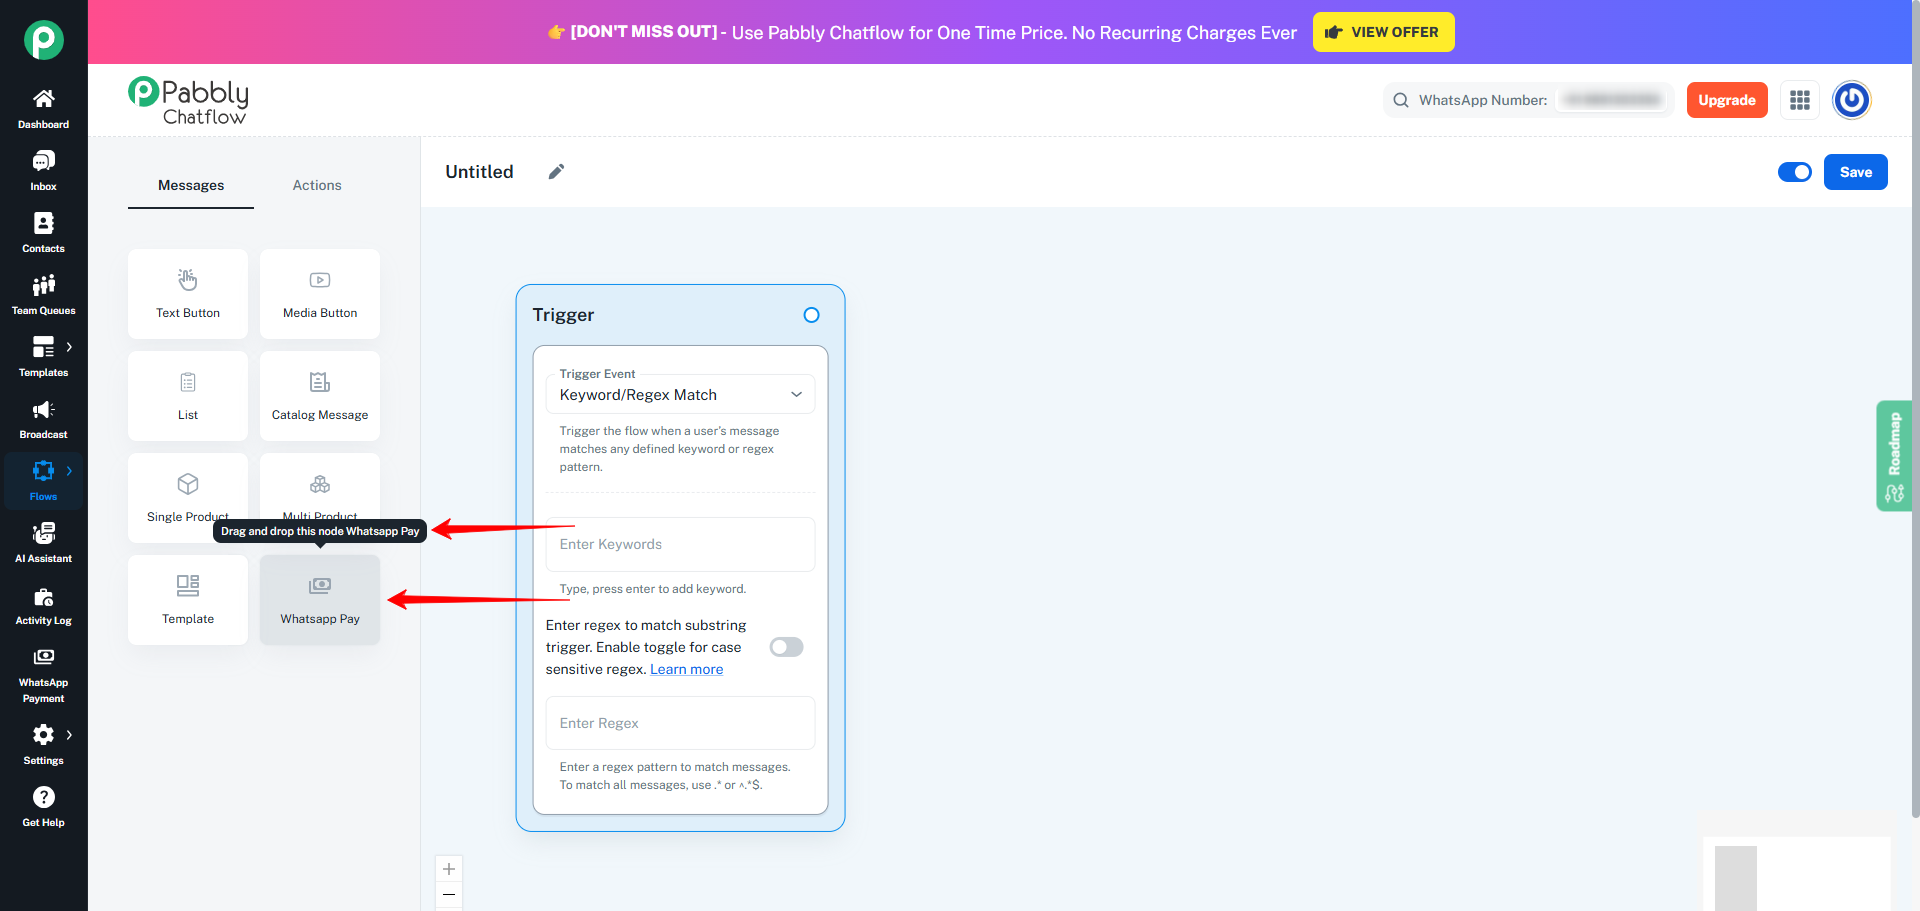
- From this point forward, you can place the WhatsApp Pay message anywhere inside your Flow, depending on how you want customers to receive order messages and payment links.
WhatsApp Pay works with three different Order Message Types:
- WhatsApp Cart
- Custom Product
- Catalog Product
Each of these types determines how the order is created, how products appear to the customer, and how payment links behave.
1. Using WhatsApp Pay with the "WhatsApp Cart" Order Message Type
When using WhatsApp Pay message with the WhatsApp Cart Order message type, the order creation process begins directly inside the customer’s WhatsApp application.
- The customer selects products from your Meta Catalog, adds them to the WhatsApp Cart, and places an order.
- As soon as this happens, the Order Received trigger fires inside your Flow. This trigger is specifically designed to capture WhatsApp Cart orders and start automation based on them.
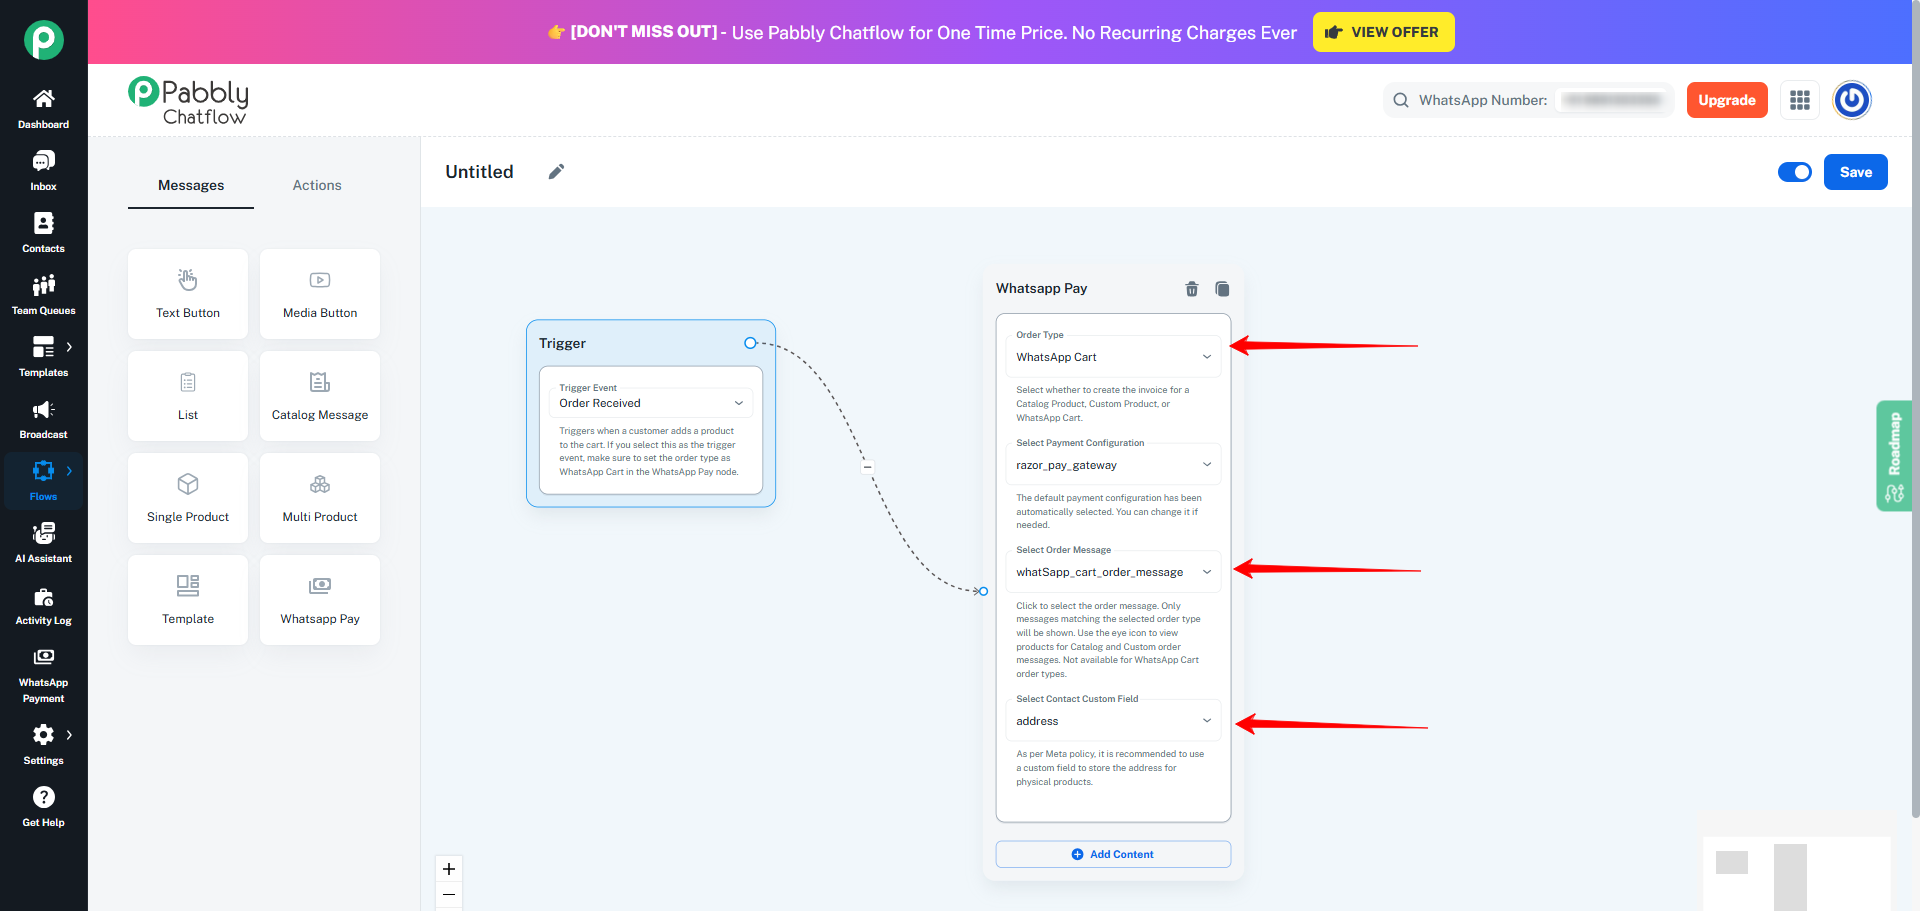
- To begin, open the Flow Builder and set Order Received as the Trigger event in flow start. From there, drag the WhatsApp Pay message into the Flow and connect it.
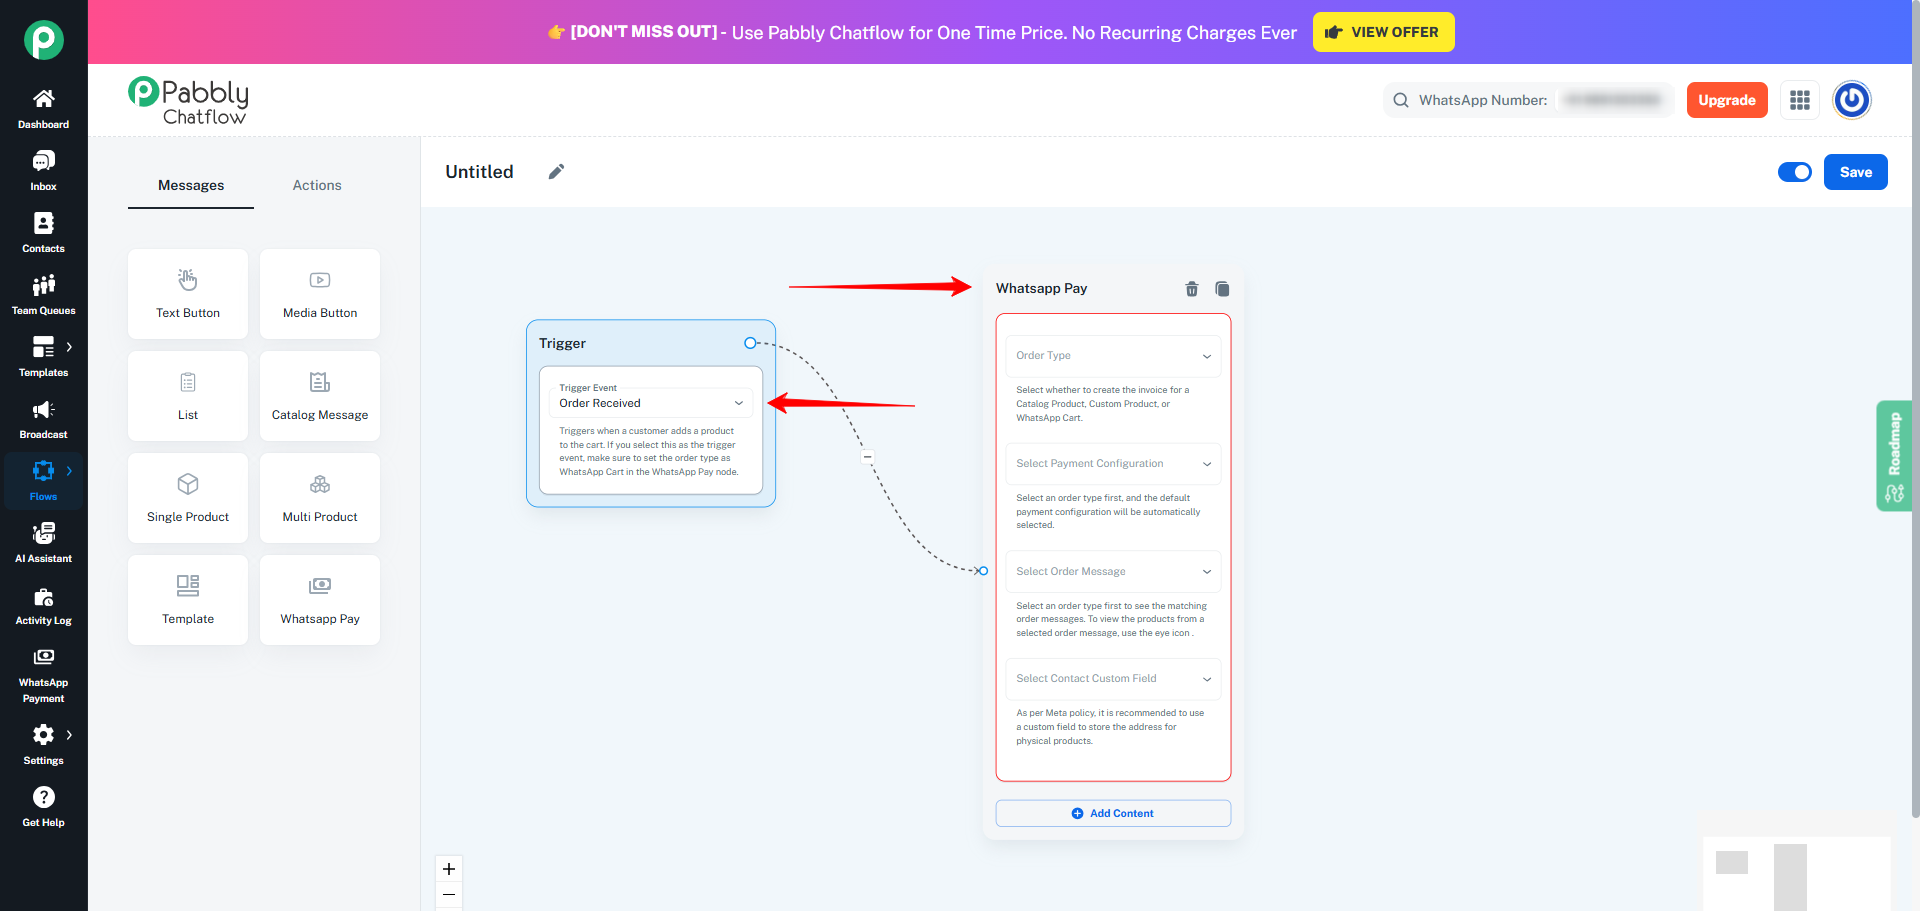
- In the WhatsApp Pay message choose WhatsApp Cart as the Order Message Type.
- The Order Message dropdown will automatically filter to display only WhatsApp Cart–based Order Messages.
- This ensures that only compatible Order Messages can be selected.
- Your Payment Configuration ID is automatically preselected using the default payment gateway.
- You may manually select a different payment gateway if required.
- Select the Order Message template that defines the message text, product display, and payment link sent to customers.
- Choose a Contact Custom Field to store extra customer information such as shipping address or customer notes.
When Selling Physical Products
- If you are selling physical products through WhatsApp, it is essential to collect the customer’s shipping address before initiating payment.
- To do this, add the Ask Address action just before the WhatsApp Pay message in your Flow.
- This ensures that the shipping address is securely stored and properly linked to the order.
- As a result, the payment link is generated only after capturing the complete delivery details.
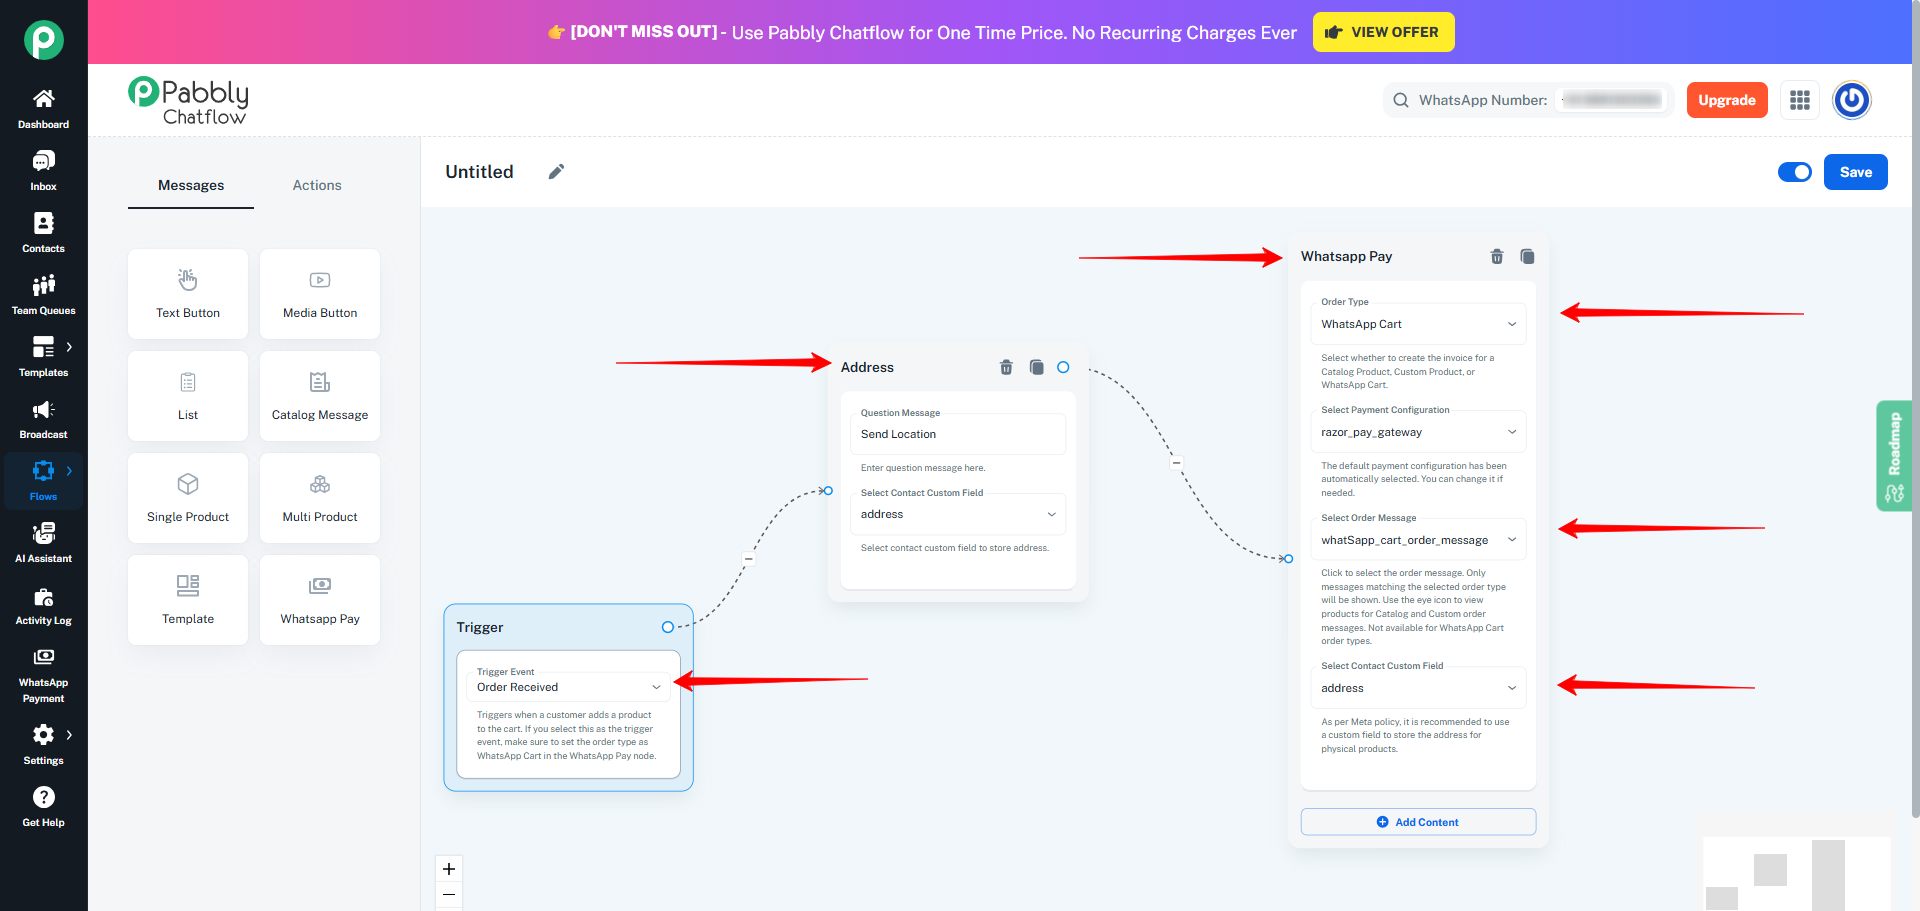
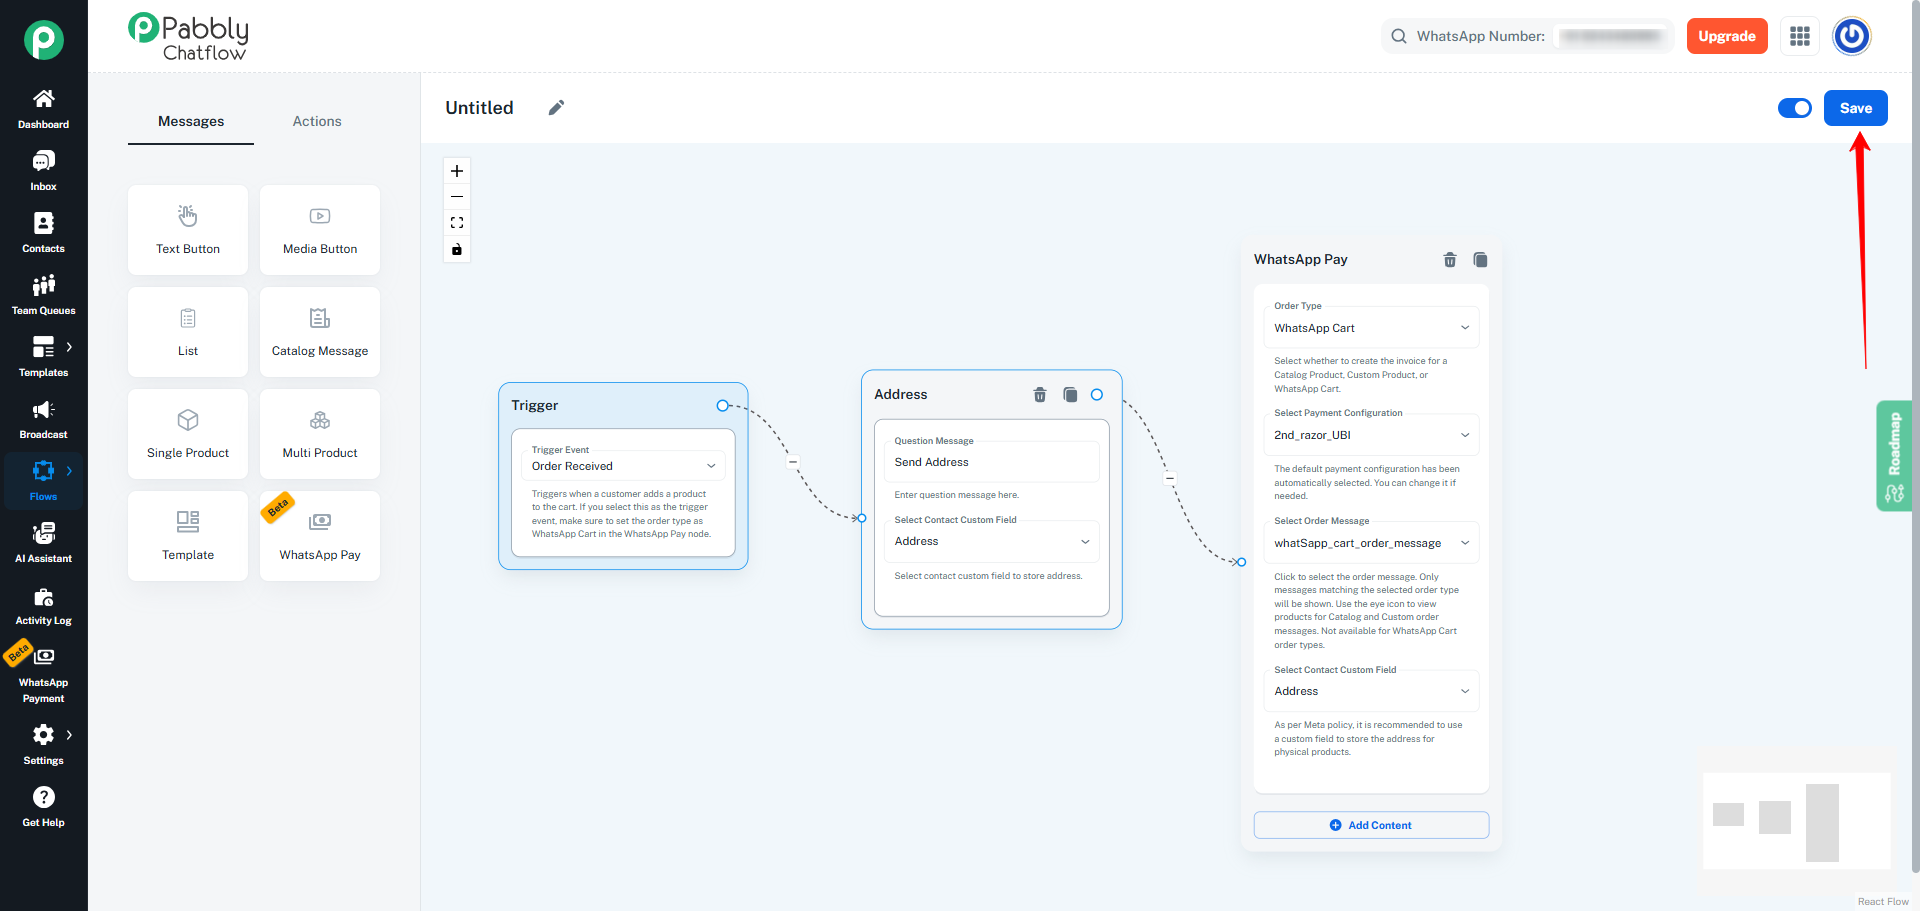
- Once the flow is fully set up, click on the Save button to activate it.
How the Flow Works Once Saved
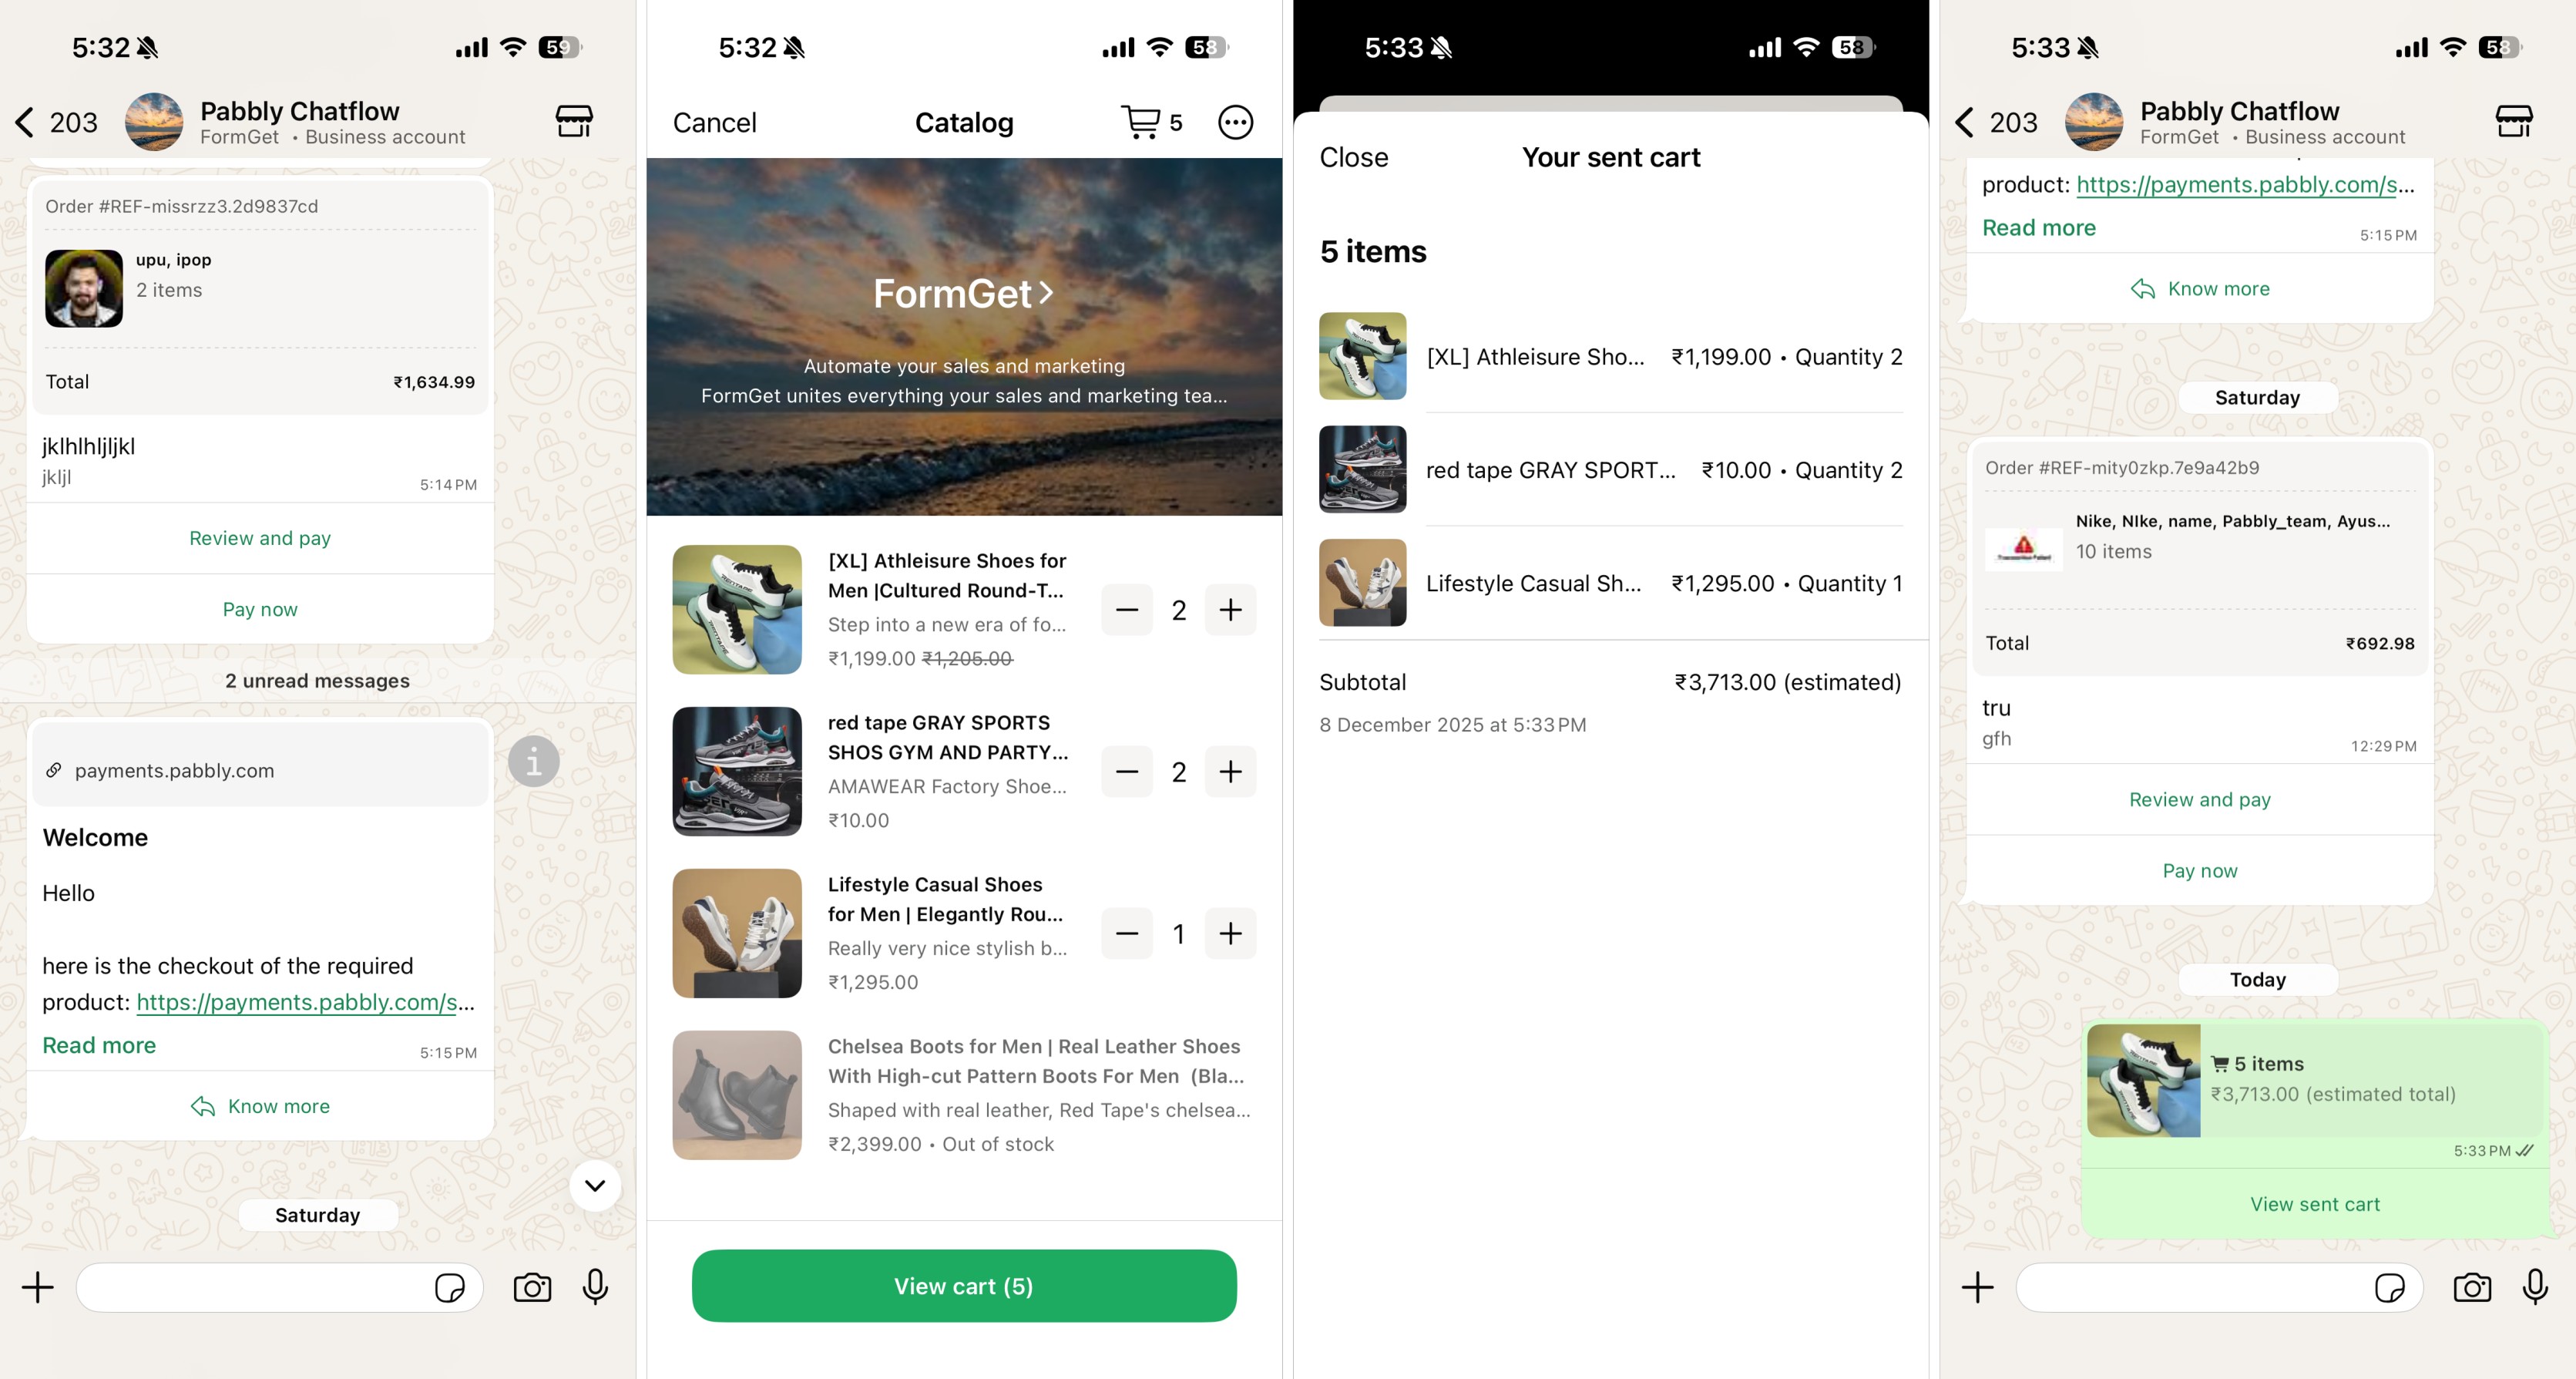
- Once the Flow is saved, the payment process begins automatically whenever a customer places an order through your WhatsApp Catalog.
- When an order is submitted from the WhatsApp app, the Order Received trigger is activated.
- Based on your flow configuration, the Ask Address action is first sent to the customer on WhatsApp.
- As soon as the customer replies with their address, the WhatsApp Pay action is executed and your configured Order Message is delivered to the customer.
- This Order Message includes the products added to the cart along with all applicable charges as defined in the selected Order Message.
The Order Message contains:
- All products added to the cart
- Applied tax rate, shipping charges, and discounts
- A secure payment link generated through your configured payment gateway
- A payment expiry timer based on your Order Message settings
- Two action buttons within the same Order Message:
- Pay Now – Opens the payment panel directly and allows the customer to choose a payment method (UPI, PhonePe, etc.) and complete the payment instantly.
- Review & Pay – Opens the full order summary where the customer can review products, applied charges, and discounts before completing the payment.
- If the Order Message is created with a 300-second (5-minute) expiry, the payment link will automatically expire after five minutes.
- Once the link has expired, the customer will no longer be able to complete the payment using that link.
Note: The Order Received trigger works only with WhatsApp Cart Order Messages. It will not fire for other types of Order Messages.
Using WhatsApp Pay Message with the "Custom Product" Order Message Type
When using the Custom Product type, you are not limited to the Order Received trigger. You can use any other supported trigger in Pabbly Chatflow except the Order Received trigger, such as Keyword, Regex etc.
-
For example, you may want to create a Flow that starts when the customer types a specific keyword. suppose you enter custom as a keyword
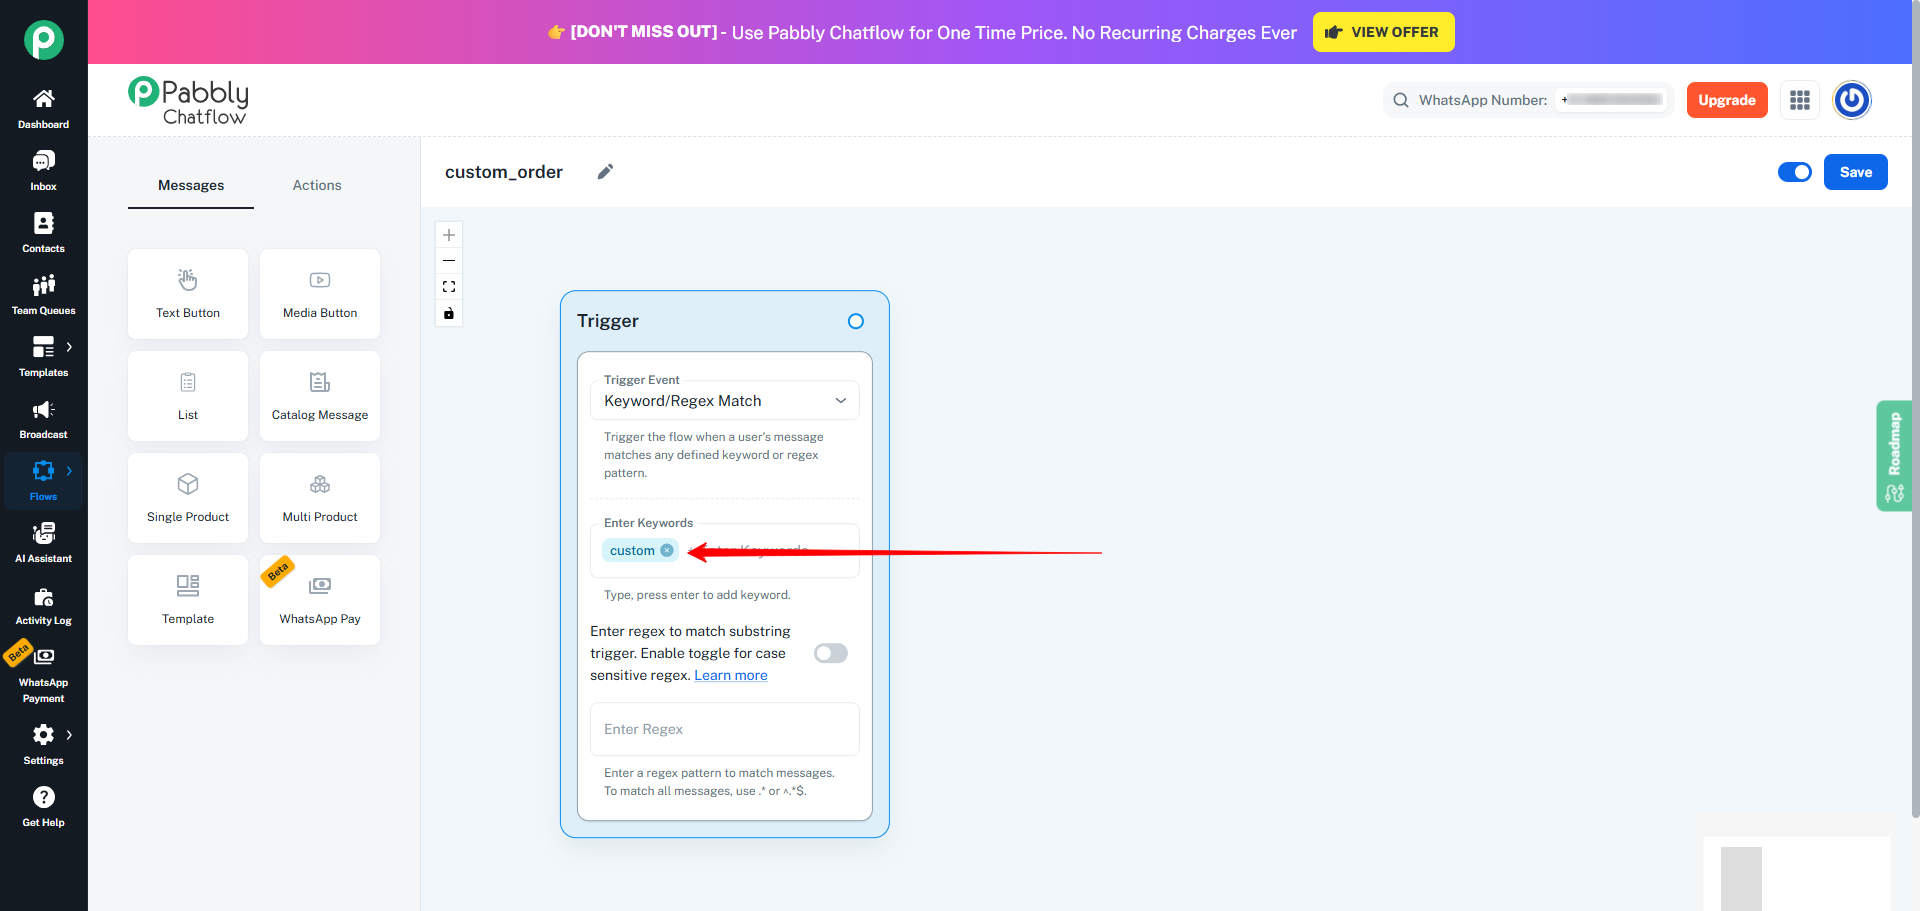
-
After selecting the trigger, you can place an Ask Address action (recommended for physical goods)
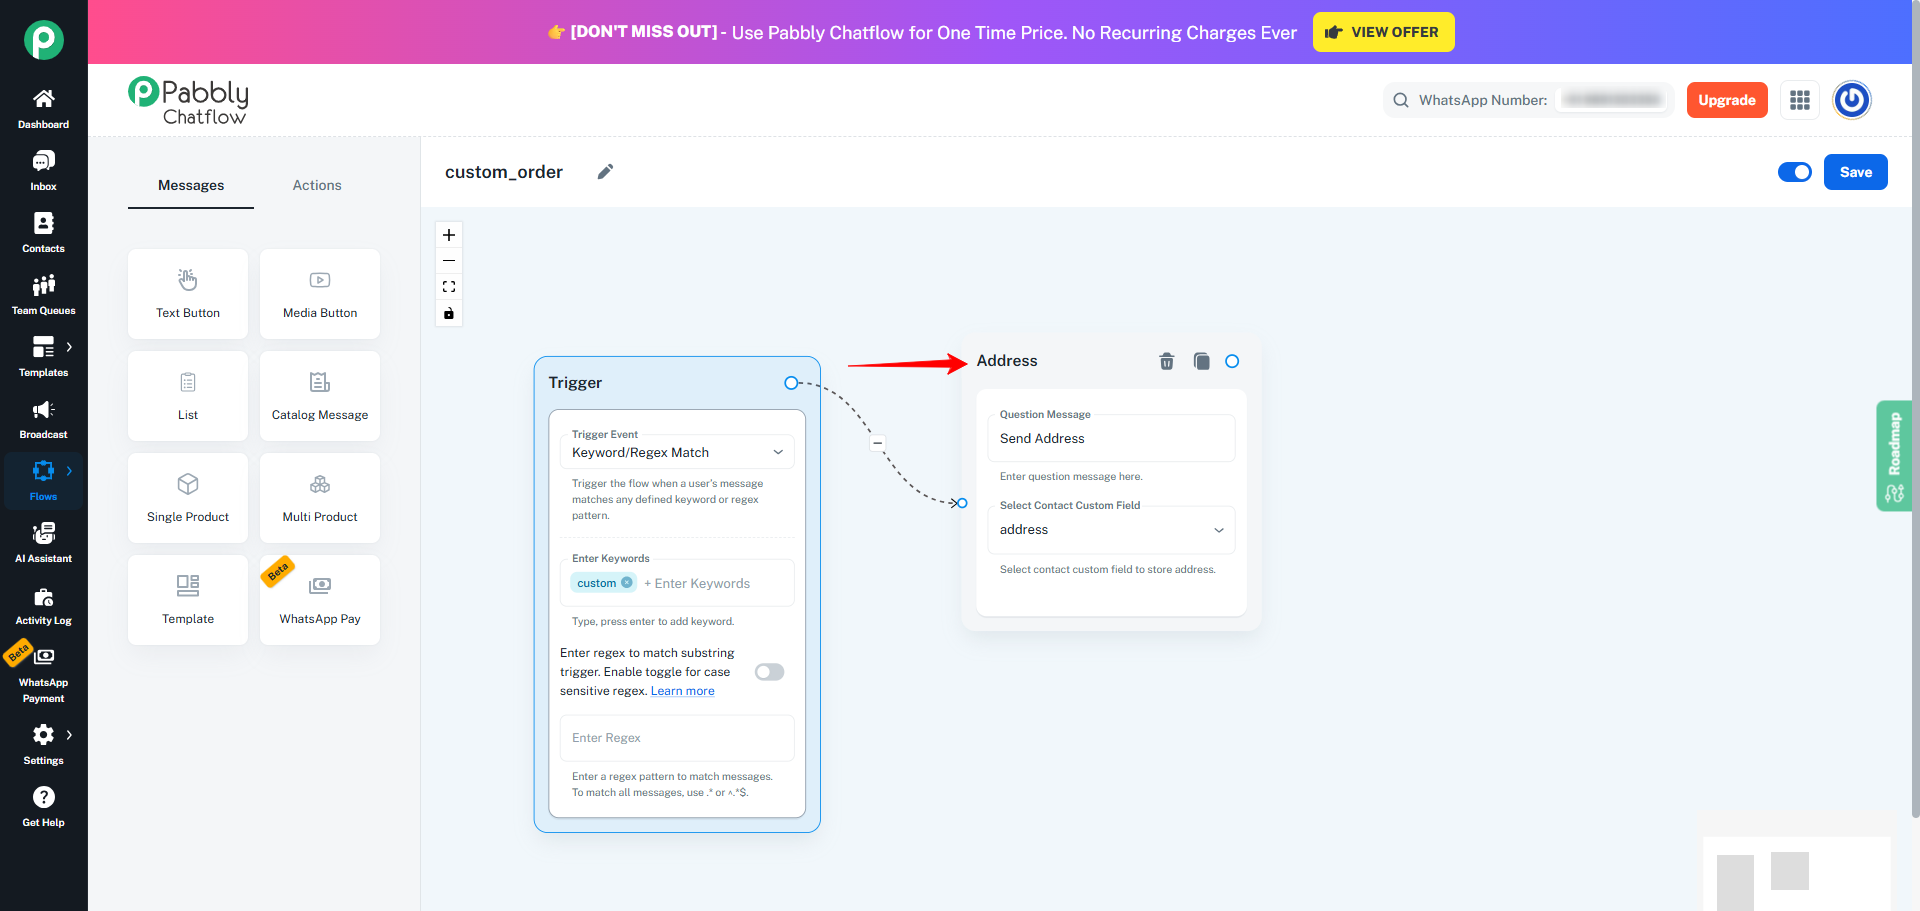
-
And Add the WhatsApp Pay Message
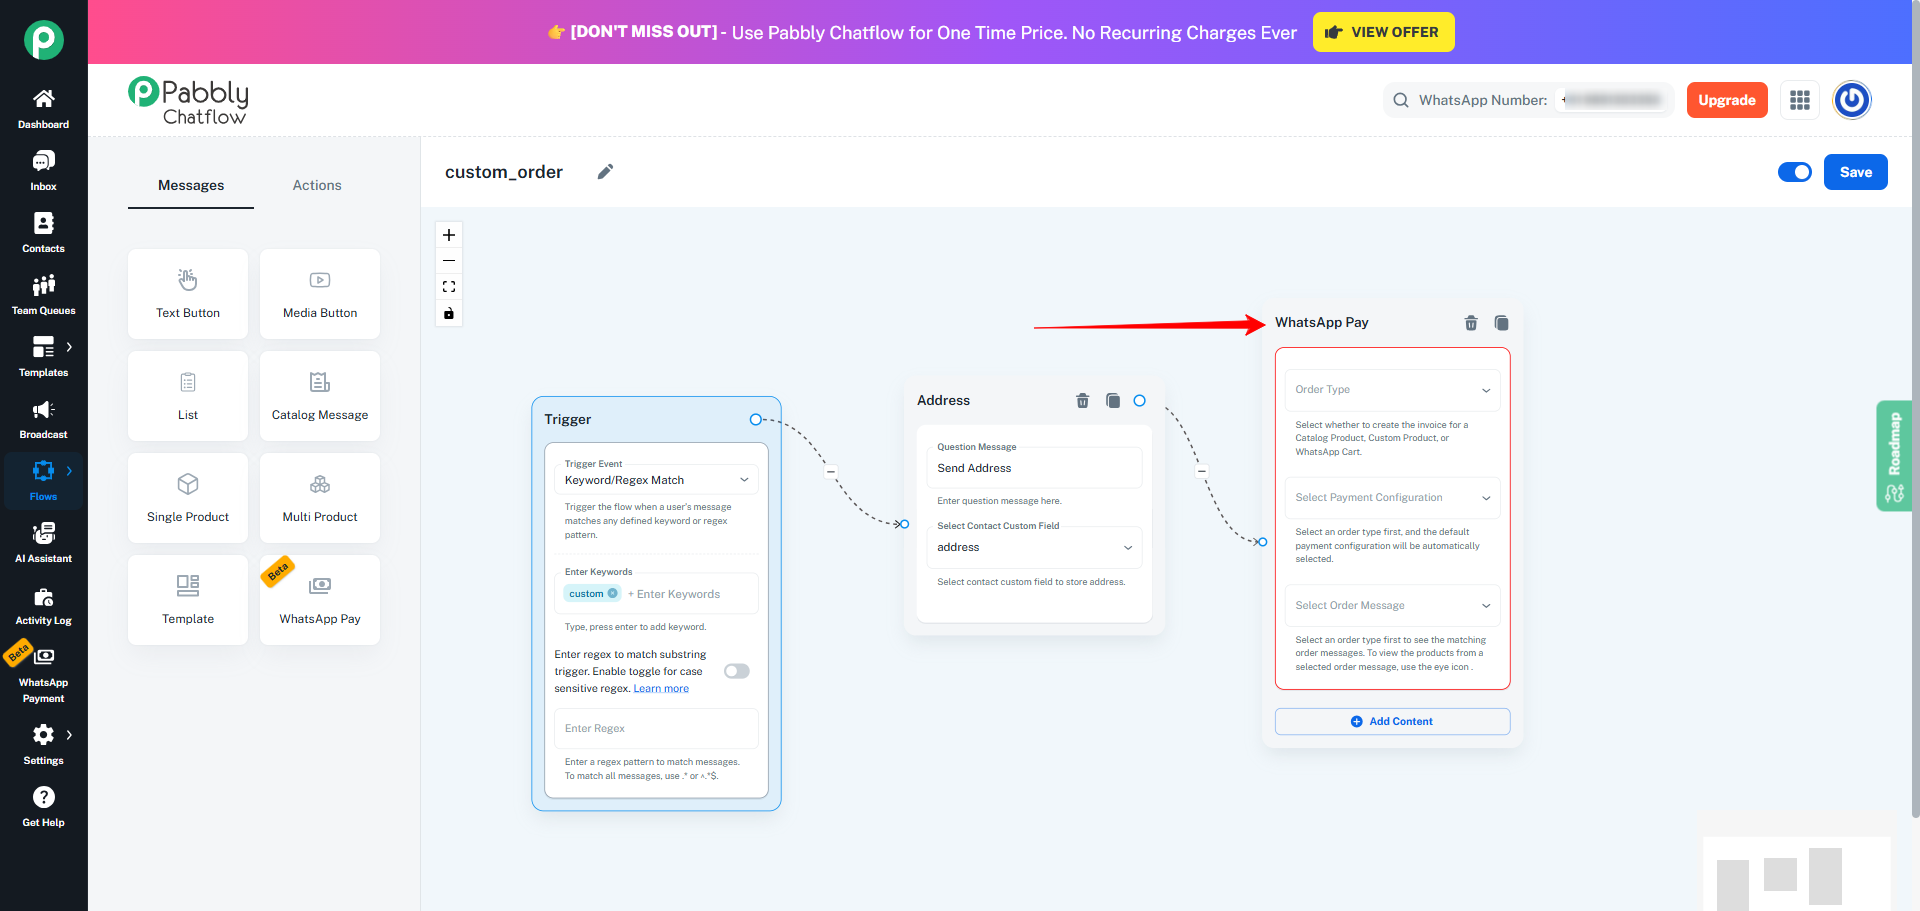
-
Inside the WhatsApp Pay message, select Custom Product as the Order Message Type.
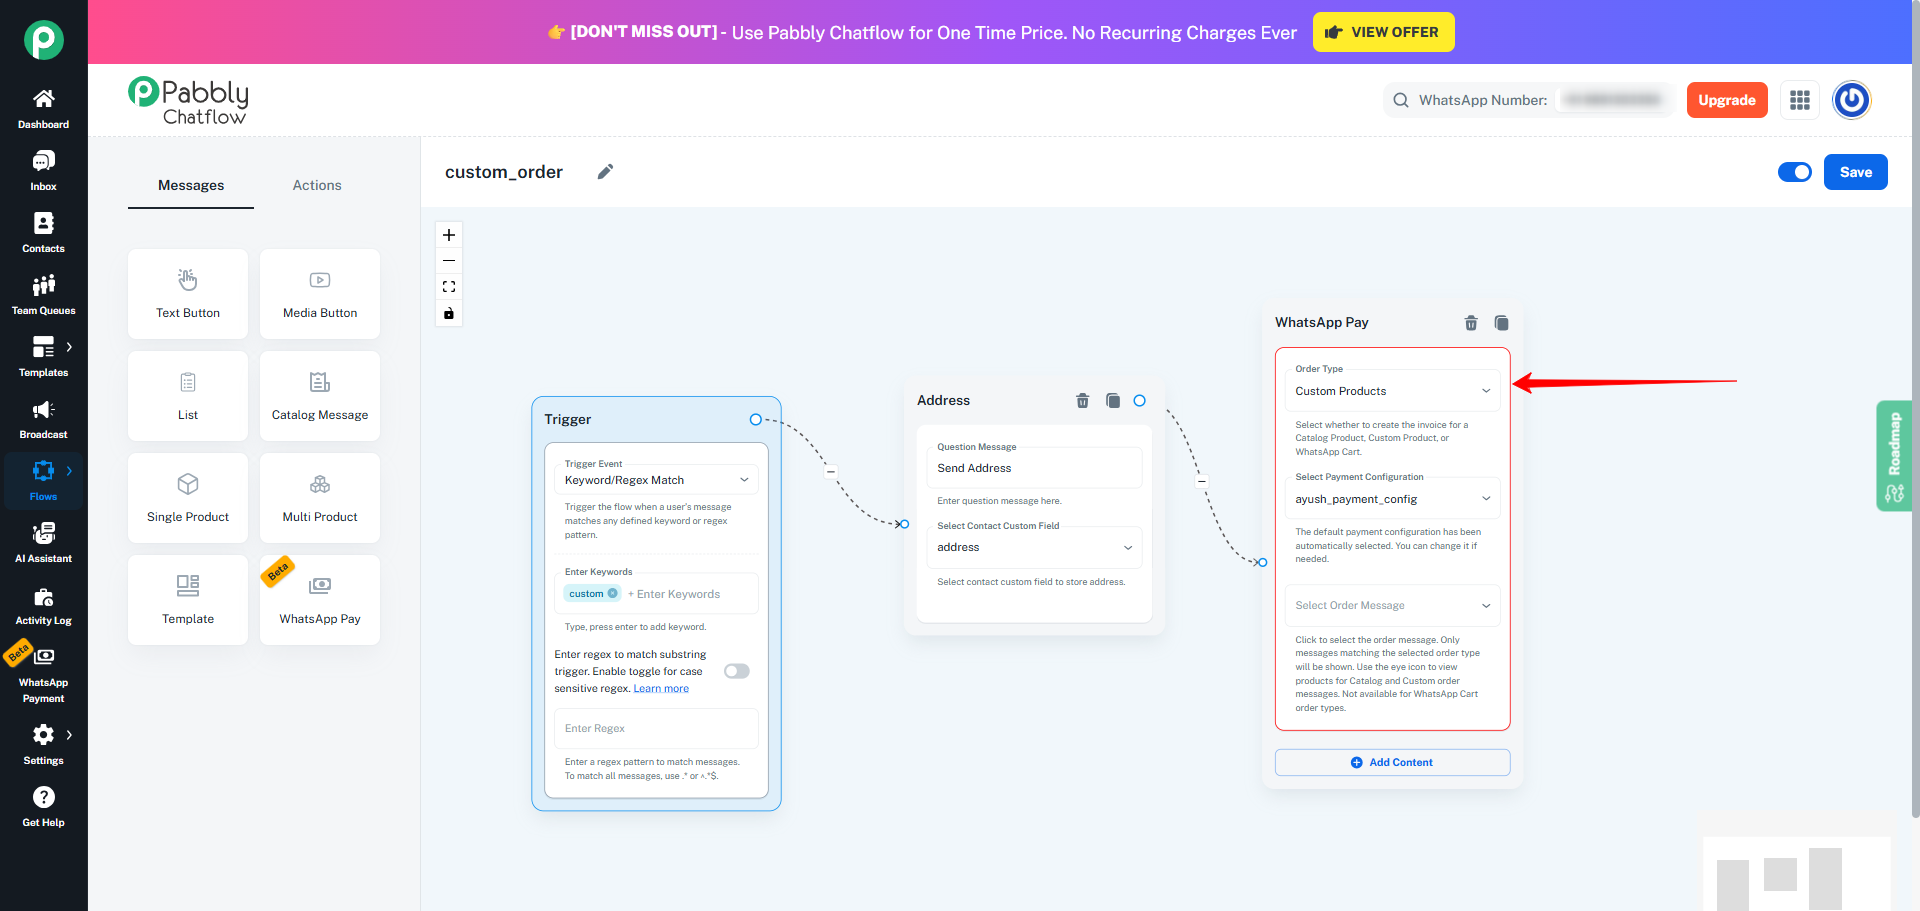
-
In the next step, choose the required Order Message. Once selected, the system opens a dialog displaying all products included in that Order Message.
Each product is displayed with the following details:
- Product image
- Product name
- Quantity field
By default, the quantity for every product is set to 1. You can adjust the quantities as per the requirement however, the system enforces a strict rule
The total combined quantity of all selected products must not exceed 30
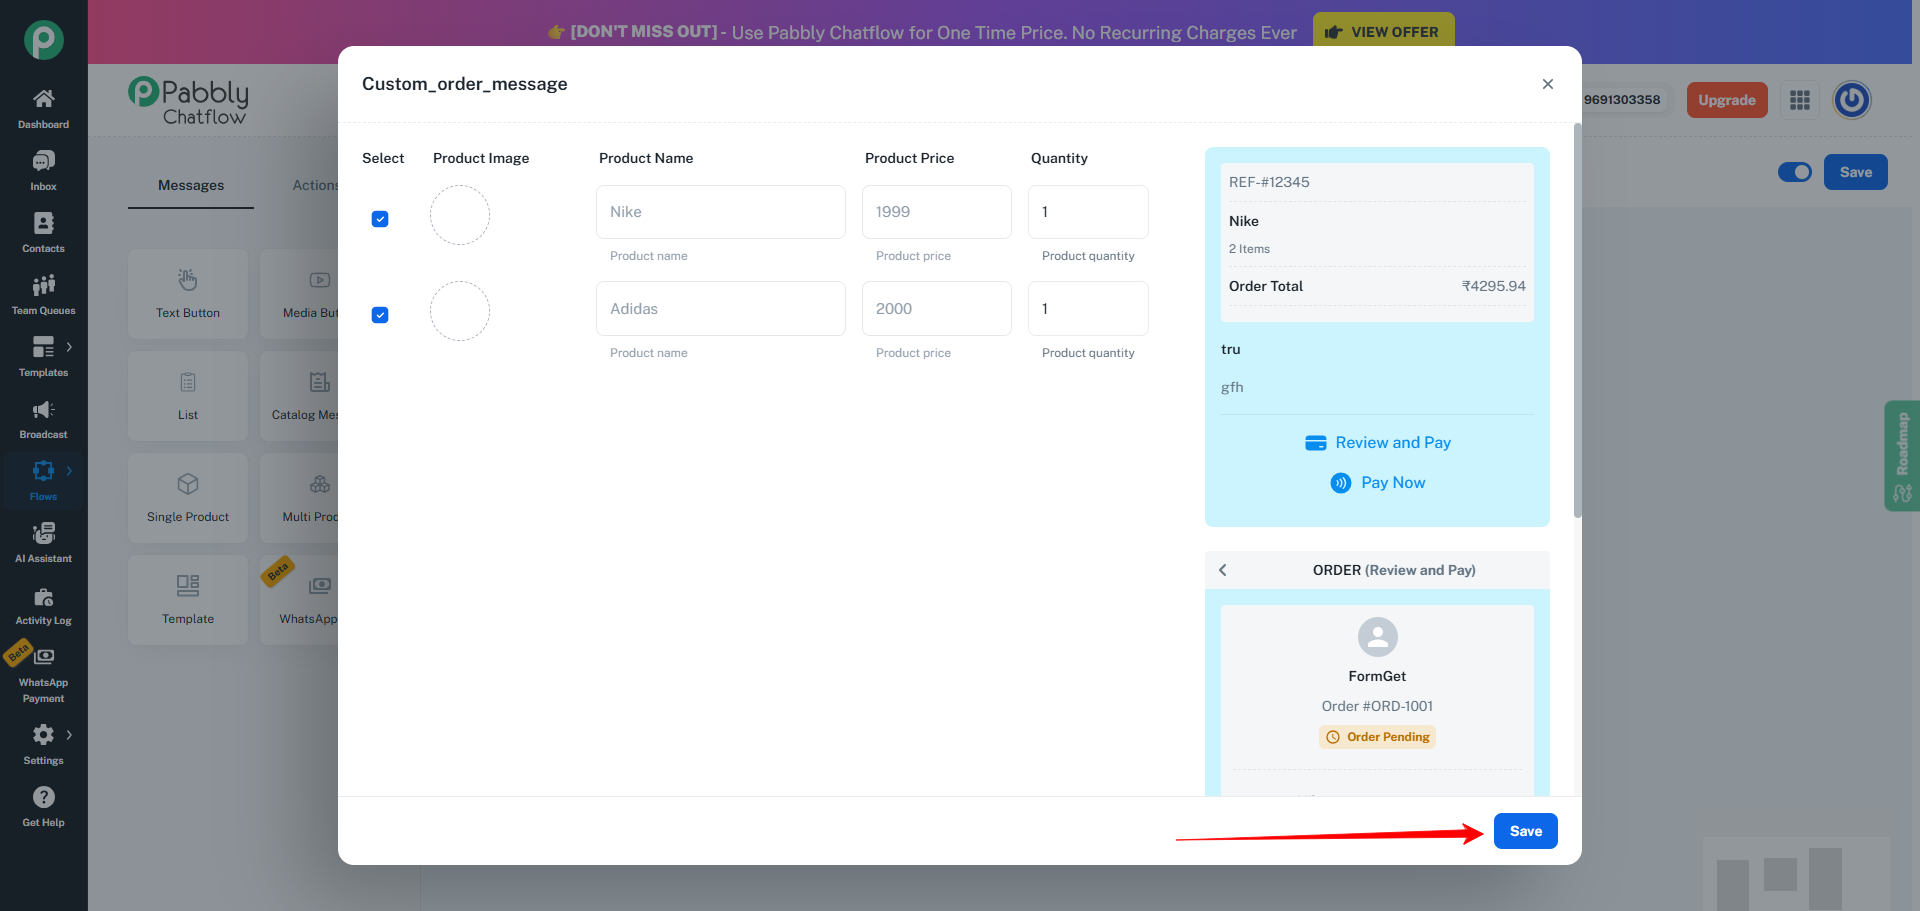
-
After selecting the products and setting their quantities, click the Save button as shown in the image above.
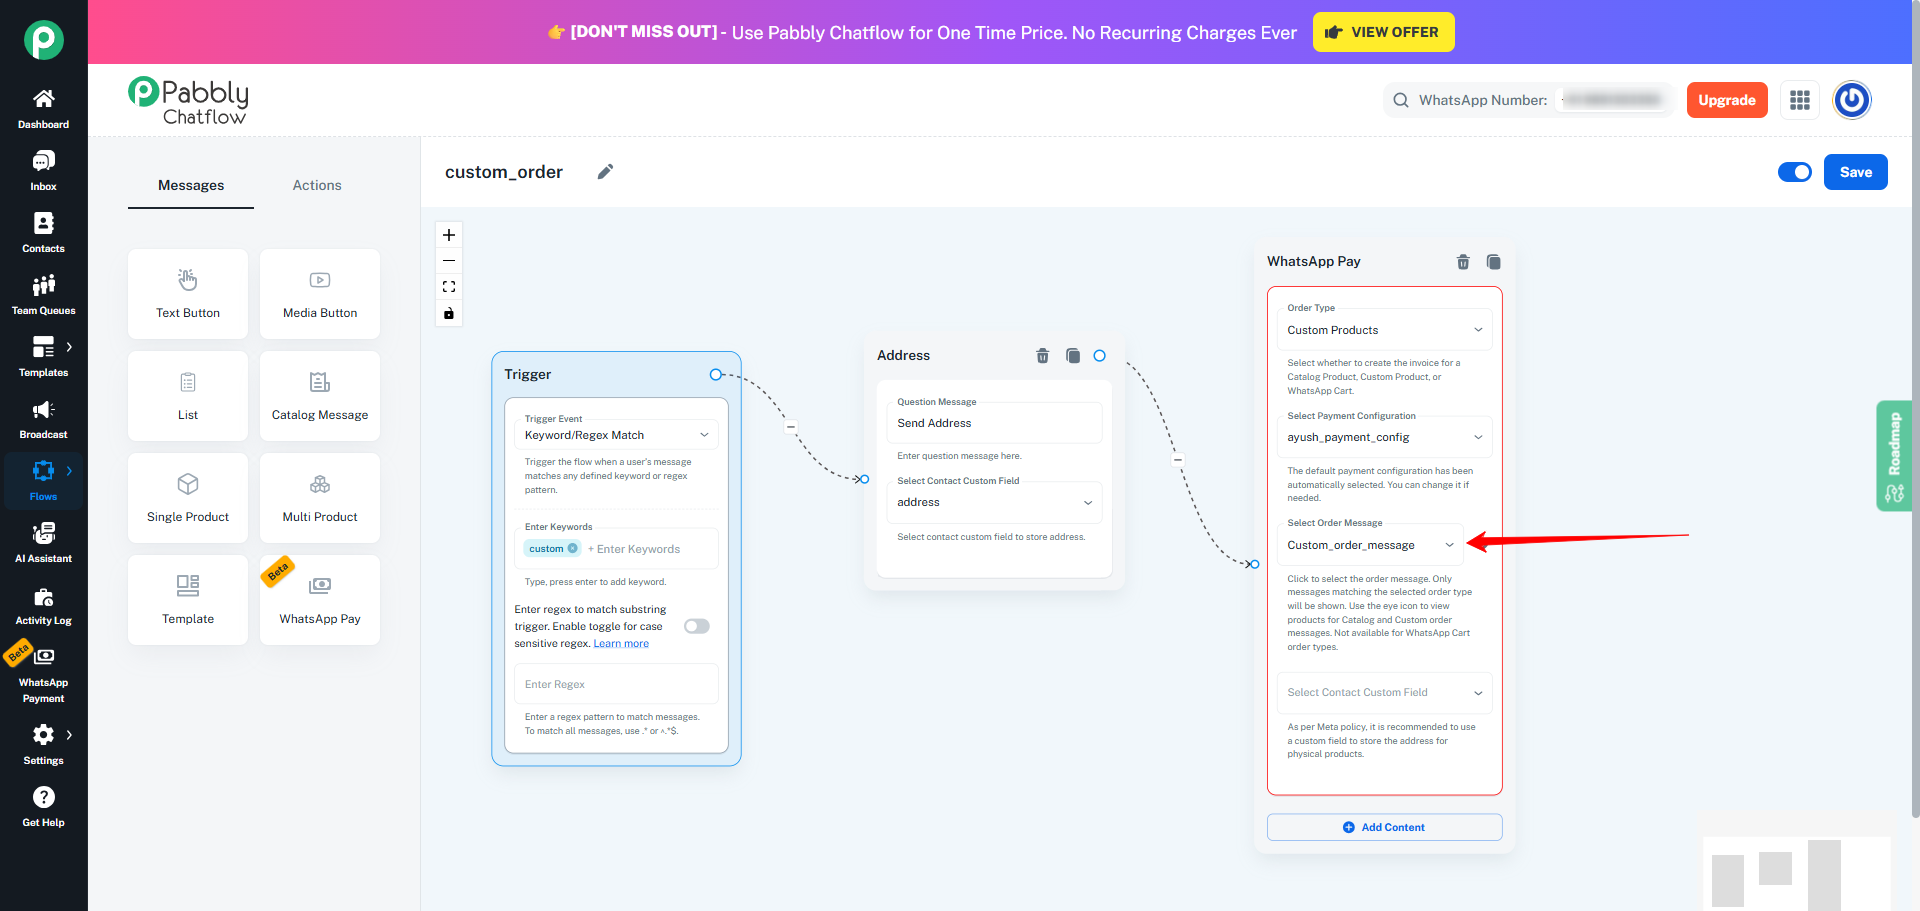
-
If the selected Order Message is of the Physical Product type, you must select a Contact Custom Field to store additional customer information related to the order.
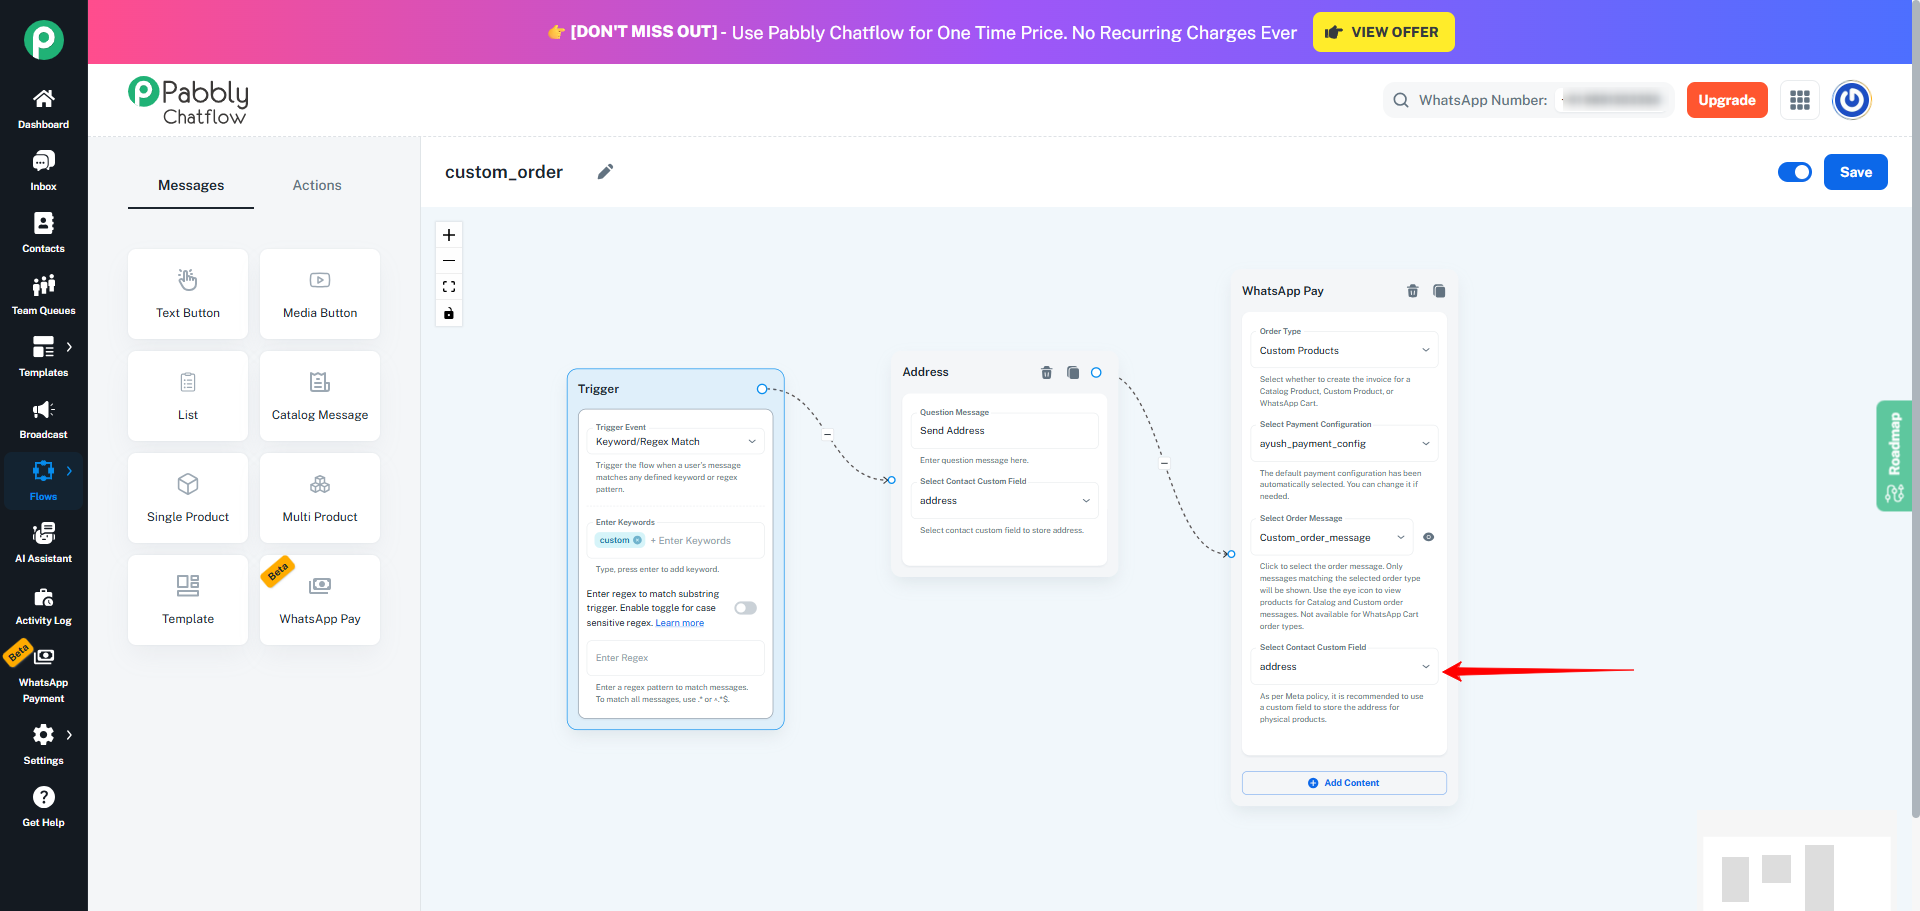
-
Now, save the Flow by clicking the Save button.
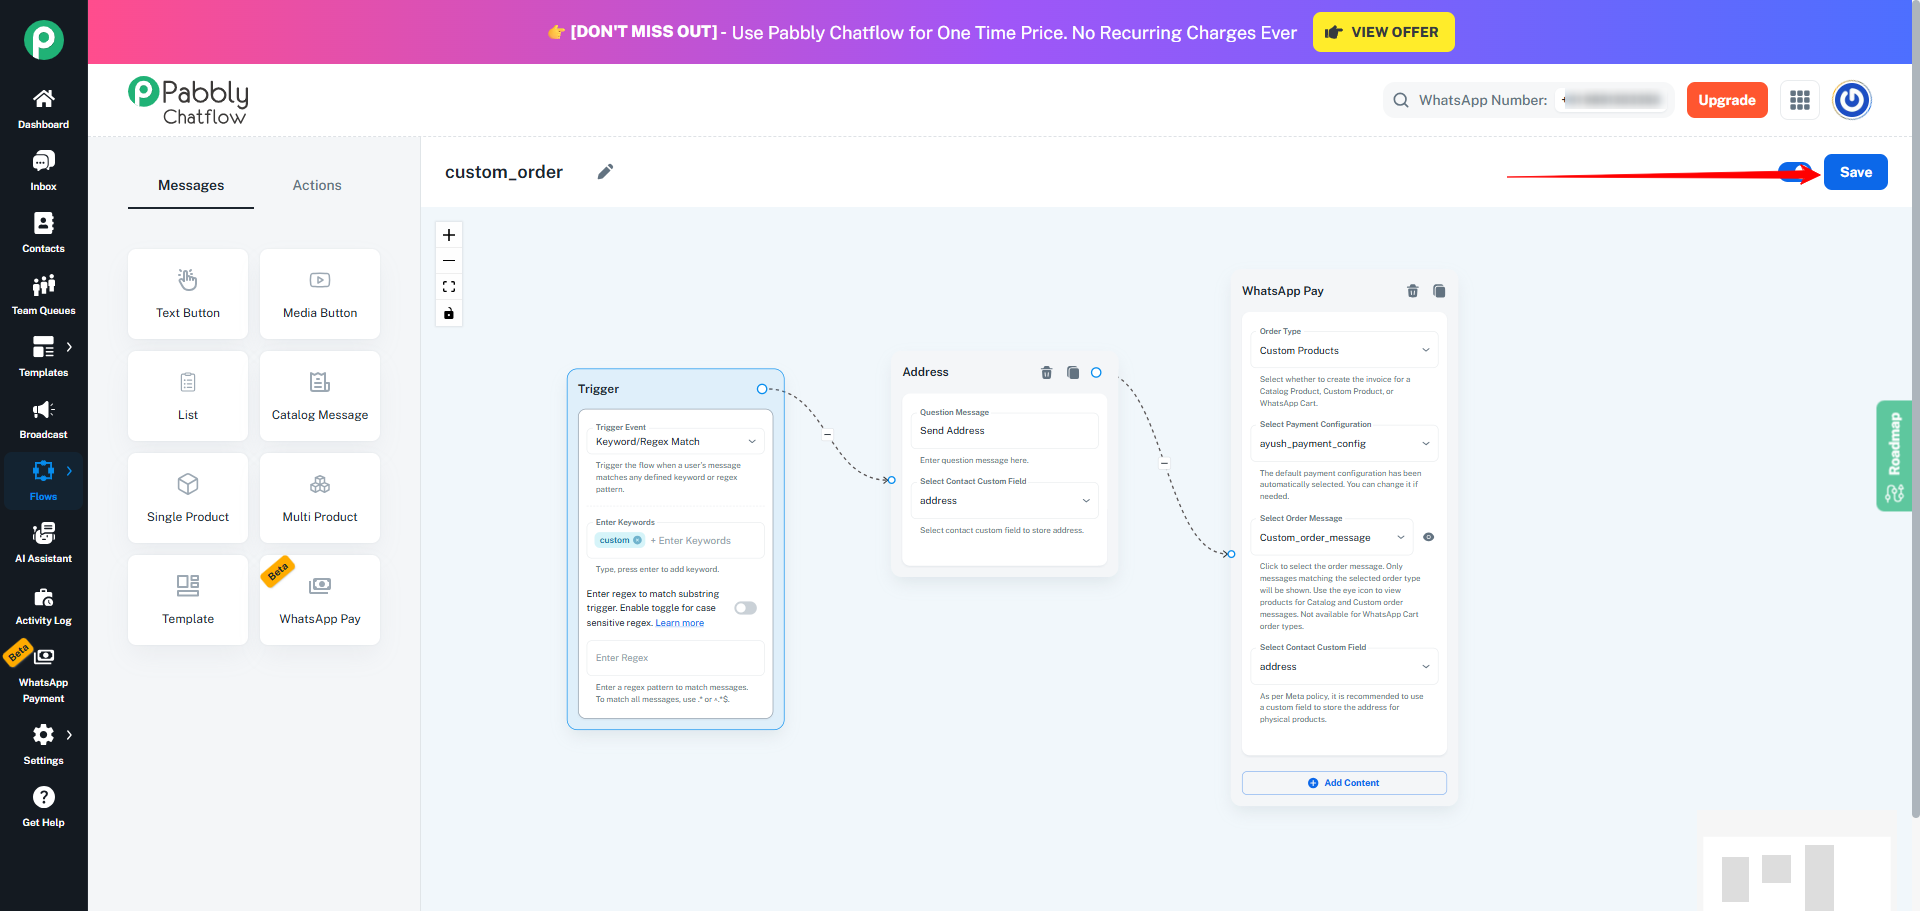
Once the Flow is saved,
To test the setup:
- Open WhatsApp.
- Send the same keyword that you configured while creating the Flow.
- As soon as the system receives the keyword, the Flow gets activated automatically.
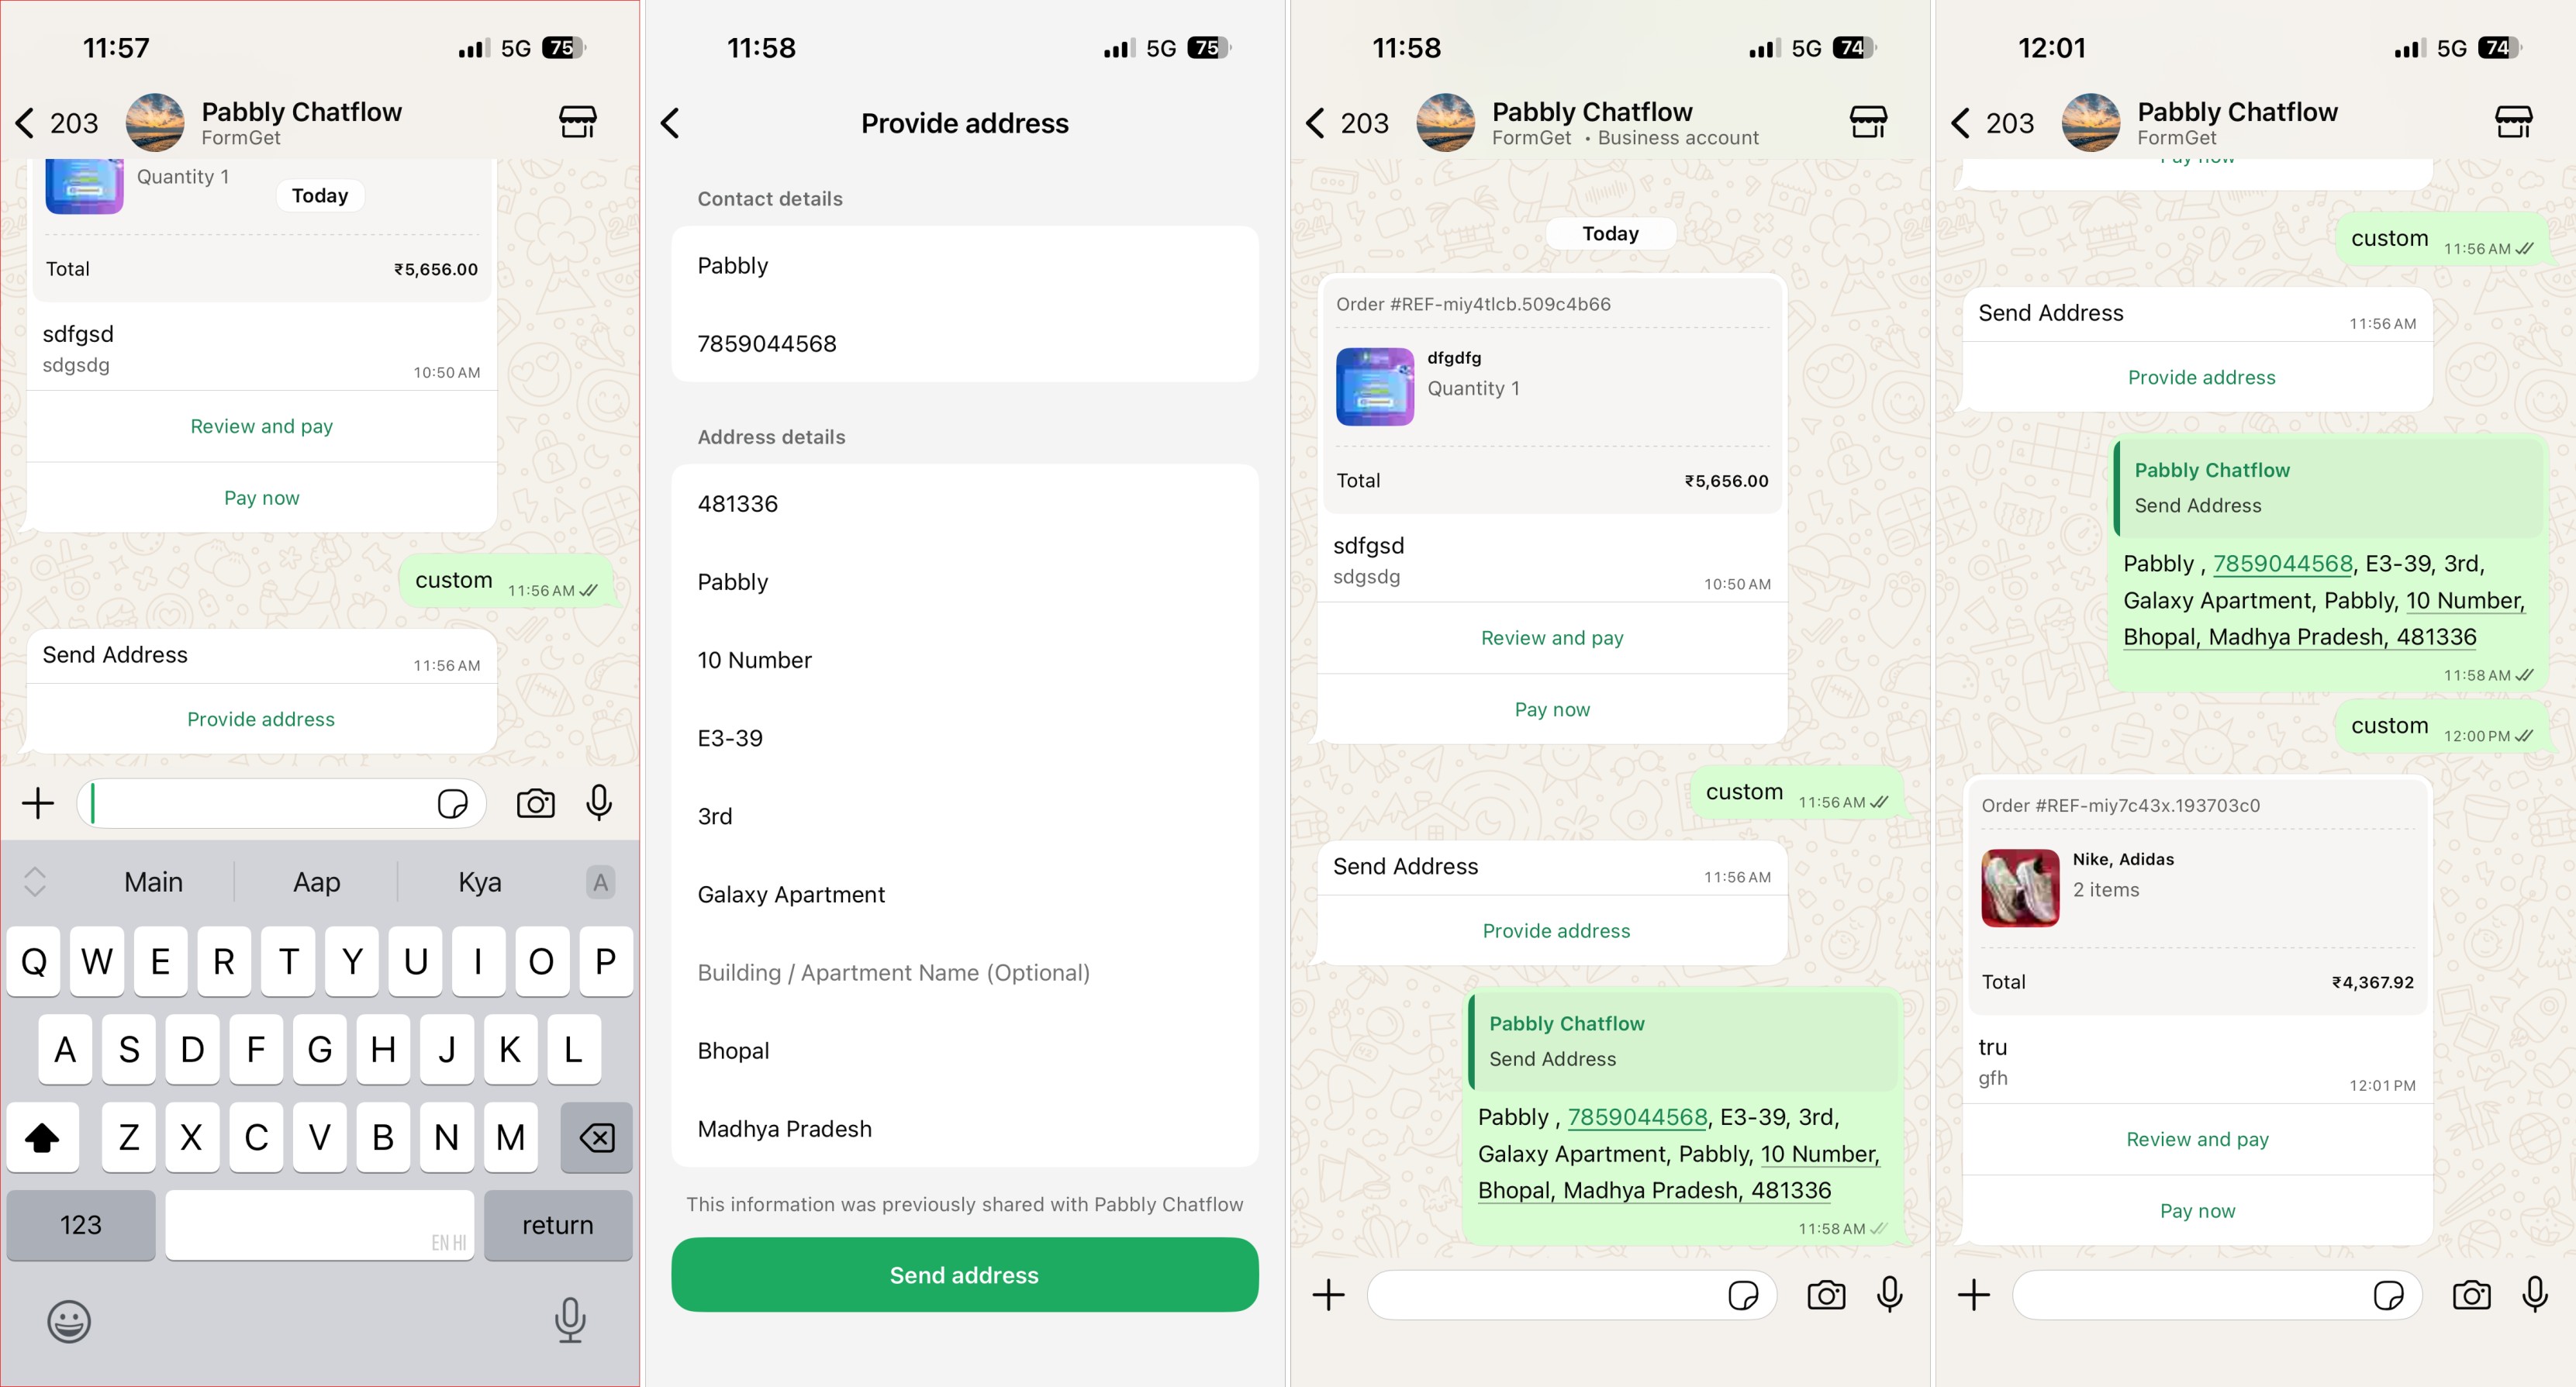
If you have added an Ask Address action in the Flow:
- The customer will first receive the address request on WhatsApp.
- Once the customer replies with their address, the Order Message is delivered automatically with:
- The selected products
- Their respective quantities
- Complete pricing details
Using WhatsApp Pay Message with the "Catalog Product" Order Message Type
The Catalog Product Order Message Type works the same way as the Custom Product type. The overall flow execution, order processing, and payment behavior remain exactly the same.
Prerequisites (Recommended)
Before using the Catalog Product Order Message Type inside the WhatsApp Pay Message, it is highly recommended to complete the following:
- Ensure that the Catalog is synced successfully in Pabbly Chatflow
- Make sure that all connected catalog products are also fully synced
This helps avoid any product visibility or delivery issues while sending the Order Message.
The “Catalog Product “ Order Message Type works exactly the same way as the Custom Product type. Once you select it, everything functions in the same manner, including:
- Flow triggering
- Order processing
- Ask Address step (for physical products)
- Order message delivery
- Payment link generation
- Tax, shipping, discount, and payment expiry rules
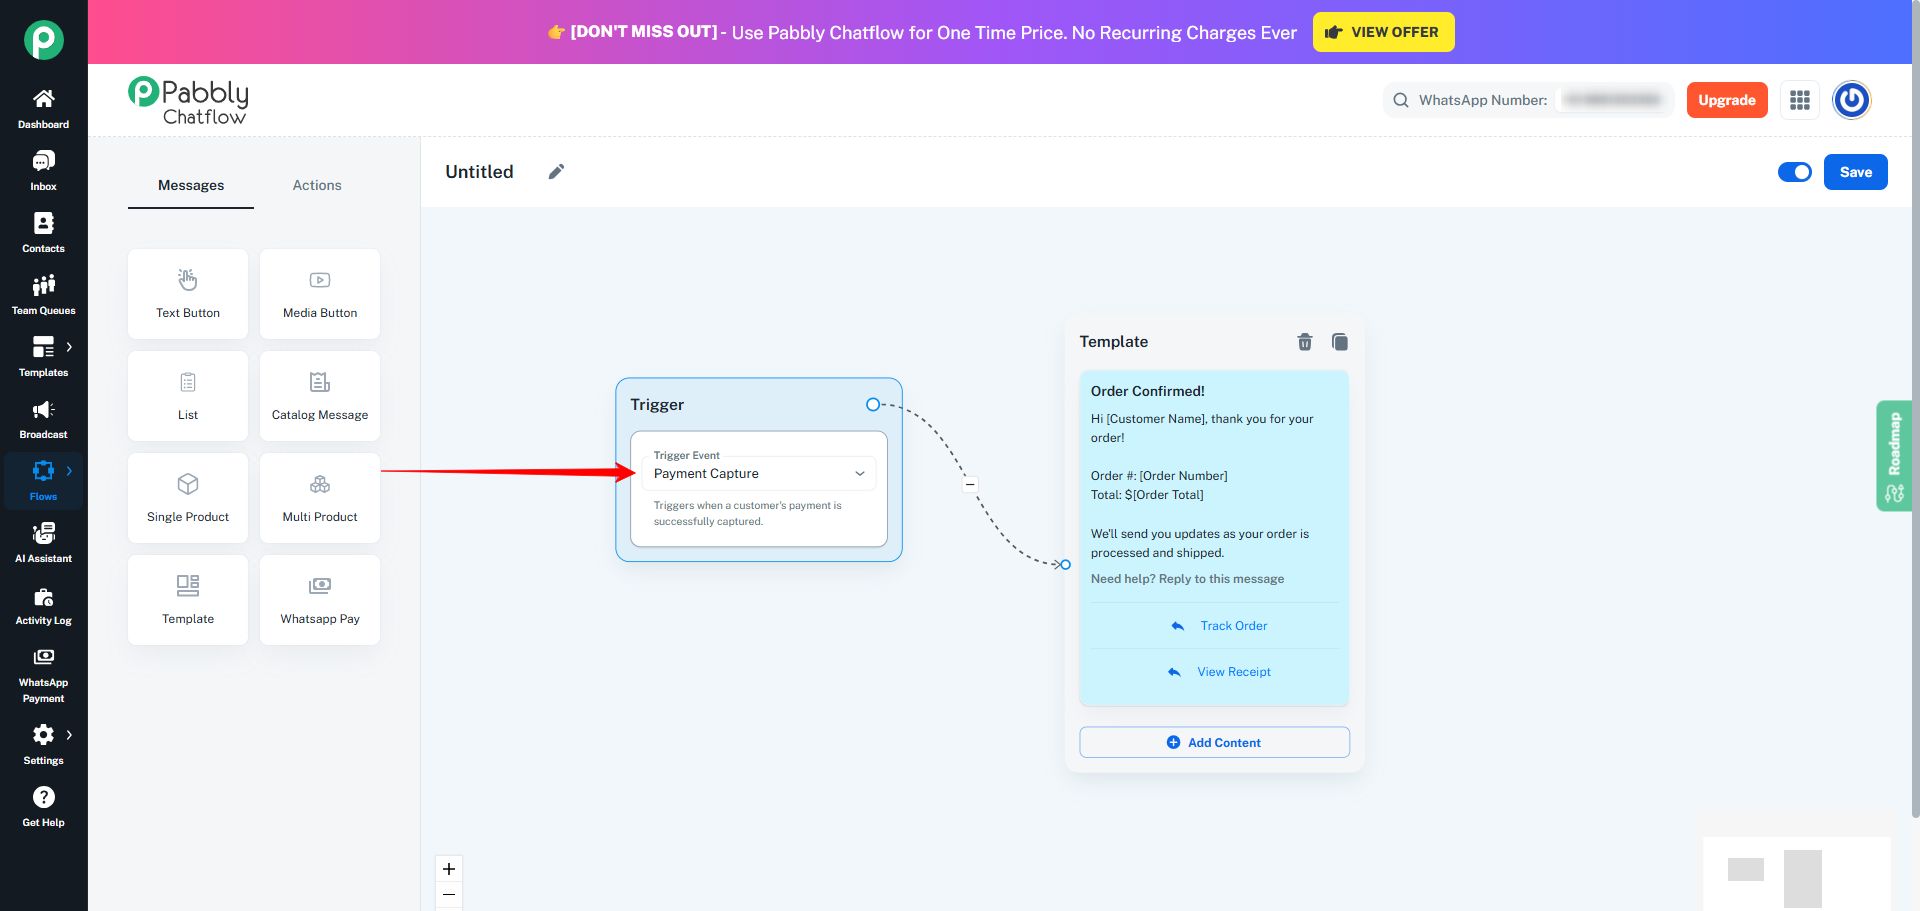
Using the "Payment Captured" Trigger
In addition with WhatsApp Pay, Pabbly Chatflow also provides a dedicated Payment Captured trigger event.
- This trigger activates automatically whenever a payment is successfully completed by a customer. If you configured any flow with this trigger events.
- This is helpful if you want to send a follow-up message then you will use this trigger events.
8. Date and Time Slot Booking Message
The Date and Time Slot Booking node allows you to create an interactive appointment or slot booking system directly inside your WhatsApp flow. Contacts can select a preferred date and time, while the system automatically manages slot availability, capacity tracking, and contact field updates.
This feature is ideal for appointment booking, consultations, demo scheduling, delivery date selection, callbacks, and more.
How to Create a Flow with Date and Time Slot Booking
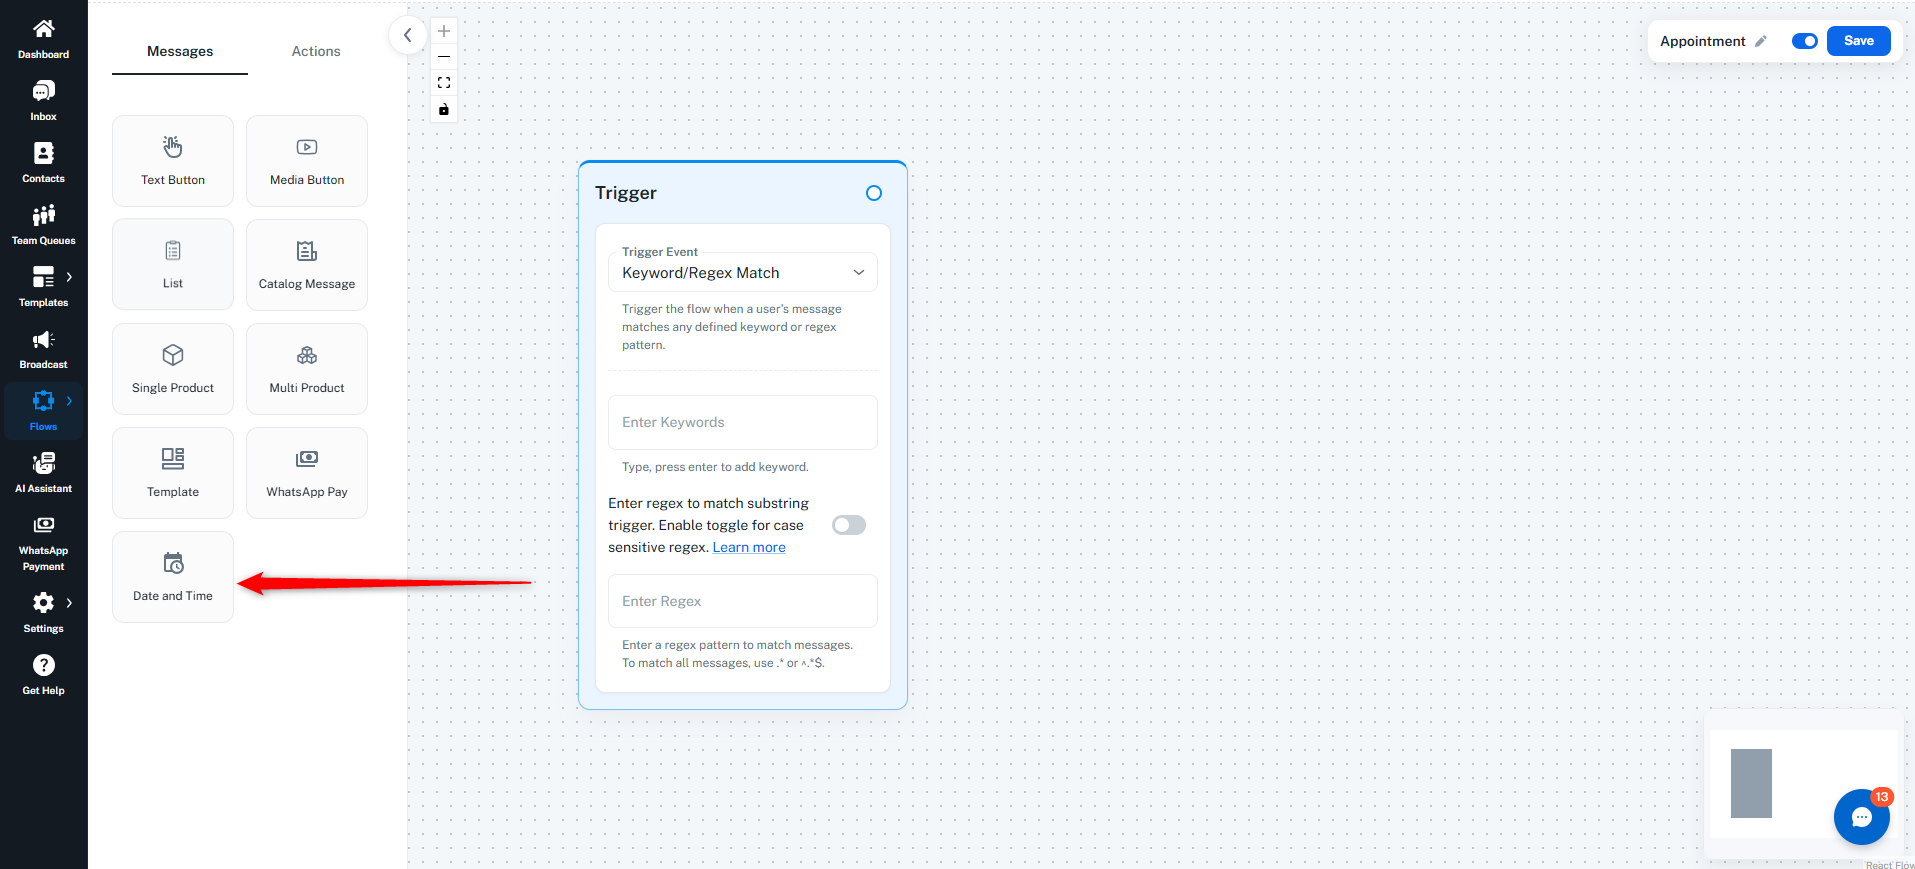
- Flow Start
- Define keywords to trigger the flow (e.g., "book", "appointment", "schedule").
- Add Date and Time Node
- Connect the Flow Start to the Date and Time Slot Booking node.
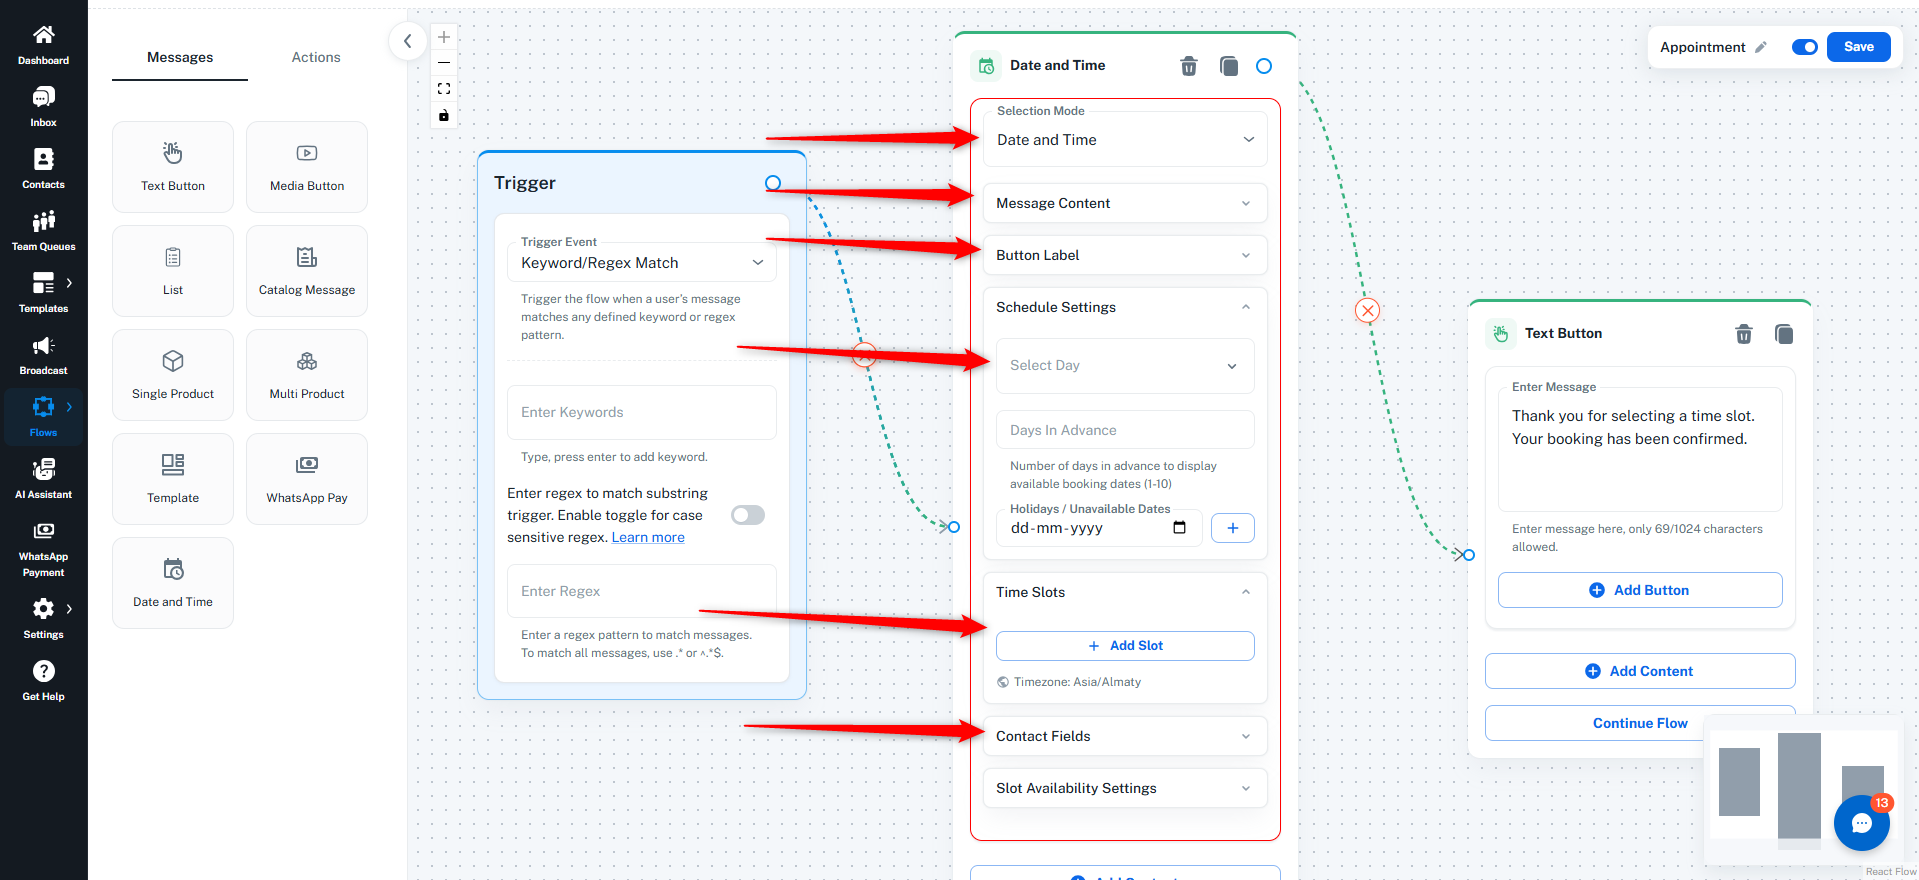
- Configure Booking Settings
- Choose selection mode.
- Configure schedule availability.
- Add time slots and capacity.
- Customize message content.
- Continue the Flow
- Connect the node to the next action or message.
- After successful booking, the flow automatically continues.
1. Selection Mode
Two selection modes are available:
Date and Time Mode
A two-step booking process:
- Contact selects a date.
- Contact selects a time slot for that date.
Date Only Mode
Contact selects only a date.
Useful for:
- Delivery scheduling
- Callback requests
- Event date confirmation
2. Interactive List Flow
Booking works using WhatsApp Interactive List Messages.
In Date and Time Mode:
- First, contacts see a date list showing available dates along with remaining slot counts.
- After selecting a date, they see a time slot list with remaining capacity.
Smart Behavior:
- Past time slots for the current day are automatically hidden.
- Fully booked slots can be auto-hidden (based on configuration).
3. Schedule Settings
Select Days
- Choose available weekdays (Sunday–Saturday).
- Days appear as removable chips.
- Default selection: Monday to Friday.
Days in Advance
- Show between 1 to 10 future dates.
- Automatically skips:
- Holidays
- Disabled weekdays
Holidays
- Mark specific dates as unavailable.
- Prevents:
- Duplicate holiday entries
- Past date selection
4. Time Slots & Capacity
You can:
- Add up to 10 time slots
- Define:
- Start Time
- End Time
- Slot Capacity
Slot Handling:
- Once capacity is full, the slot is automatically hidden (optional setting).
- System timezone is automatically synced with your account settings (read-only).
5. Contact Field Mapping
Booked data is automatically saved into Contact Custom Fields, including:
- Selected Date
- Selected Time Slot
These fields can be used later in:
- Confirmation messages
- Reminder flows
- CRM integrations
- Automation steps
6. Fully Booked Handling
If all slots for a date are filled:
- A customizable Fully Booked Message is shown.
- If slots become unavailable while a contact is selecting, the system automatically refreshes and re-shows the available date list.
7. Duplicate Booking Prevention
To prevent multiple bookings in the same session:
- If a contact taps multiple slots, only the last selection is stored.
- If the flow runs separately again, it creates a new independent booking.
8. Race Condition Protection (Overbooking Prevention)
The system uses a:
- Check-before-insert
- Verify-after-insert
pattern to prevent overbooking when multiple contacts try to book the same slot simultaneously.
This ensures accurate capacity tracking even under high booking volume.
9. Message Content & Button Labels
You can fully customize:
- Header
- Body
- Footer
- Date List Button Label
- Slot List Button Label
Supports:
- Contact attribute placeholders
- Dynamic personalization
10. Continue Flow After Booking
After a successful booking:
- The node automatically passes control to the next connected step.
- You can send:
- Confirmation message
- Thank you message
- Reminder setup
- CRM action
- Webhook trigger
Trigger the Flow
The booking flow is triggered when a contact sends a message containing the defined keywords.
This enables a complete end-to-end automated booking experience directly inside WhatsApp - without manual intervention.
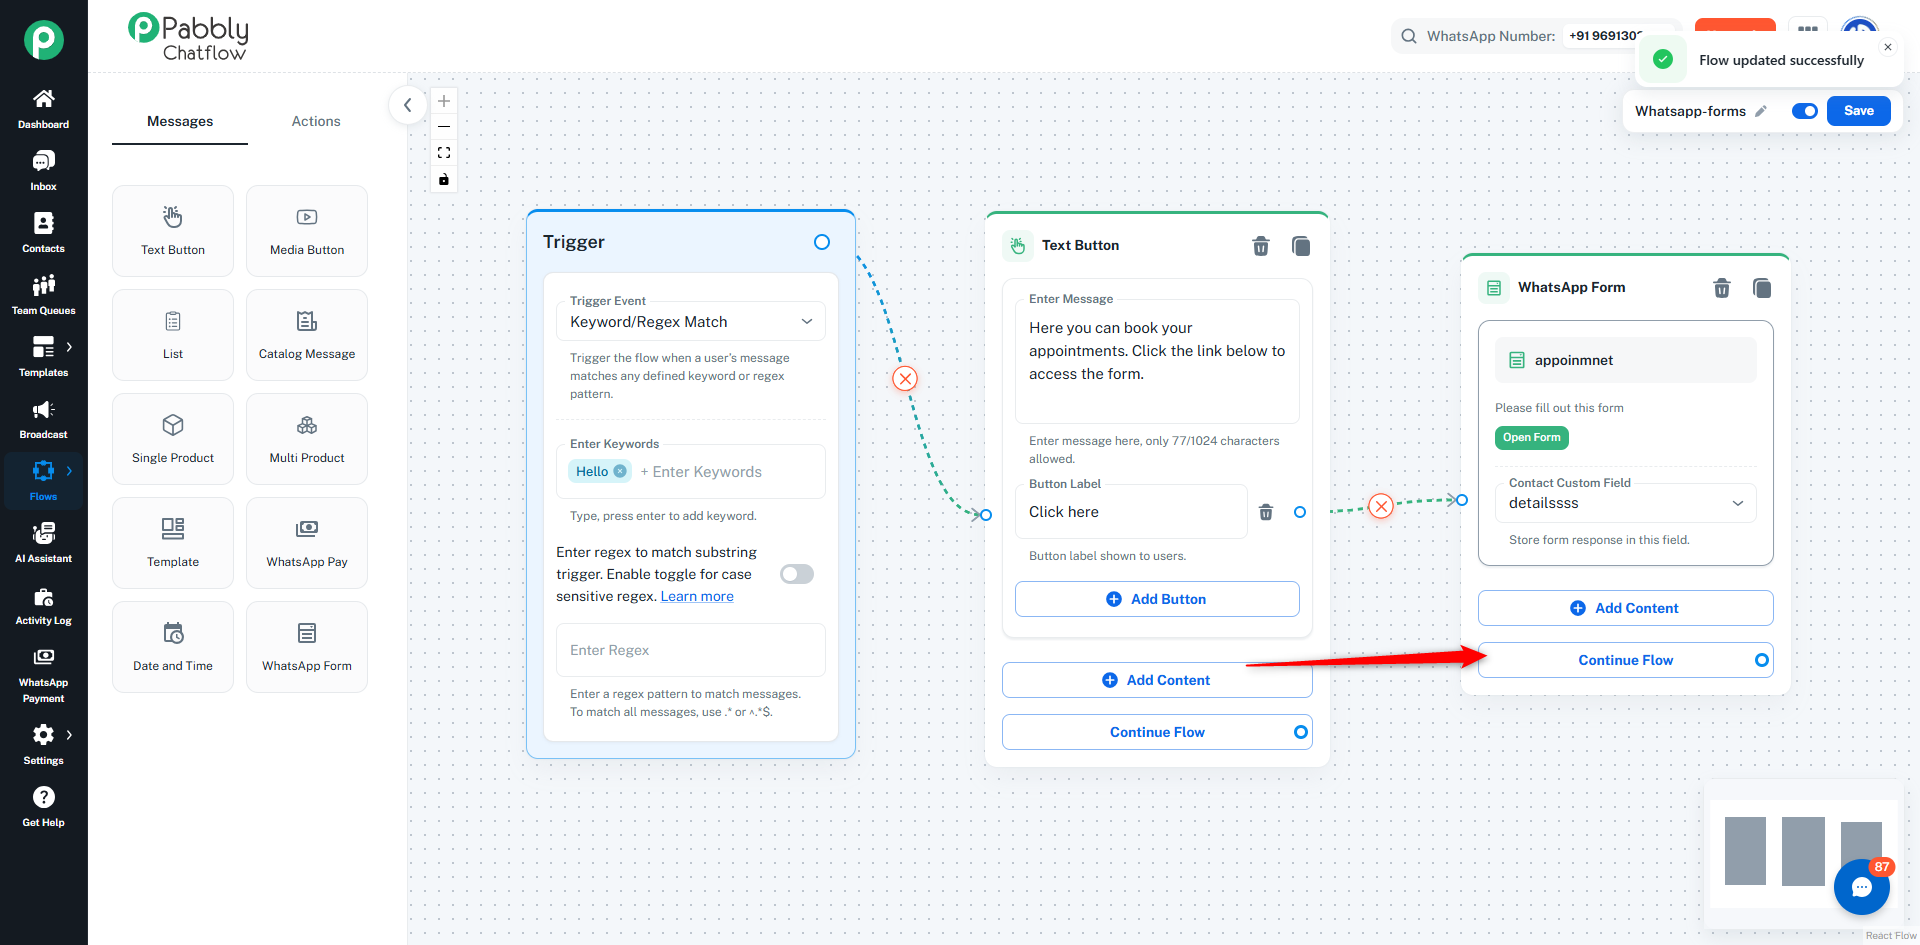
The WhatsApp Form Message allows you to send interactive forms directly within a flow. This enables you to collect structured user data such as details, preferences, documents, or feedback without manual interaction.
This message type is useful for automating data collection inside WhatsApp conversations.
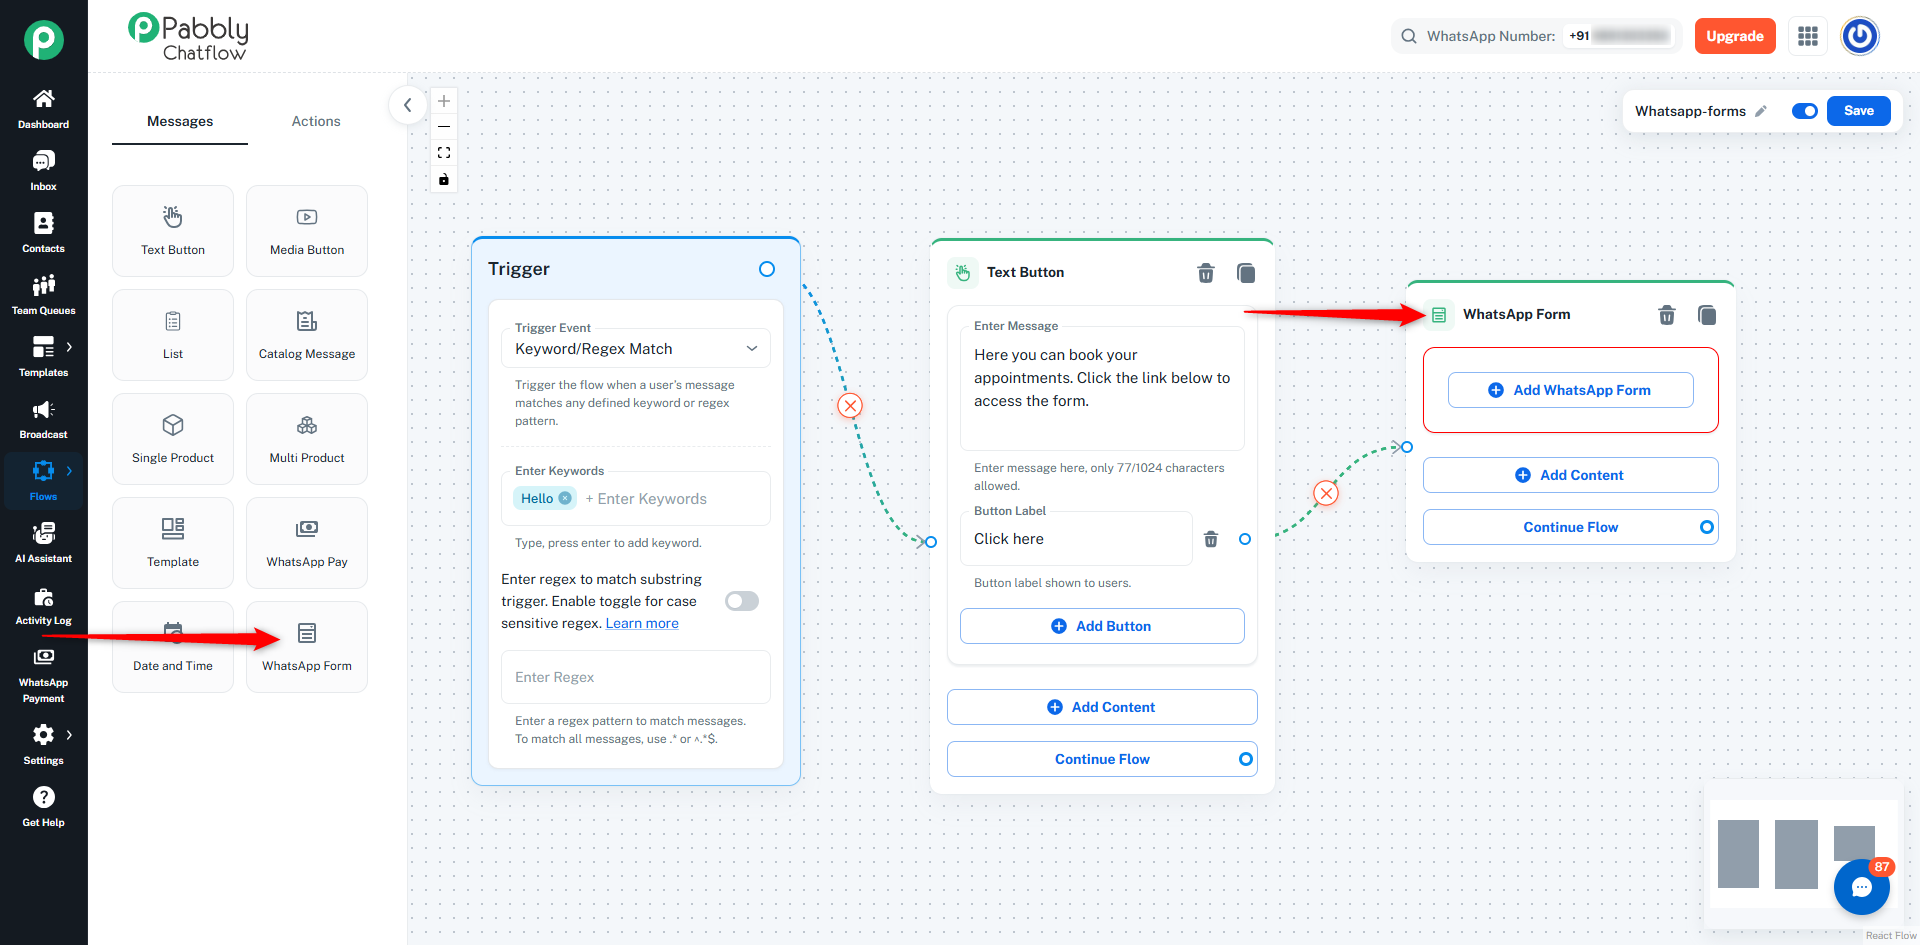
Flow Start:
Define keywords or select a trigger event to start the flow.
Connect to WhatsApp Form Message:
- Drag the WhatsApp Form message into the flow
- Connect it with the Flow Start or previous step
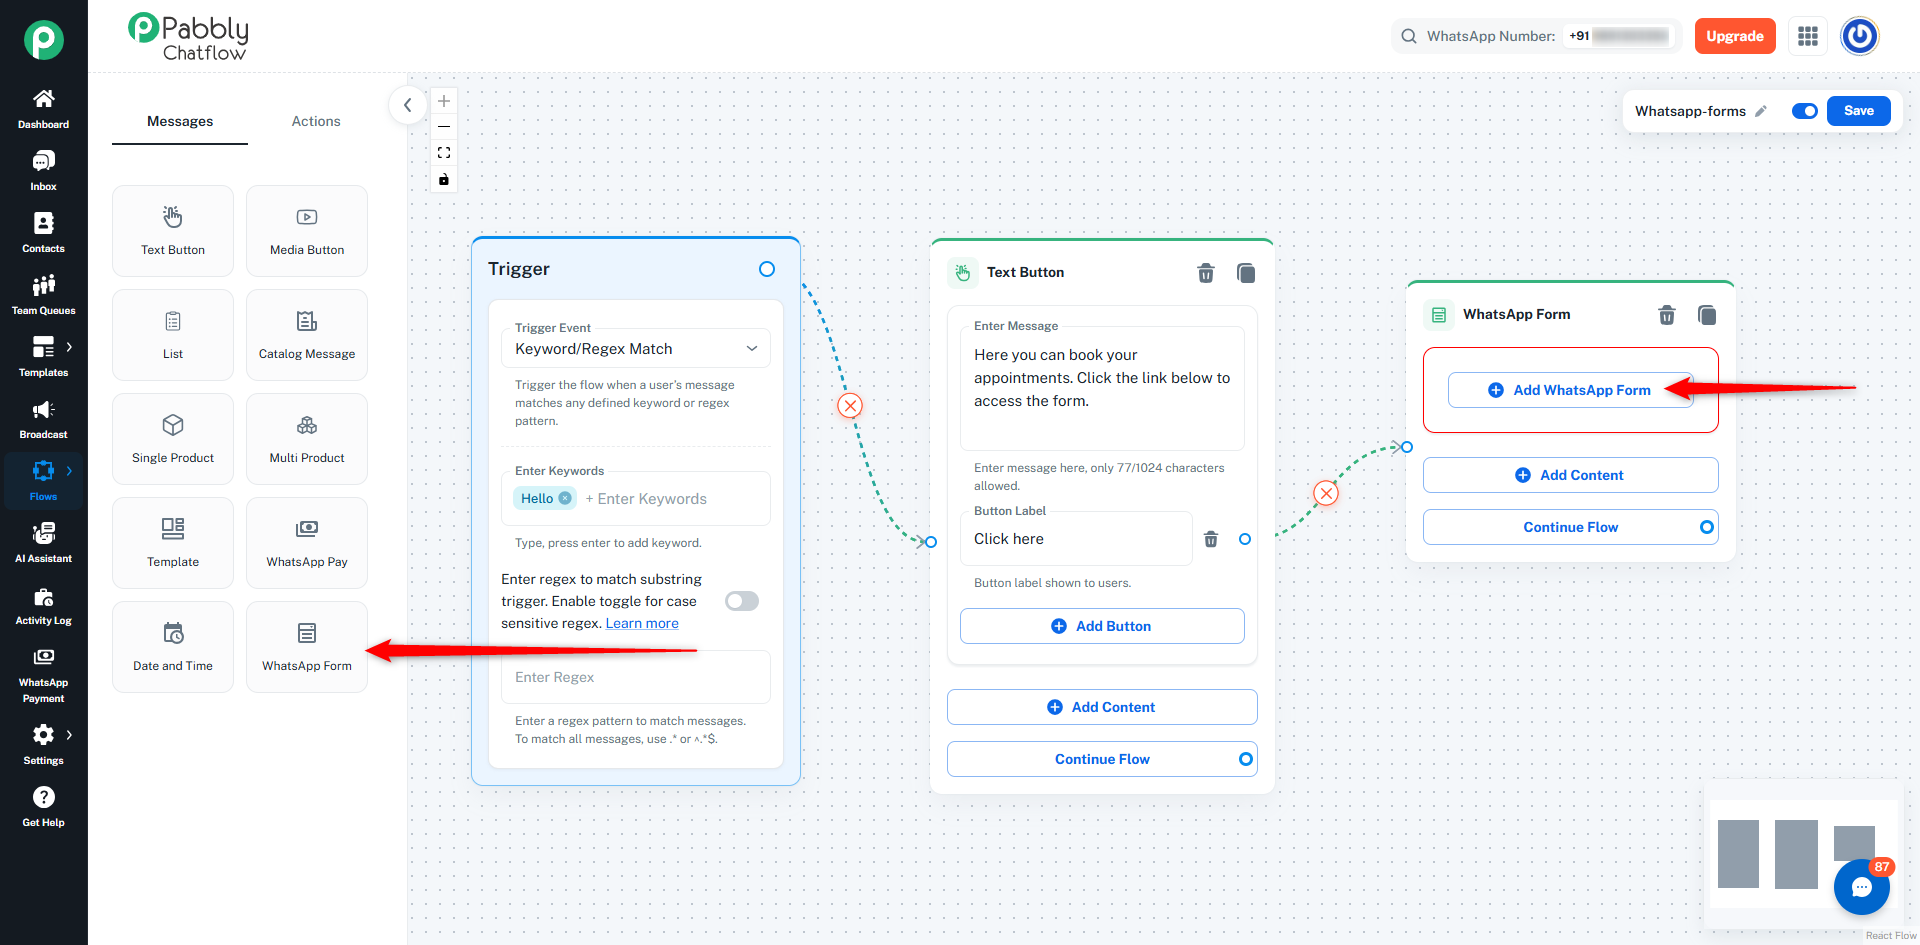
Select Form:
- Click on Add WhatsApp Form
- Choose a form from the list
👉 Note: Only Published forms are available for selection
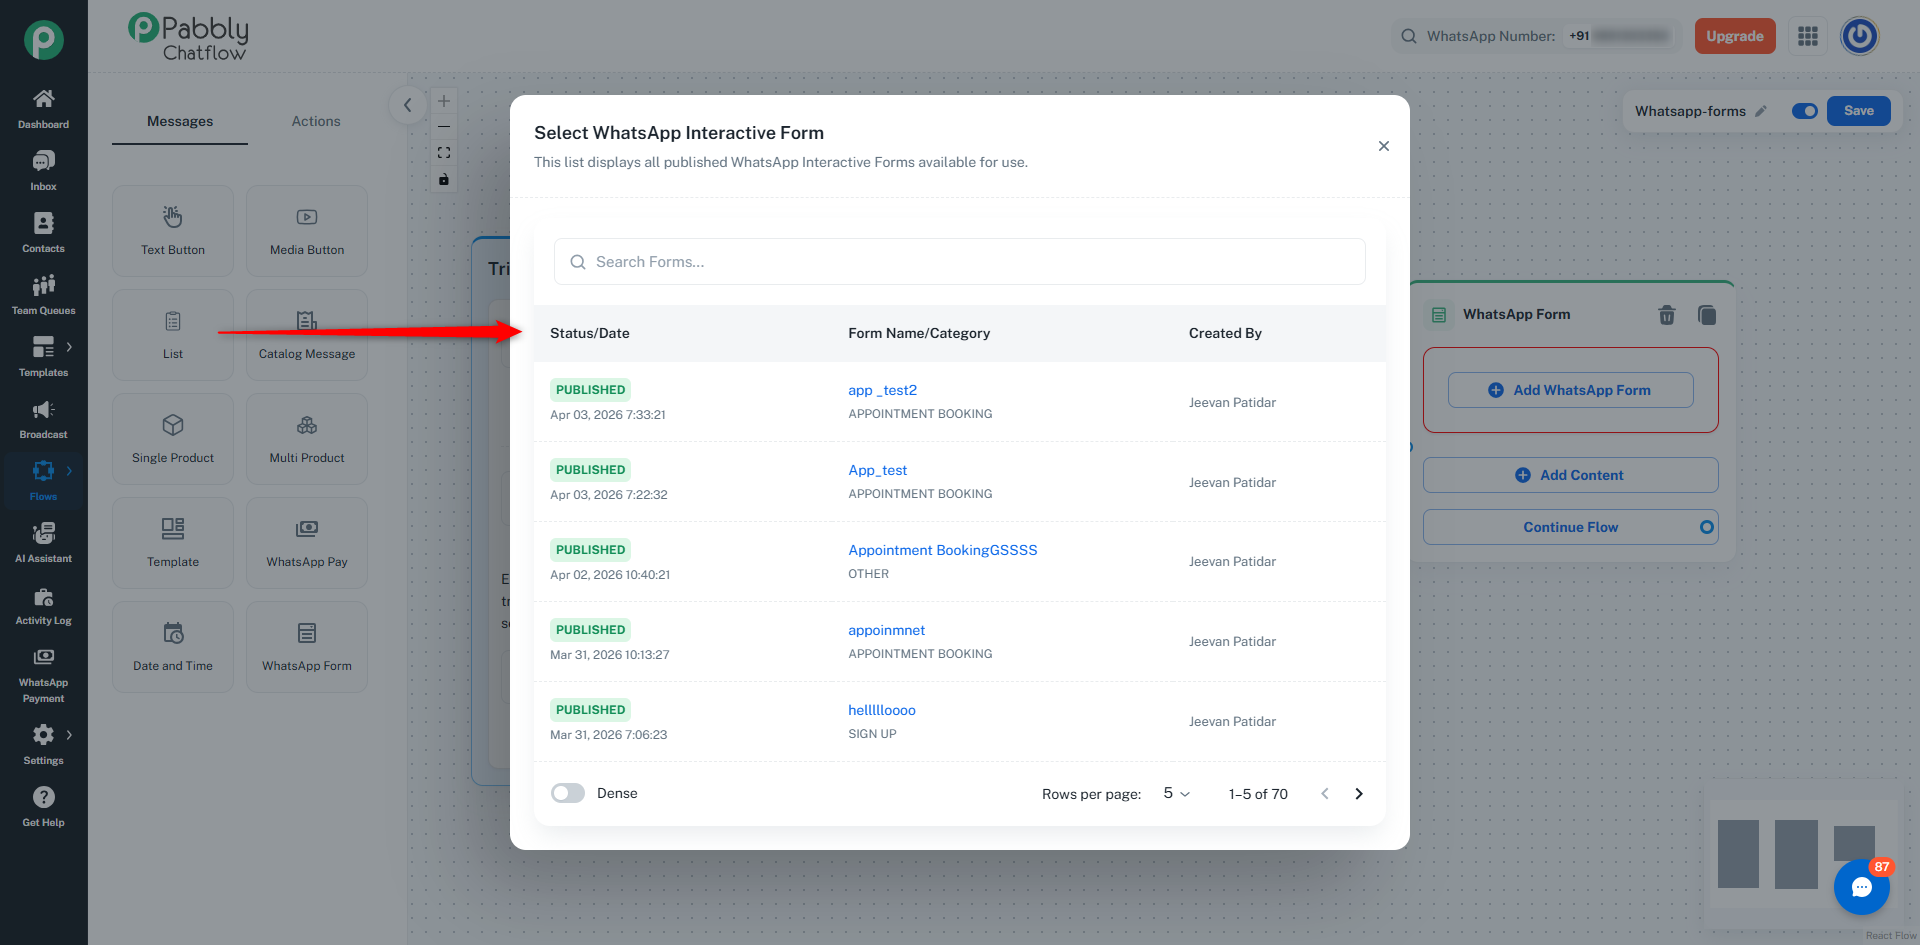
Configure Message:
Add the following details:
- Body Text → Message shown to the user
- CTA Button Text → Button label (e.g., Open Form, Book Now)
- Header/Footer (optional)
- Contact Custom Field (optional) → Store form responses
Save Configuration:
Click Done to apply the settings.
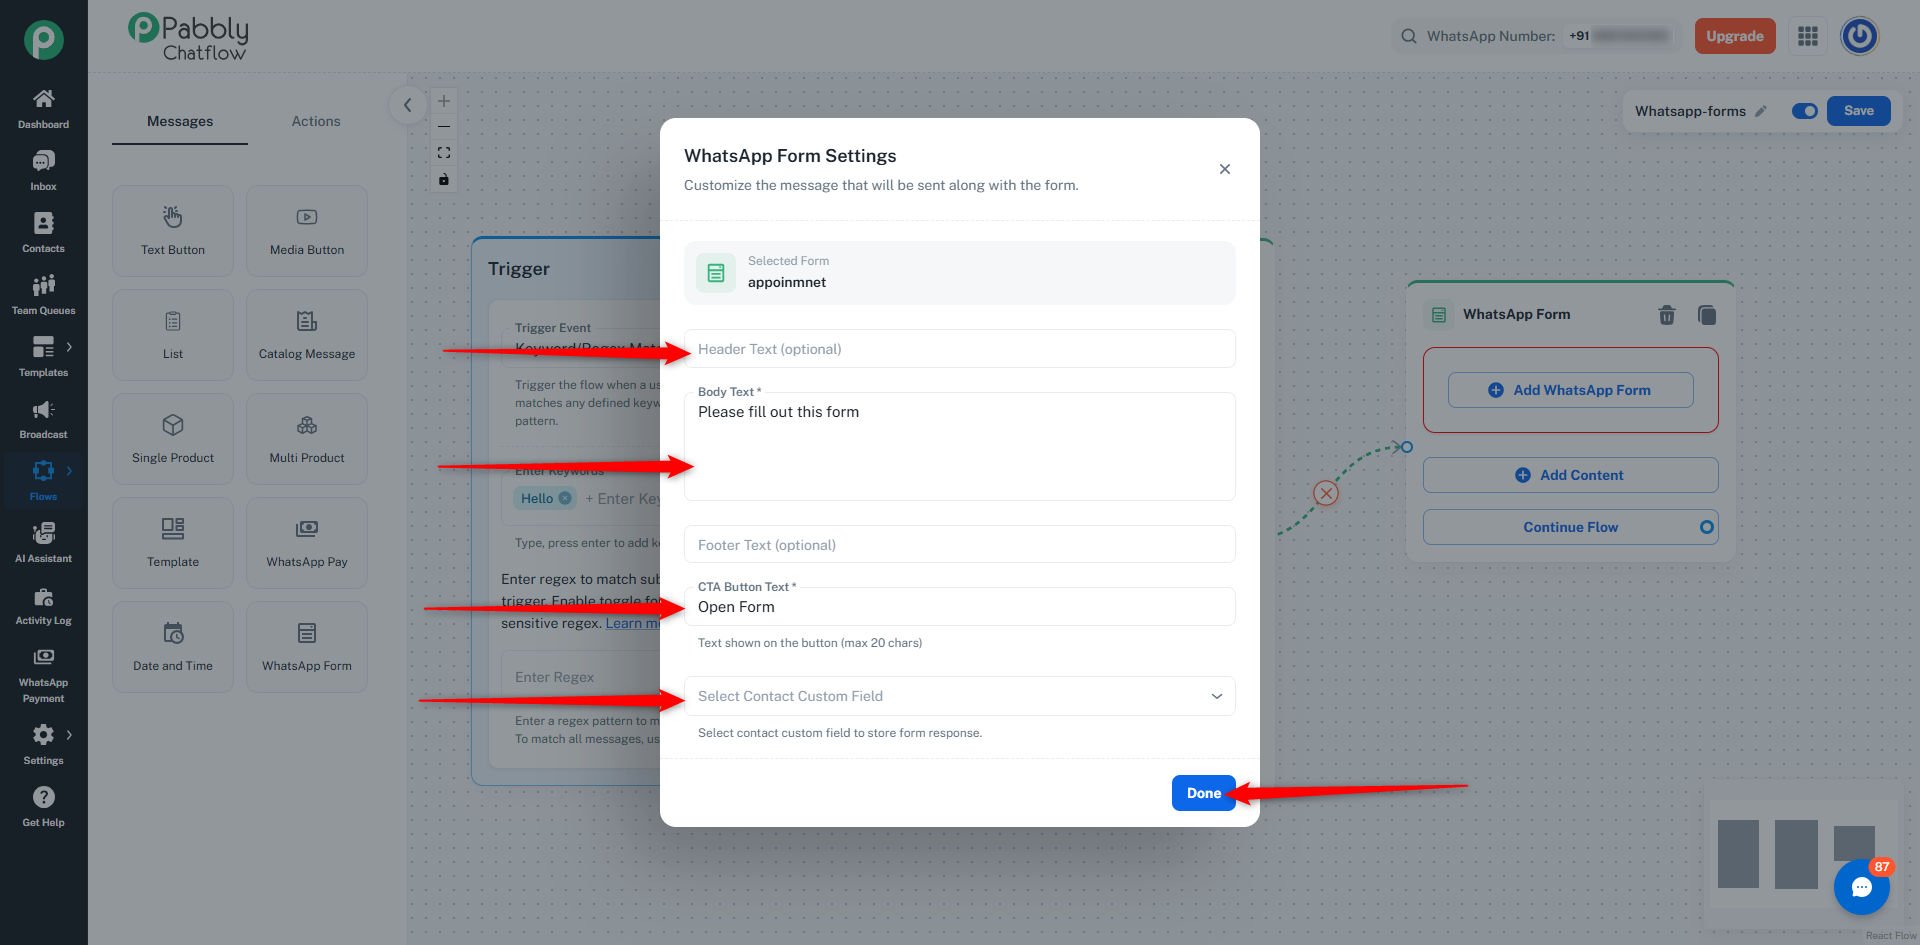
Continue Flow (Optional):
- Connect the WhatsApp Form message to the next step
- Flow continues automatically after sending the form
How It Works
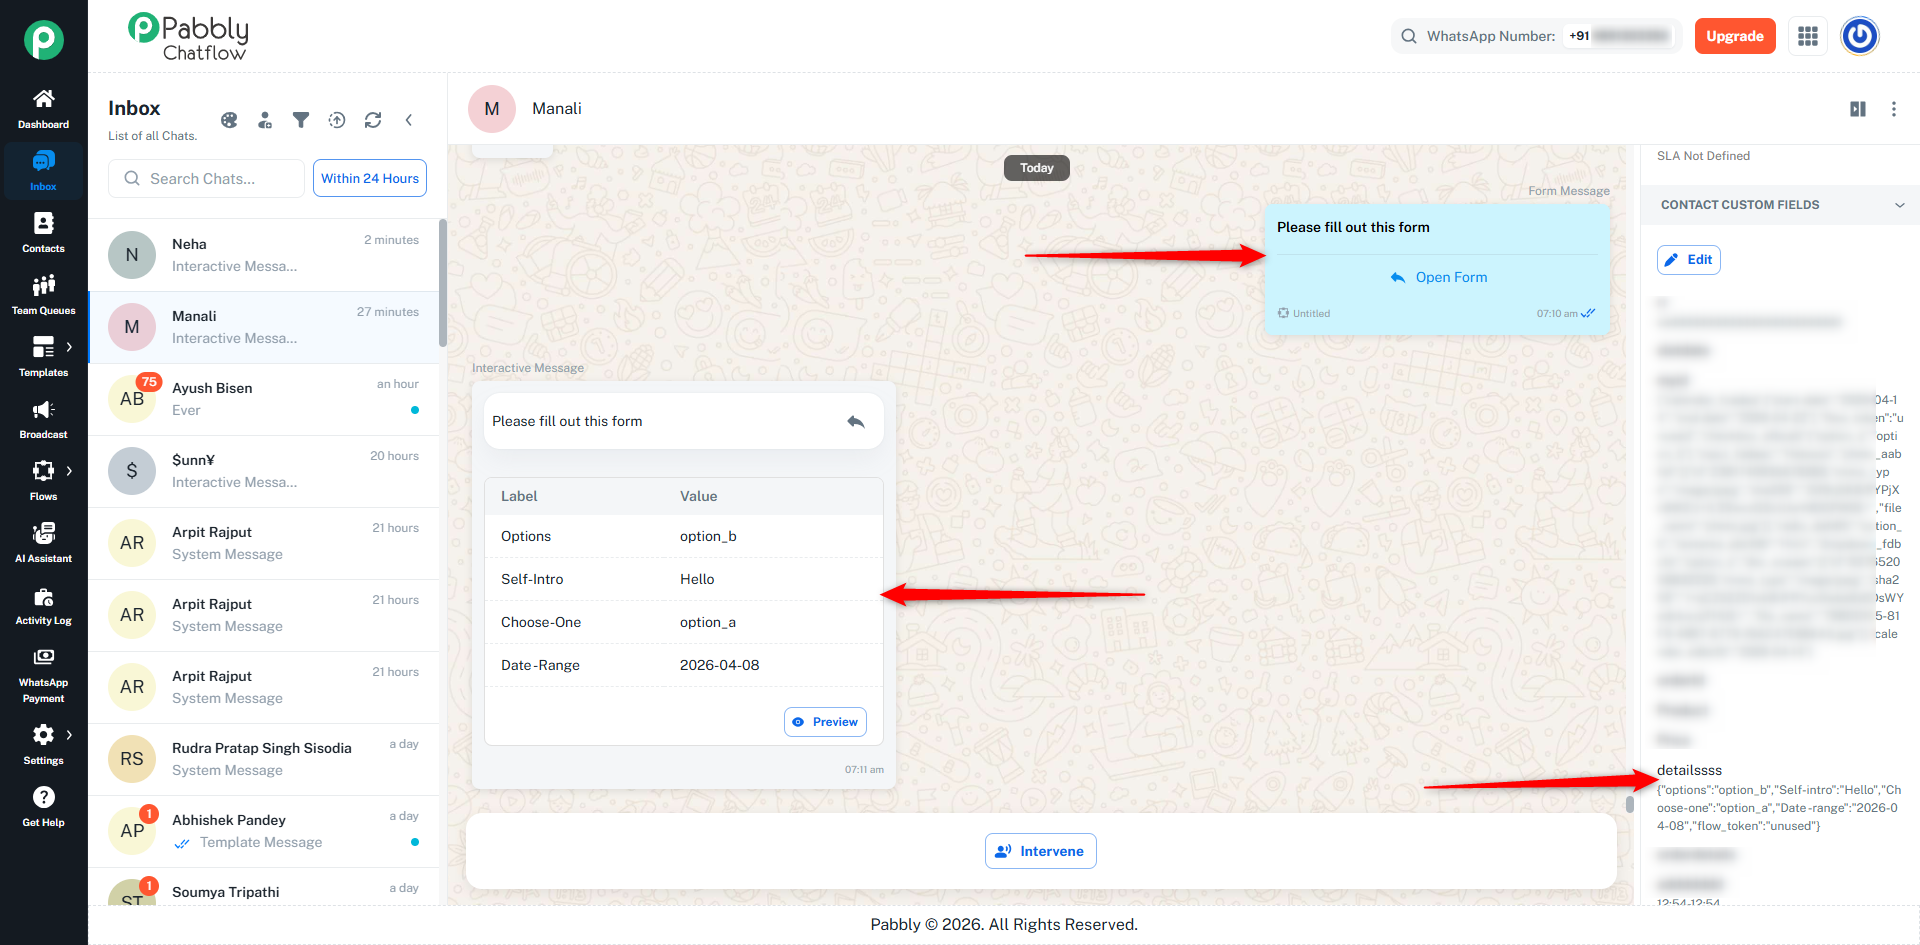
Once the flow is triggered:
- The WhatsApp Form message is sent to the user
- User clicks the button and opens the form
- User fills and submits the form
- Response is collected automatically
👉 Responses appear inside the Inbox chat
👉 Responses can also be stored in Contact Custom Fields
Key Points
- Only Published forms can be used
- Forms are sent as a message with a button
- Users complete the form inside WhatsApp
- Flow continues automatically after sending the form
Example Use Case
Appointment Booking Flow:
Flow Start: Keyword → “book”
↓
Message:
“Let me help you book an appointment.”
↓
WhatsApp Form Message:
- Form: Appointment Booking
- Body: “Please fill out this form”
- CTA: “Book Now”
↓
Message:
“Your appointment request has been received.”
Trigger the Flow:
The flow will be triggered when a user sends a message containing the defined keywords or meets the selected trigger condition.
Action Available in Pabbly Chatflow
1. Condition Action
Equal If-Else Condition
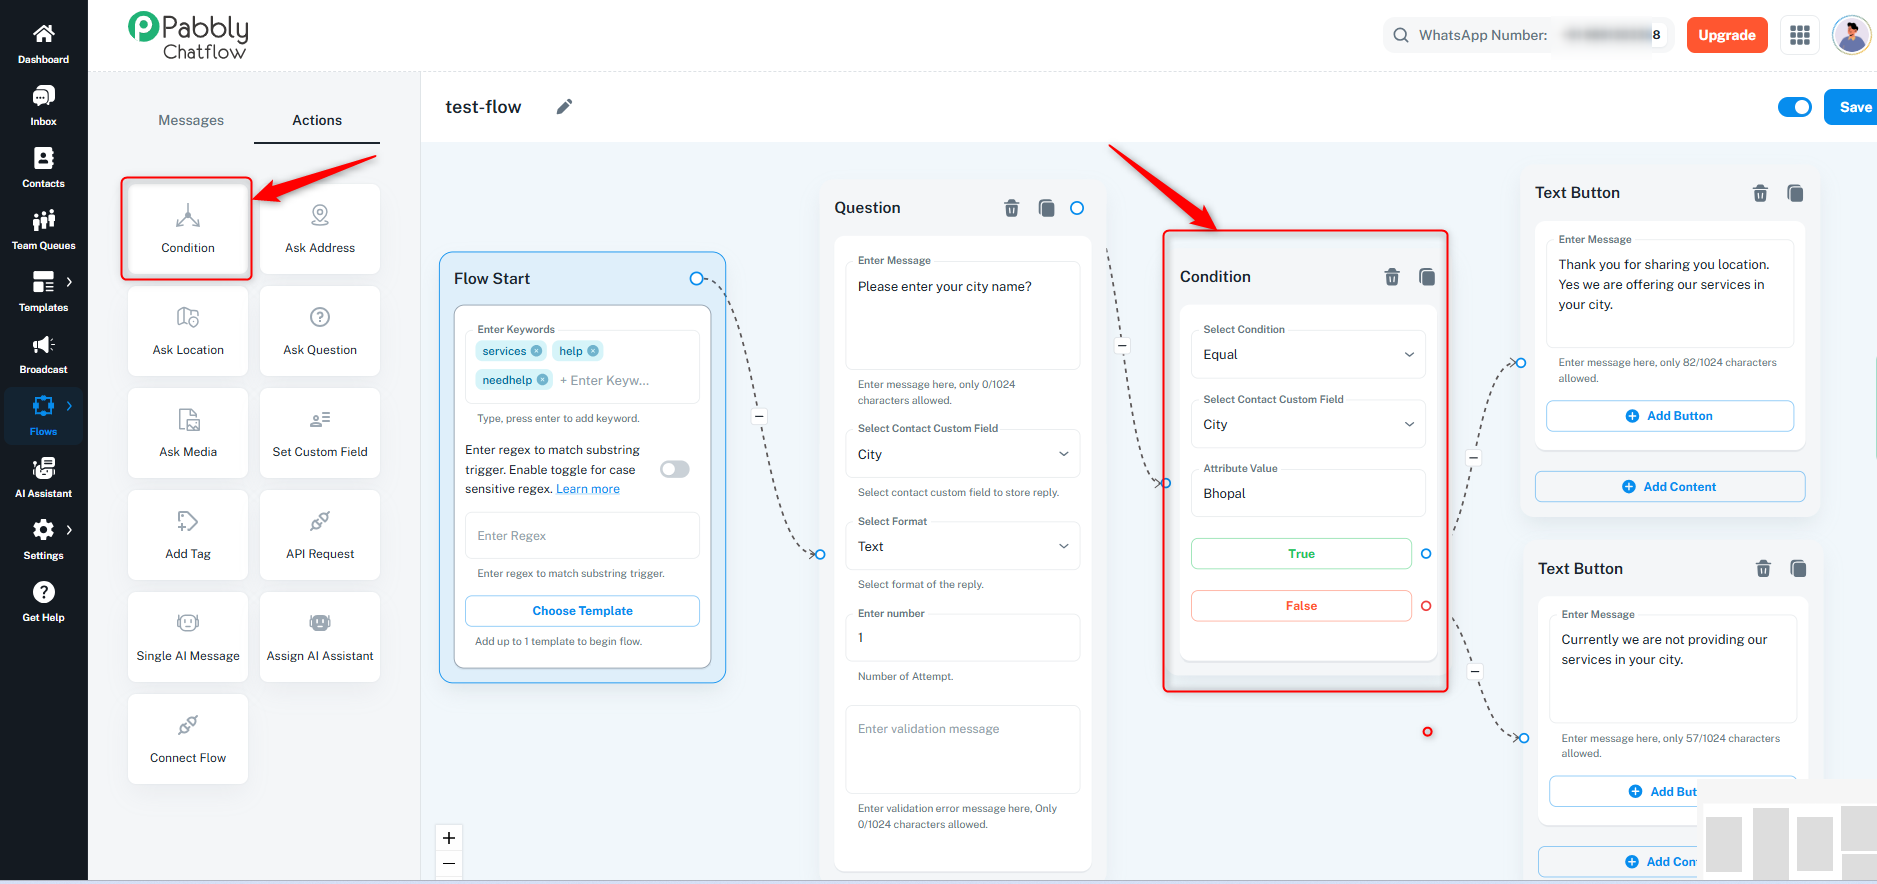
This condition verifies if the user input matches a predefined value. If the value matches, a "True" response is sent; otherwise, a "False" response is delivered.
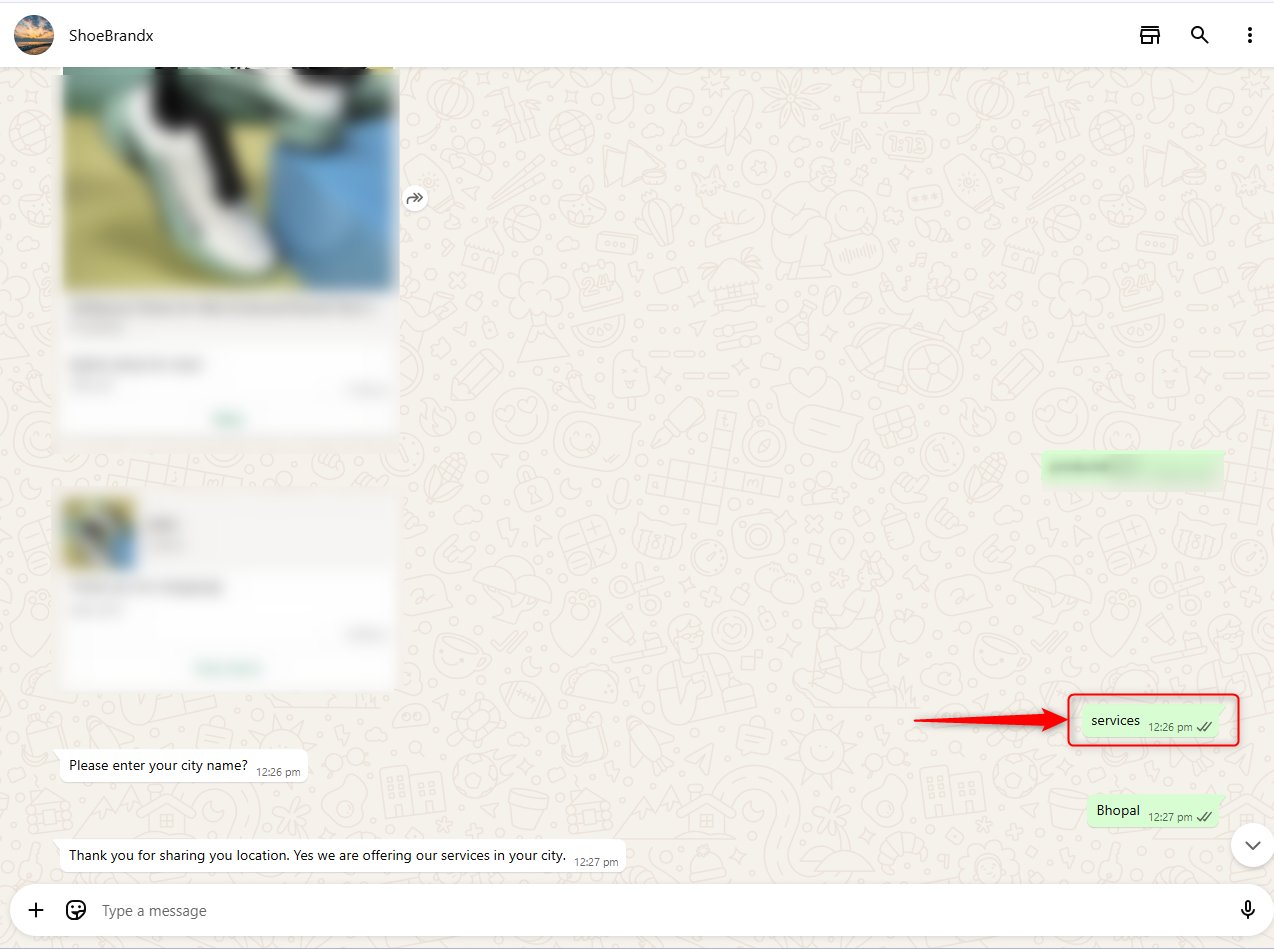
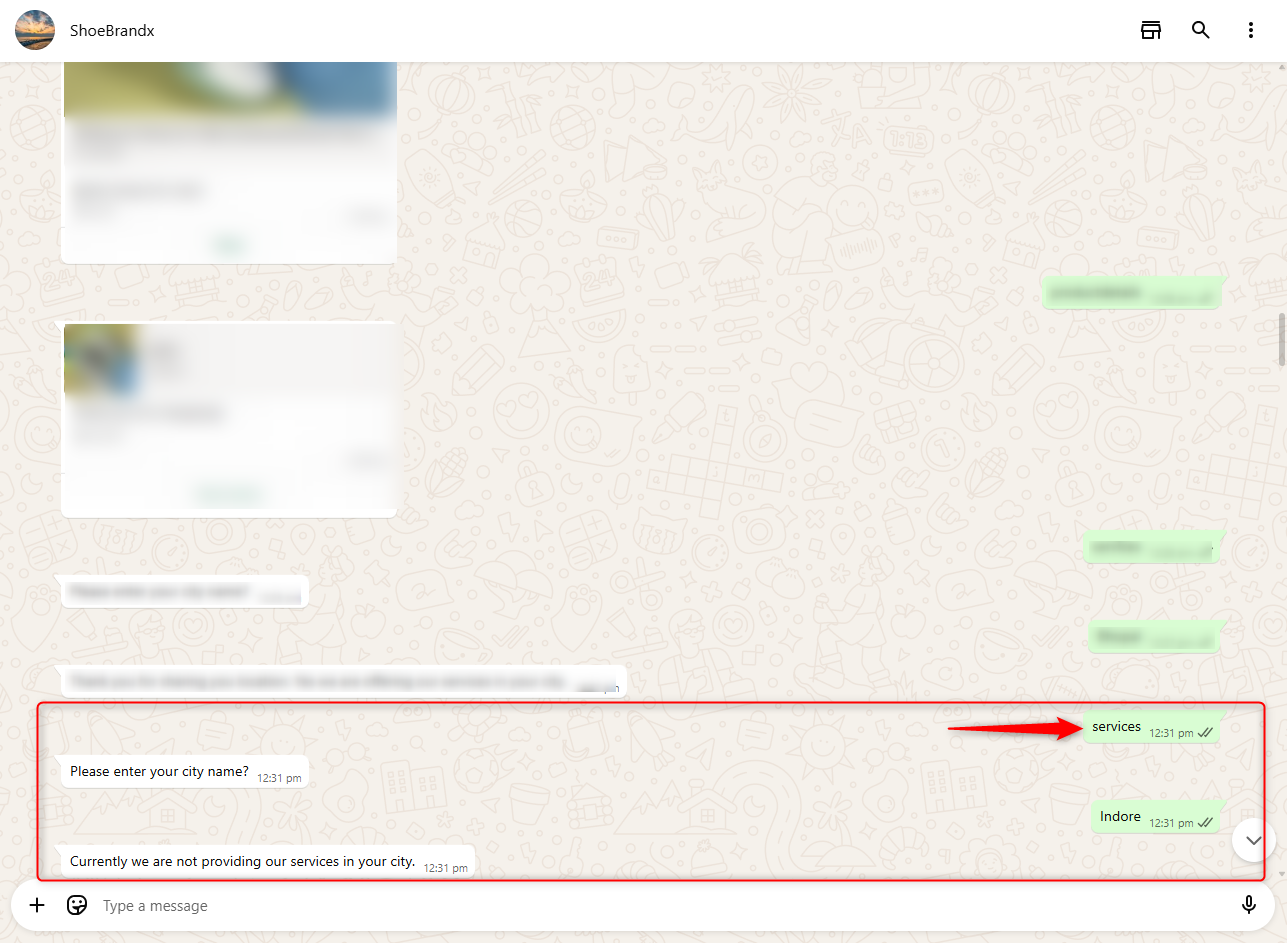
Example: If a user enters "Bhopal" as their city and the condition is set to "Bhopal," the chatbot will return a "True" response. Otherwise, it will return "False."
- Trigger the Flow:
- The flow will be triggered when a user sends a message containing the defined keywords.
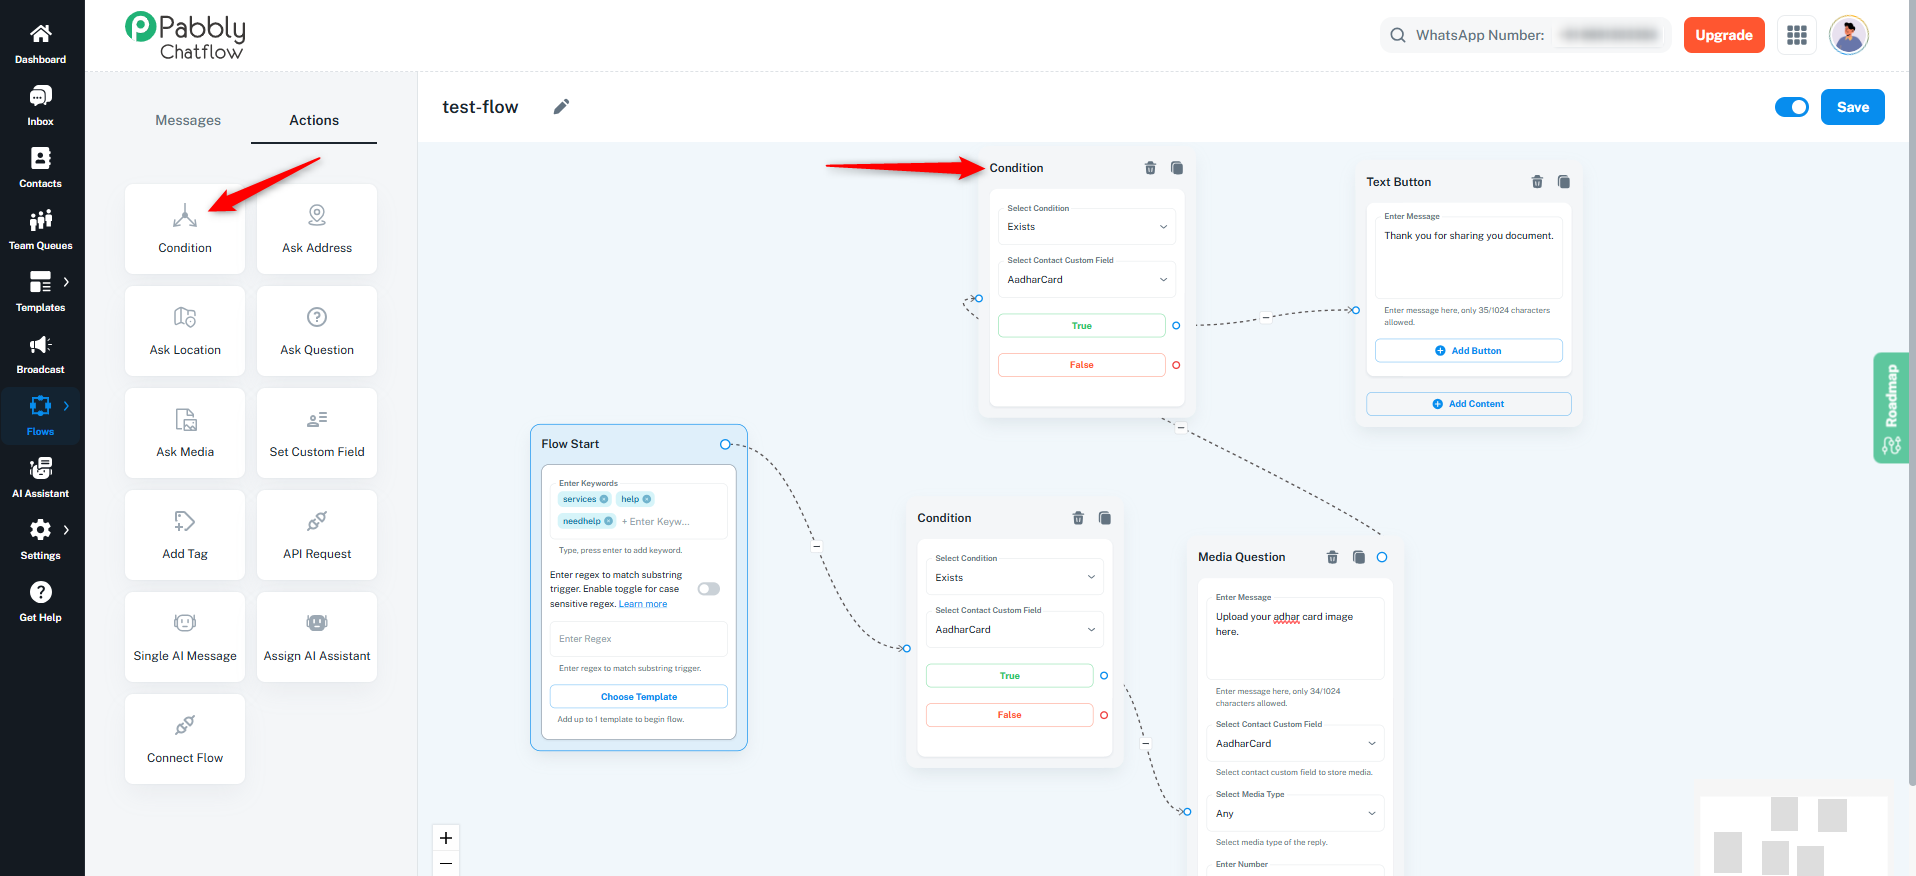
Exists If-Else Condition
This condition checks whether a user has provided any input. If a value exists, a "True" message is sent; otherwise, a "False" message is returned.
Example: If a user submits their PAN card details, they receive a "True" response. If no details are provided, they receive a "False" response.
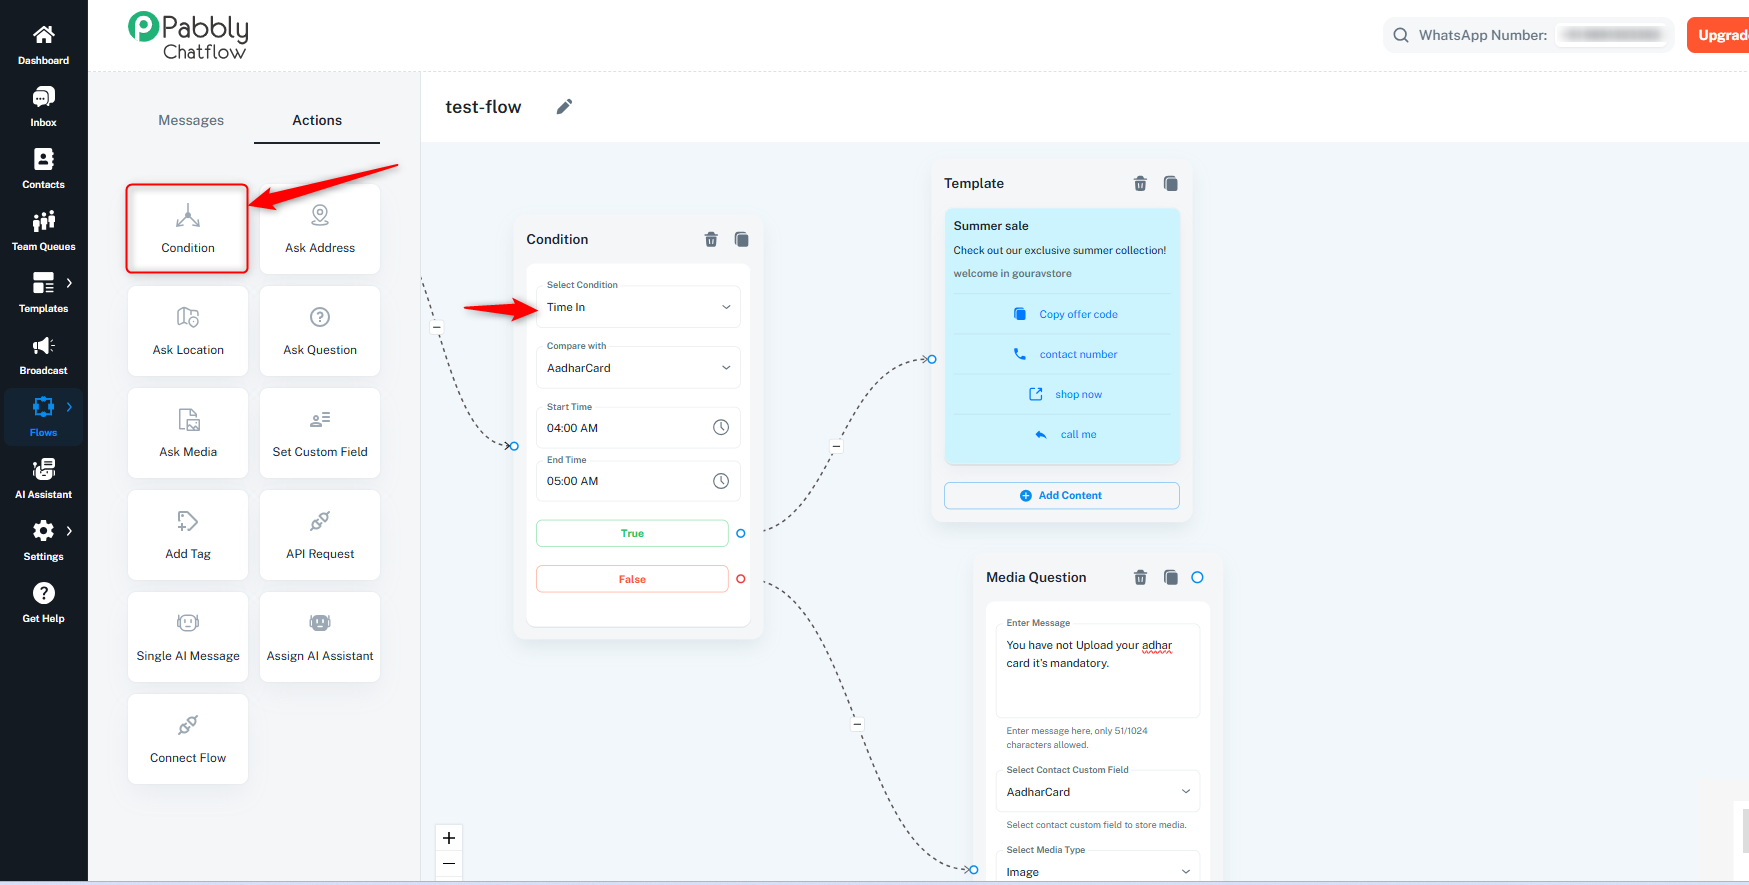
Time-Based and Date-Based Conditioning
This condition allows chatbots to provide customized responses based on specific time ranges.
Example: A chatbot can be programmed to send a welcome message between 10 AM and 7 PM. Messages received outside these hours can trigger an off-hour response. Similarly, date-based conditioning can be used for holidays and vacations.
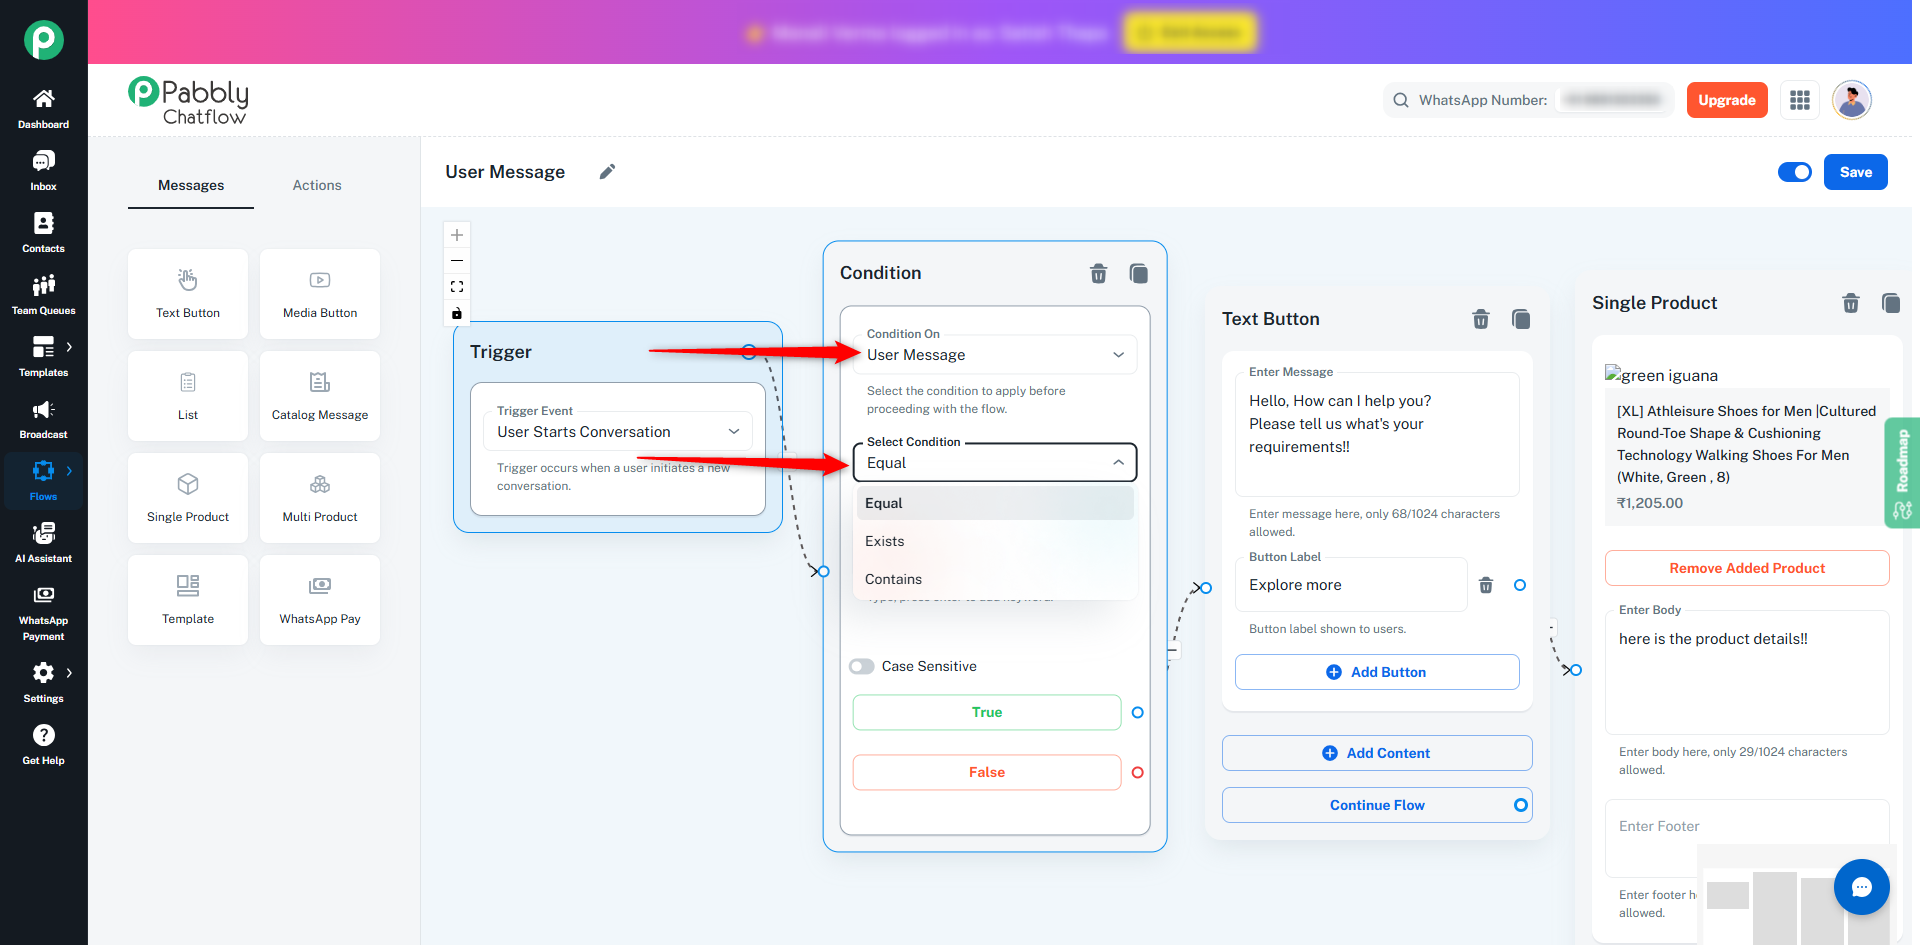
User Message Condition
The User Message condition allows you to control the flow based on the text sent by the user. It is commonly used to filter messages before sending a response, especially at the start of a conversation.
How It Works
When a user sends a message, the system evaluates the message content using the User Message condition and routes the flow through the True or False path based on the rules you define.
Condition On
Note:
Keywords can be defined only when “User Message” is selected as the condition.
Other condition types (Contact List, Contact Custom Field, Tags) do not support keyword input.
Select Condition
- Equal – Triggers when the message exactly matches one of the defined keywords
- Contains – Triggers when the message contains the defined keyword
- Exists – Triggers when any user message is present
Enter Keywords
- Add one or multiple keywords.
- The condition evaluates to True if the user’s message matches any one of the entered keywords.
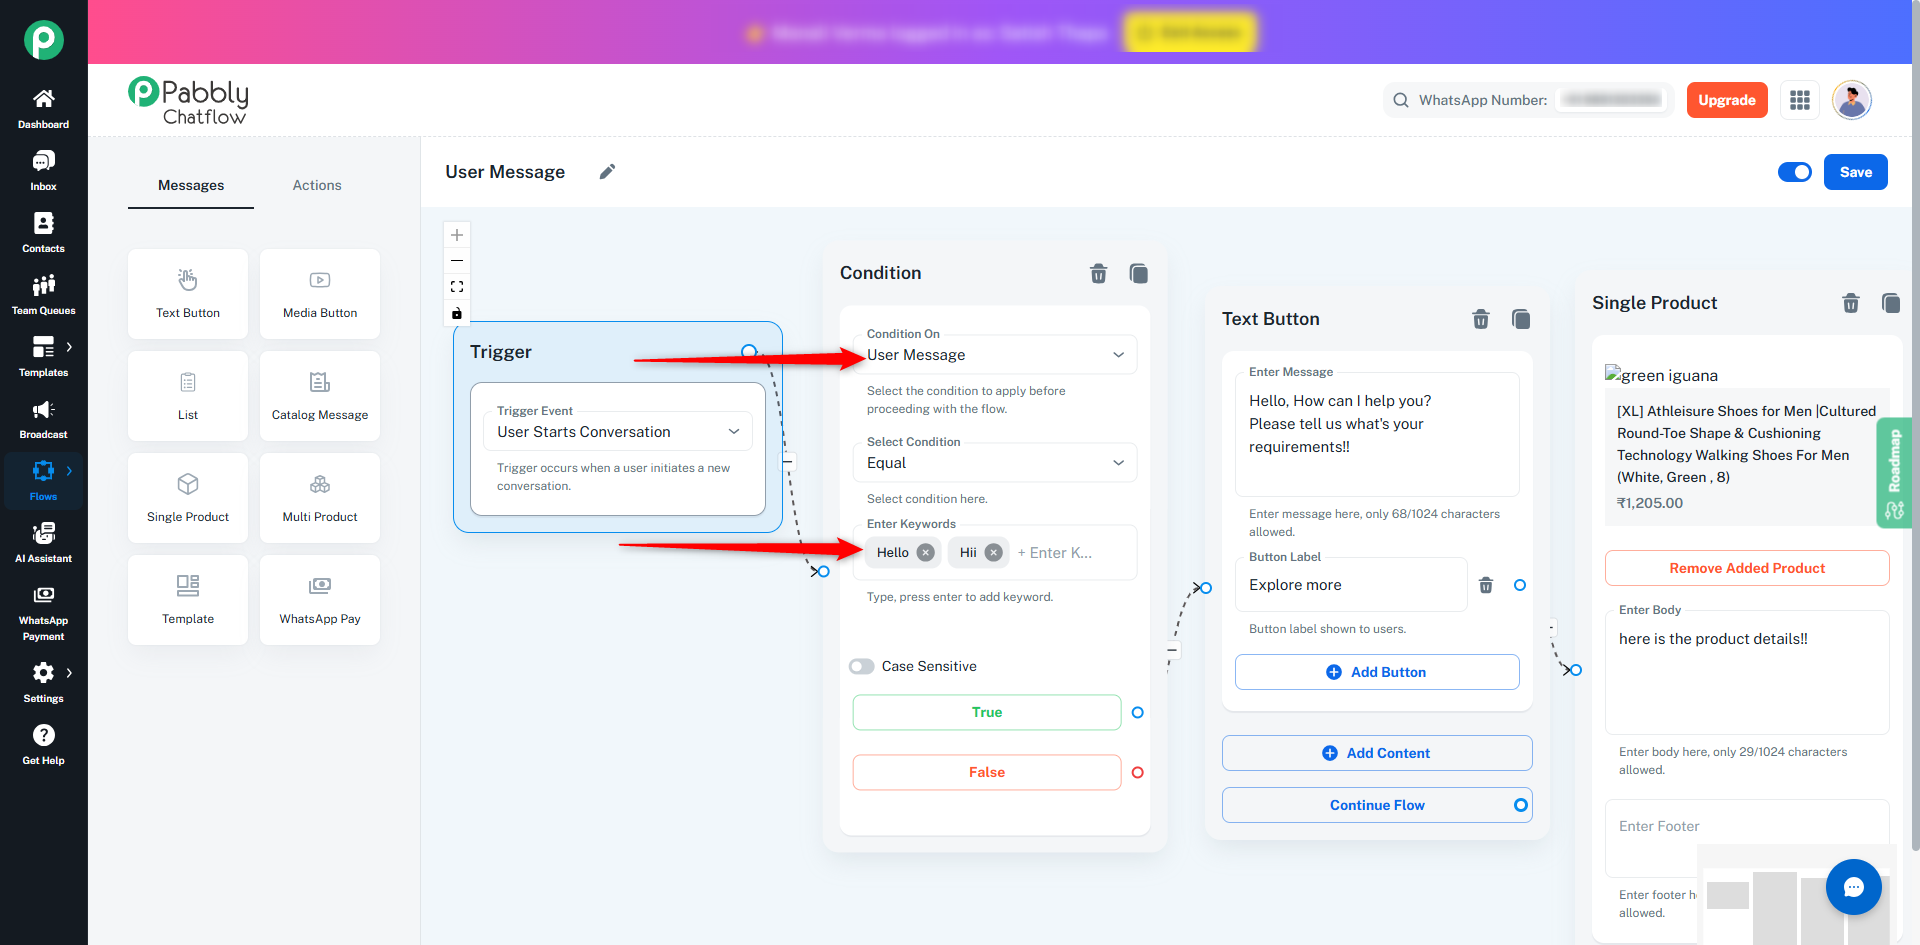
Case Sensitive
- Enable this option to match exact letter casing.
- Keep it disabled for flexible matching (recommended).
When a new user message is received, both triggers can activate. However, in the User Starts Conversation flow, you can add a Condition action with Condition On = User Message to control whether the flow should continue.
- If the user’s message matches the defined keywords in the User Message condition, the condition evaluates to True and the flow continues to the next actions.
- If the user’s message does not match the defined keywords, the condition evaluates to False and the flow stops or follows the False path.
At the same time, if the message matches a Keyword/Regex Match trigger, the keyword-specific flow executes independently.
This setup ensures that the User Starts Conversation flow runs only when the User Message condition is satisfied, preventing unwanted or duplicate responses.
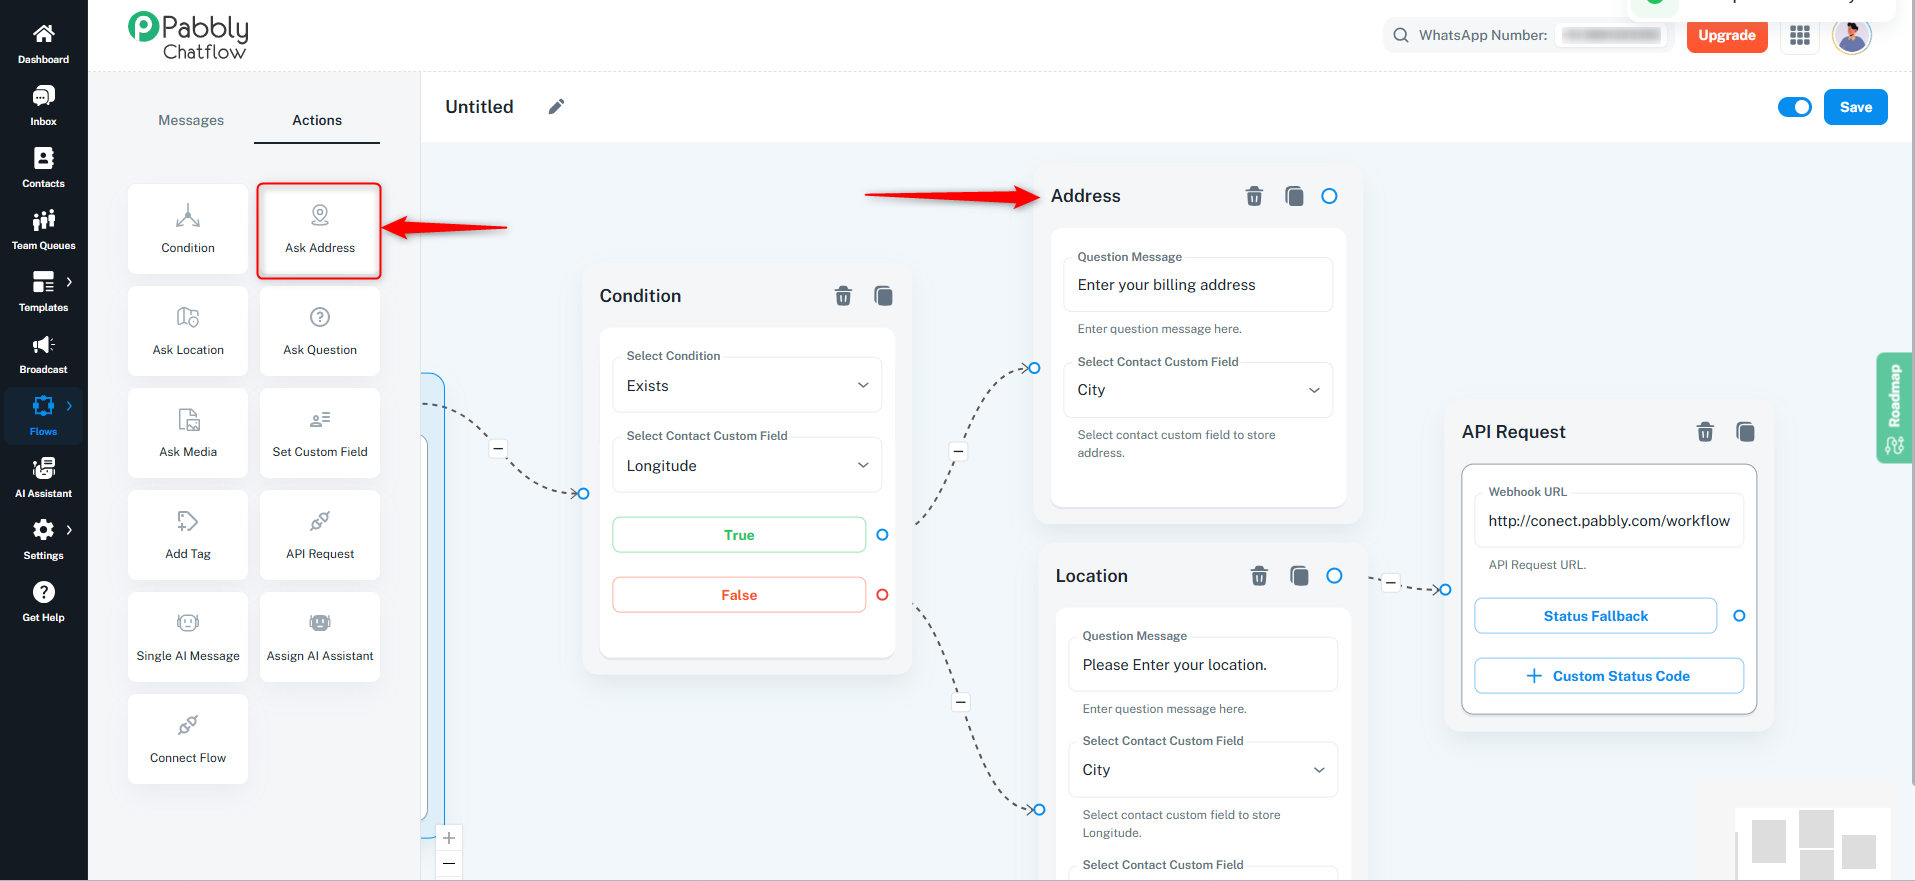
Ask Address Action
This action enables the chatbot to collect the user’s address. The chatbot prompts the user to enter their complete address, which can then be stored for future interactions, deliveries, or support queries.
Example: If a business requires shipping details, the chatbot can request the address and store it for processing orders or deliveries.
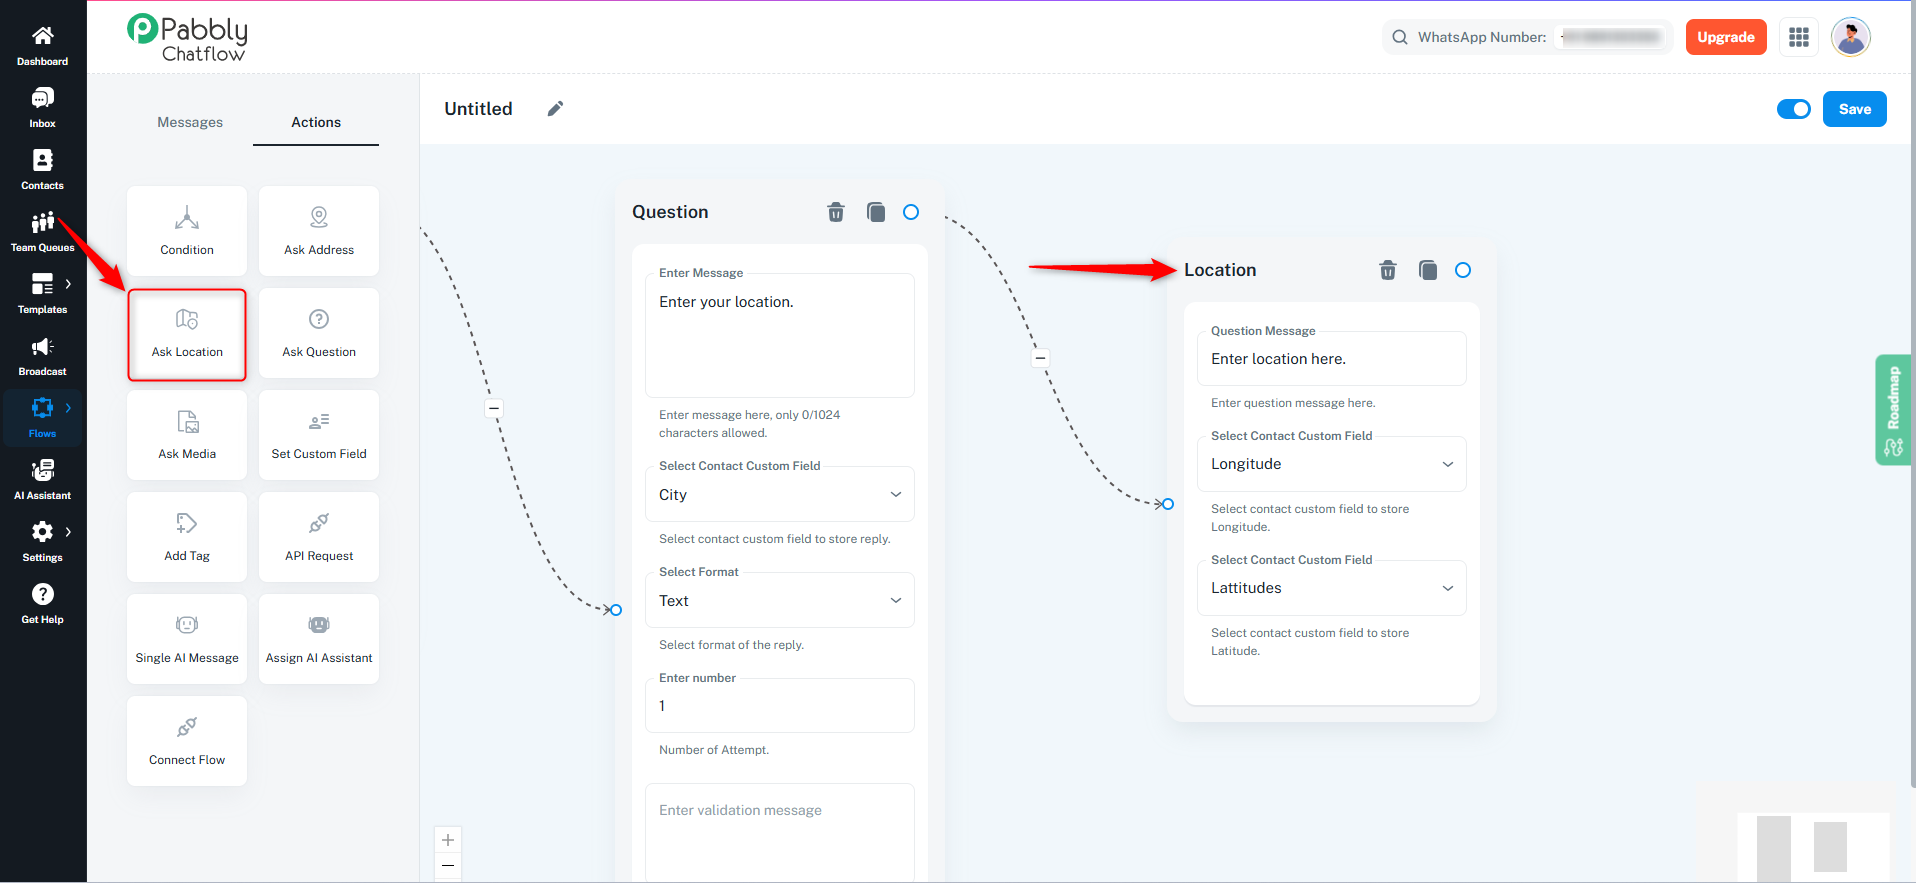
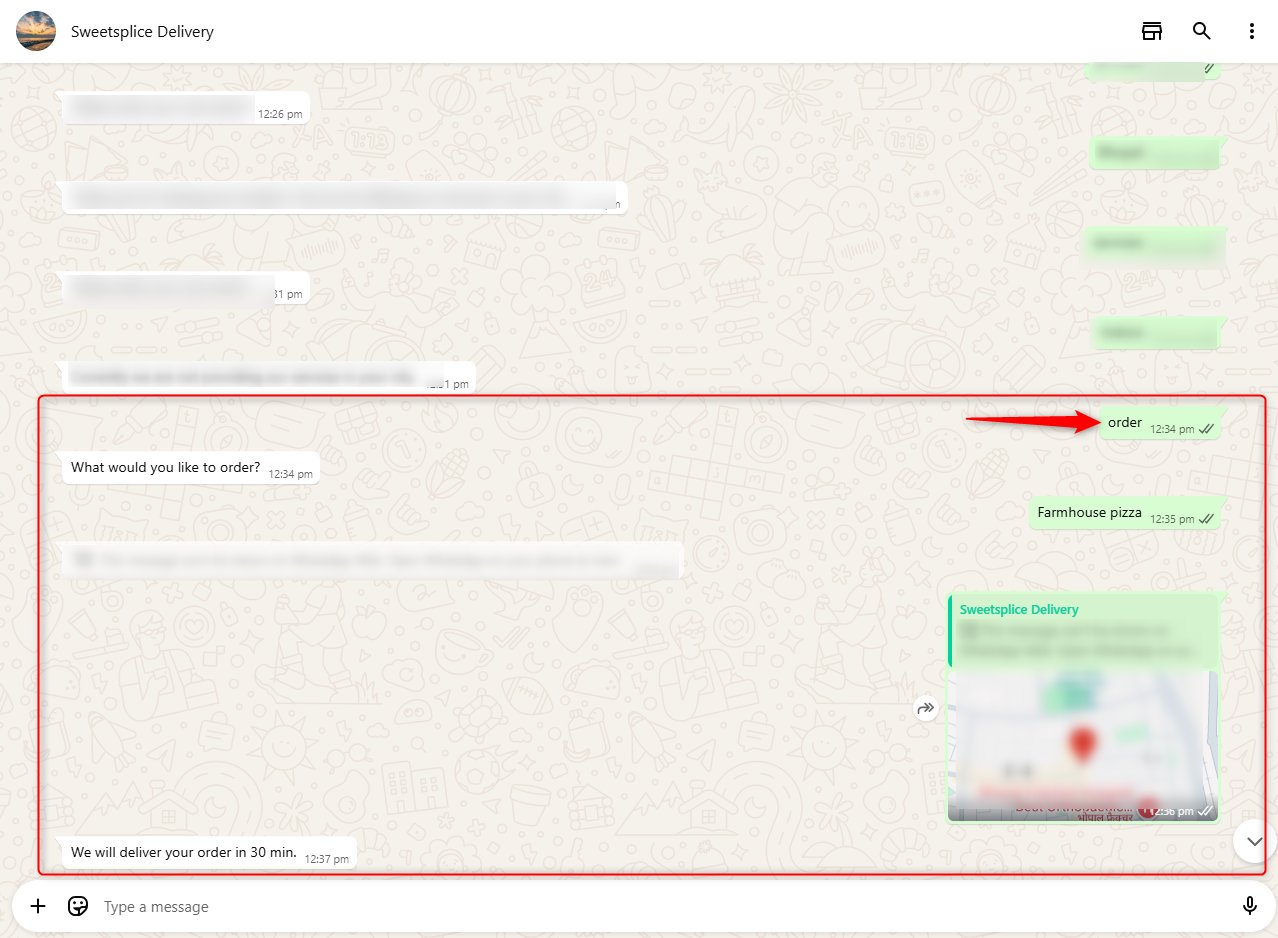
3. Ask Location Action
This action enables the chatbot to request the user’s live location to facilitate location-based services. The user will be prompted to share their current GPS location using WhatsApp’s built-in location-sharing feature.
Example: If a service provider wants to allocate a technician for a home service, the chatbot can collect the customer’s location to assign the nearest available technician.
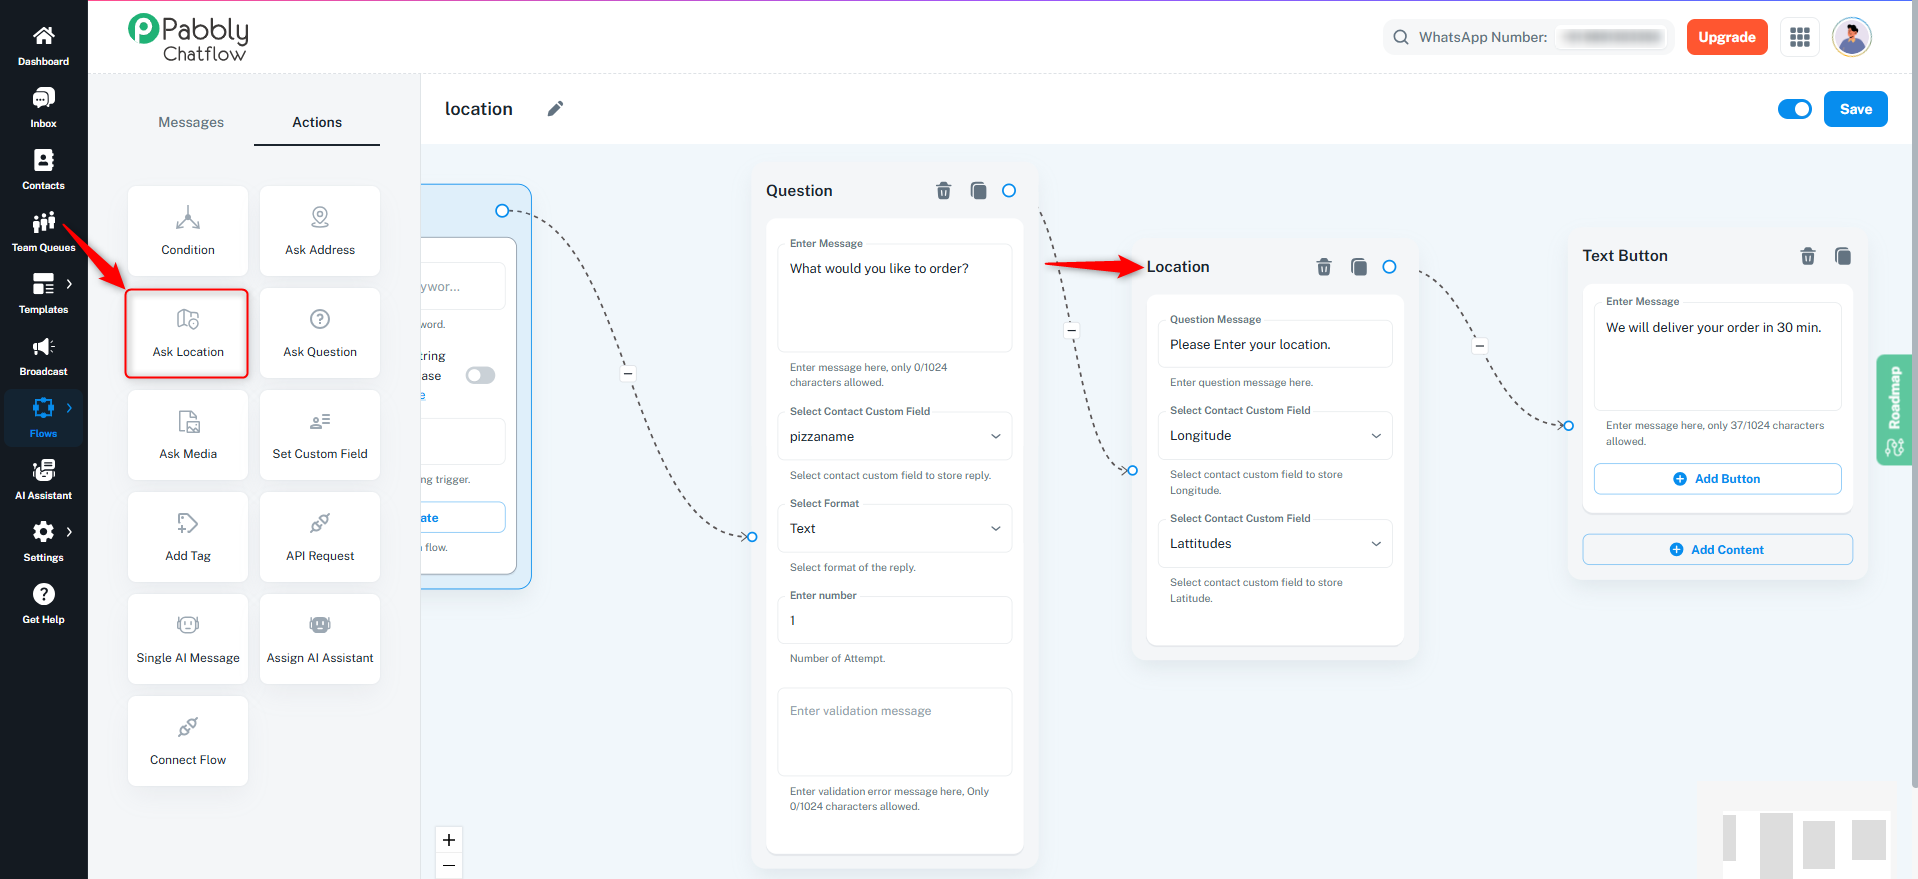
Example Use Case:
If a food delivery business wants to take customer orders and deliver to their exact location, this chatbot flow helps collect the order details and precise delivery address using live location.
- Trigger the Flow:
- The flow will be triggered when a user sends a message containing the defined keywords.
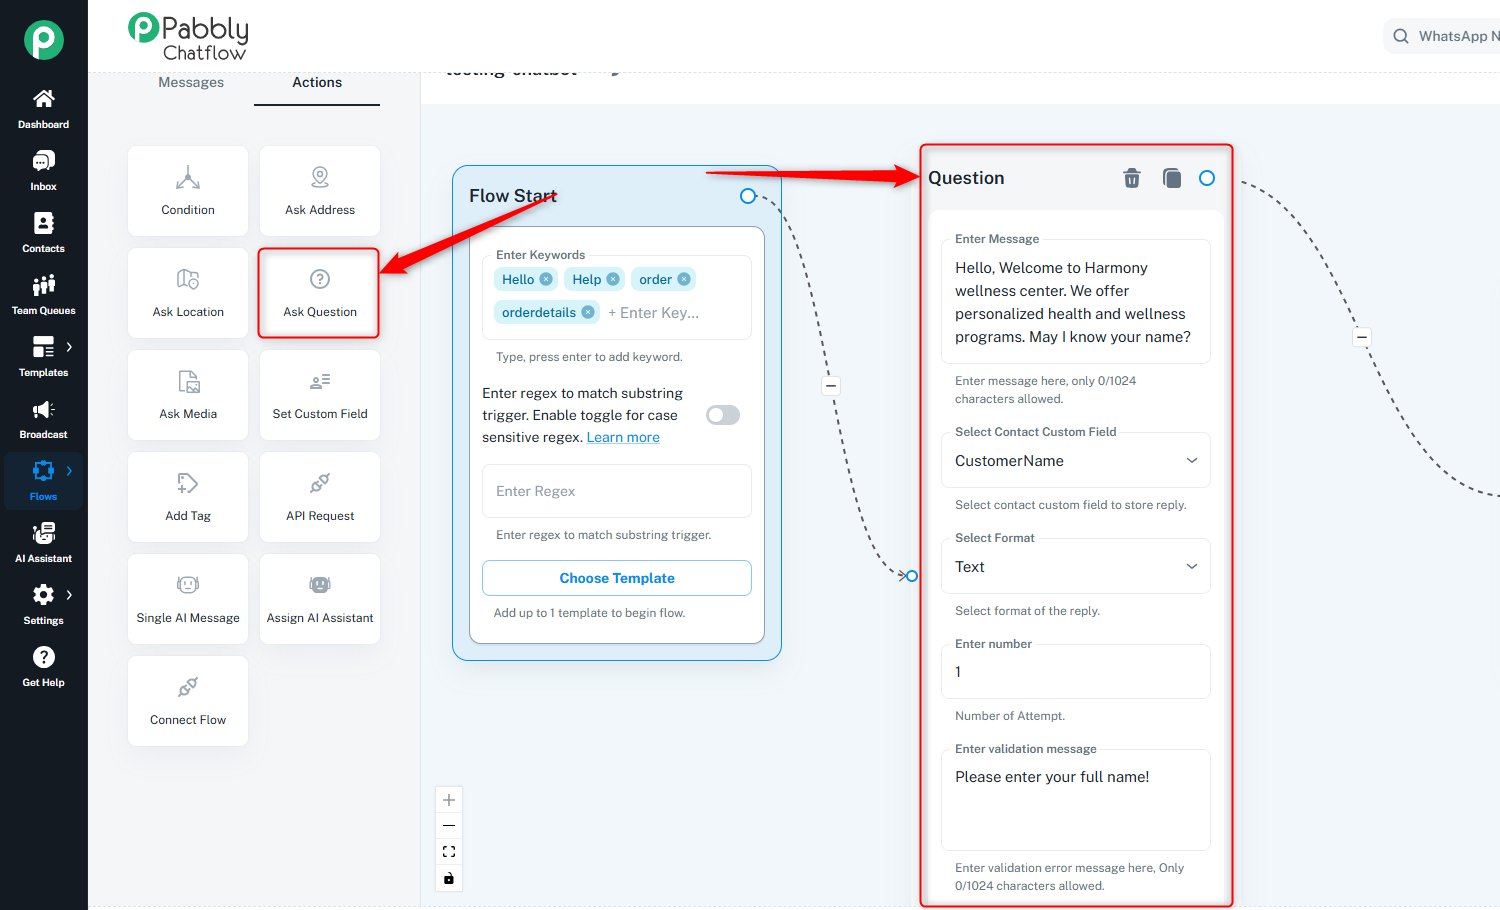
4. Ask a Question Action
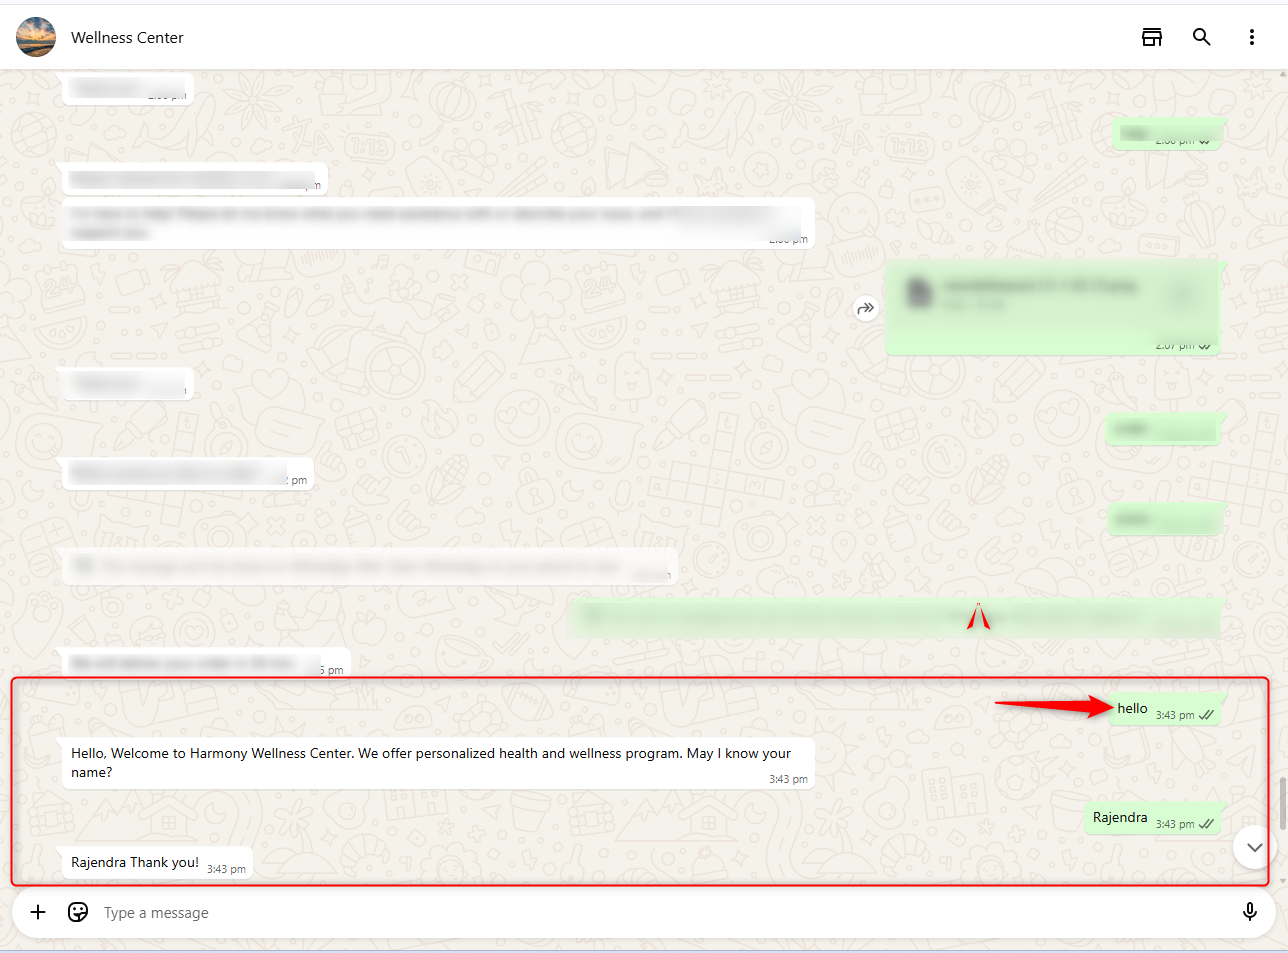
This action allows the chatbot to collect structured information from users, such as their name, email, phone number, or any other relevant details. You can define specific input fields to ensure accurate data collection.
Example: A chatbot for an online event may ask users for their full name and email address to send them a confirmation link.
- Trigger the Flow:
- The flow will be triggered when a user sends a message containing the defined keywords.
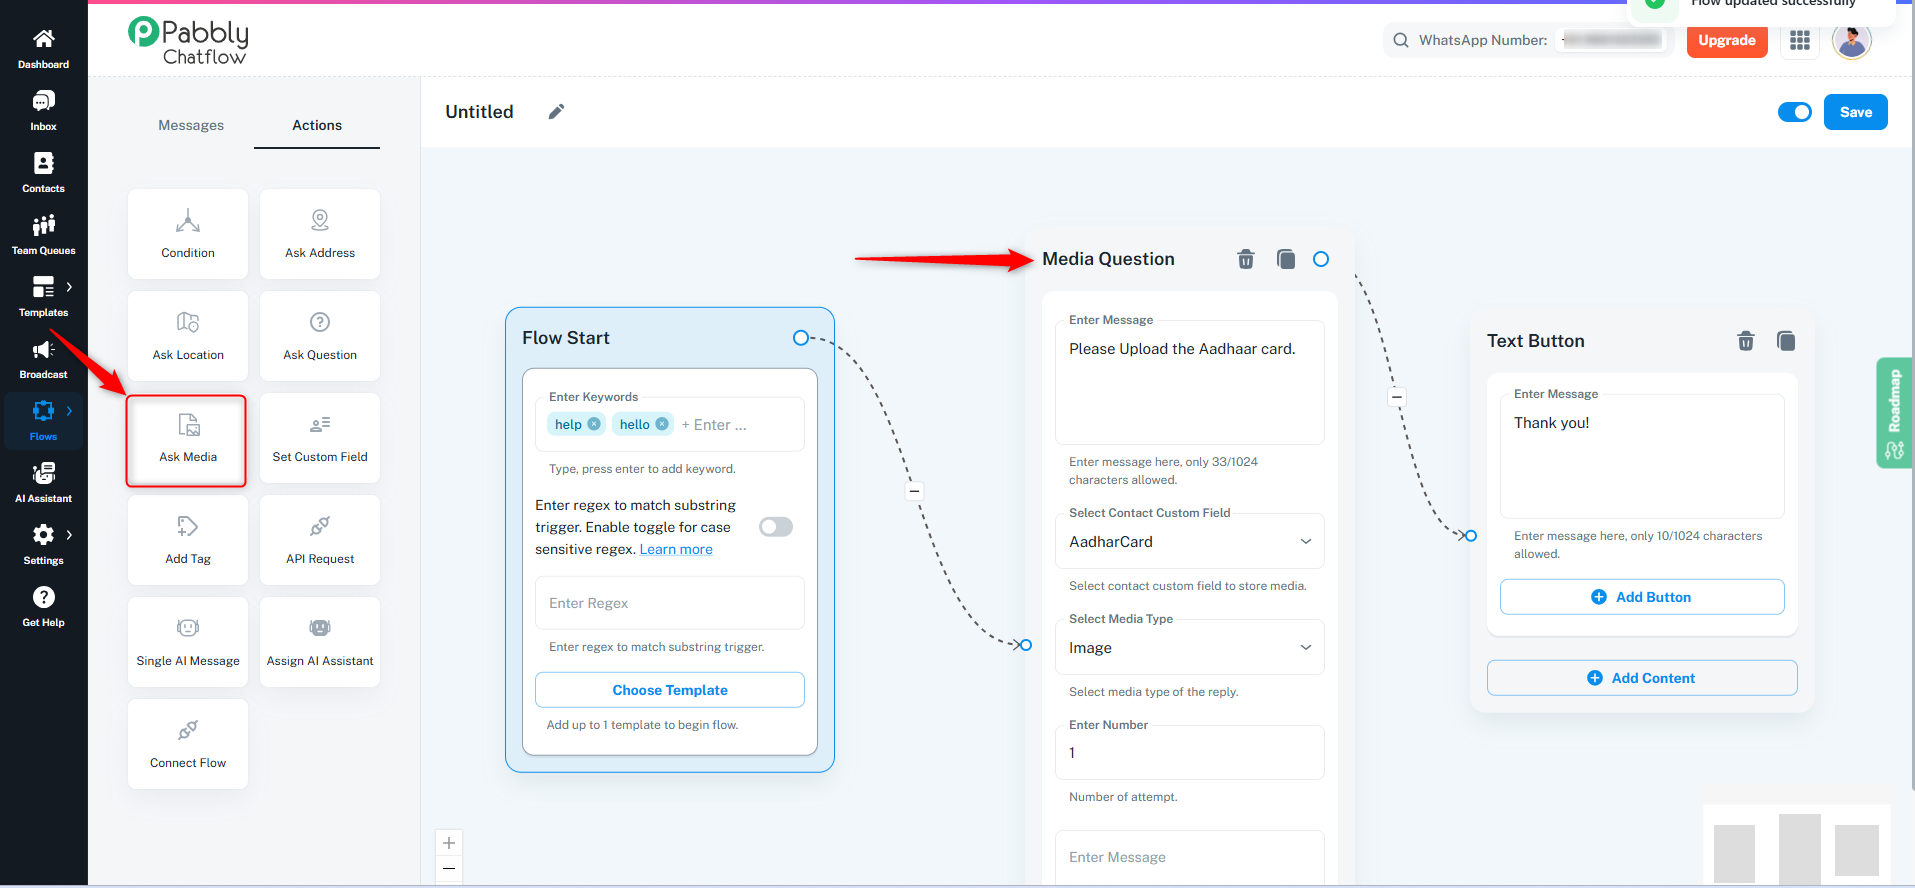
This acton enables users to upload and share media files such as images, videos, documents, or audio clips. The chatbot can collect media for verification purposes, customer support, or documentation.
Example: A banking chatbot may ask users to upload a scanned copy of their identity proof for verification purposes.
- Trigger the Flow:
- The flow will be triggered when a user sends a message containing the defined keywords.
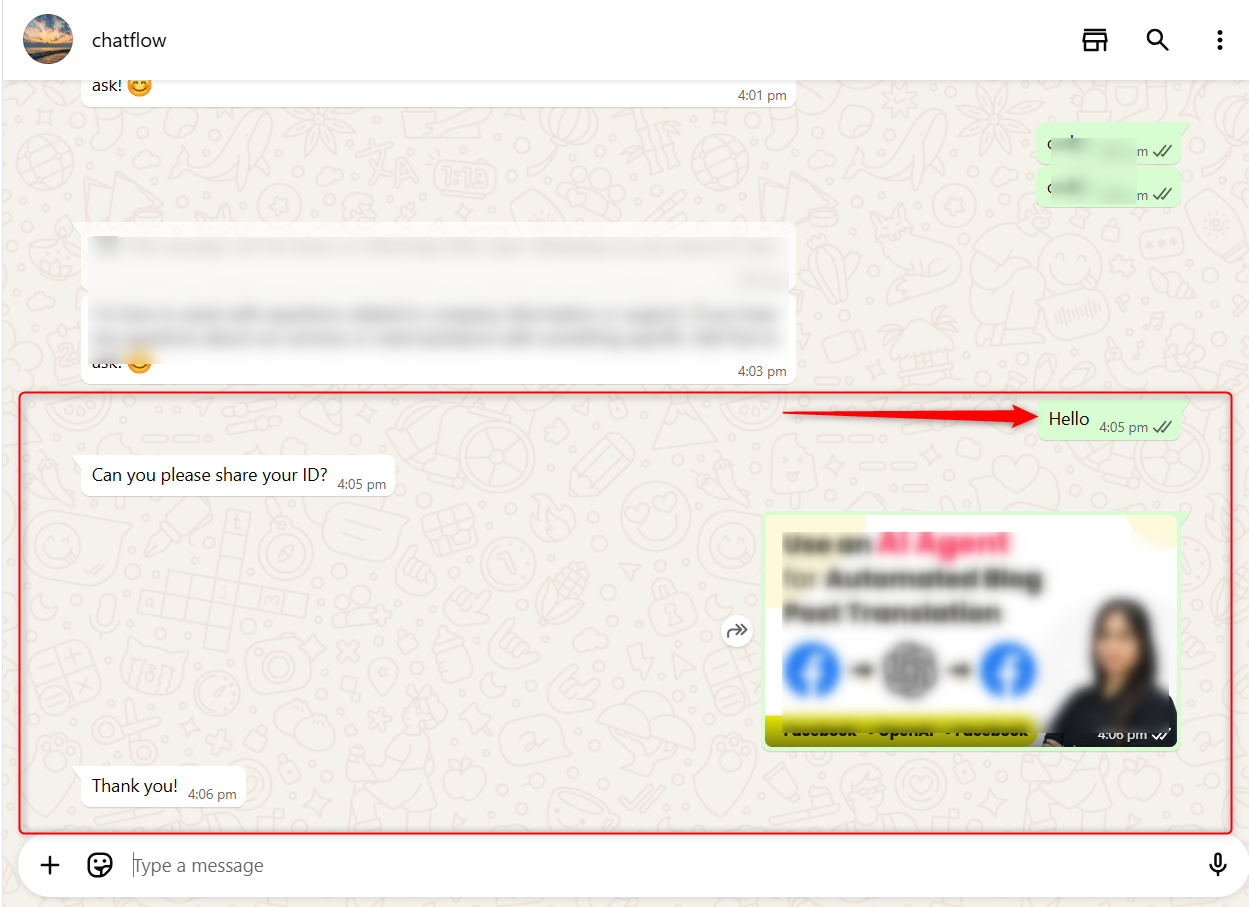
6. Set Custom Field & Tag Action
This action captures user responses as attributes and assigns values accordingly. Users can also be categorized using tags.
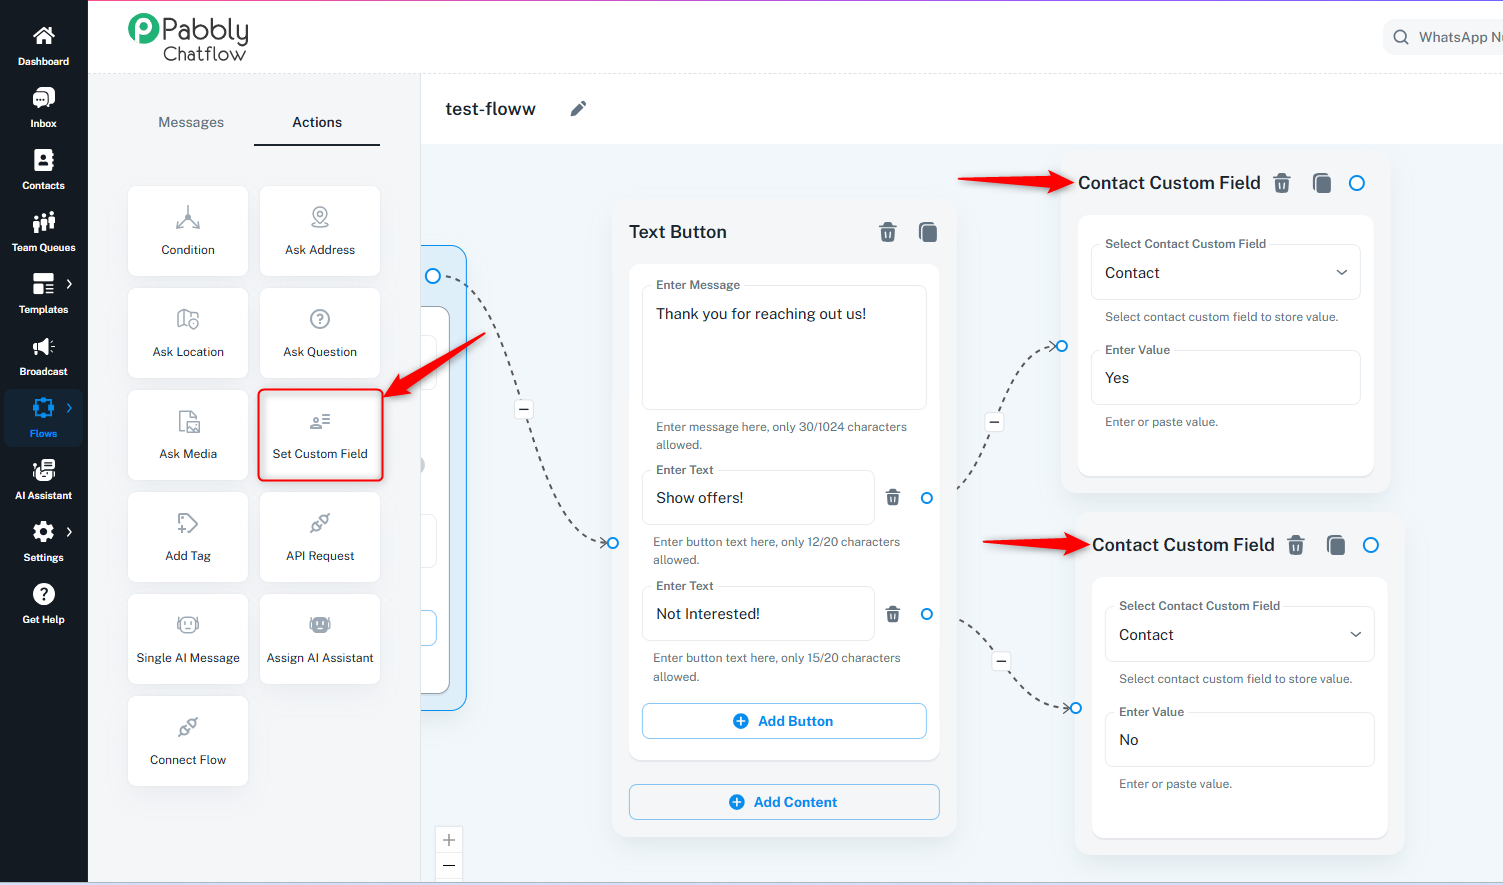
Example:
- If a chatbot presents two quick reply buttons, "Show Offers" and "Not Interested," the chatbot assigns the "Optin" attribute to both.
- Clicking "Show Offers" assigns the "Optin" attribute with a "Yes" value, while "Not Interested" assigns it a "No" value.
- These responses can then be used for lead segmentation and further communication.
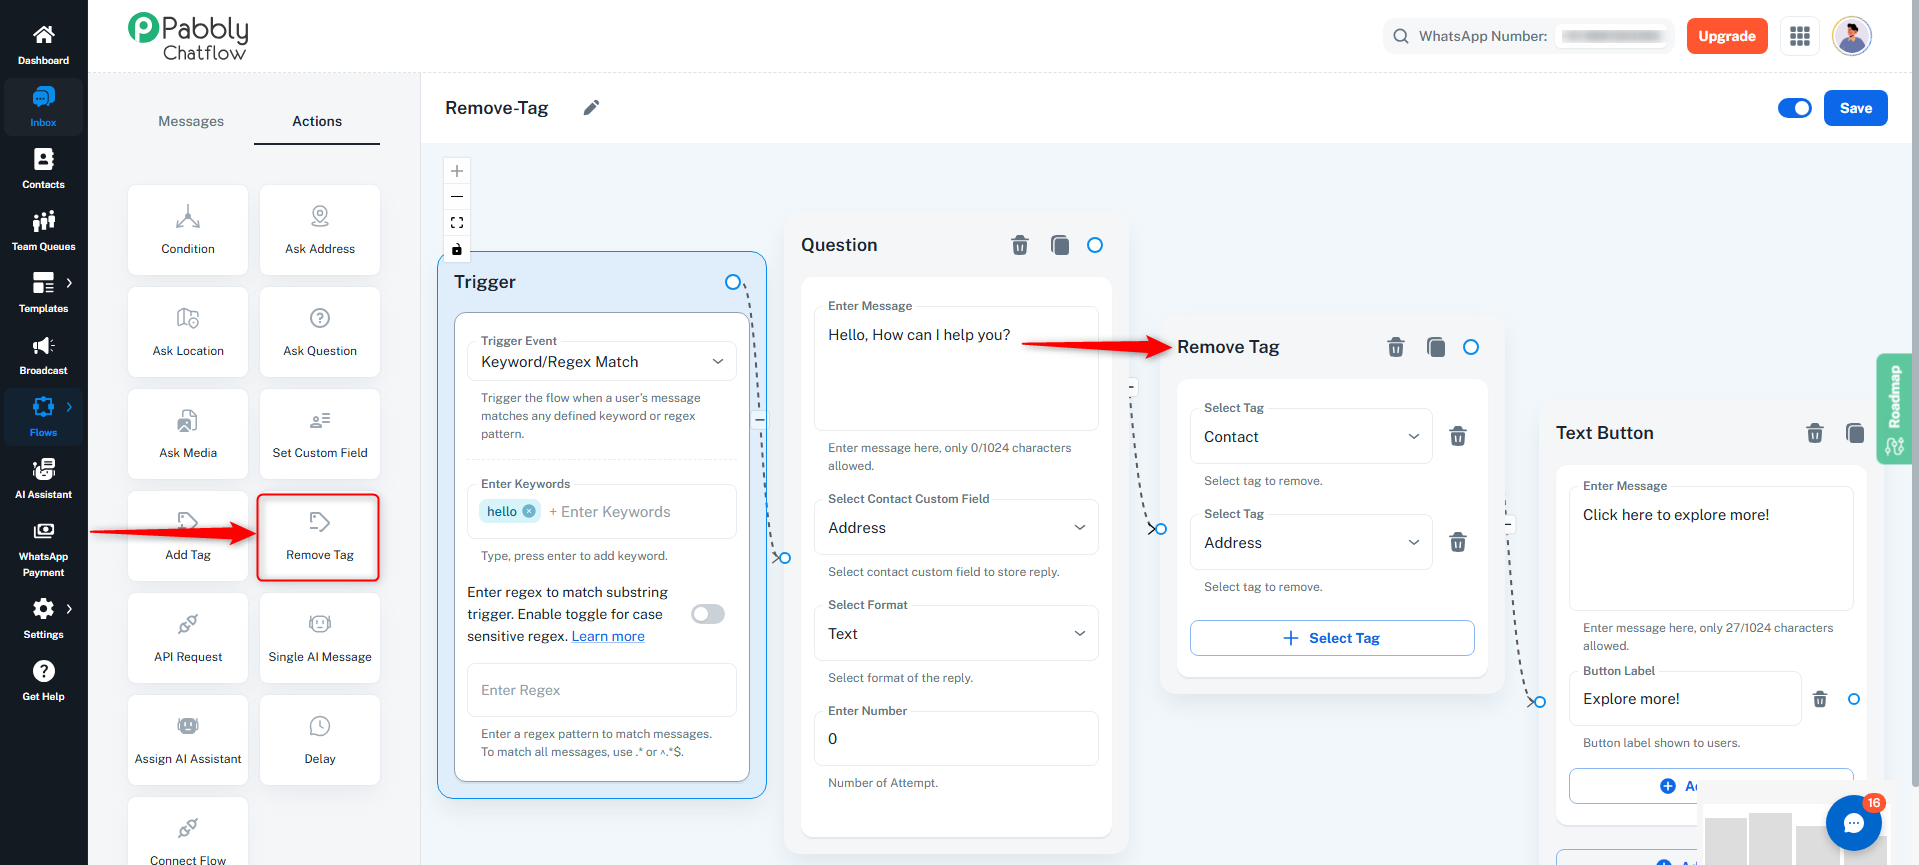
6. Remove Tag Action
This action removes selected tags from a contact and helps keep contact data clean and up to date.
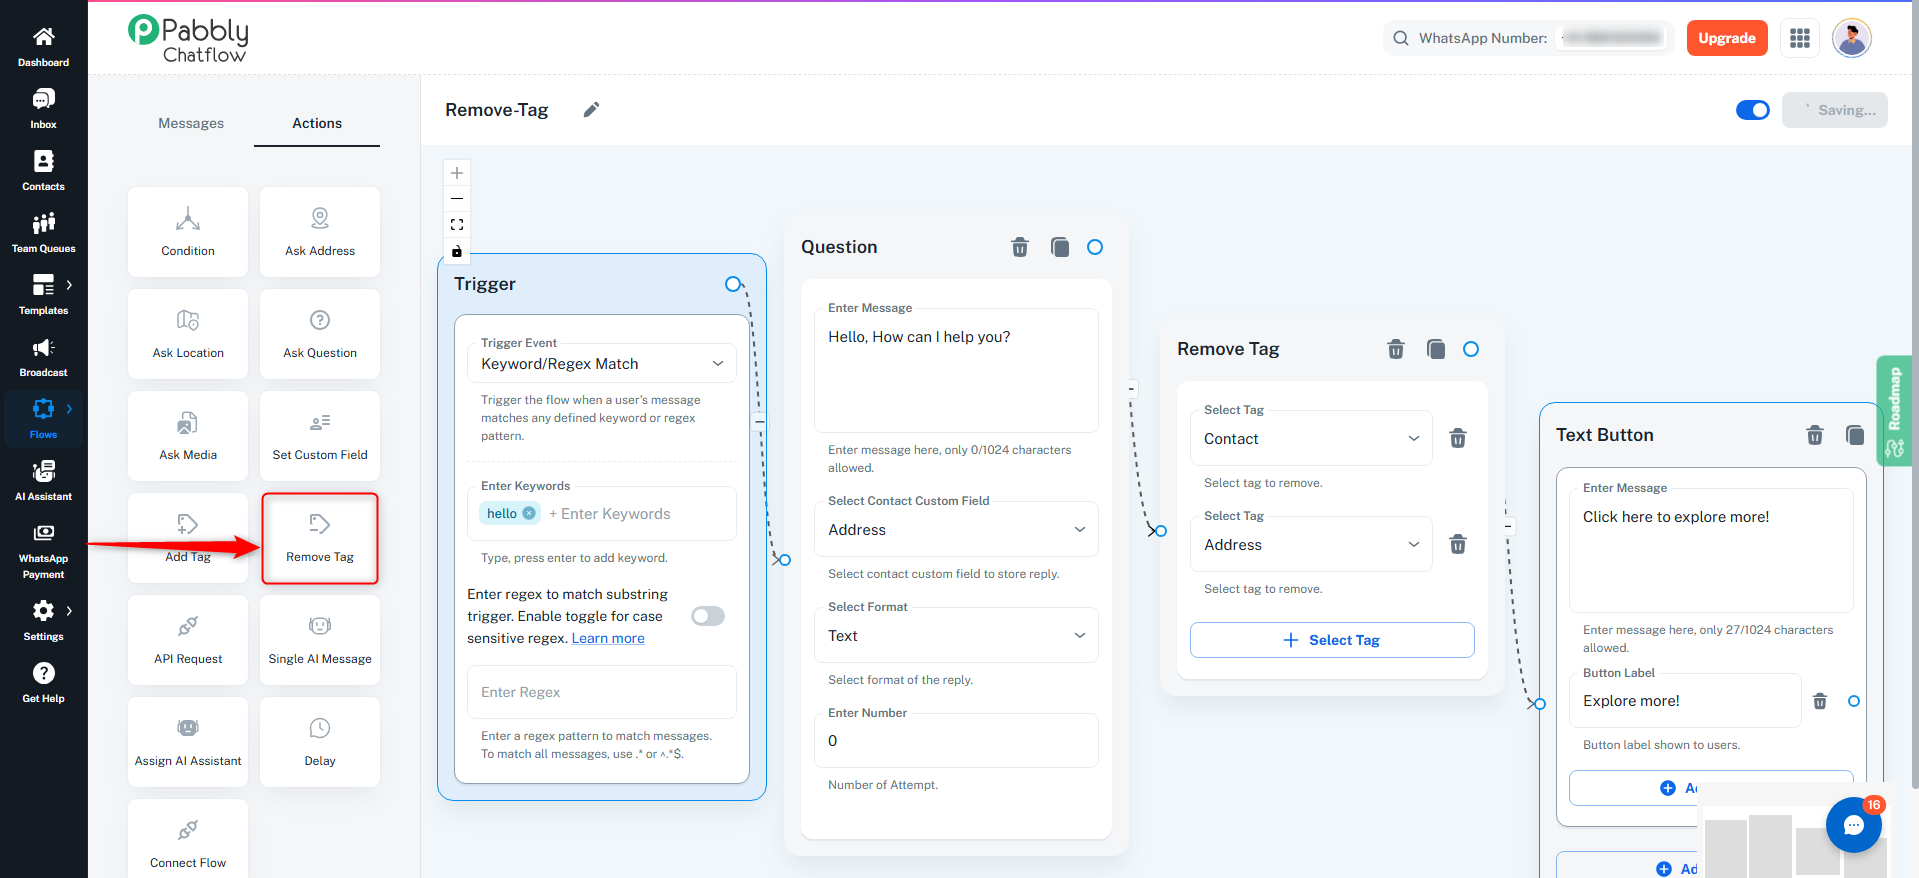
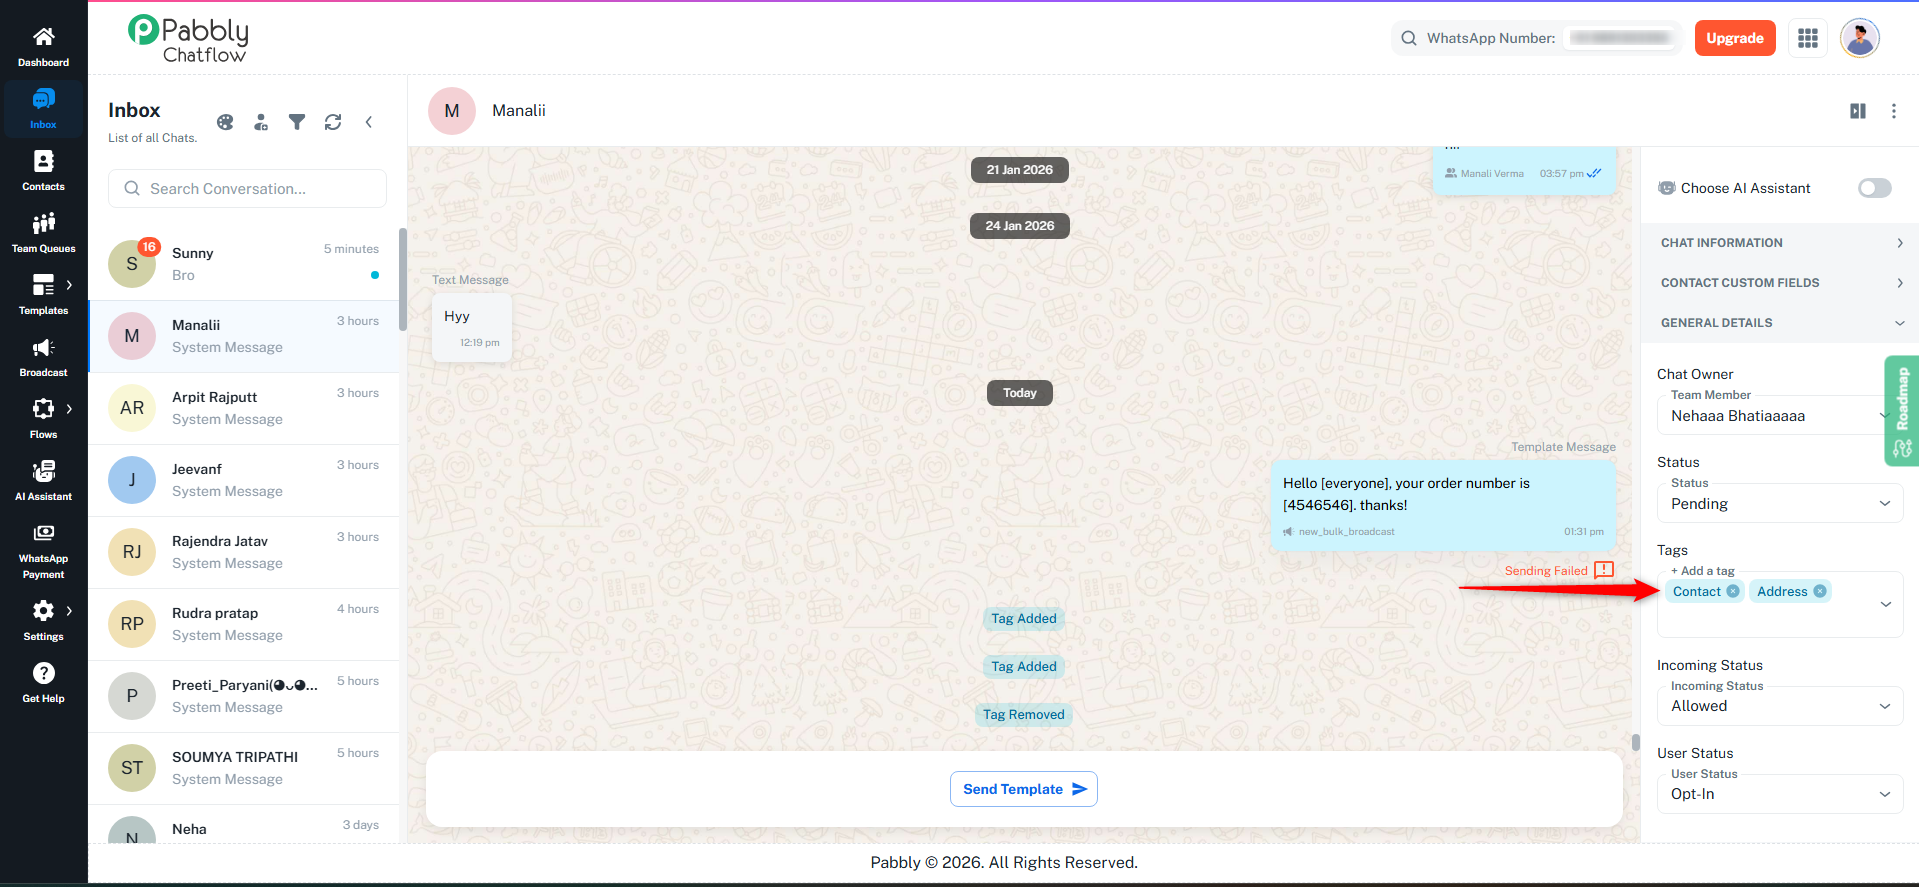
When a flow is triggered using keywords or trigger events, any Remove Tag action placed inside the flow will automatically remove the selected tags from the contact.
- The flow starts when the user message matches the defined keyword or trigger condition.
- As the flow progresses, once it reaches the Remove Tag action, the specified tags are removed.
- This works for both keyword-based triggers and event-based triggers.
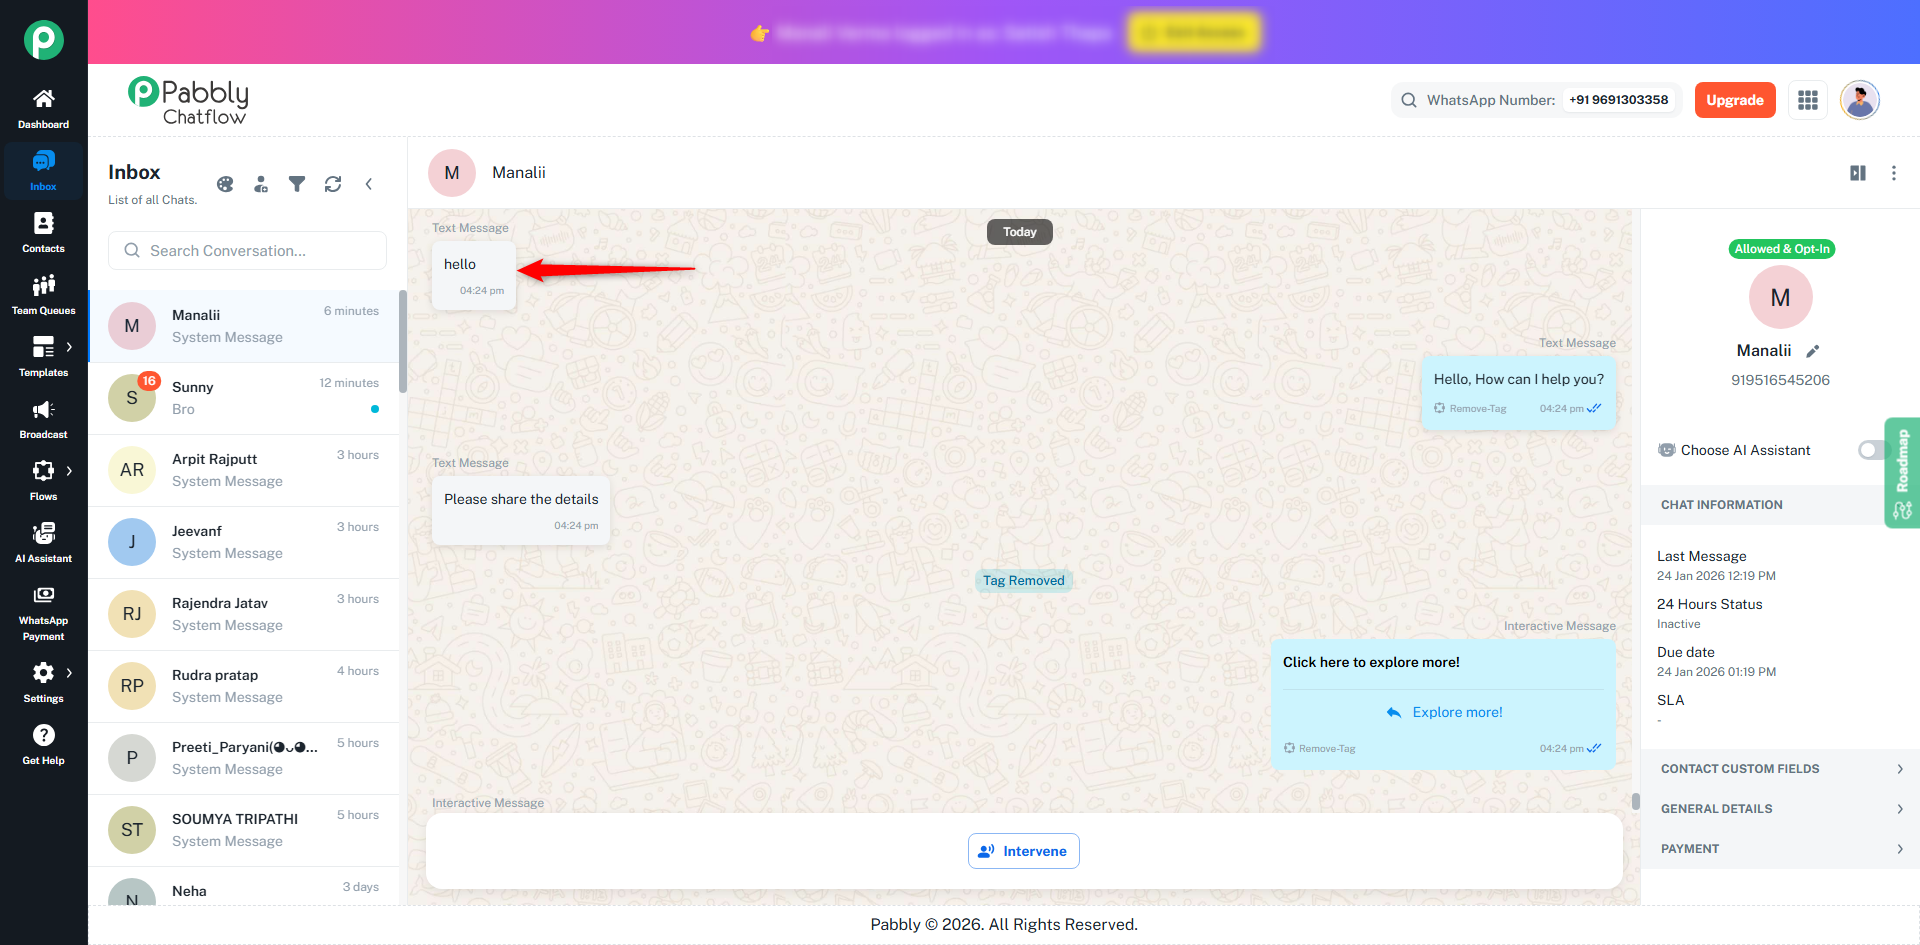
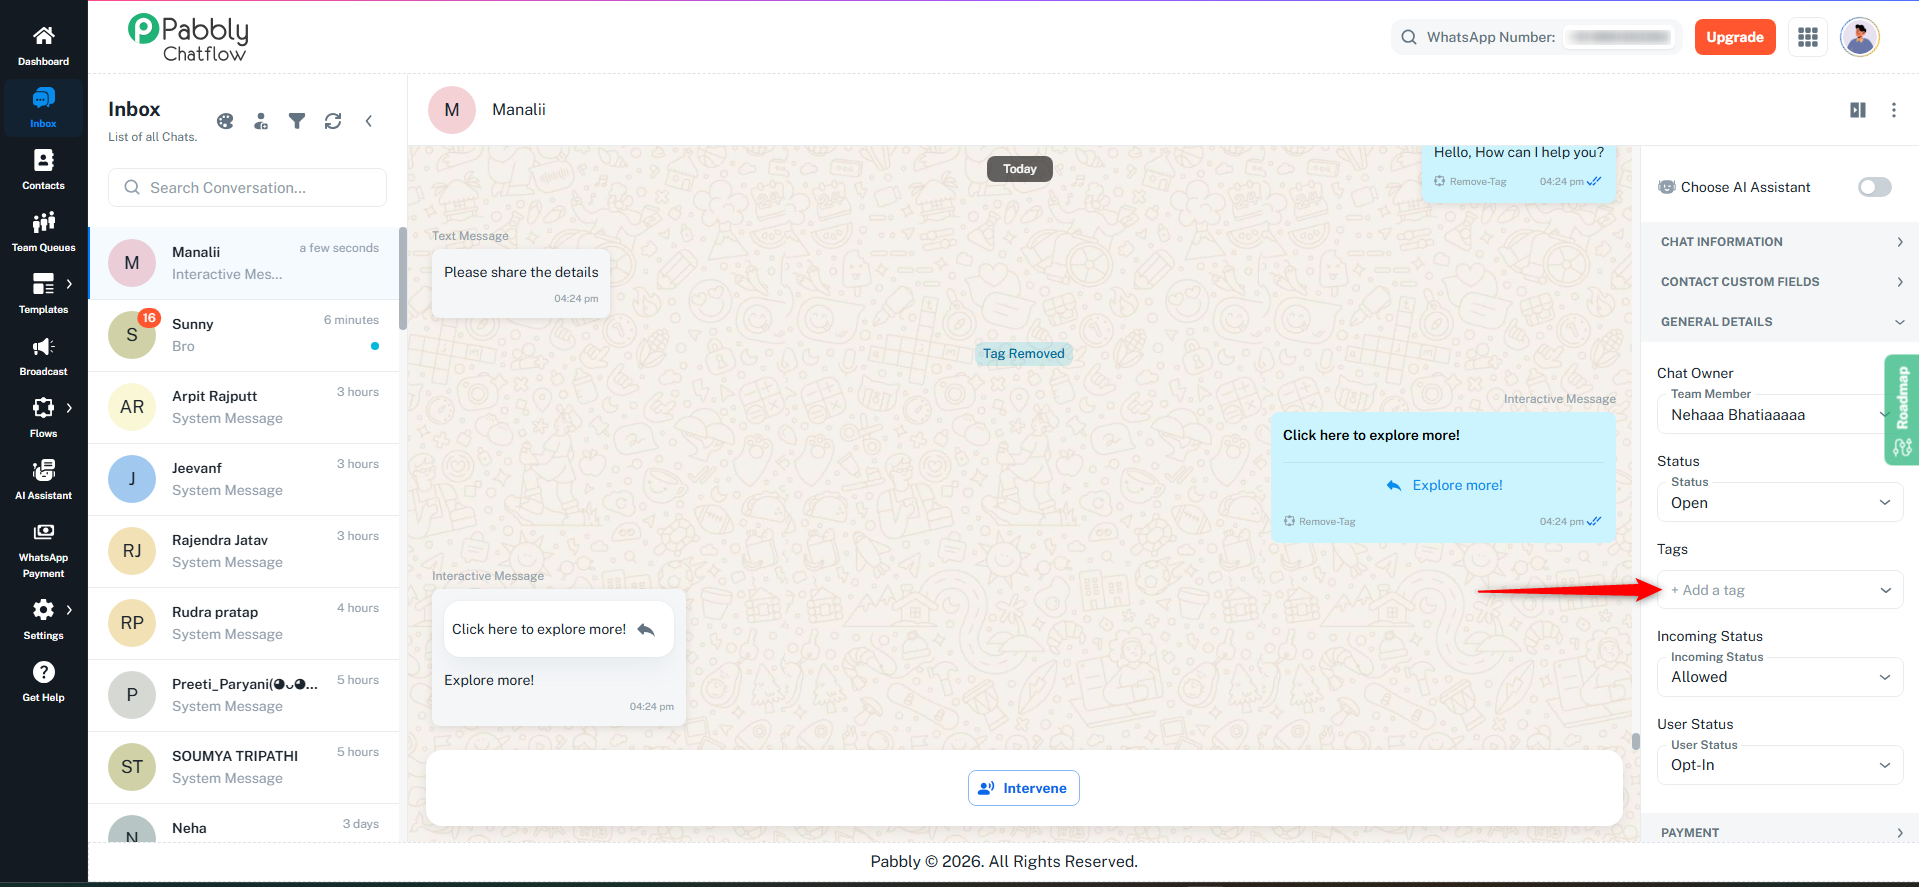
Example:
If a contact has tags like “Contact” or “Address” and the flow is triggered by the keyword “hello”, those tags will be removed automatically when the flow executes the Remove Tag action.
7. API Request Action
The API Request action enables a chatbot to integrate with external systems via API calls to fetch and send data dynamically. This ensures a personalized and efficient user experience.
For a detailed walkthrough, watch the tutorial: API Integration Tutorial
https://www.youtube.com/watch?v=TMu35XAOK0A
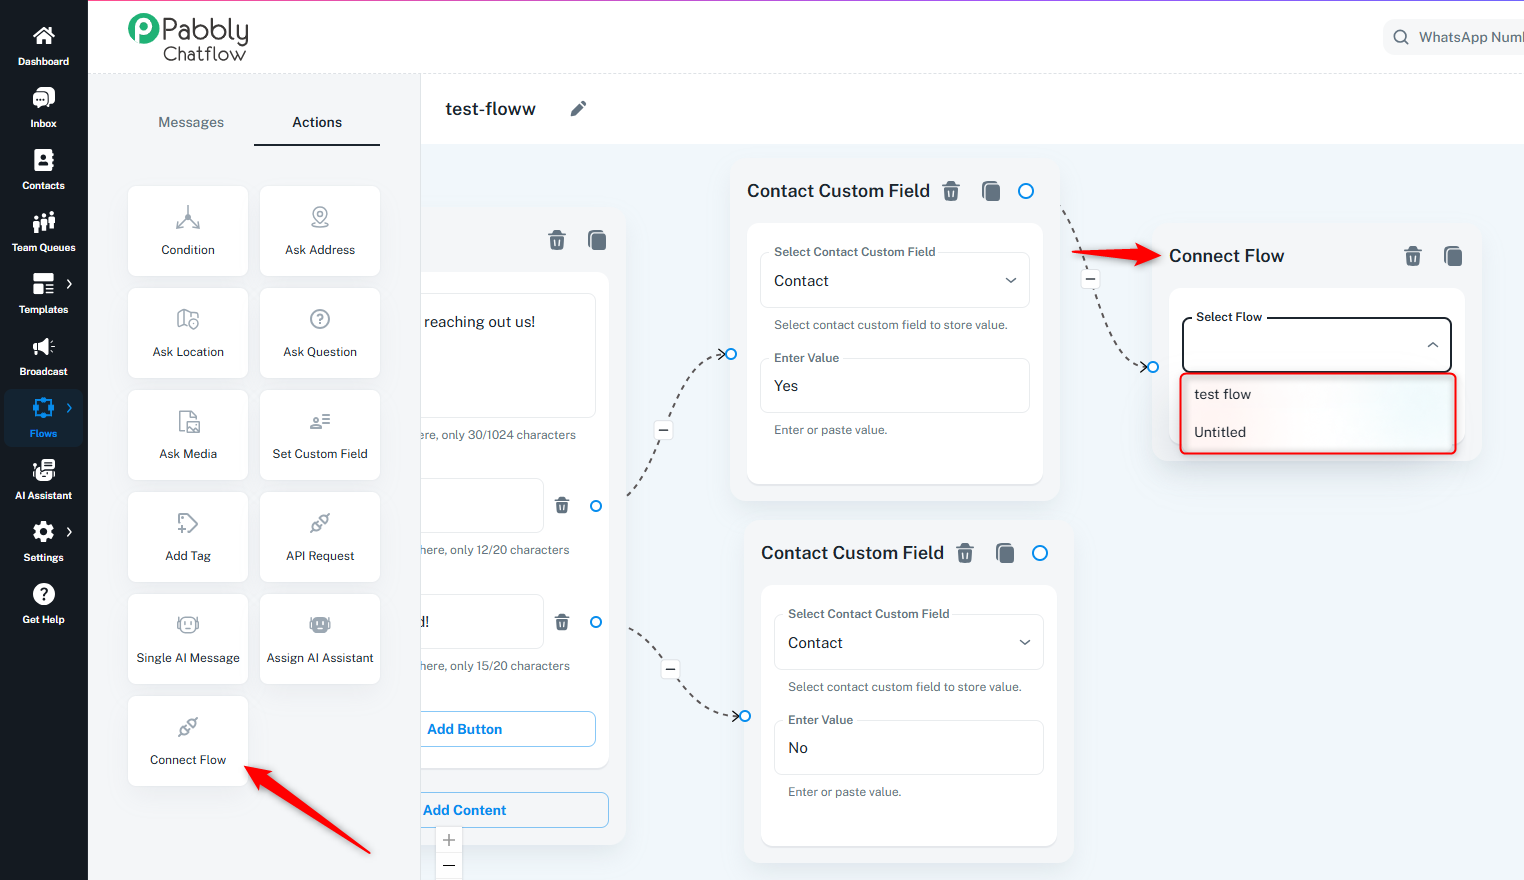
8. Connect Flow Action
This action allows you to link pre-existing flows together, streamlining development and saving time. It enhances efficiency and promotes a modular chatbot design.
9. Assign AI Assistant Action
The Assign AI Assistant action allows you to assign an AI assistant to a specific chat flow, enabling automated responses and task management.
How to Use:
- Select AI Assistant: Choose the AI assistant you have already created inside the AI Assistant module. This AI assistant will be assigned to the chat once the flow is triggered.
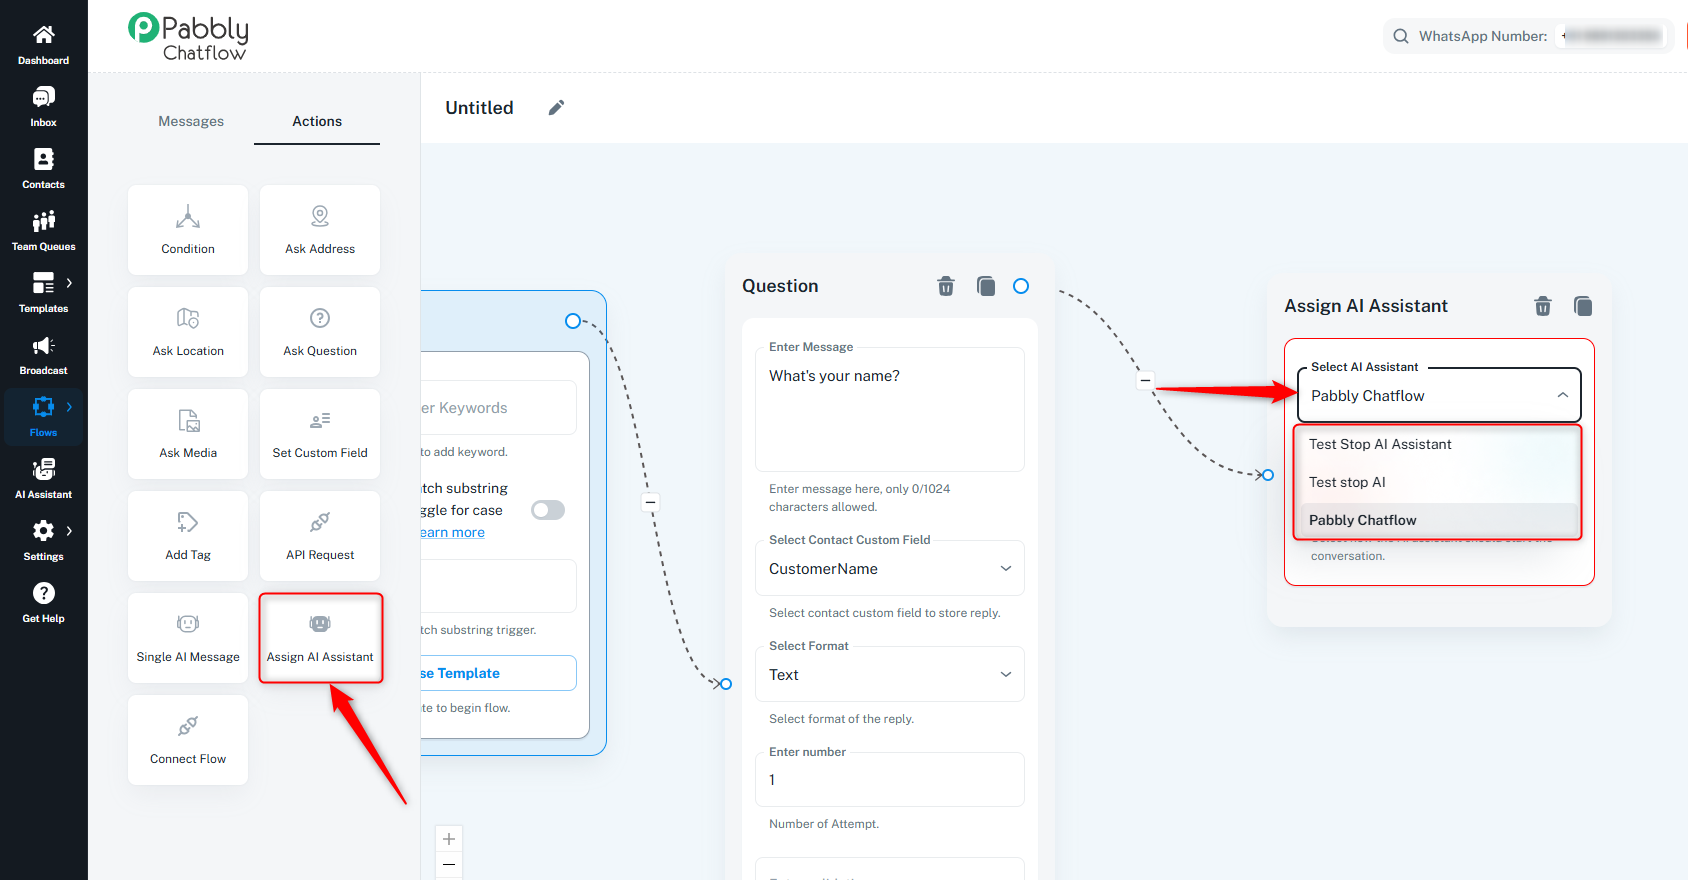
- Start With: The flow allows you to start the conversation in different modes:
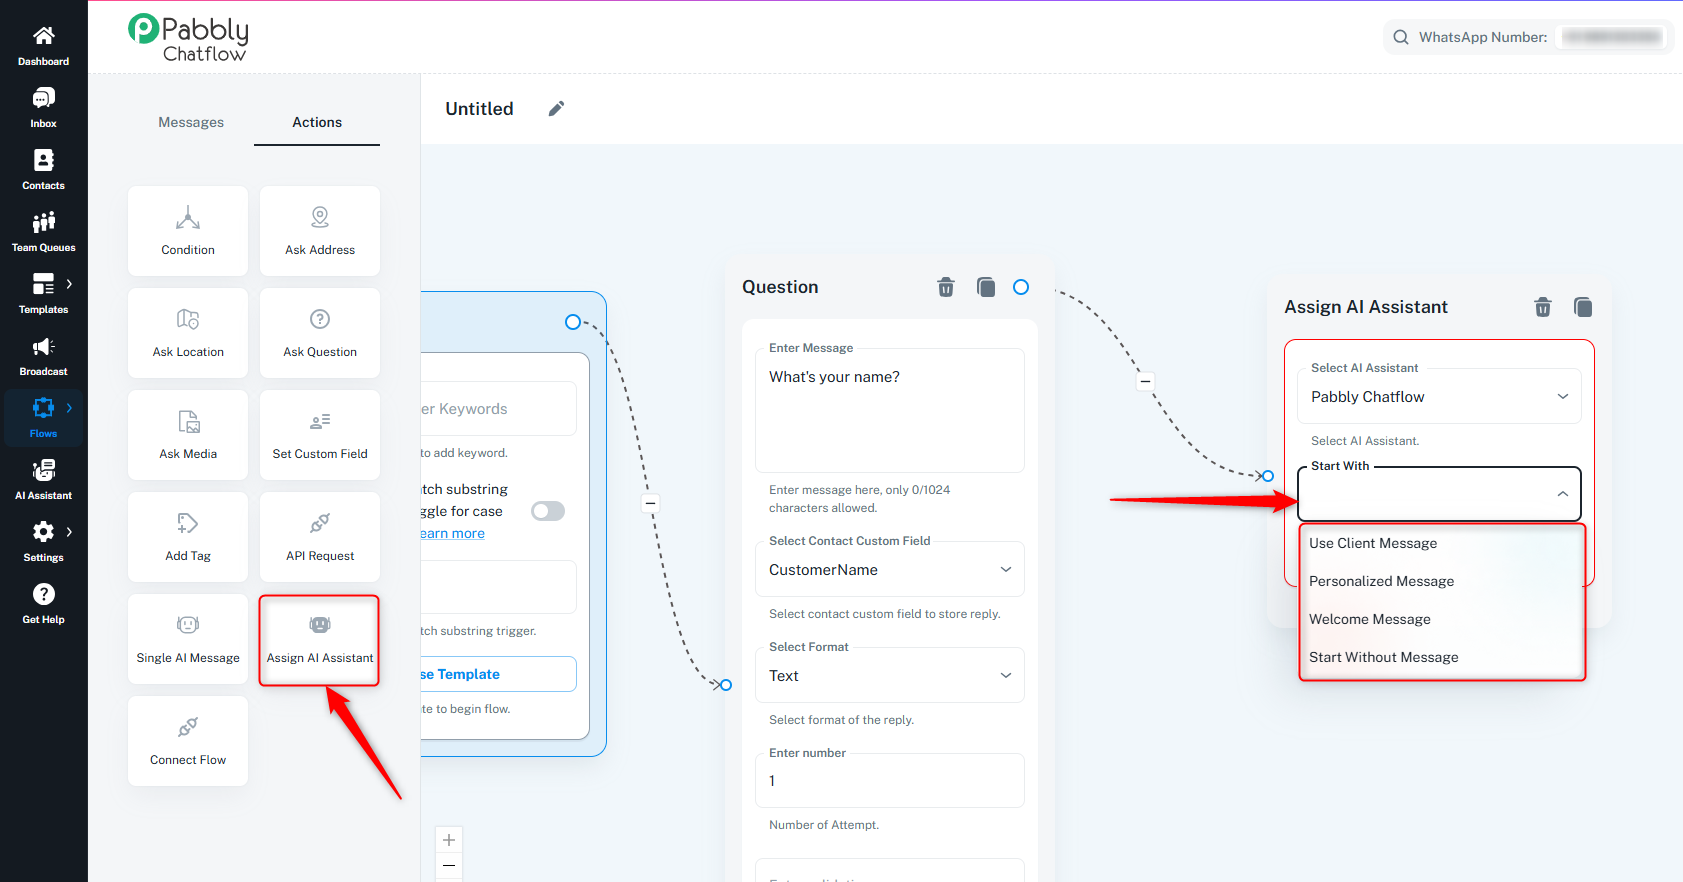
- Start Without Message: This triggers the AI assistant without sending an initial message.
- Use Client Message: The AI assistant will respond to the text message from the previous message or action in the flow.
- Welcome Message: Sends a static message directly to the client, bypassing the AI assistant for the first time.
- Personalized Message: Your message will be sent to the AI assistant, and its generated response will be sent to the client.
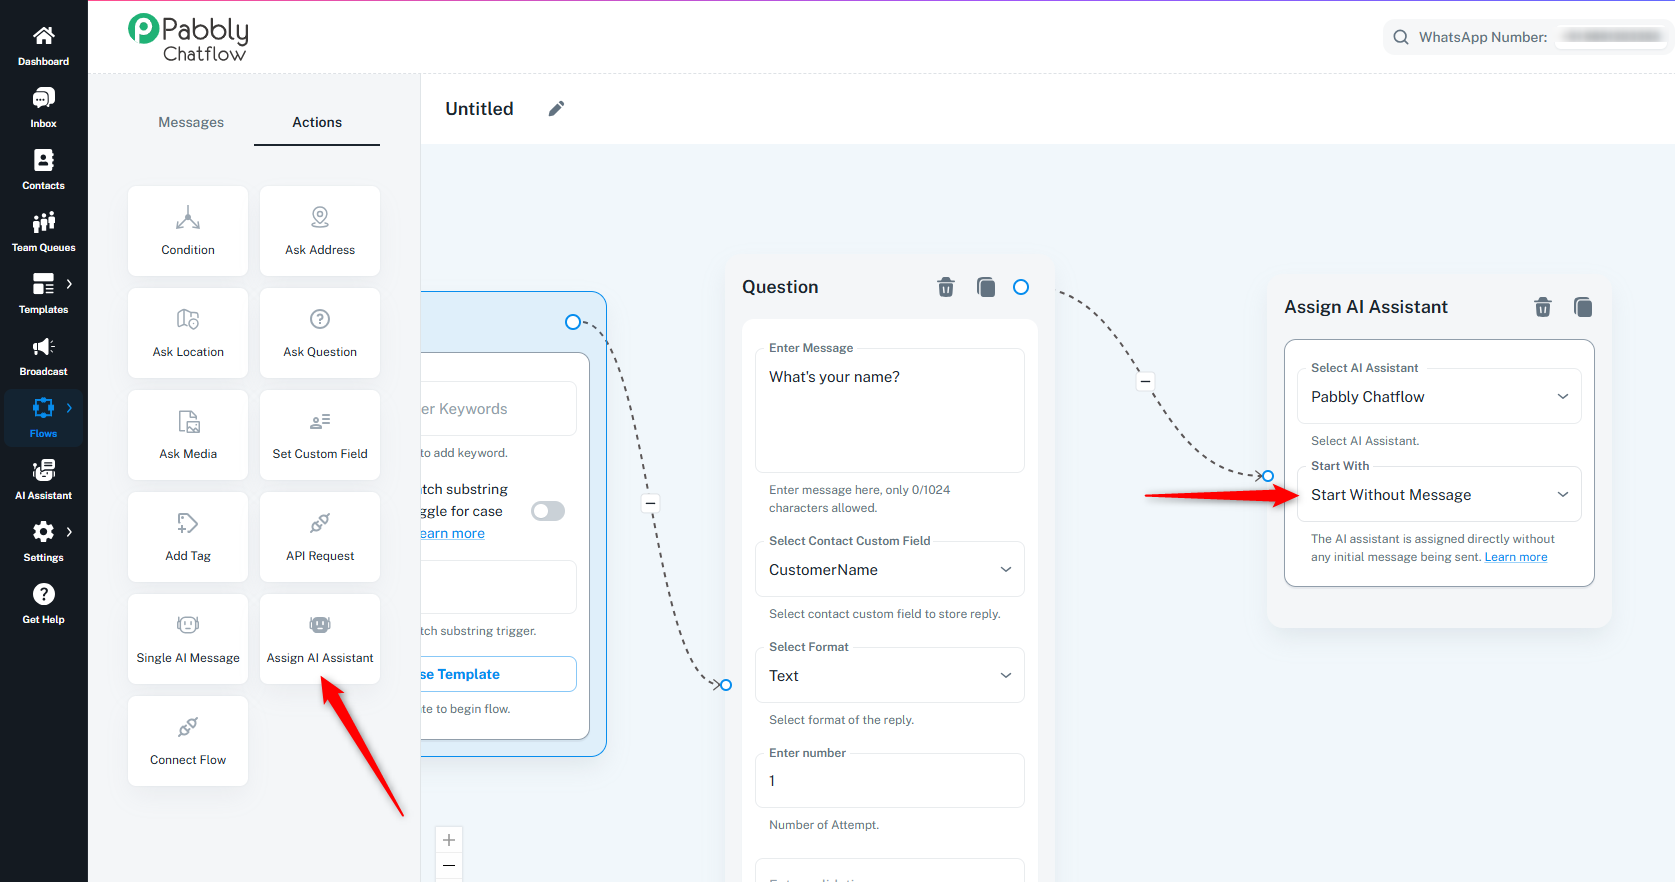
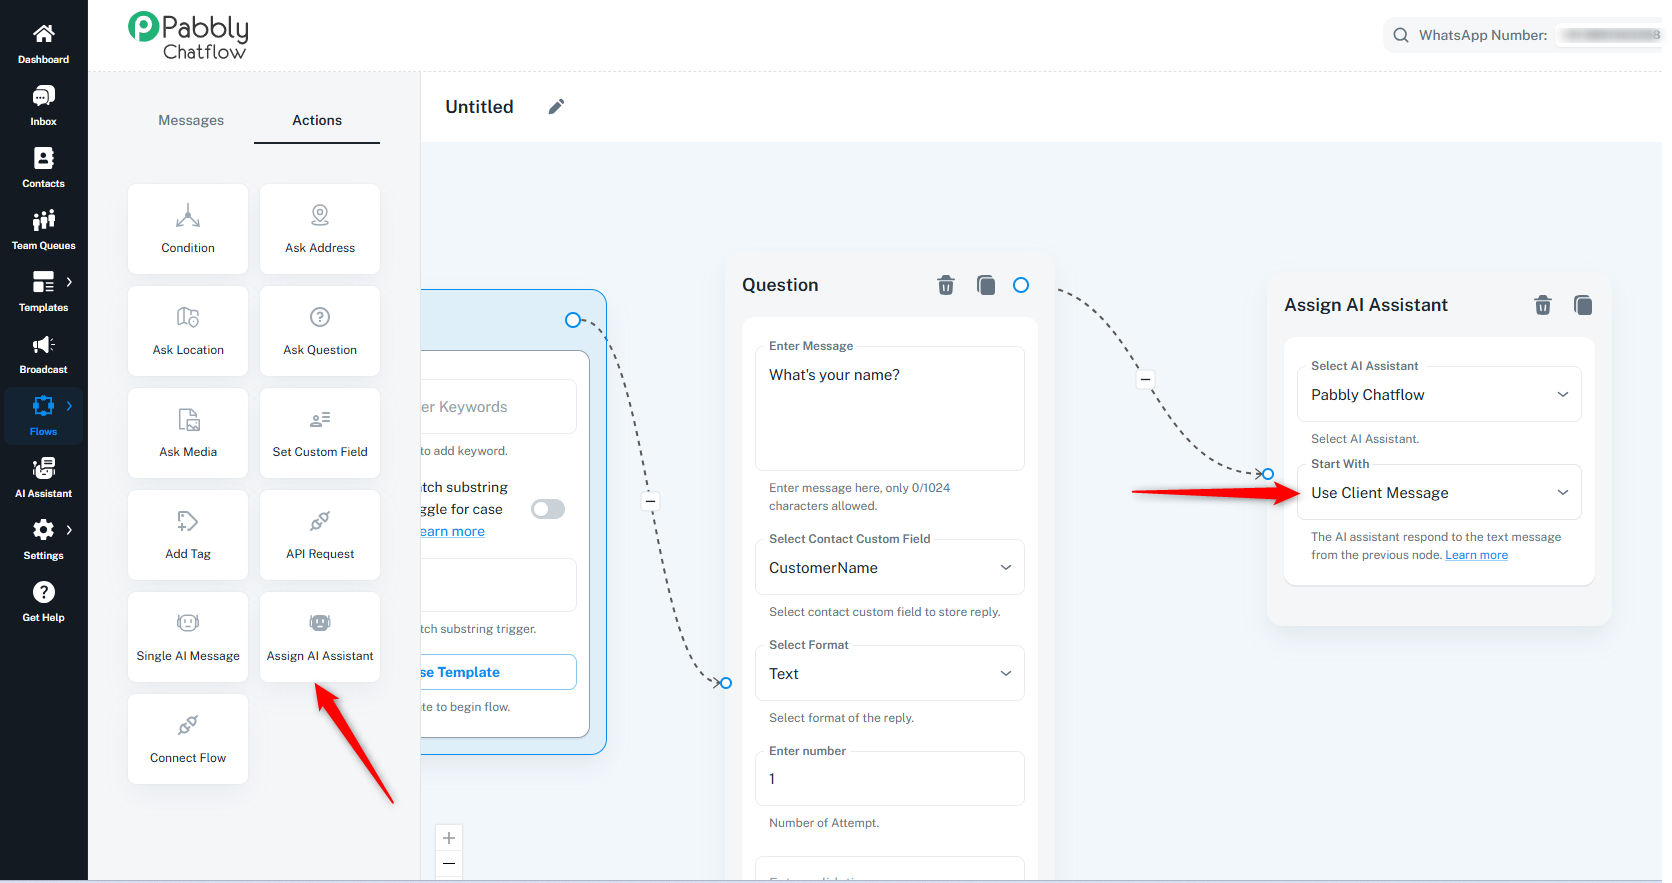
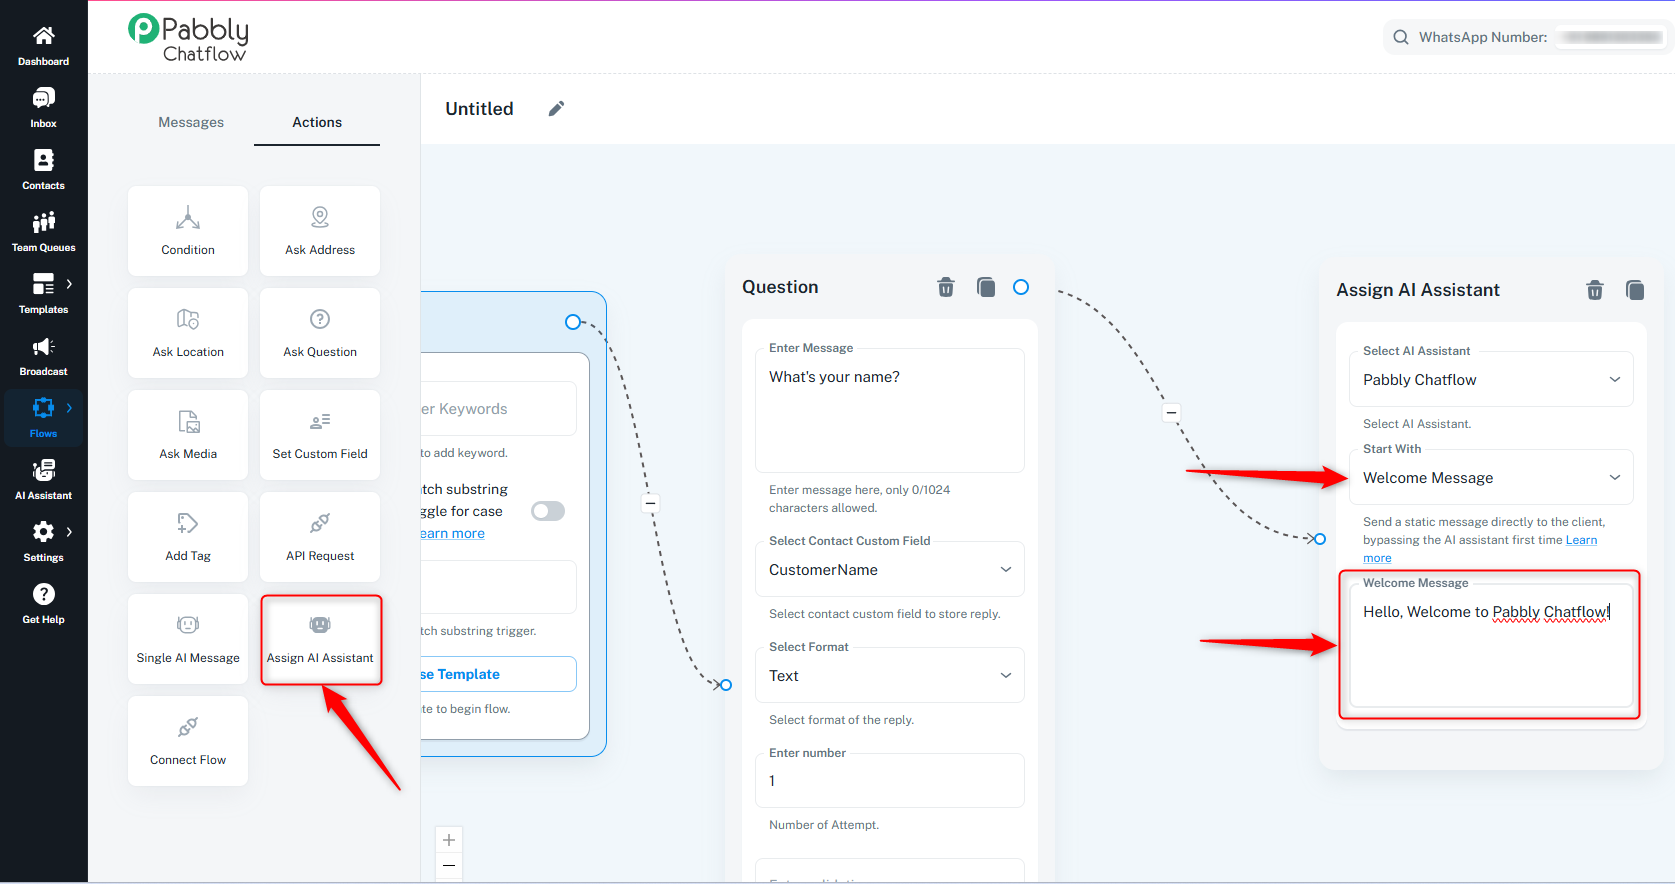
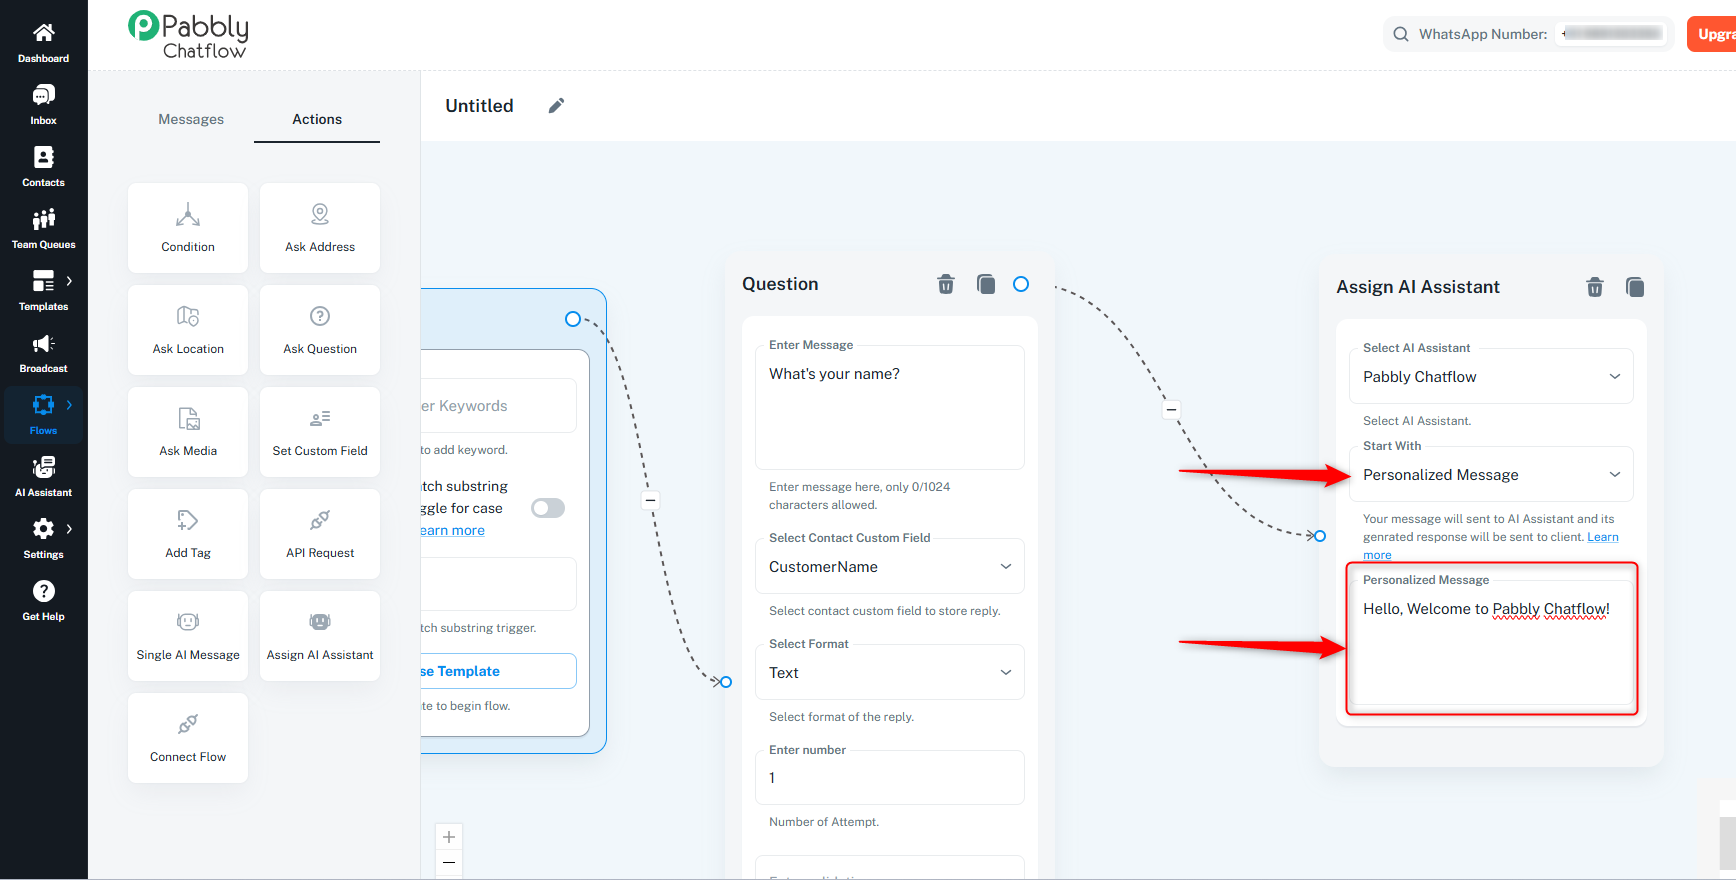
Once the AI assistant is assigned, it will automatically handle the conversation and provide relevant responses based on the flow.
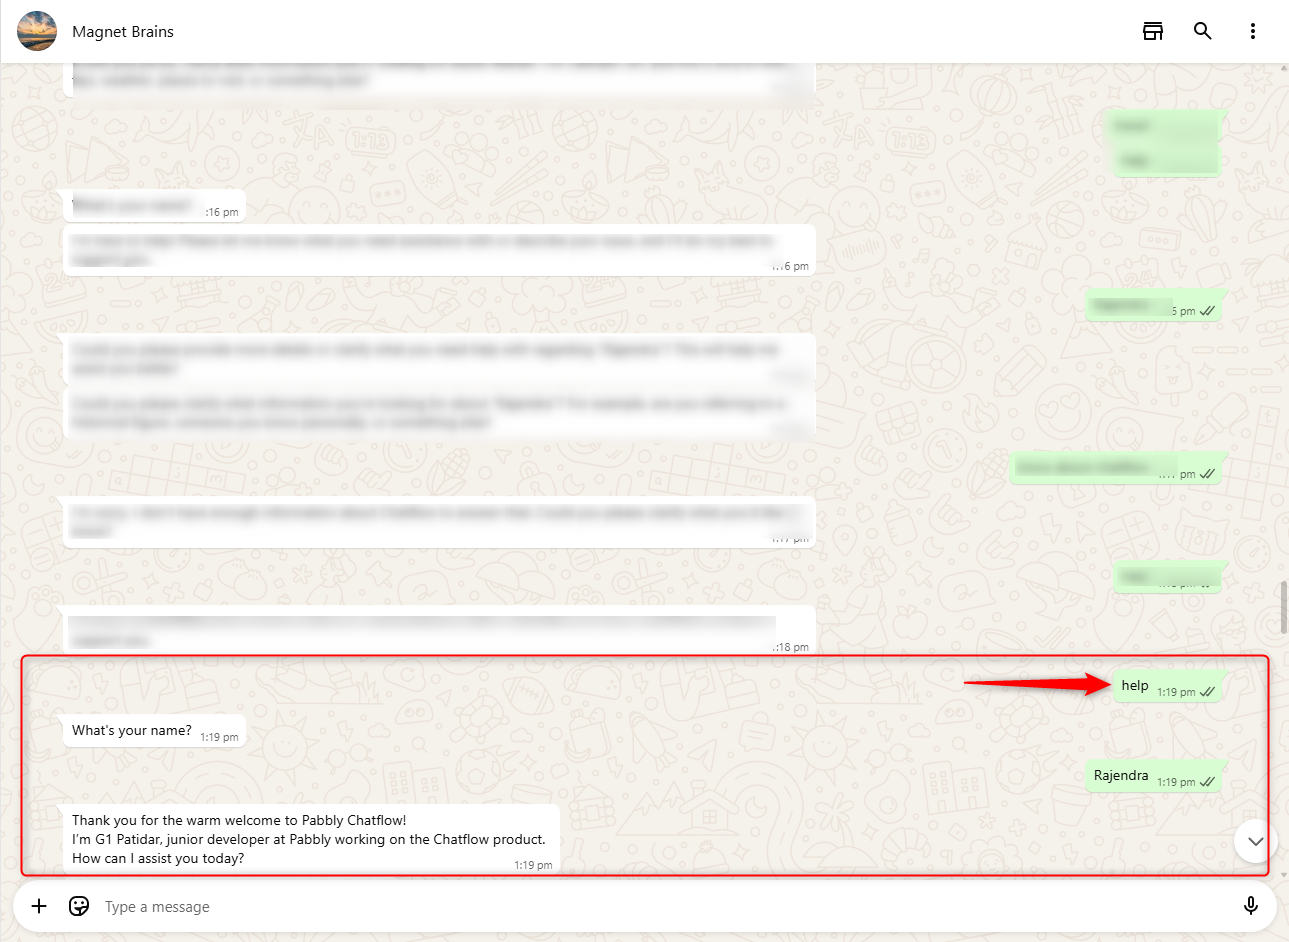
Trigger the Flow:
- The flow will be triggered when a user sends a message containing the defined keywords. The AI Assistant takes over the chat and replies to the user.
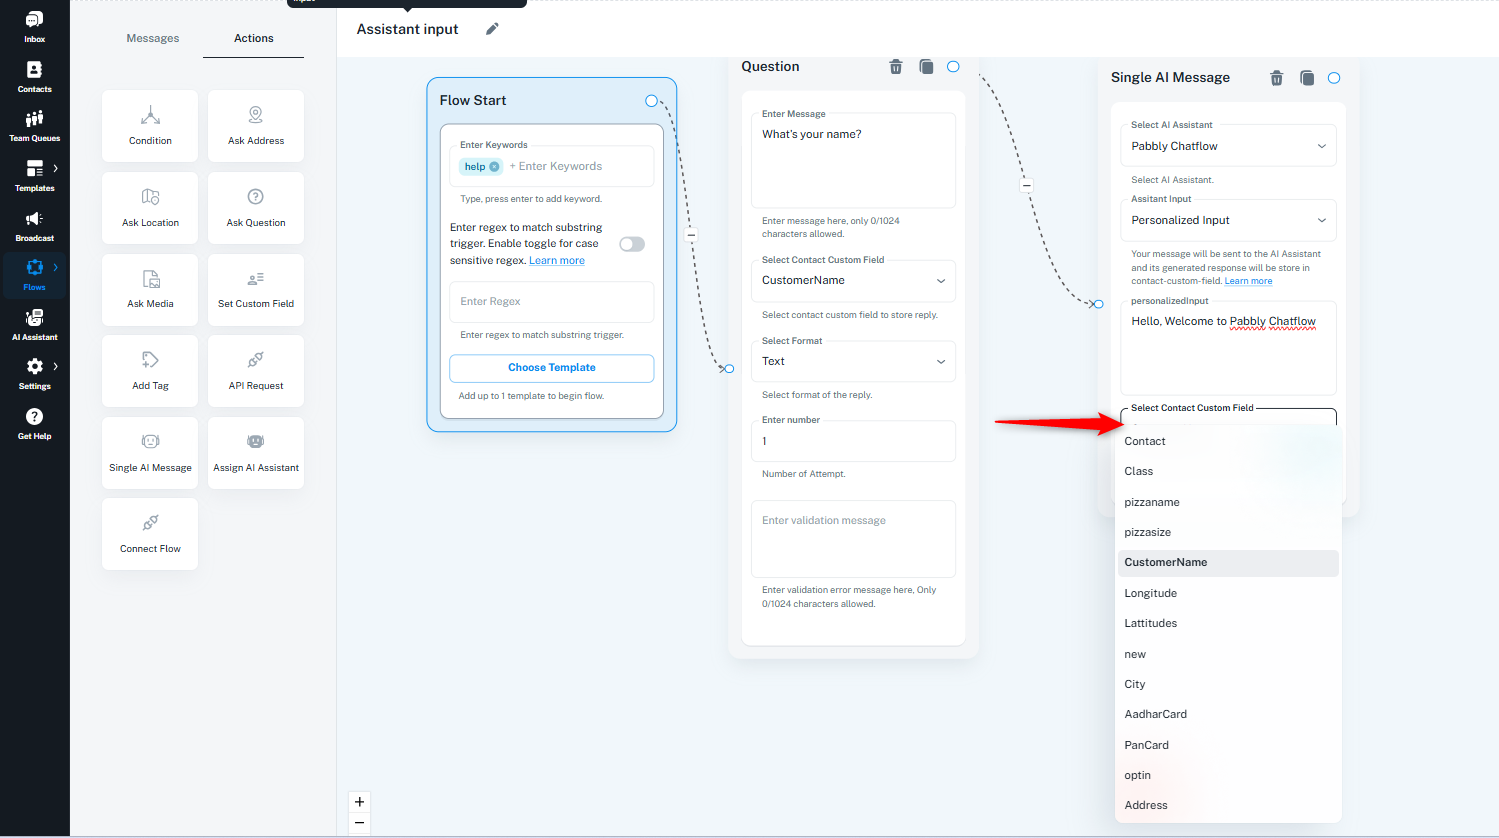
10. Single AI Message Action:
The AI captures the client's input (such as location or preferences), generates a personalized response based on that input, and then saves the AI-generated response in the selected contact custom field. This contact custom field can be used later in the flow to enable dynamic follow-ups or further personalized interactions."
Example: If a user provides a location, the AI generates a tailored response (e.g., service availability based on that location) and saves it in the contact's custom field, making it accessible for further use in the flow.
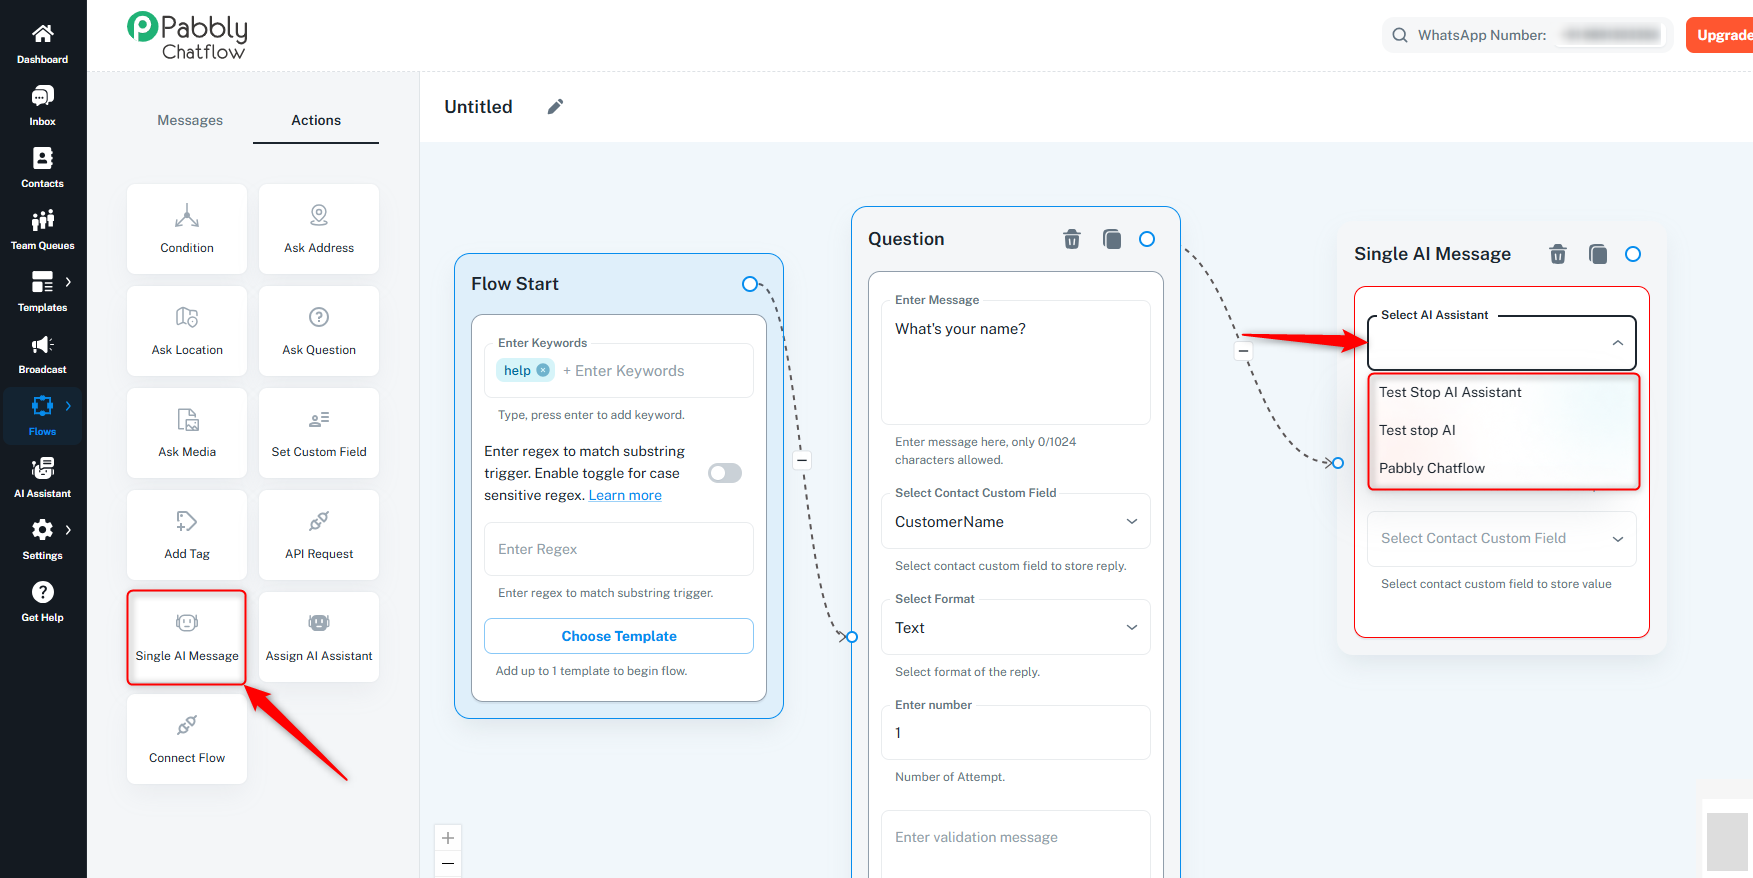
How to Use:
- Select AI Assistant: Choose the pre-configured AI assistant to send the response.
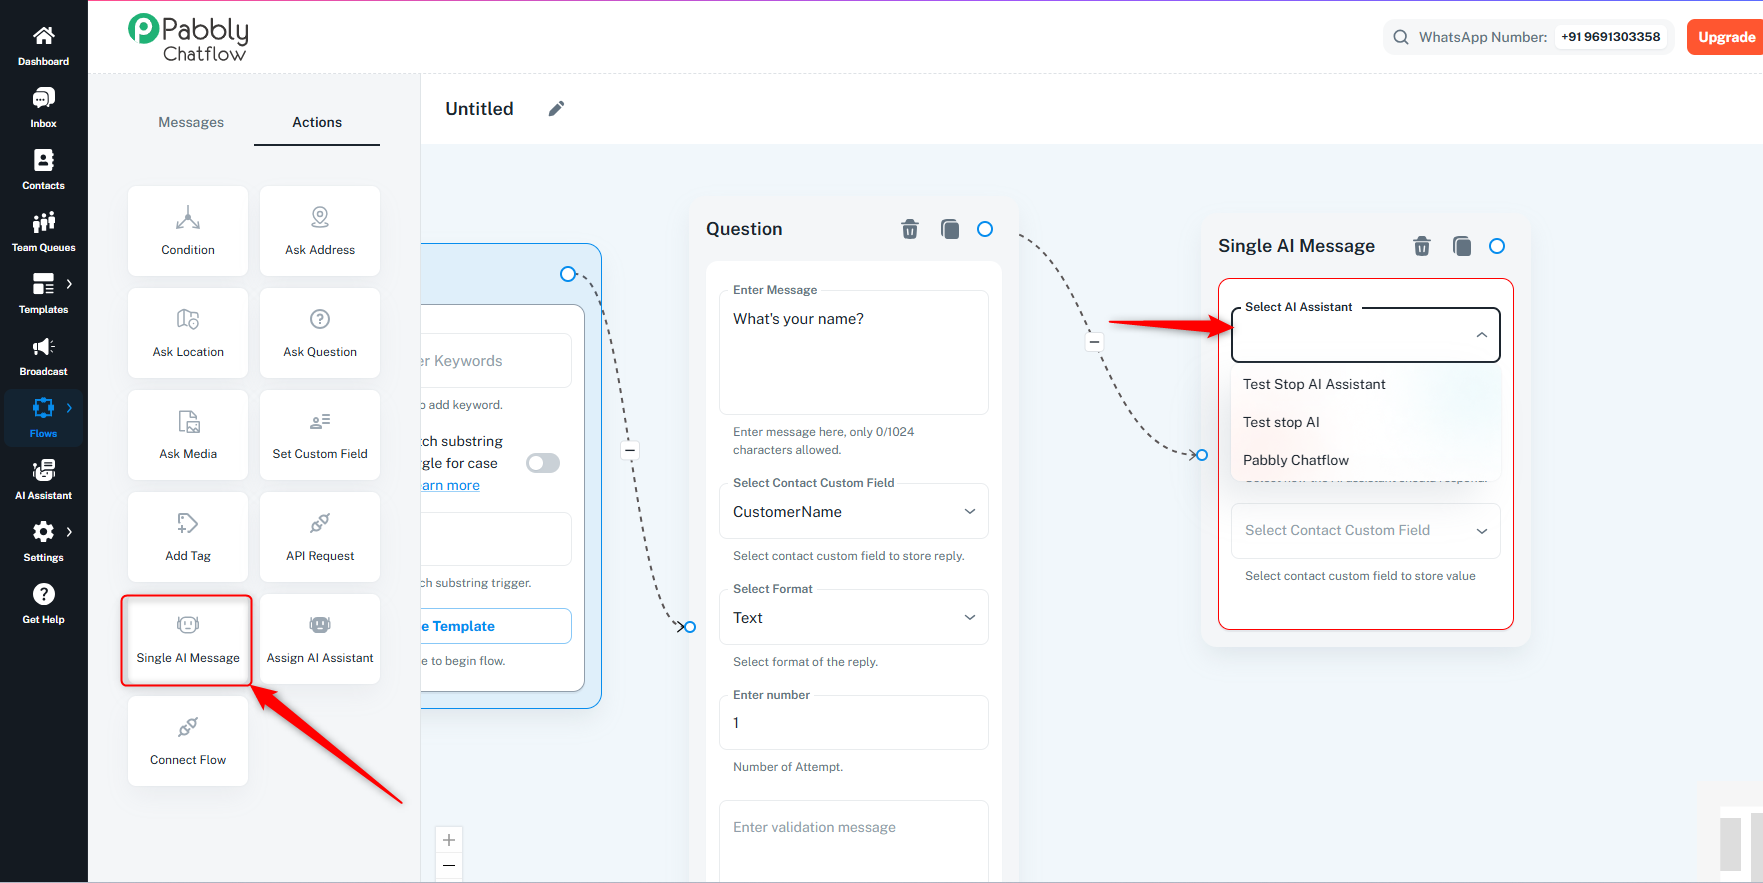
- Start With: The flow allows you to start the conversation in different modes:
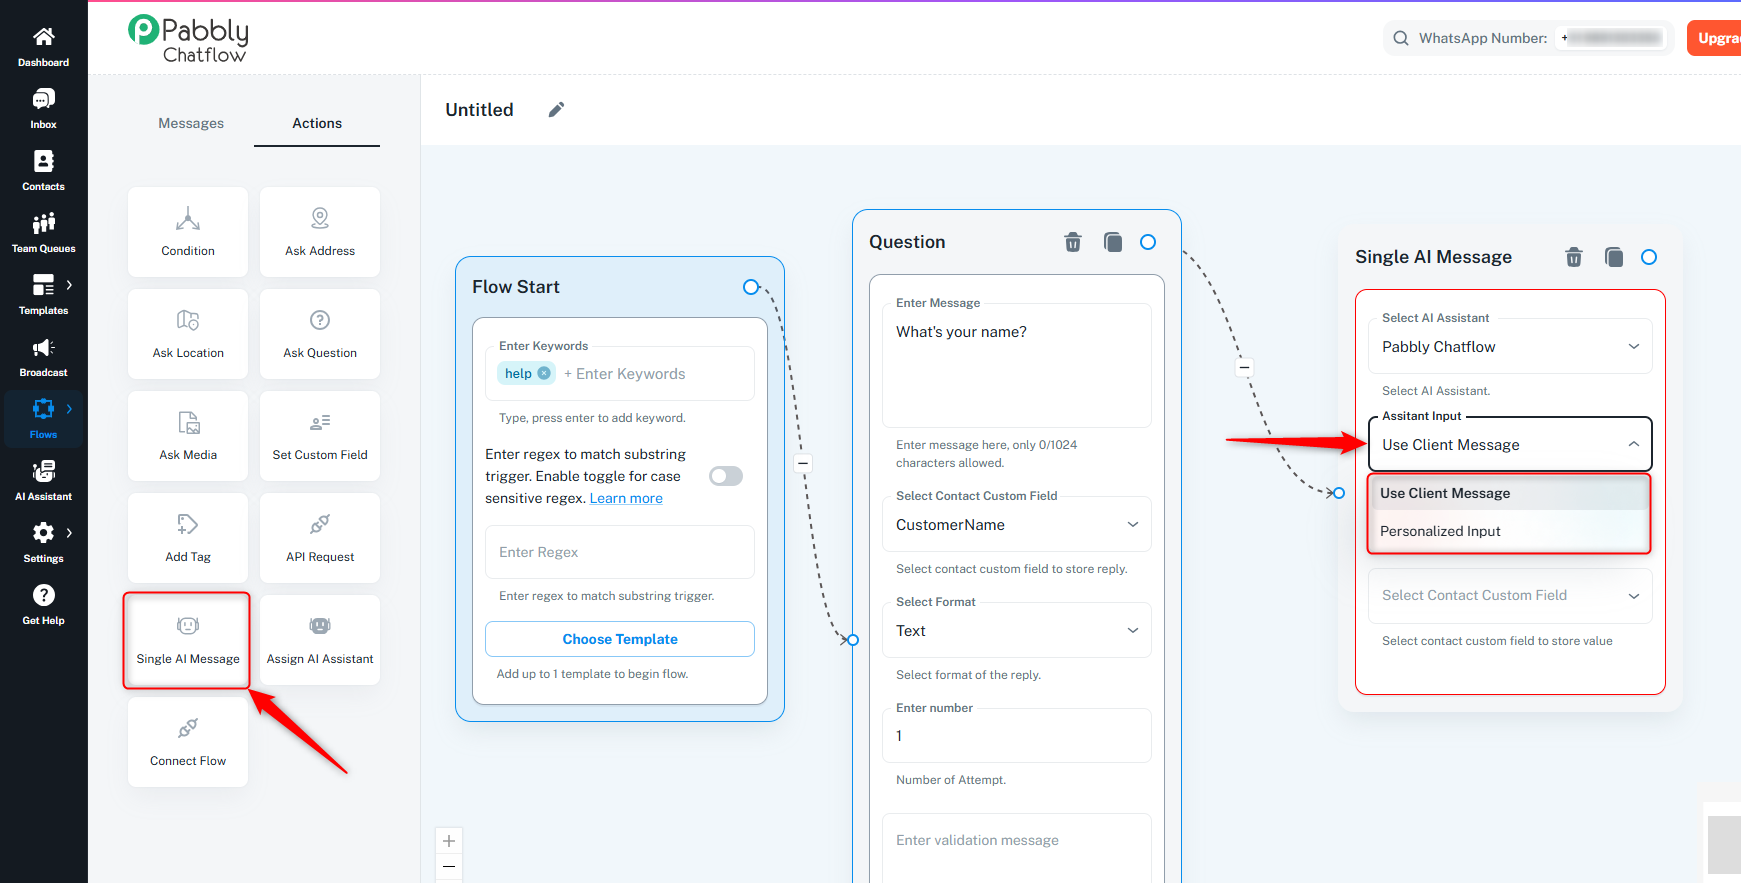
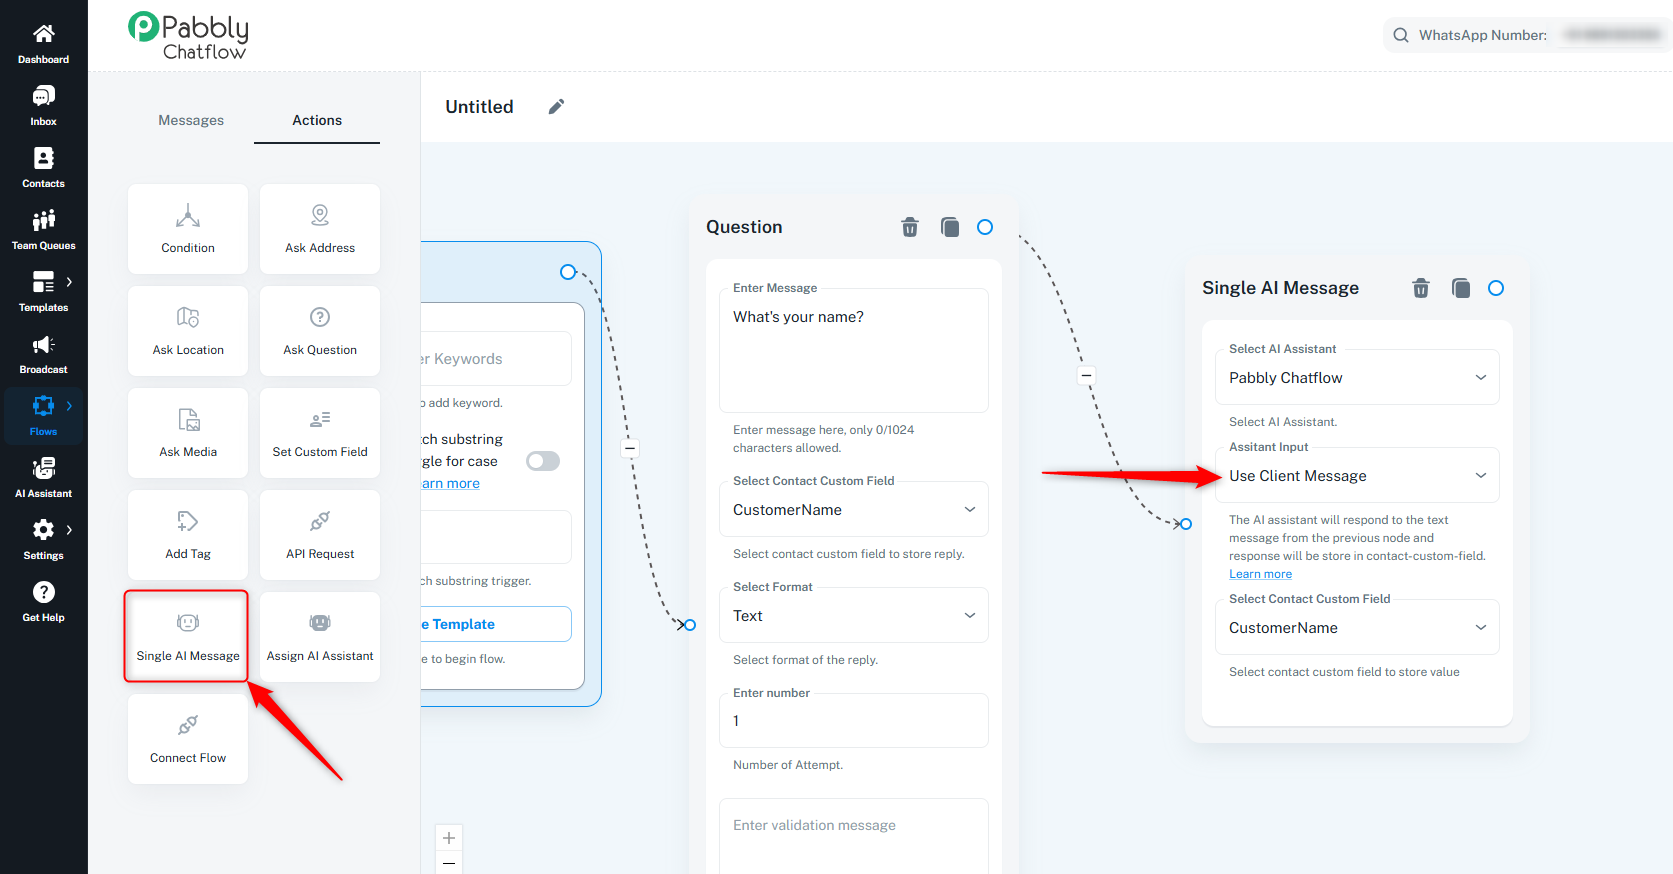
- Use Client Message: The AI assistant will respond to the text message from the previous message/action in the flow.
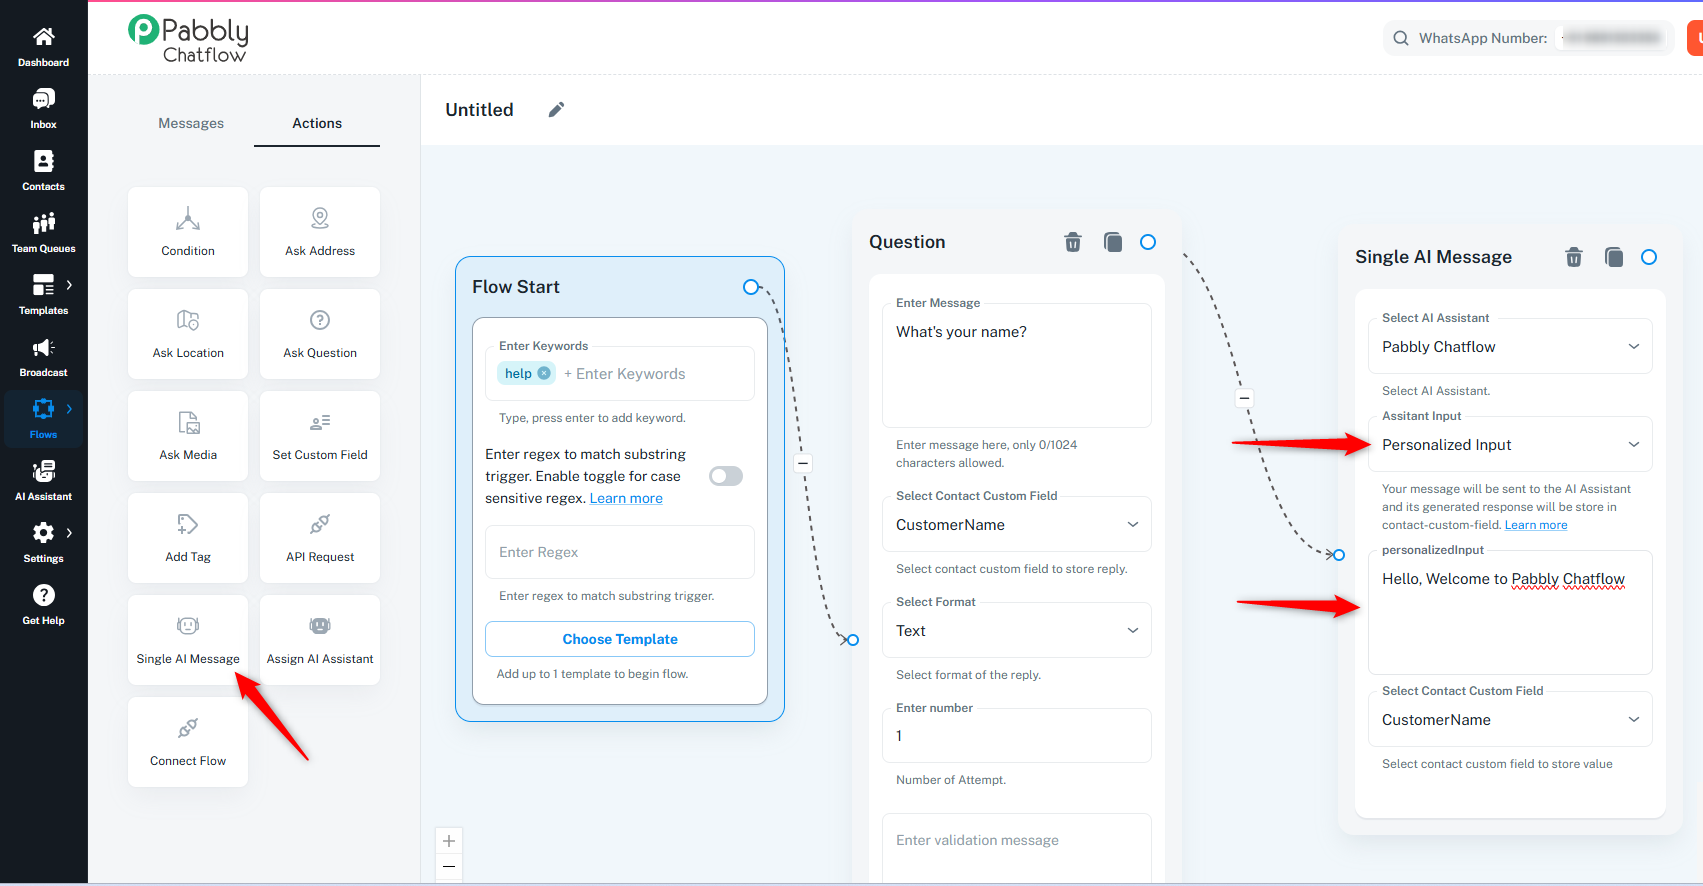
- Personalized Message: Your message will be sent to the AI assistant, and its generated response will be sent to the client.
- Store in Custom Field: Optionally, use the "Select Contact Custom Field" to save the AI assistant's response for future use, segmentation, or automation.
- Response Behavior: The AI assistant will send a single response to the user.
- Fallback for Media Messages:
- If the previous action involves media (e.g., image, video), and the AI assistant is unable to reply:
- If the Fallback Message toggle was enabled during the creation of the AI assistant, the fallback message will be sent.
- If the Fallback Message toggle was not enabled, the system will send a default response: "Sorry, I can't respond right now. Please try again later."
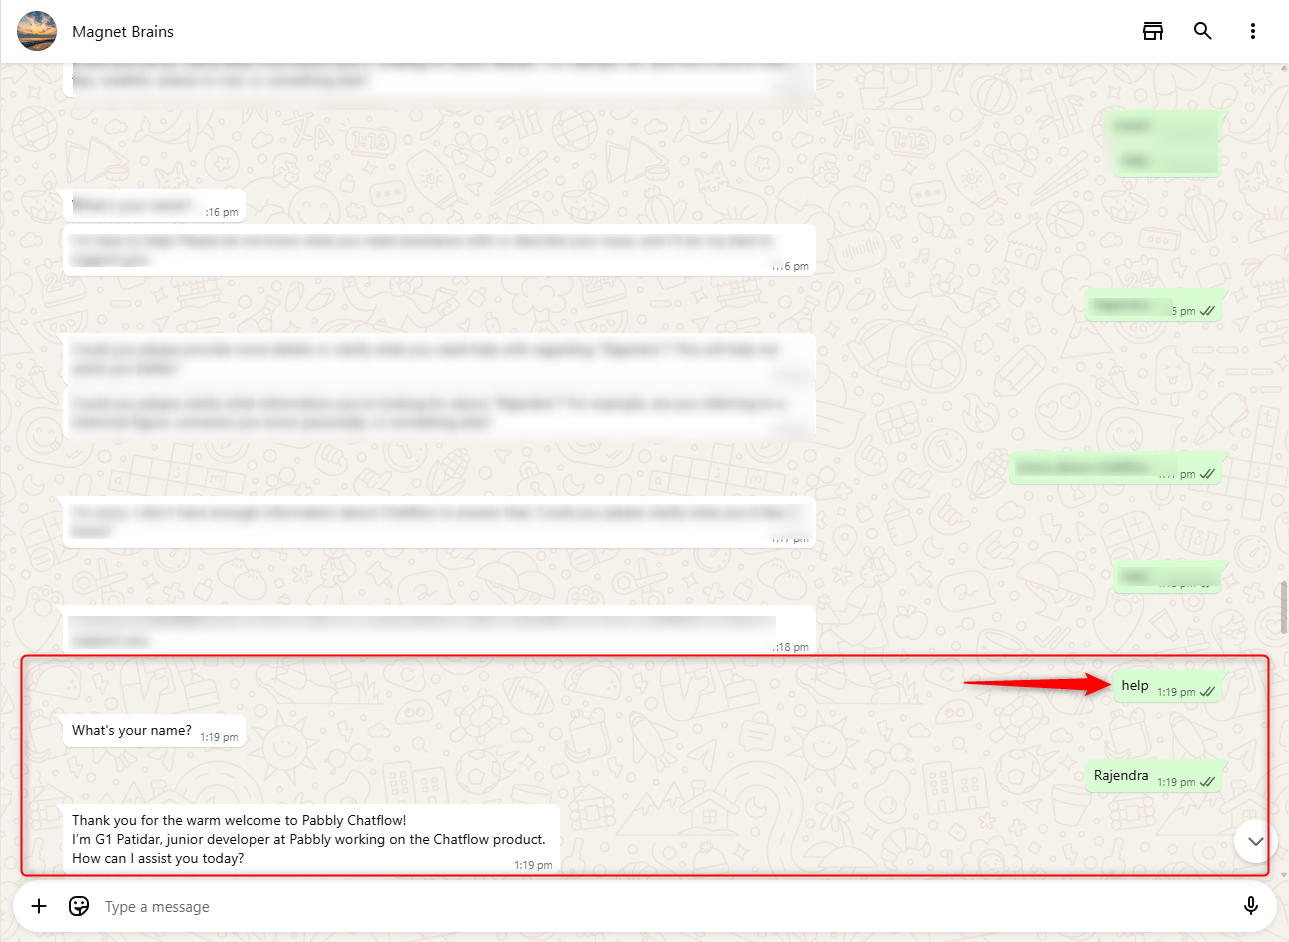
Trigger the Flow:
- The flow will be triggered when a user sends a message containing the defined keywords.
11.Delay Action
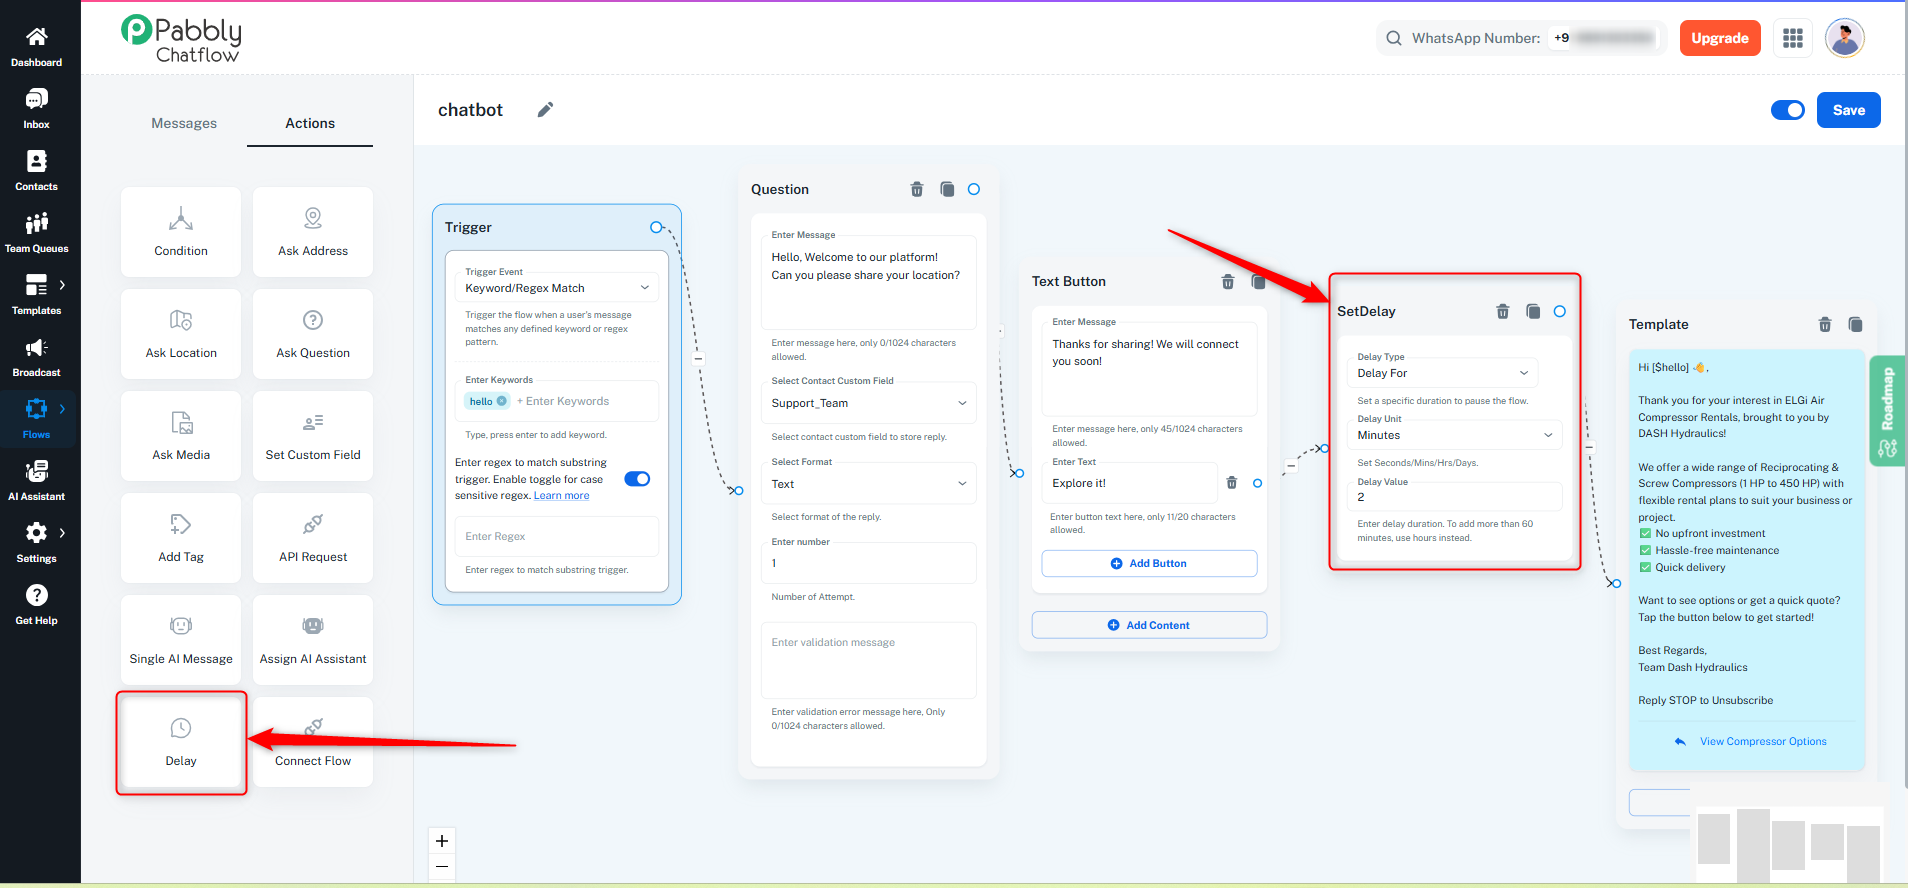
The Delay action allows you to introduce a delay in the flow before the next action is triggered. This feature helps to manage the timing of responses and actions, ensuring the flow happens at the right moment.
-
Delay For: Delay the flow for a specific amount of time (in minutes, hours, etc.).
How it Works: You define the amount of time to wait (seconds, minutes, hours, or days), and the flow pauses for that exact period.
Example: If you choose Delay For 10 minutes, the flow will stop for 10 minutes, then resume after the delay is over.
Use Case: Ideal when you need to wait a specific amount of time before the next action triggers (e.g., waiting 5 minutes before sending a follow-up message).
How to use
- Drag the Delay block where you want to pause.
- Choose Delay For, pick unit (seconds/minutes/hours/days) and enter the number.
- Connect the previous action → Delay → next action.
- Save.
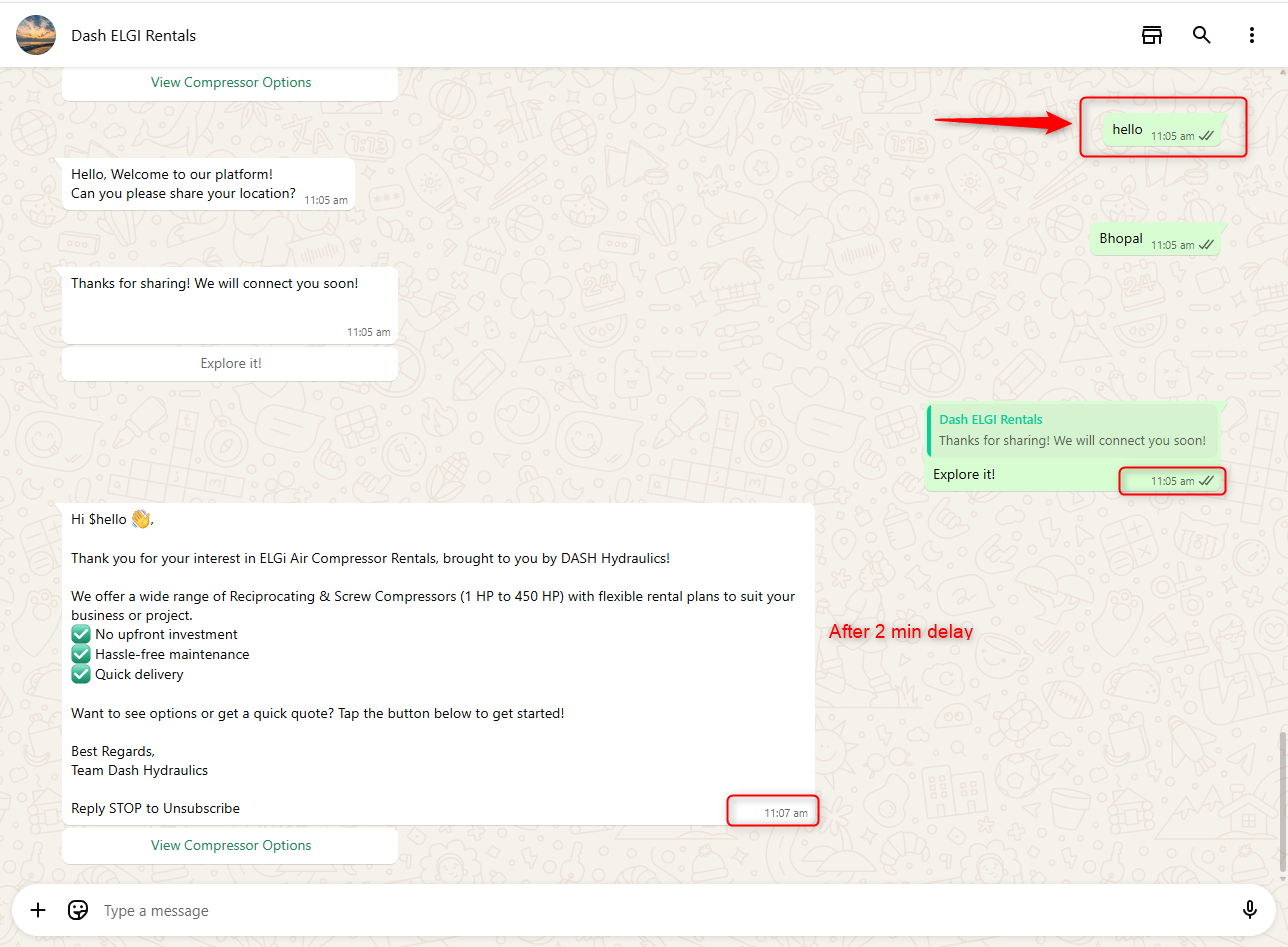
  ### What happens when the flow runs
  * The flow runs until it reaches the **Delay** block.
  * It pauses for the time you set.
  * After that time ends, the same flow continues and runs the next action automatically.
-
Delay Until: Delay the flow until a specific time (e.g., a specific date or hour).
How it Works: You set a specific date and time (e.g., 09/10/2025 03:00 PM), and the flow will wait until that moment before continuing to the next action.
Example: If you set Delay Until 03:00 PM, the flow will pause until exactly 03:00 PM and then proceed.
Use Case: Useful for scheduling actions at a precise future time, like sending emails at a specific hour of the day.
How to use
- Drag the Delay block where you want to pause.
- Choose Delay Until, Set the exact date and time (e.g.,
09/10/2025 03:00 PM).
- Connect previous → Delay → next and save.
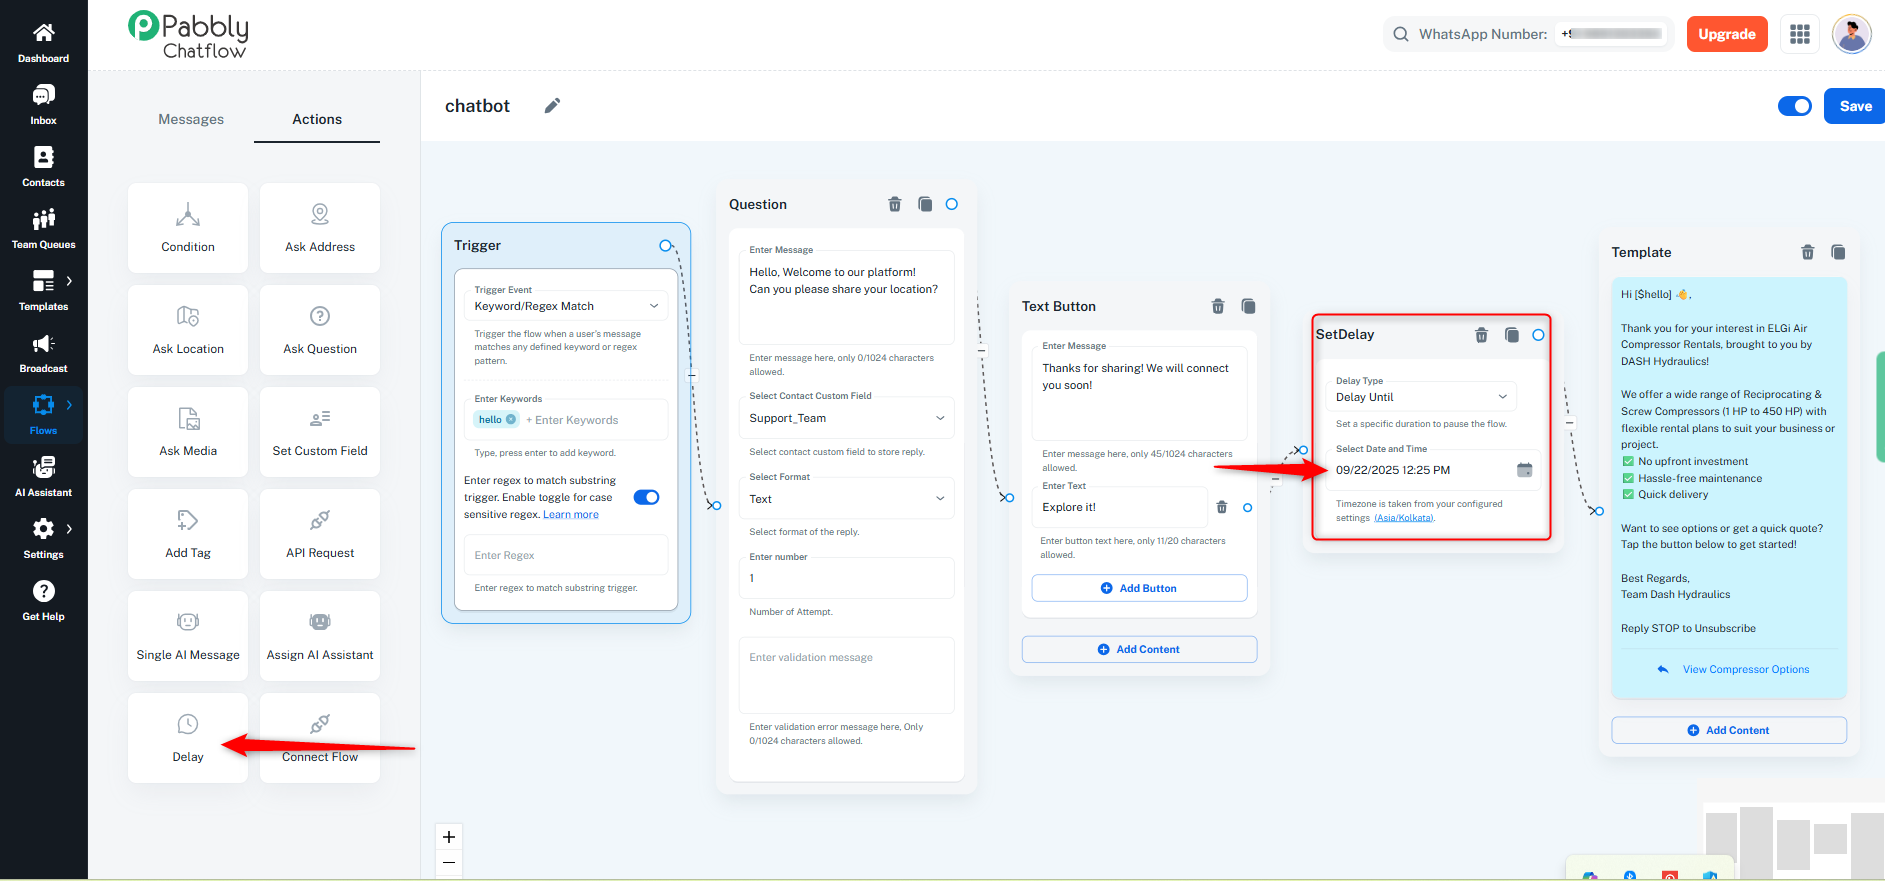
What happens when the flow runs
- The flow pauses and waits until the exact date/time you set.
- At that moment the same flow resumes and runs the next action automatically.
-
Delay Until a Specific Weekday: Delay the flow until a particular weekday (e.g., next Monday) and optionally at a specified time on that day.
How it Works: You choose a weekday (e.g., Monday) and set the time (e.g., 09:00 AM) to resume the flow on that day.
Example: If you choose Delay Until next Monday at 09:00 AM, the flow will wait until Monday at 9 AM before proceeding with the next action.
Use Case: Ideal for scenarios where actions should happen only on specific days, like starting a weekly campaign or follow-up reminders on certain weekdays.
How to use
- Drag the Delay block where you want to pause.
- Choose Delay Until a Specific Weekday, Pick the weekday (e.g., Monday) and time (e.g.,
09:00 AM).
- Connect previous → Delay → next and save.
What happens when the flow runs
- The flow waits until the chosen weekday at the chosen time.
- When that day/time arrives the flow resumes and runs the next action automatically.
11. Assign Team Member Action
The Assign Team Member Action allows you to automatically assign a chat conversation to a team member when a contact reaches this step in the flow. This helps ensure that conversations are handled by the right person without manual effort.
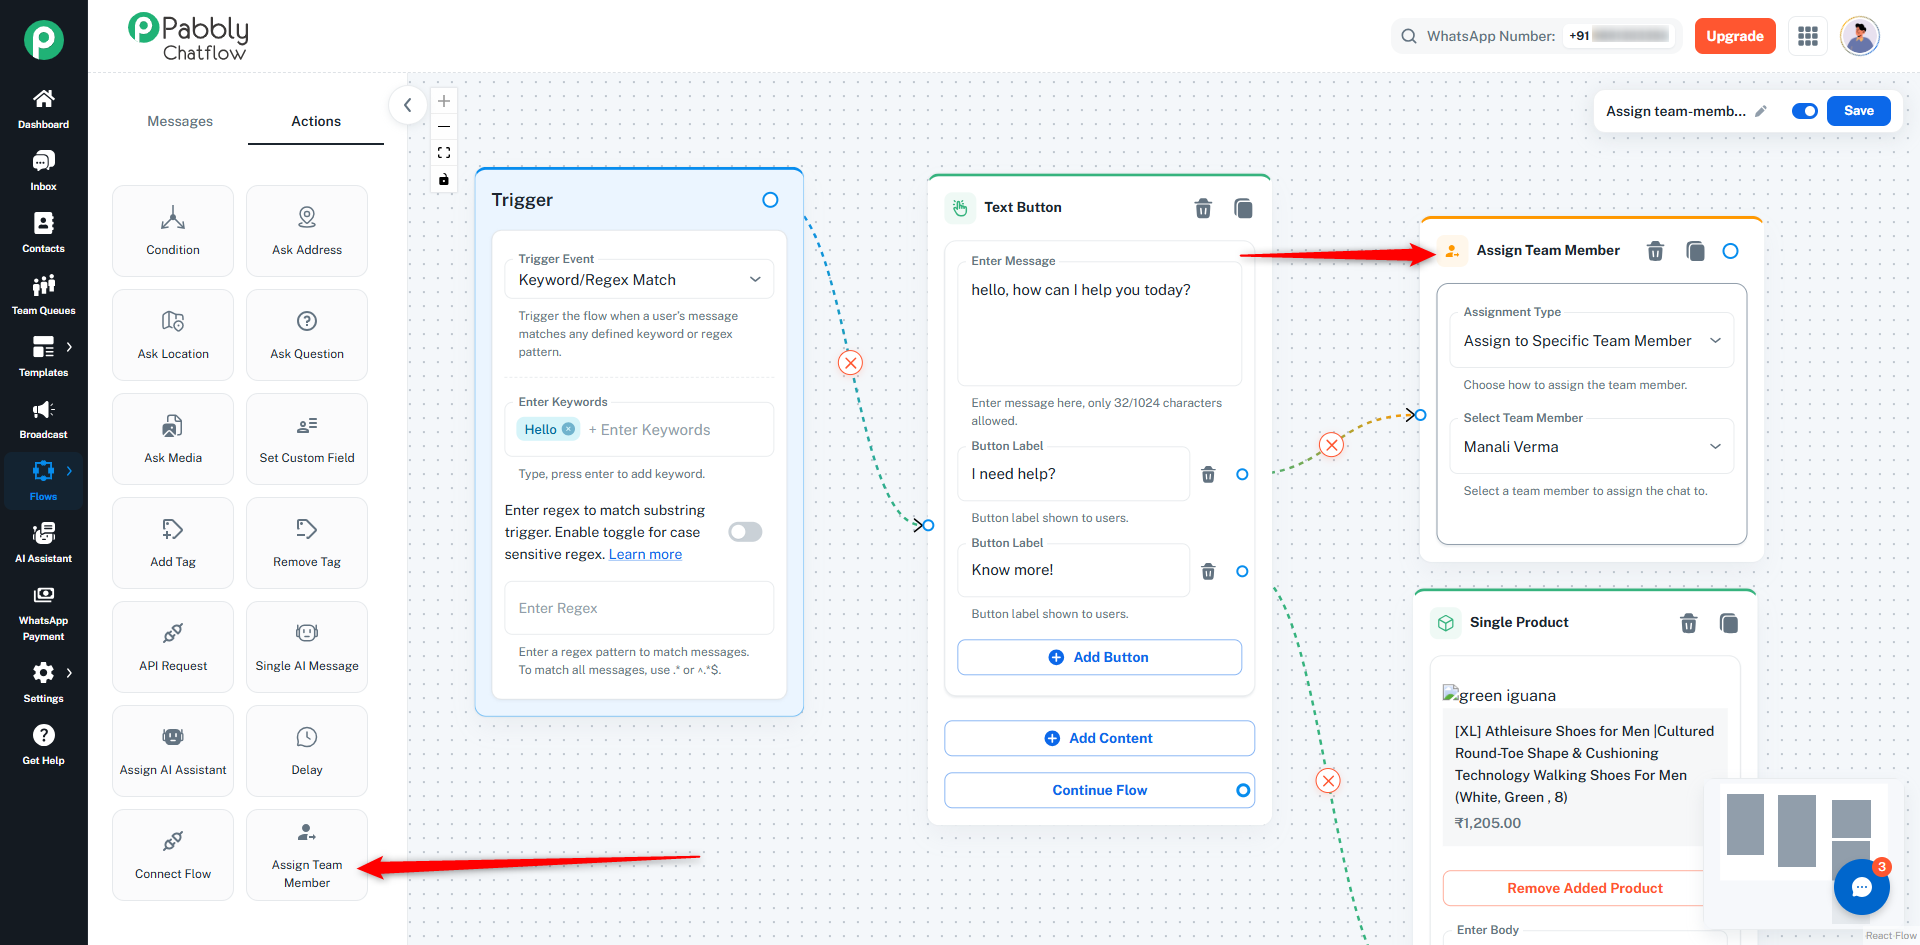
How to Use
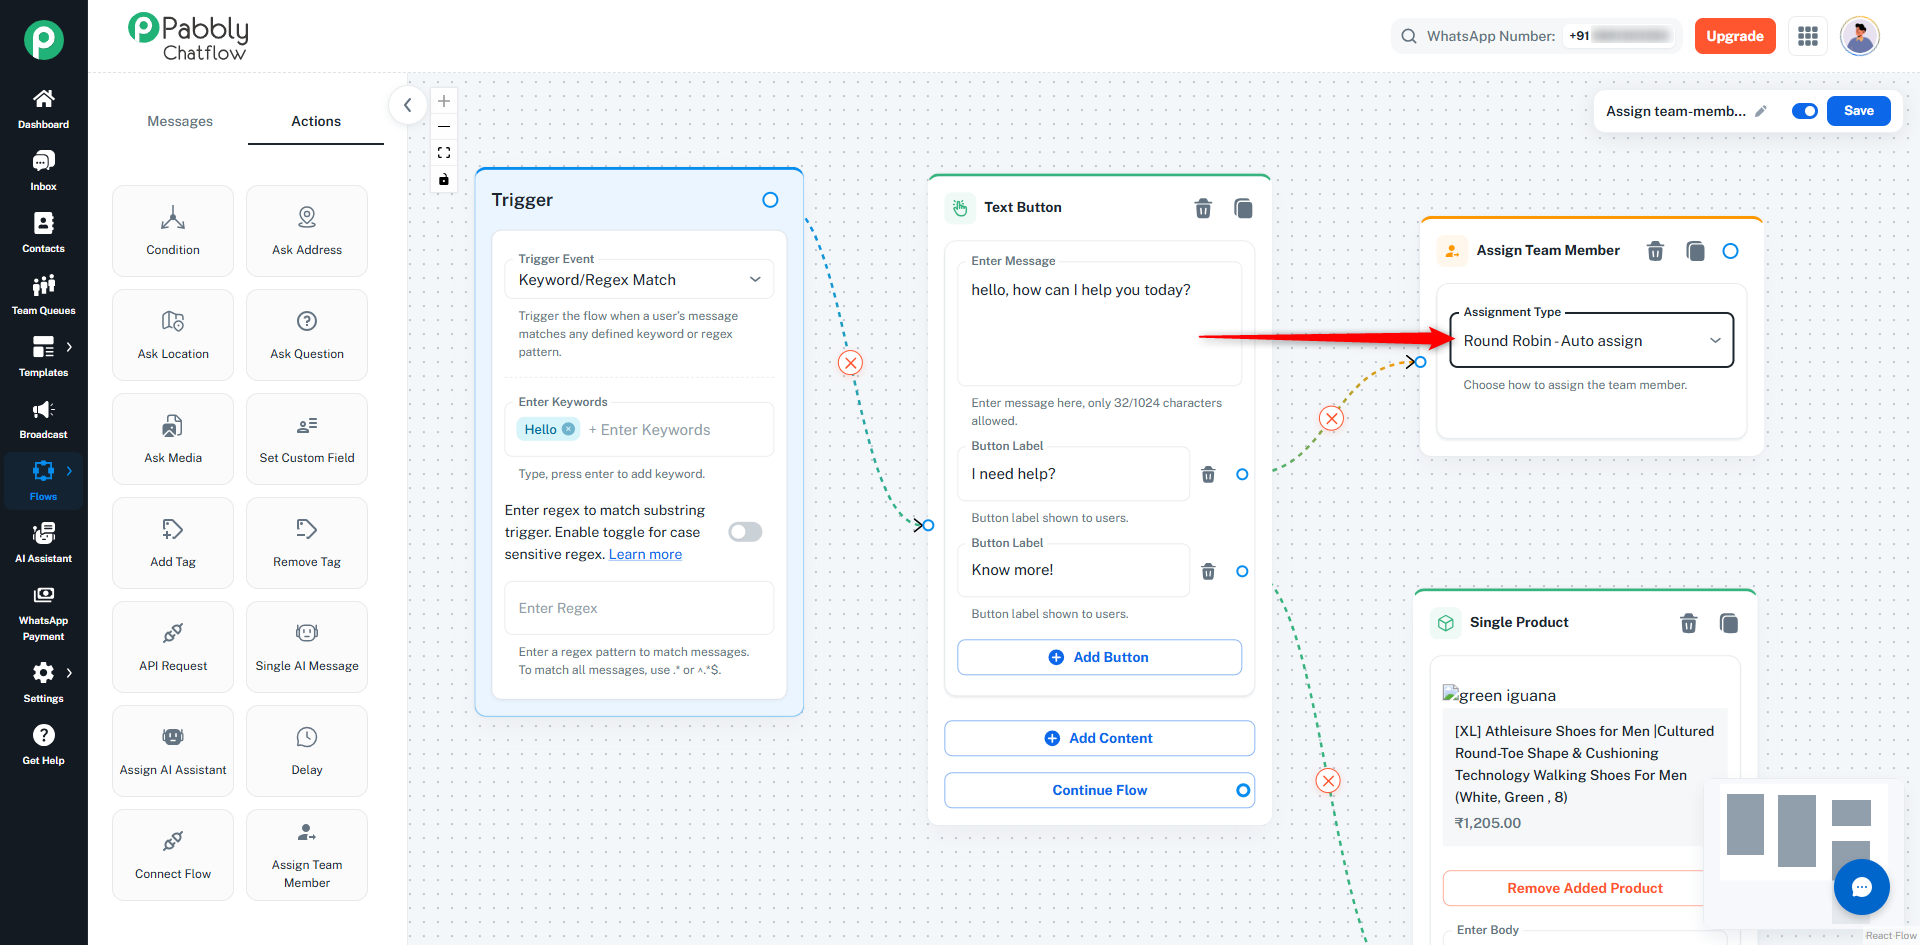
Select Assignment Type:
Choose how you want chats to be assigned:
- Assign to Specific Team Member
Assigns every chat to one selected team member
- Round Robin - Auto Assign
Automatically distributes chats evenly among all available team members
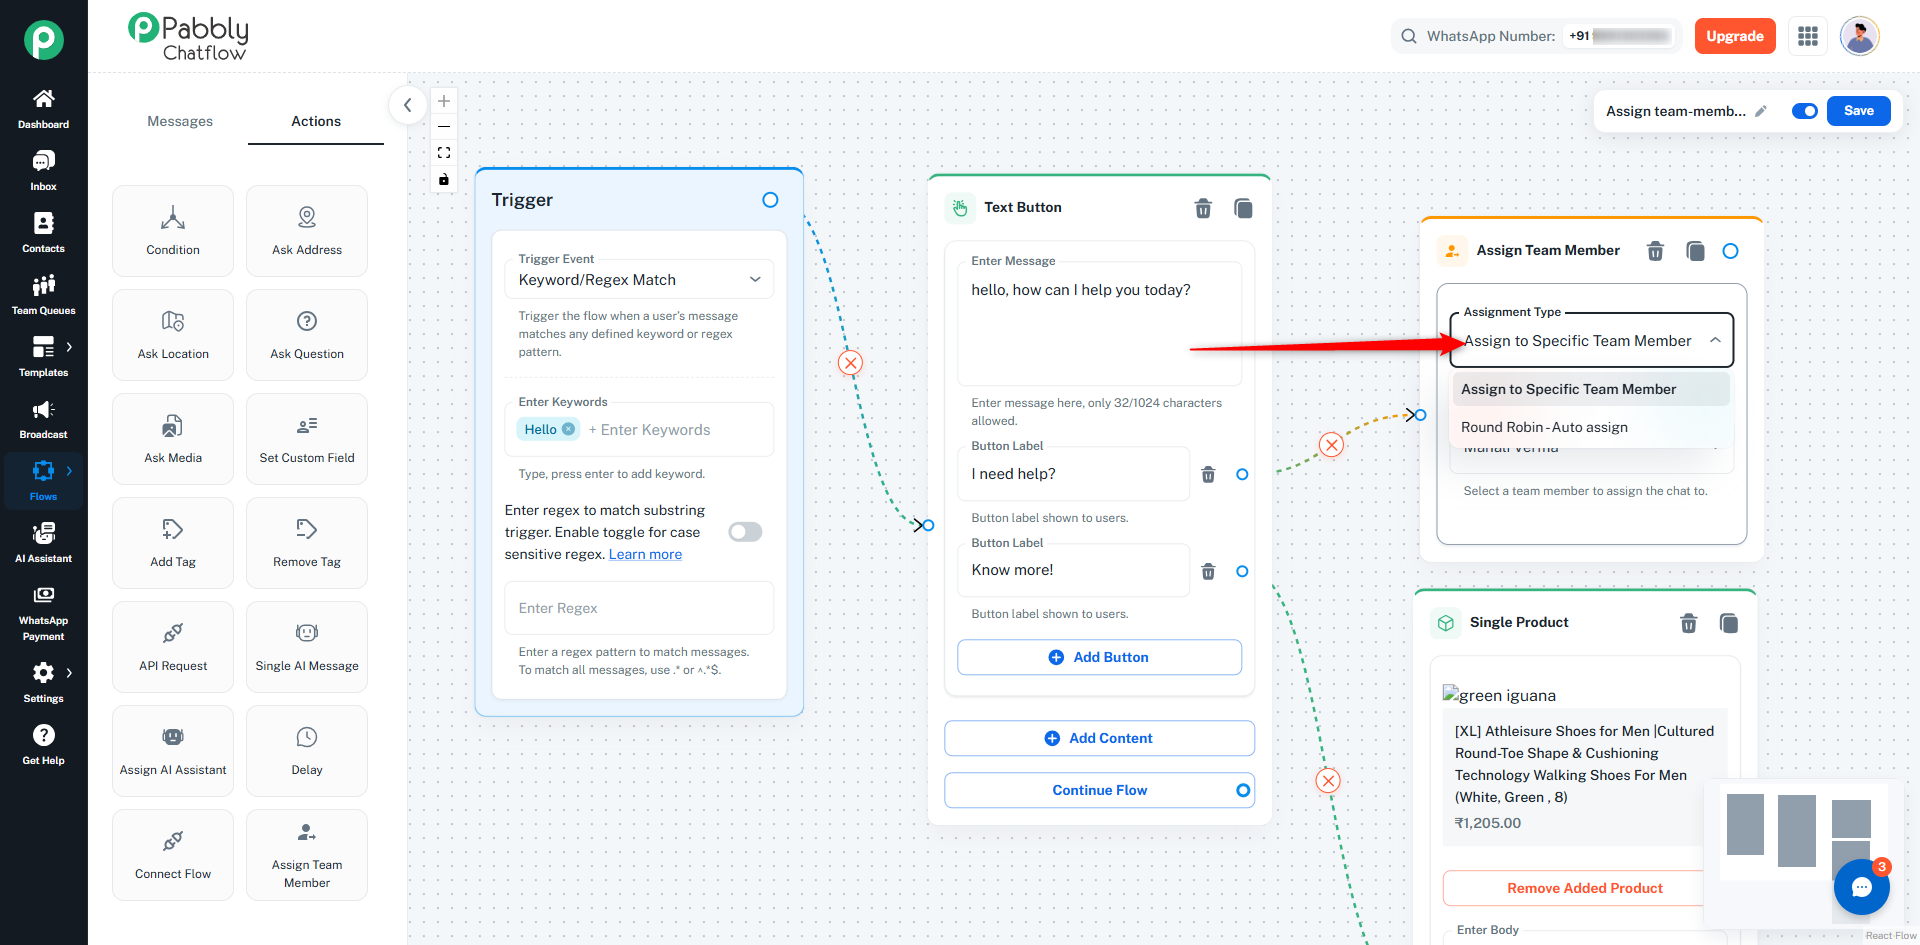
Direct Assignment Configuration
If you select Assign to Specific Team Member:
- A dropdown will appear
- Select a team member from the list
- The list includes all team members added in your account
👉 If you switch to Round Robin, the selected team member is automatically cleared
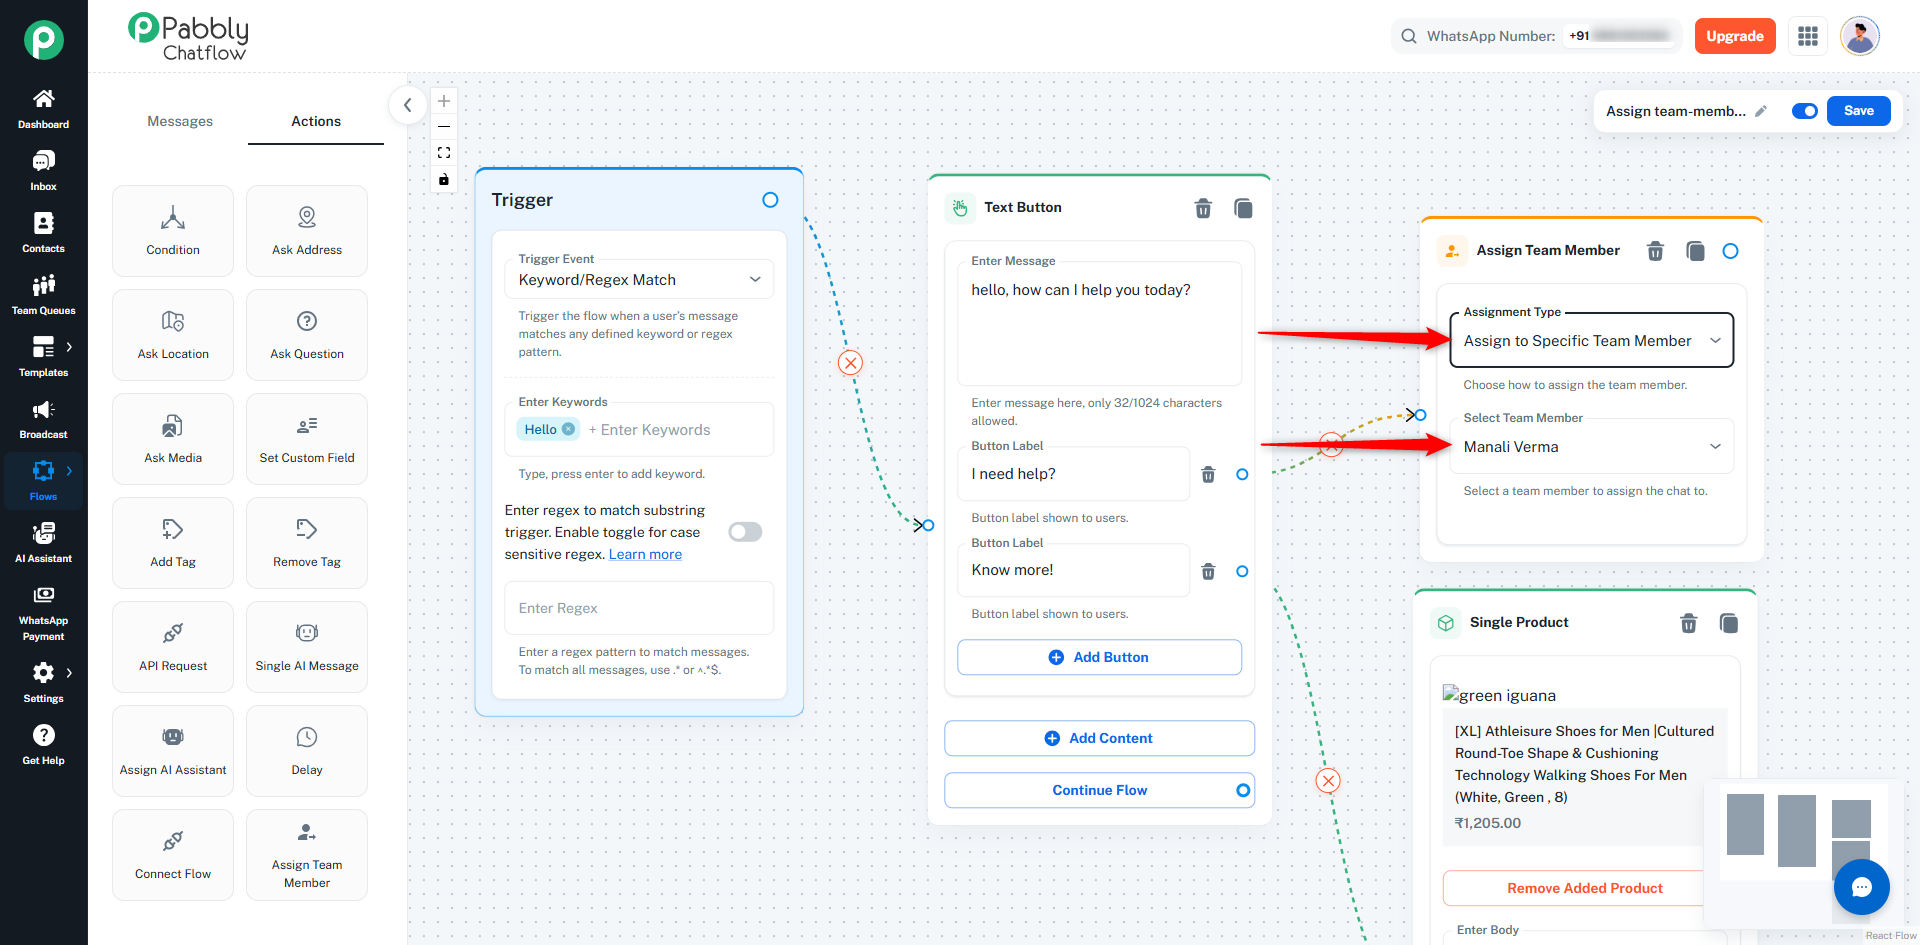
Validation Rules
- Selecting an assignment type is mandatory
- For Direct Assignment, selecting a team member is required
- Round Robin does not require any additional selection
How It Works
- When a contact reaches this action in the flow:
→ The chat is instantly assigned based on your configuration
- This action:
- ✅ Assigns the conversation
- ❌ Does NOT send any message to the user
👉 To send a message after assignment, connect a message node next
When to Use
- Direct Assignment:
Use when a specific person should handle certain conversations
(Example: Billing queries → Billing specialist)
- Round Robin:
Use when you want to distribute chats evenly across your team
(Example: Support chats → All agents)
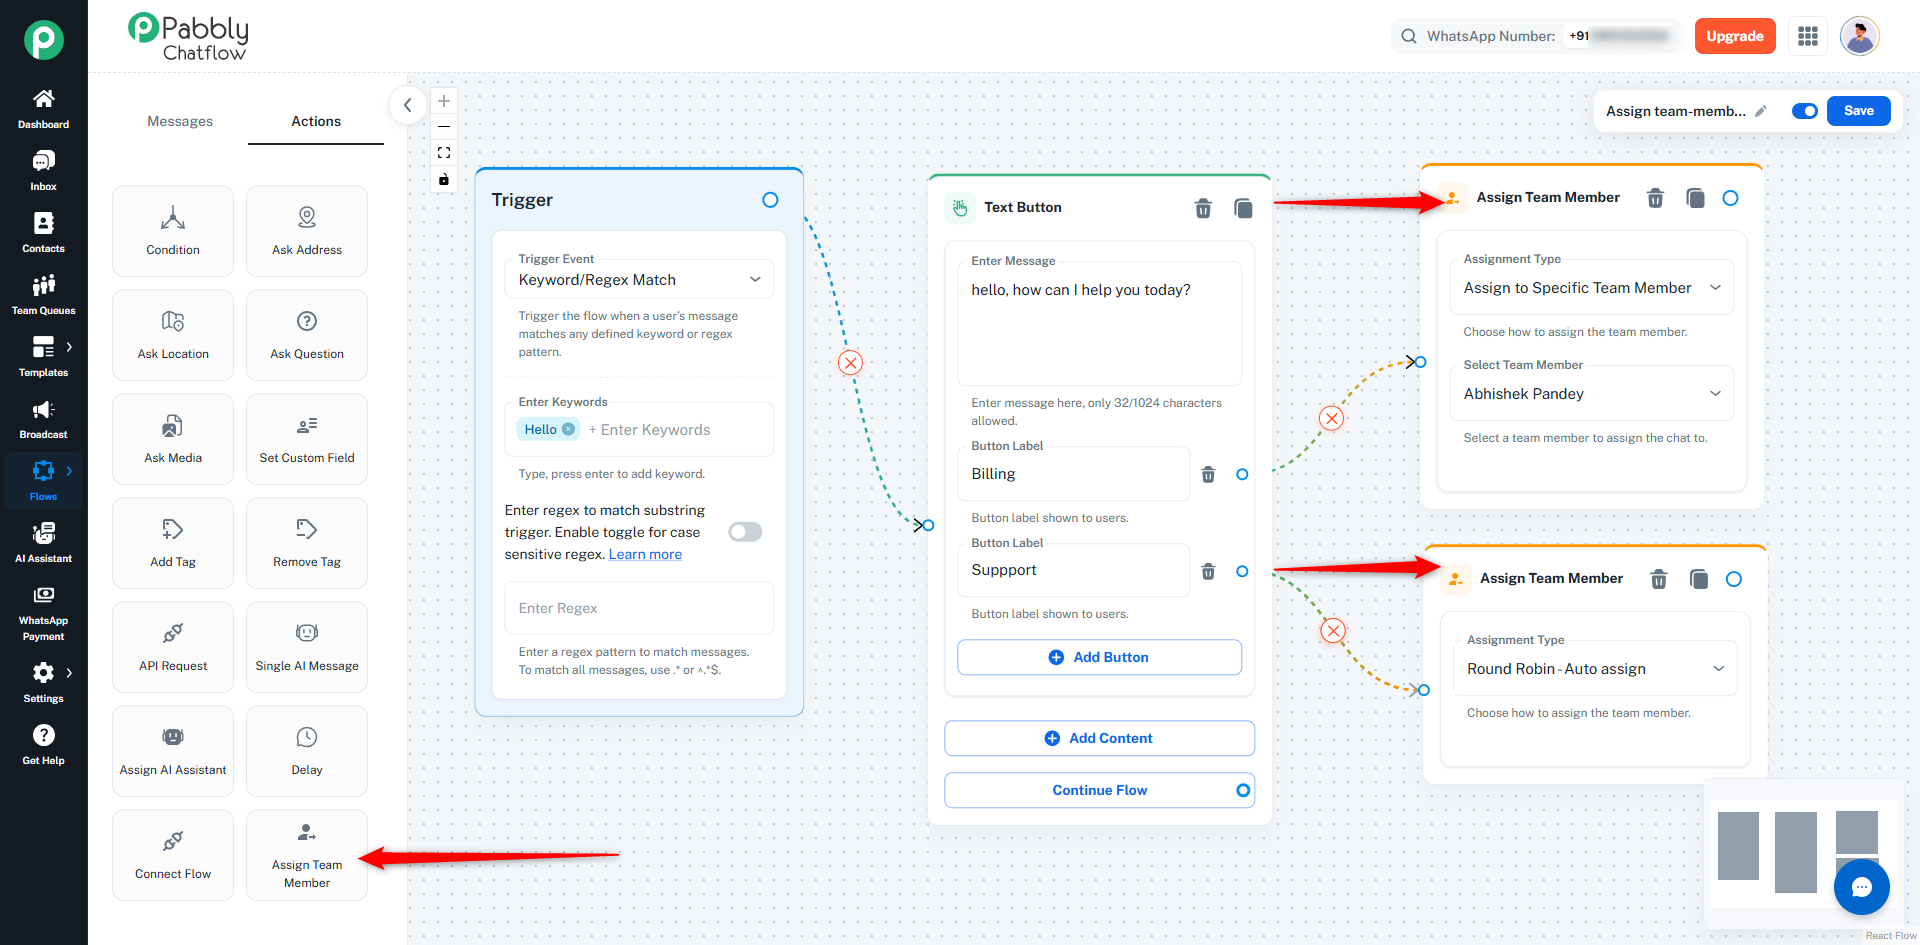
Example Flow
Trigger (New Message)
→ Ask Question ("What do you need help with?")
→ Condition (If "Billing")
→ Assign Team Member (Direct → Billing Specialist)
→ Condition (If "Support")
→ Assign Team Member (Round Robin)
Important Notes
- Team members must be added first via Settings → Team Members
- If a selected team member is removed, the node must be updated
- Assignment happens instantly when this step is reached
- This action only manages assignment — it does not affect message delivery
How to Create a WhatsApp Chatbot Using Flow Builder?
Creating a chatbot using Flow Builder is extremely easy. All you need to do is choose the necessary elements (like Lists or Media Buttons) and drag & drop them onto the builder.
Step-by-Step Guide
1. Log in to your Pabbly Chatflow account.
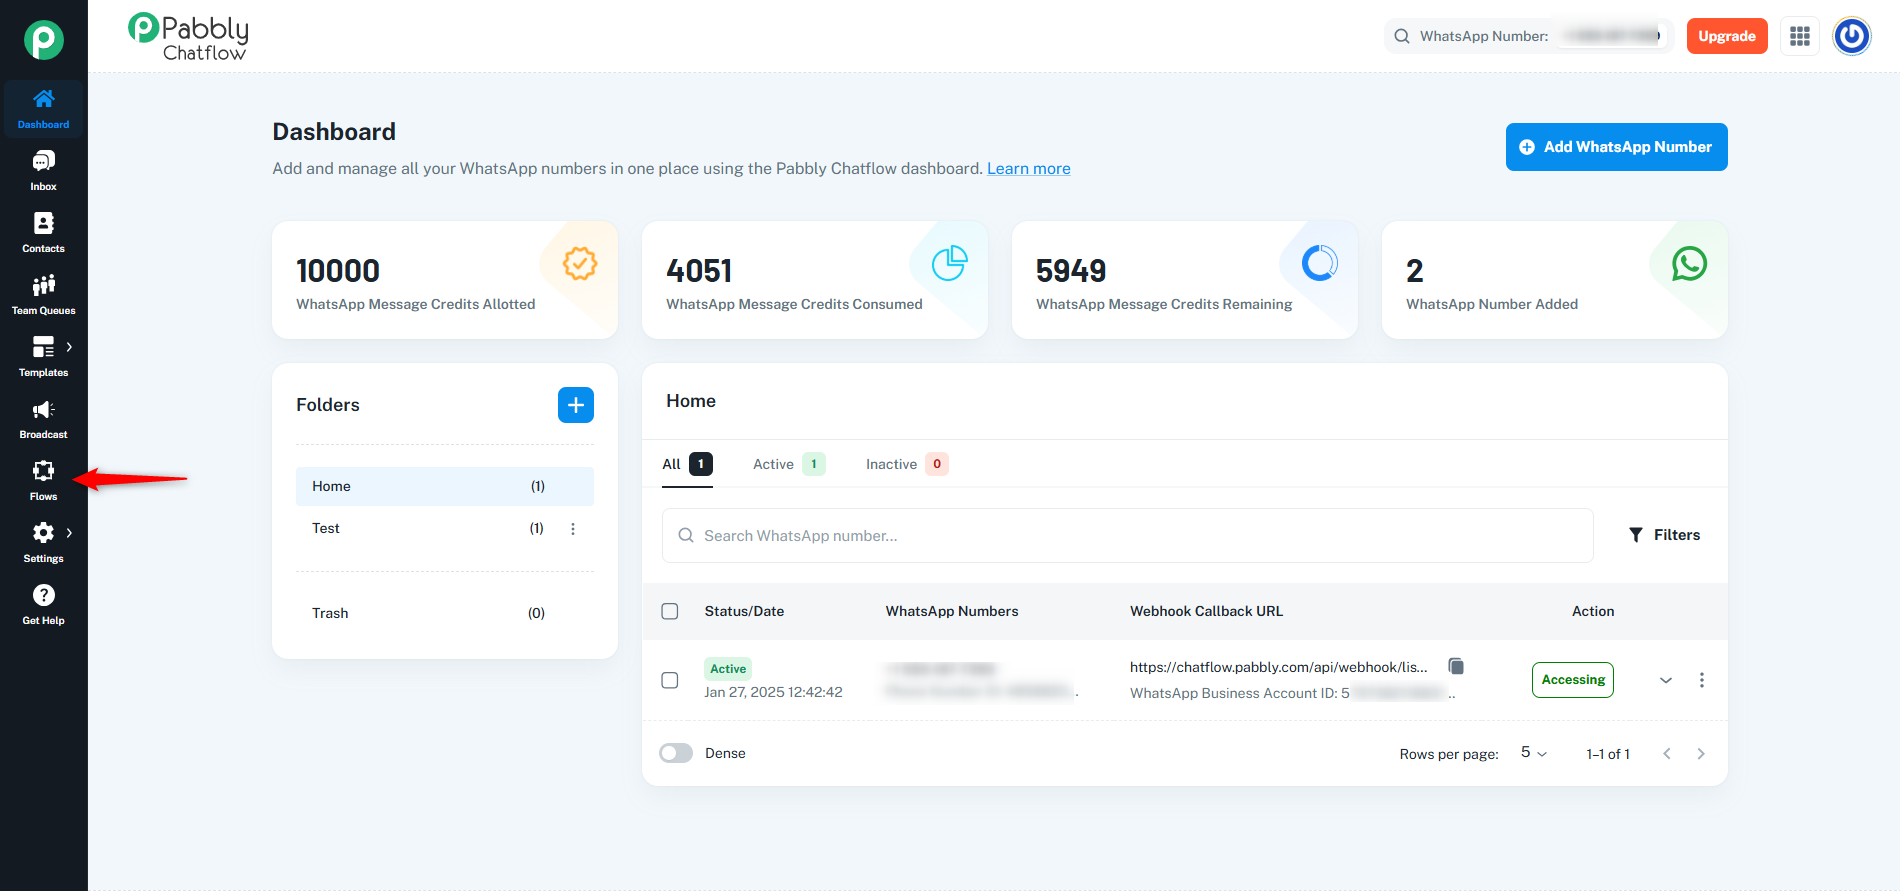
2. Navigate to the left sidebar and select "Flows" to create a chatbot.
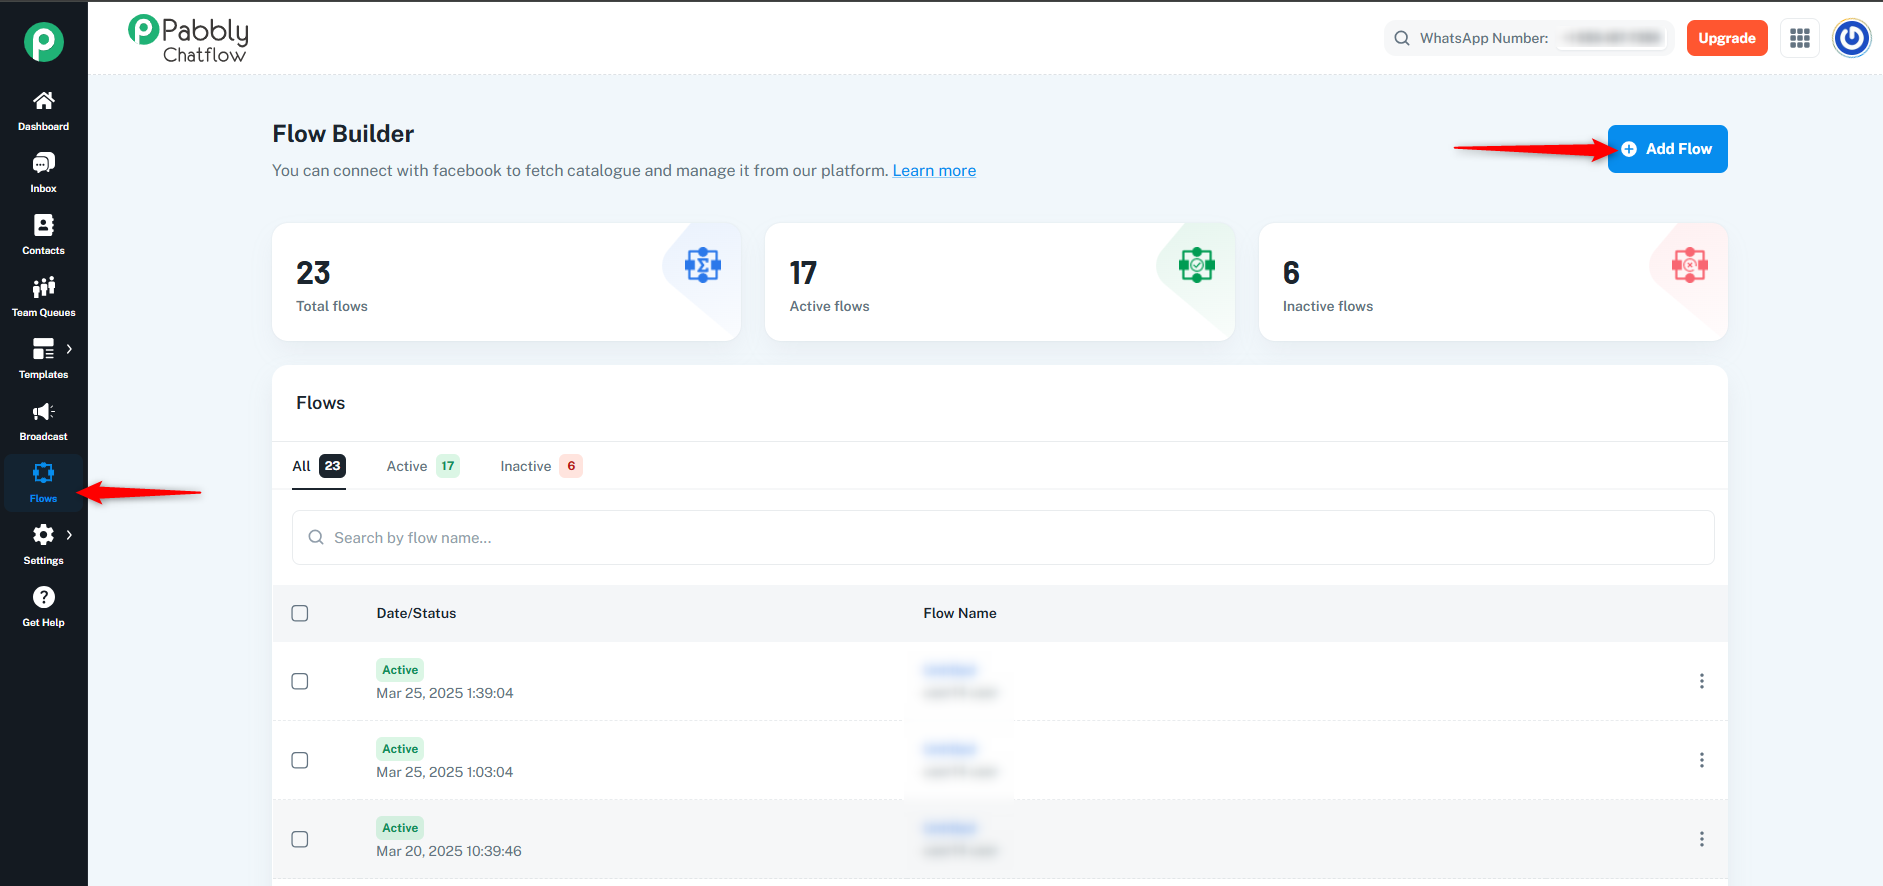
3. Click on "Add Flow" to initiate chatbot creation.
4. Upon clicking "Add," you will see a Flow Start. Here, you can choose how to trigger the chatbot flow using any of the available trigger events:
Available Trigger Events:
- Keyword/Regex Match
- Trigger the flow when a user's message matches any defined keyword or regex pattern.
- This method allows for advanced message pattern recognition using regular expressions (requires technical knowledge for regex creation). Learn more
- User Starts Conversation
- Trigger occurs when a user initiates a new conversation.
- Template Selected
- Trigger the flow when a user replies via a quick reply button on a sent template.
- WhatsApp Template Delivered
- Triggered when a WhatsApp message template is successfully delivered to a contact.
- Contact Added
- Trigger when a new contact is created manually or by lead.
- Contact Added to Contact List
- Trigger when a contact is added to one of the selected contact lists.
- Custom Field Updated
- Trigger when a custom field is added or updated for a contact.
- Tag Assigned
- Trigger the flow when a tag is assigned to a contact during an update.
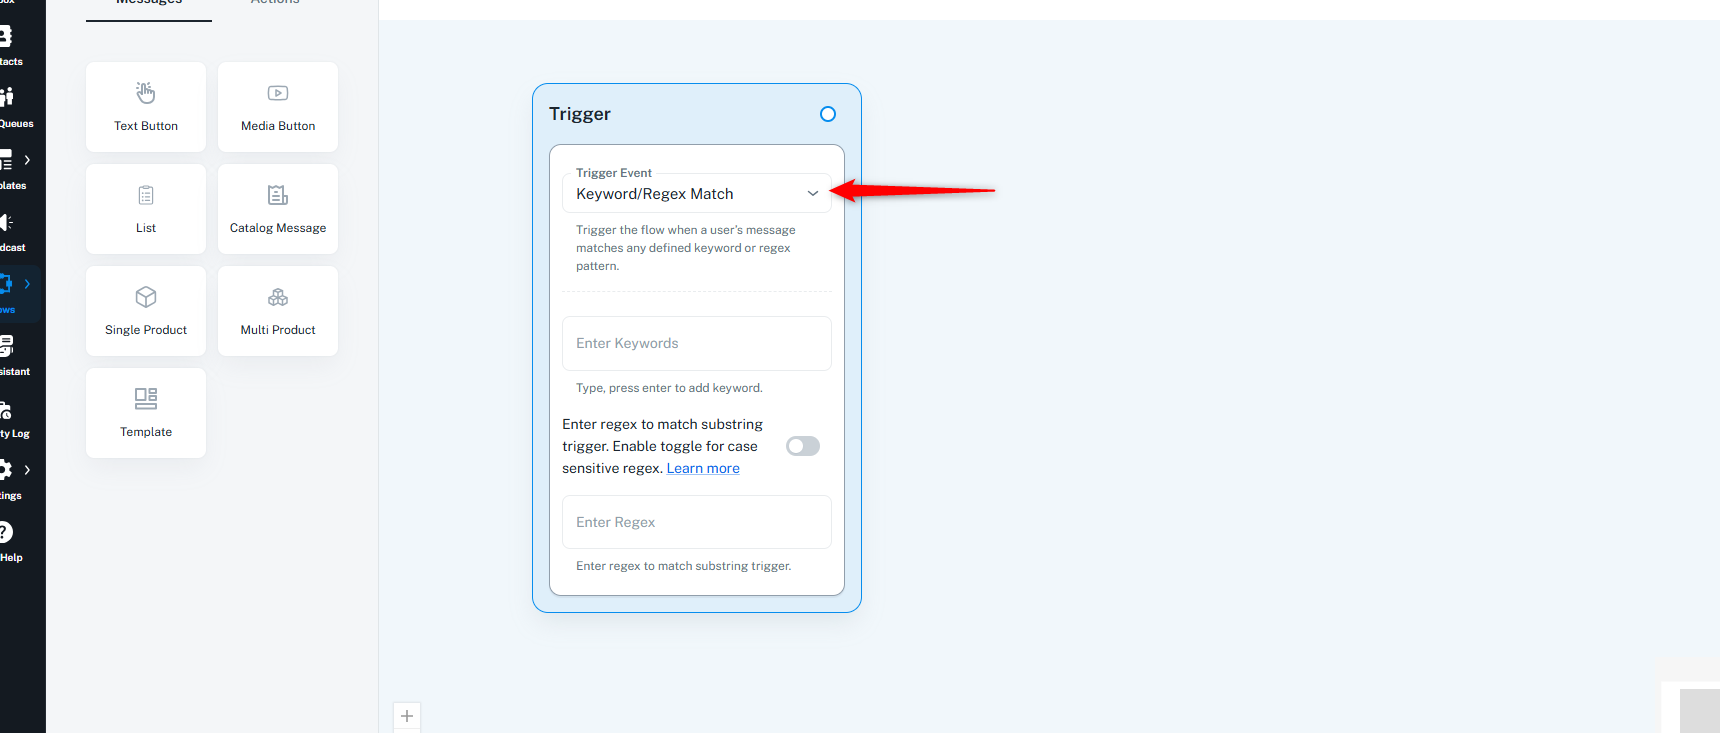
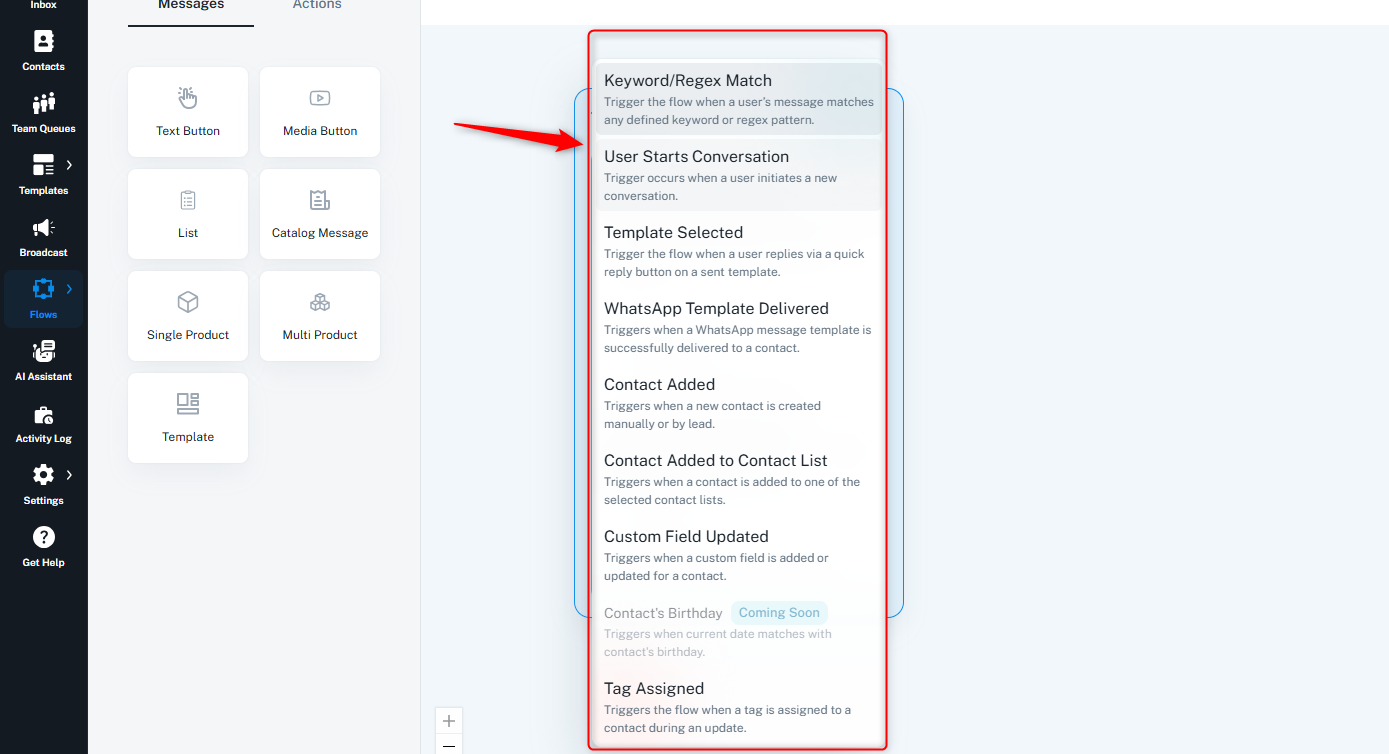
- After selecting your preferred trigger event, drag and drop the required message type or action according to your business requirements.
Finalizing Your Flow
Once the flow is built according to your needs, follow these steps:
- On the top of the Flow Builder screen, you will see an option to name your flow.
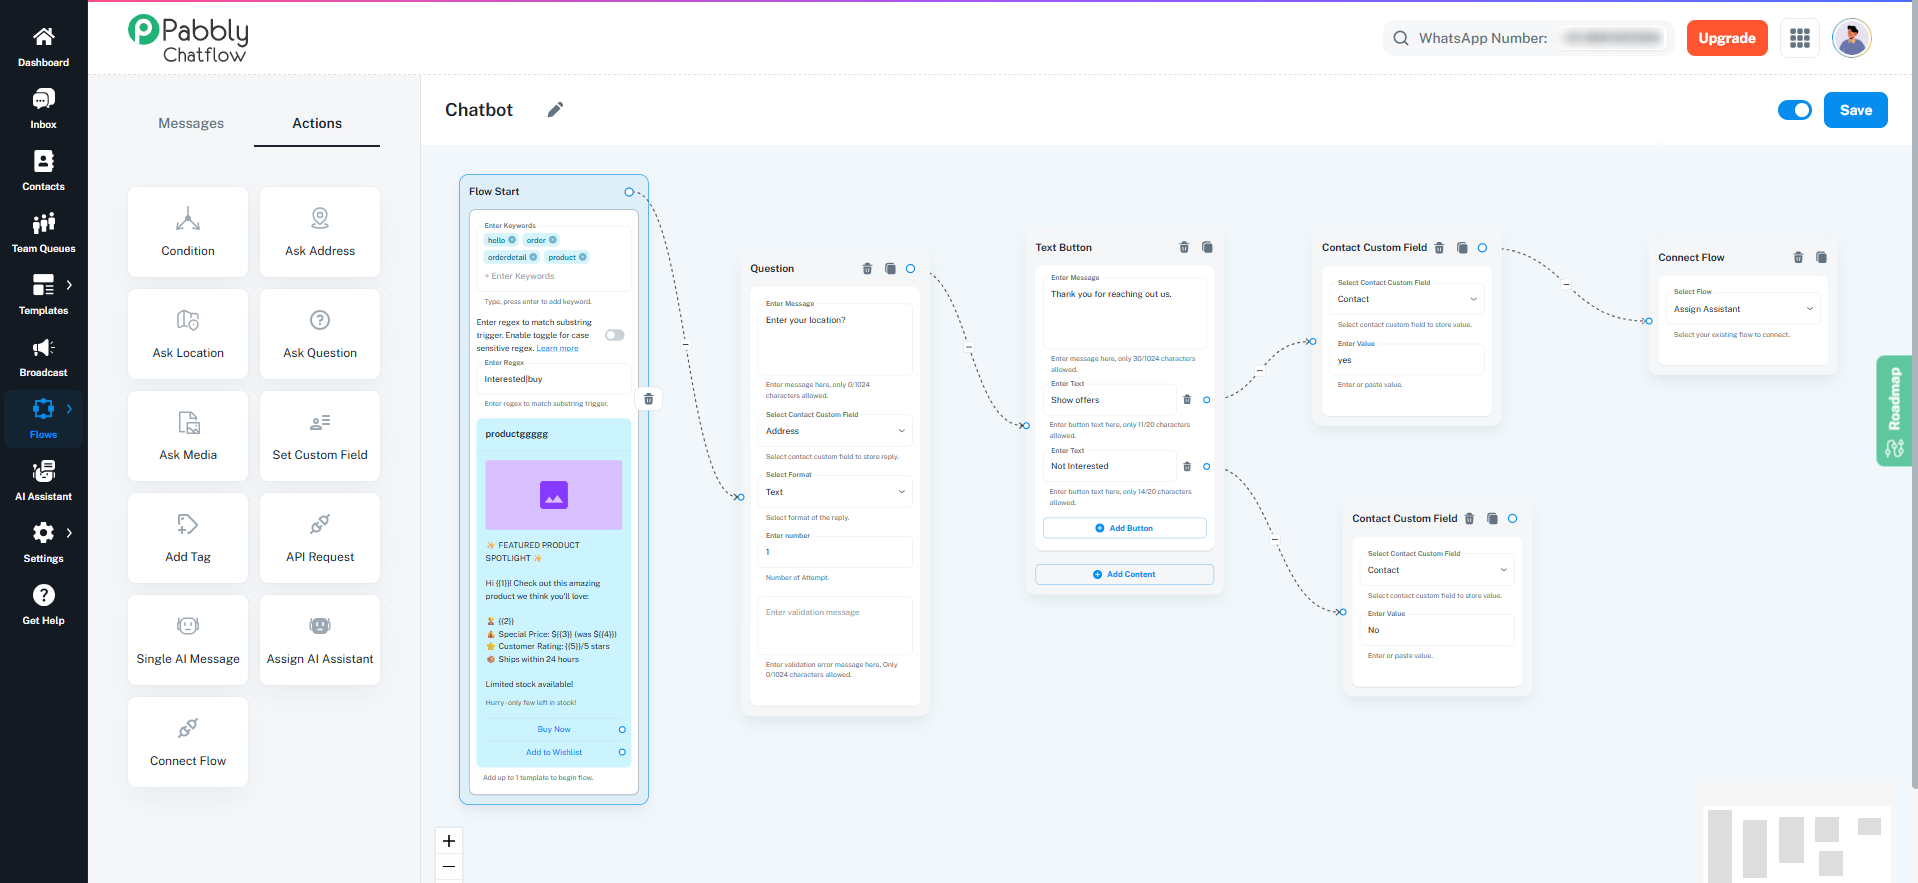
- On the right corner, you can enable the toggle to make your flow active.
- Click on the Save button to save your created flow.
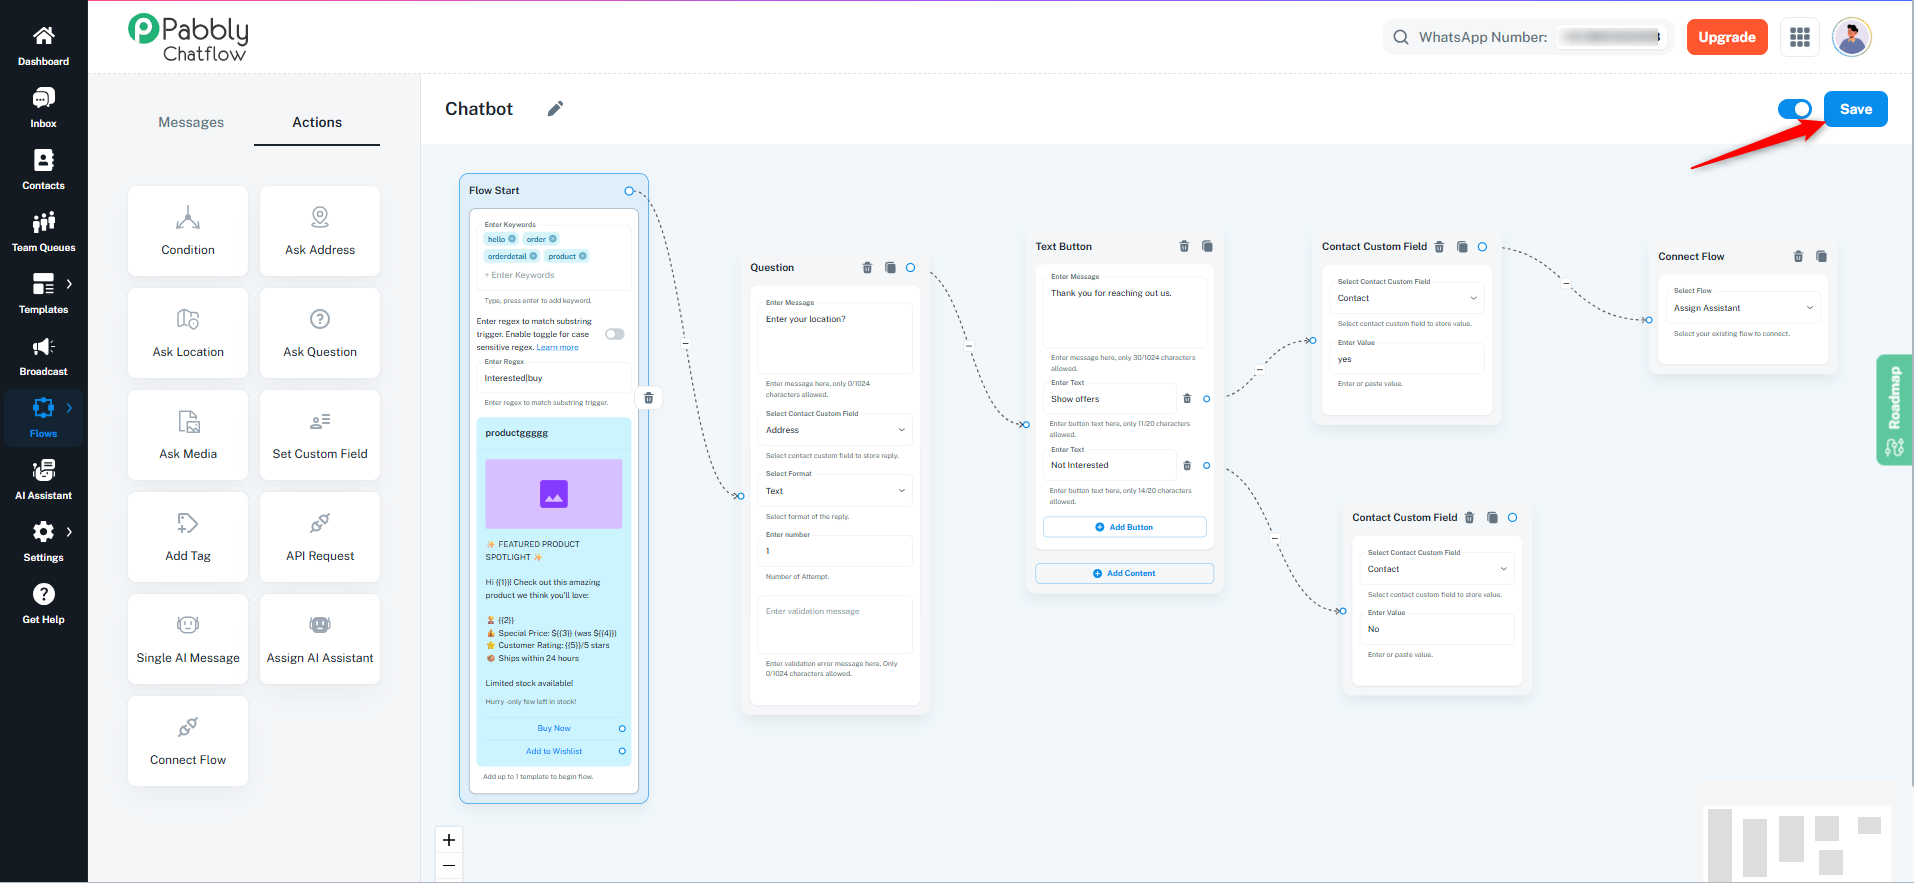
Now, once a user initiates a conversation, if any keyword or regex matches, the flow will trigger automatically. Similarly, if a conversation is initiated using templates and a quick reply button connected to a flow is clicked, the flow will get triggered seamlessly.
Learn More
To know more, you can watch our video tutorial here: How to Create a Drag & Drop Chatbot
https://www.youtube.com/watch?v=NXIbDhxXKF0&list=PLgffPJ6GjbaIhiTPT2HwbVRWyJNxyTq1b&index=6
Conclusion
With Pabbly Chatflow's intuitive Drag & Drop Flow Builder, creating chatbots has never been easier. By leveraging powerful message, action, and seamless integrations, you can automate conversations, provide prompt customer support, and drive sales efficiently. Start building your chatbot today and enhance your business communication like never before!
 Pabbly Chatflow Team•Updated Oct 24, 2026•36 min read Video included