Features & Capabilities
 Pabbly Chatflow Team•Updated Oct 24, 2026•11 min read Video included
A broadcast in Chatflow allows you to send messages to a predefined contact list. Follow the steps below to create and manage your broadcast efficiently.
Choose how you want to send your WhatsApp messages:
Broadcast Campaign
Send template-based messages in bulk to a predefined contact list. Ideal for promotions, announcements, and scheduled updates.
2) API Campaign
Trigger WhatsApp messages programmatically via API requests to one or multiple contacts. This method is best suited for transactional alerts or event-driven messages.
Log in to your Chatflow account using your credentials.
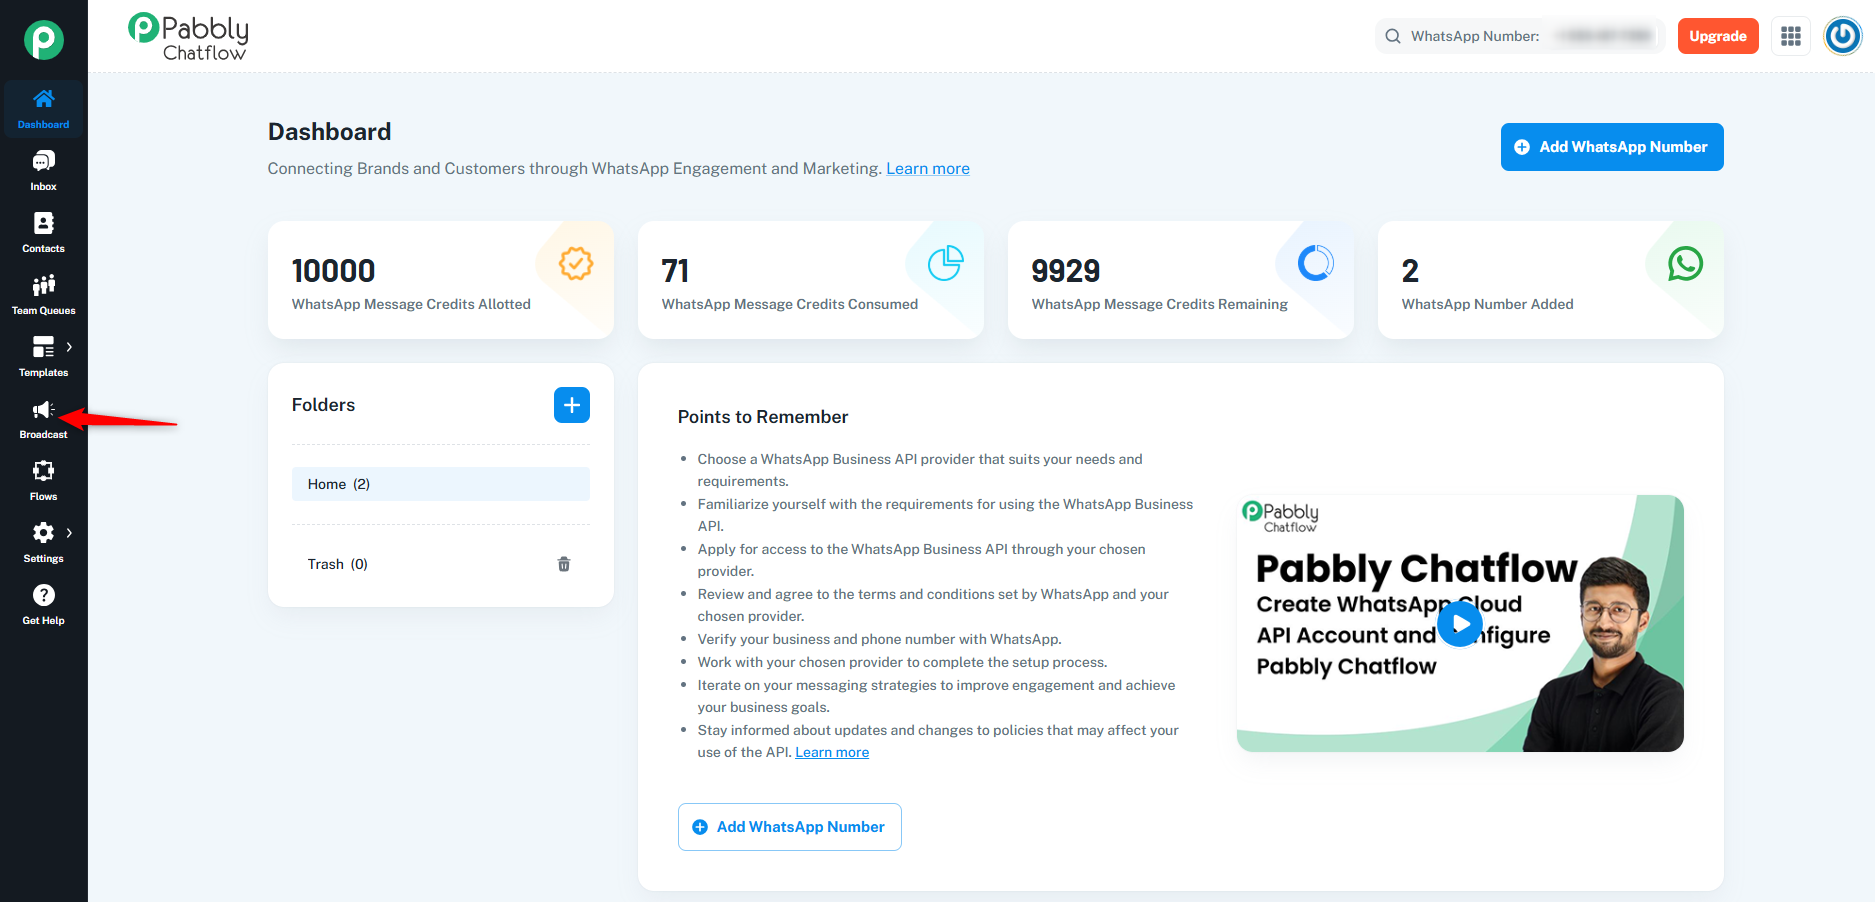
On the left-side menu, click on the Broadcast module to access the broadcast campaign section.
Click on the Add Broadcast button to initiate a new broadcast campaign.
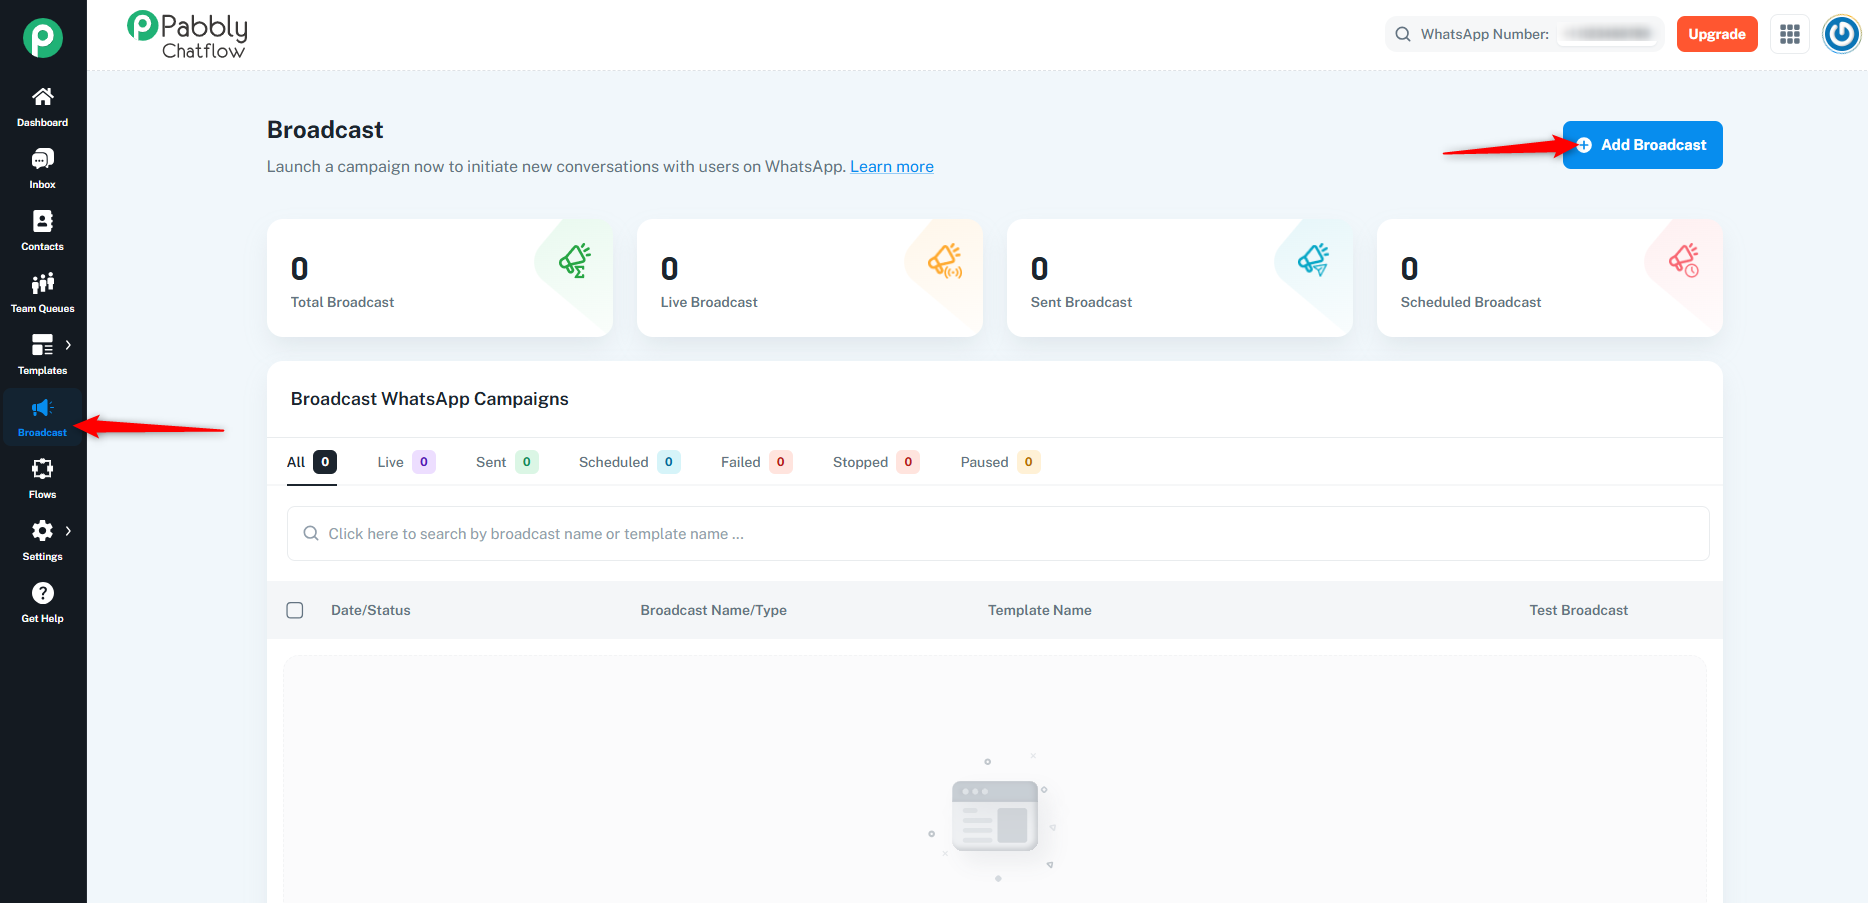
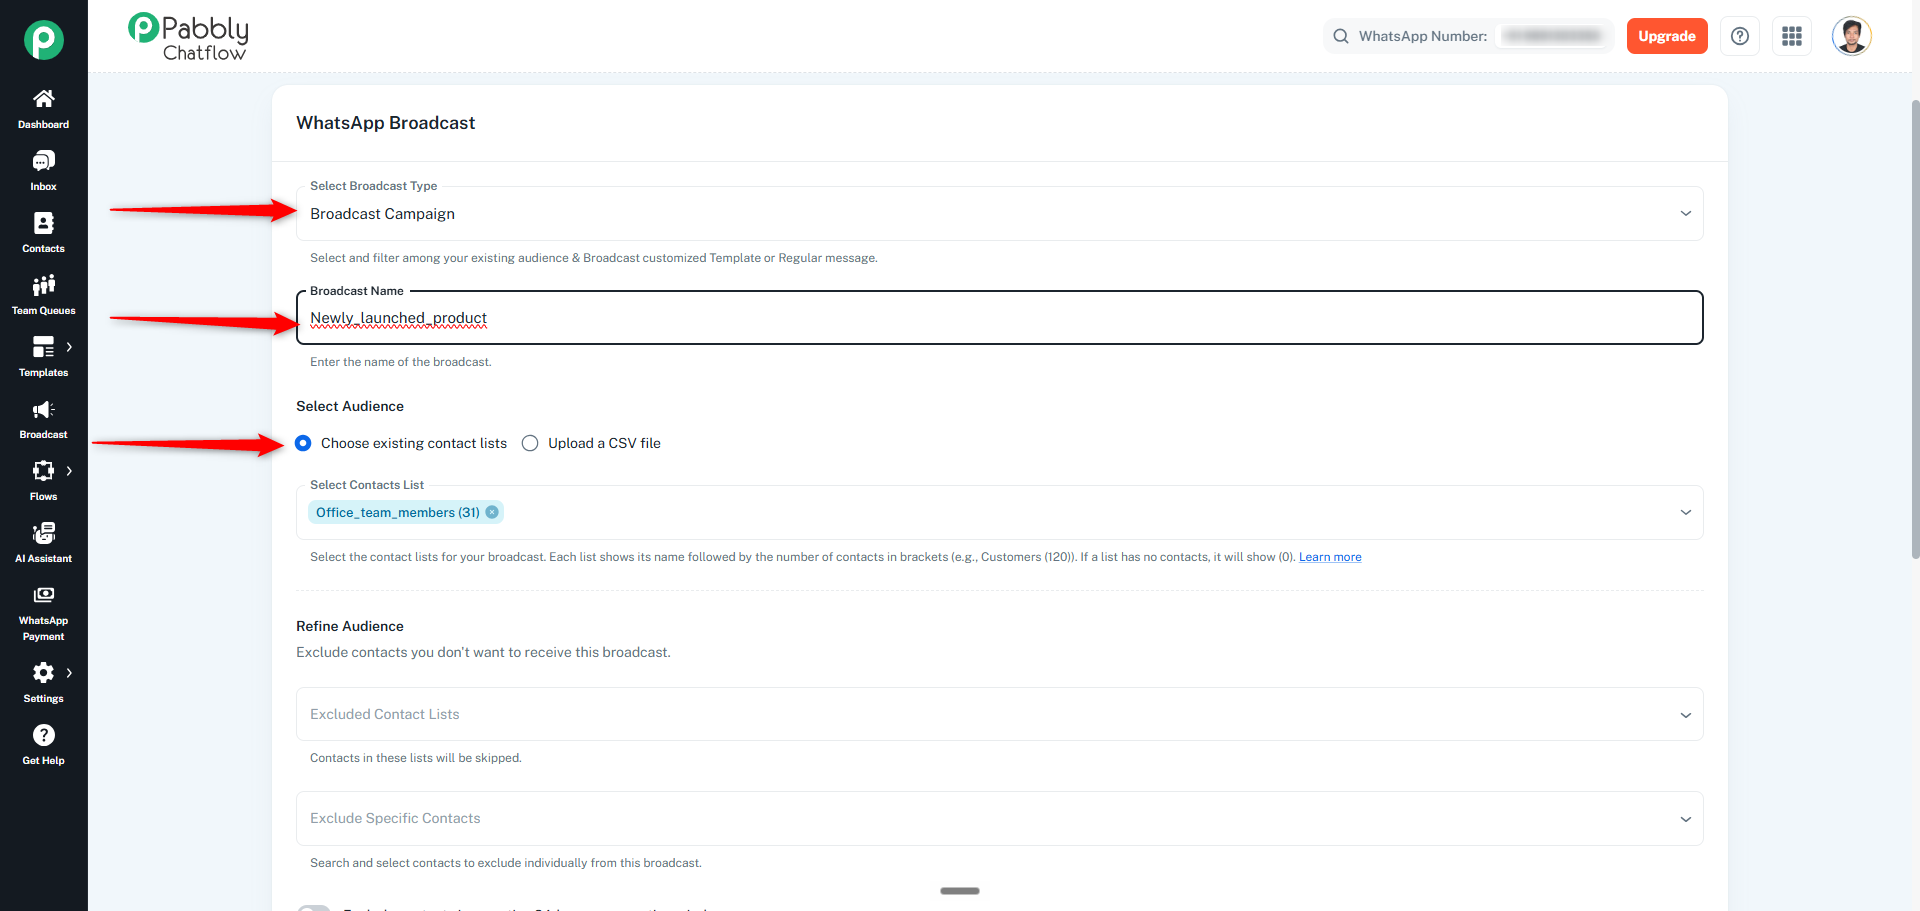
Fill in the required details based on your campaign needs:
Broadcast Type: Select Broadcast Campaign.
Broadcast Name: Provide a descriptive name for the broadcast.
Select Audience: Choose how you want to select the contacts for your broadcast:
Choose Existing Contact Lists: Select one or more existing contact lists from the dropdown.
Upload a CSV File: Upload contacts from a CSV file to create a new contact list for the broadcast.
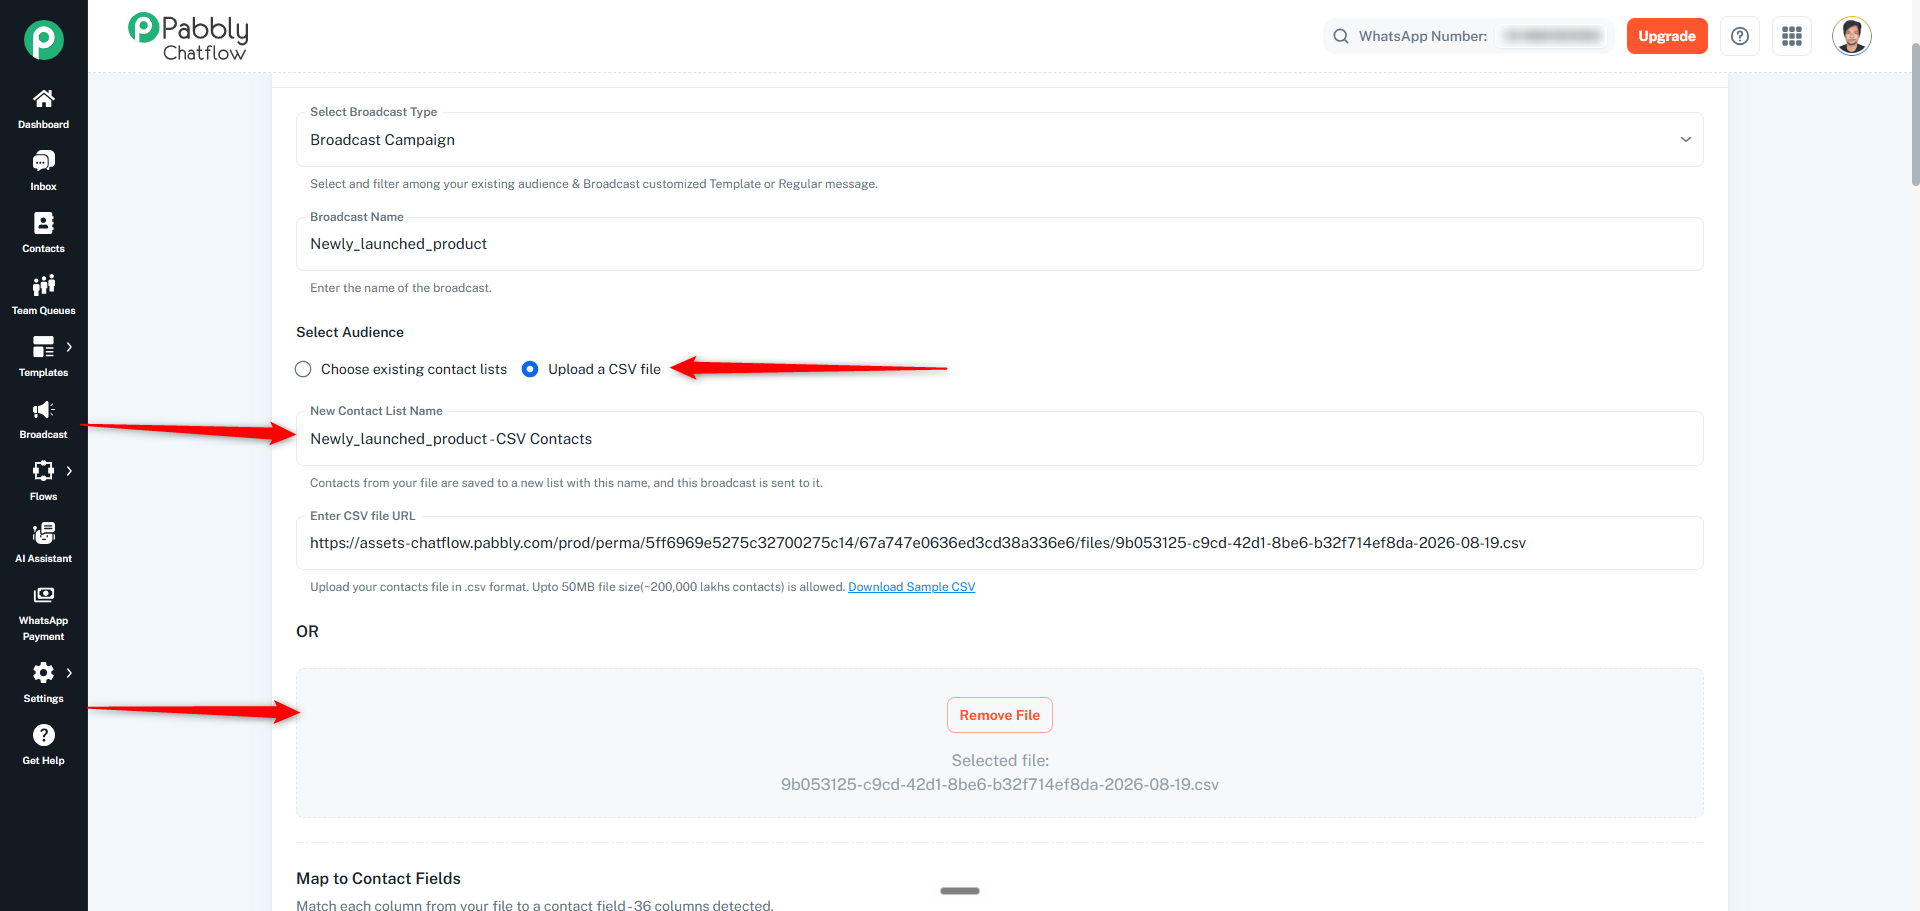
If you choose Upload a CSV File:
Enter a New Contact List Name. The uploaded contacts will be saved as a new contact list with this name.
Provide the CSV File URL or upload the CSV file from the Media Library.
Only CSV files are supported.
The maximum file size is 50 MB, with up to 200,000 contacts allowed.
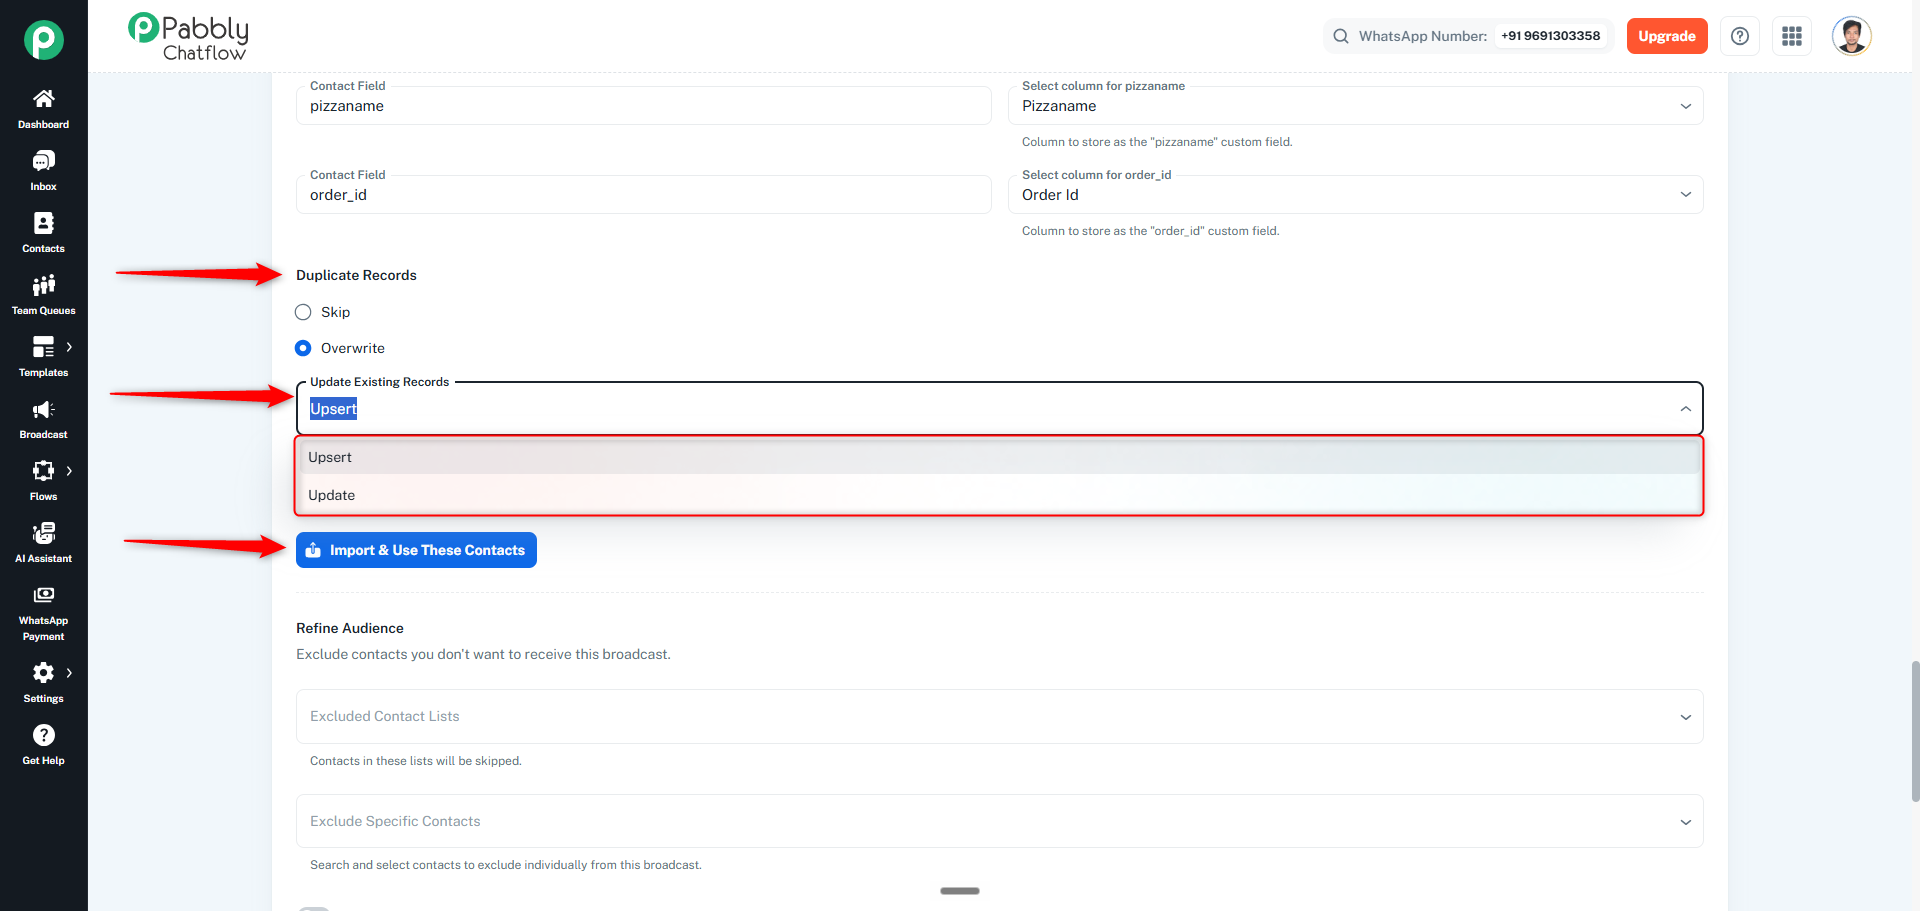
Click Import & Use These Contacts after completing the field mapping and duplicate-record settings.
Note: Contacts uploaded through a CSV file are automatically saved to a new contact list with the name you provide, and the broadcast is sent to that list
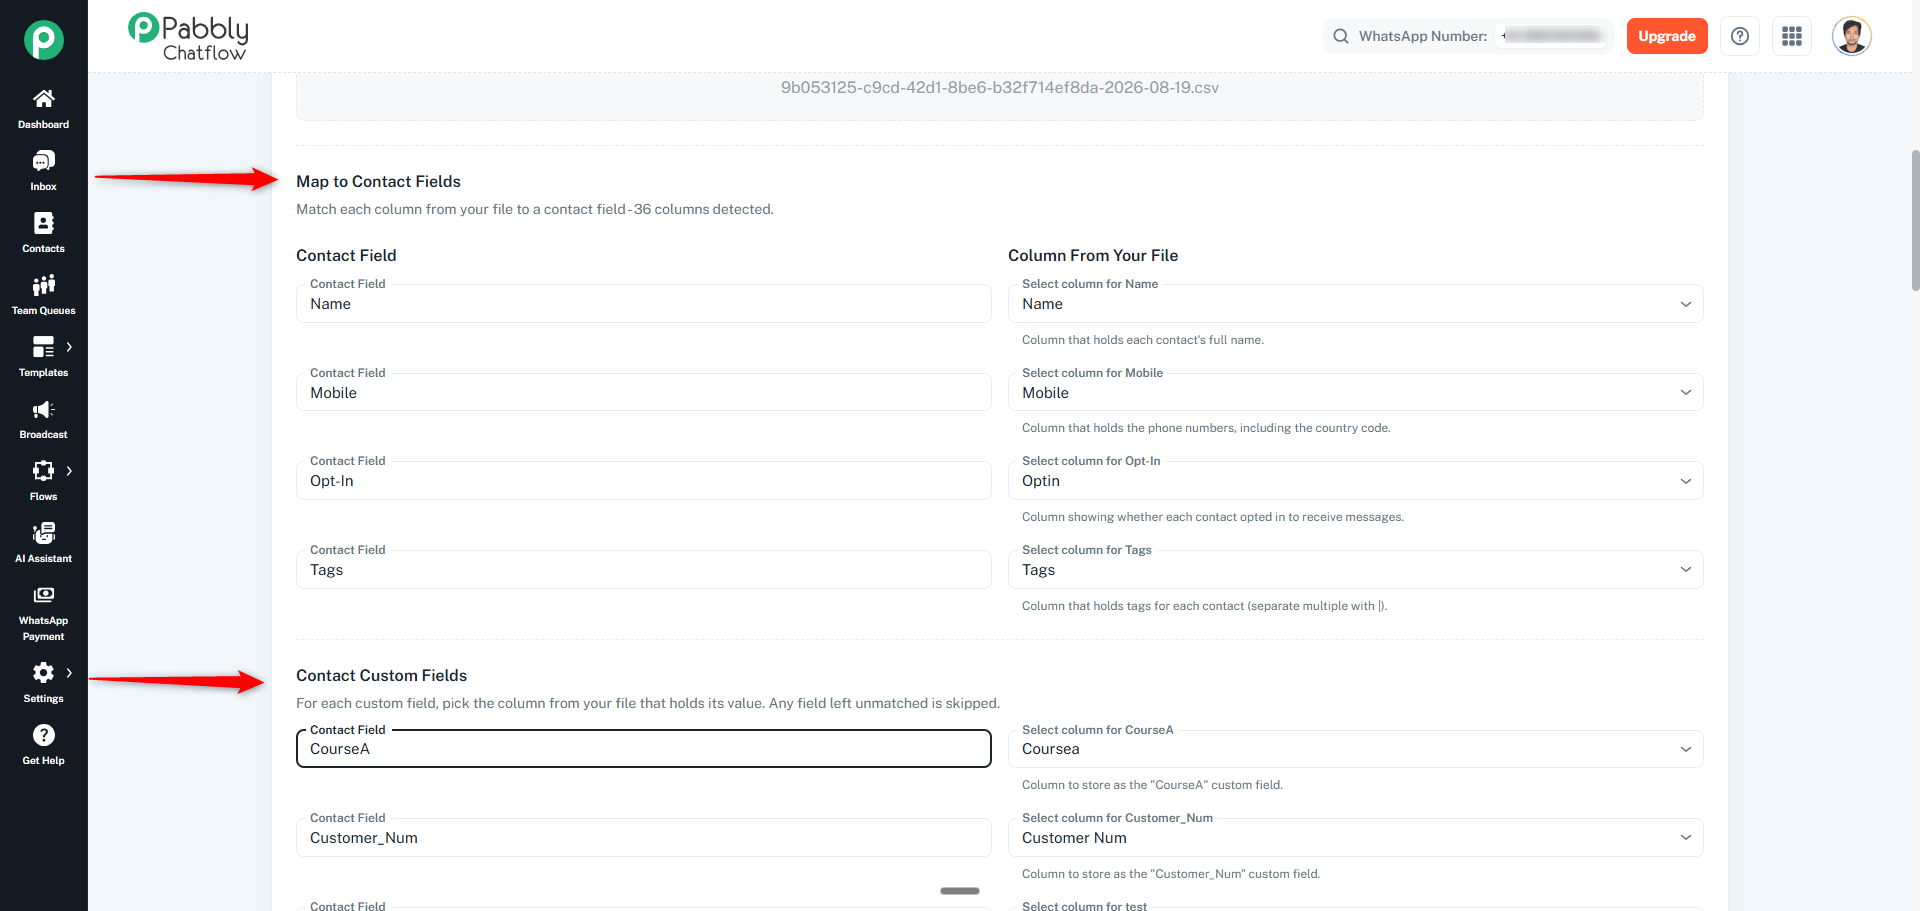
After uploading the CSV file, Chatflow detects the columns in your file and opens the Map to Contact Fields section.
The system automatically maps matching CSV columns to standard contact fields such as:
Name
Mobile
Opt-In
Tags
You can review and change the column mapping if required.
CSV columns that do not match standard contact fields are automatically mapped to Contact Custom Fields.
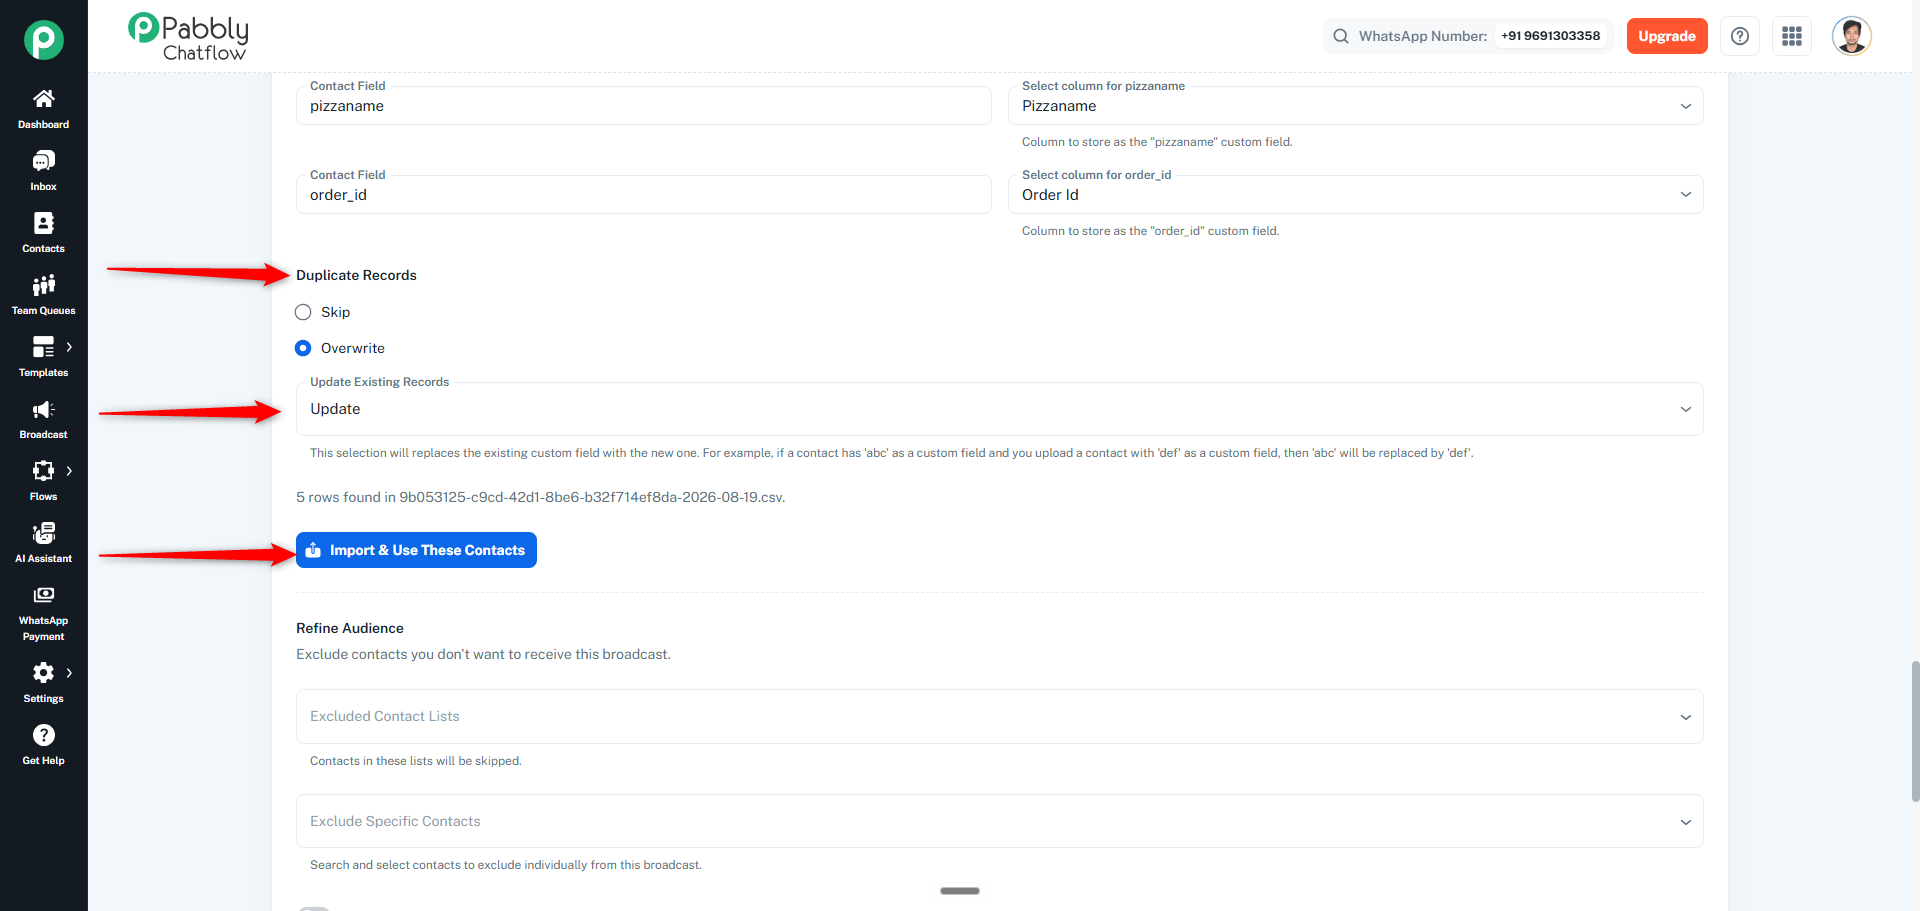
Choose how Chatflow should handle contacts that already exist:
Skip: Skip duplicate contacts during the import.
Overwrite: Update the existing contact with the imported information.
When Overwrite is selected, you can choose how existing custom fields should be handled:
Update: Replace the existing custom field value with the new value from the CSV.
Upsert: Add the new custom field while keeping the existing custom fields.
For example:
With Update, if an existing contact has abc and the CSV contains def, the existing value abc is replaced with def.
With Upsert, the existing abc value is retained and the new def value is added as another custom field.
Once the mapping and duplicate-record settings are configured, click Import & Use These Contacts to import the contacts and use them as the broadcast audience.
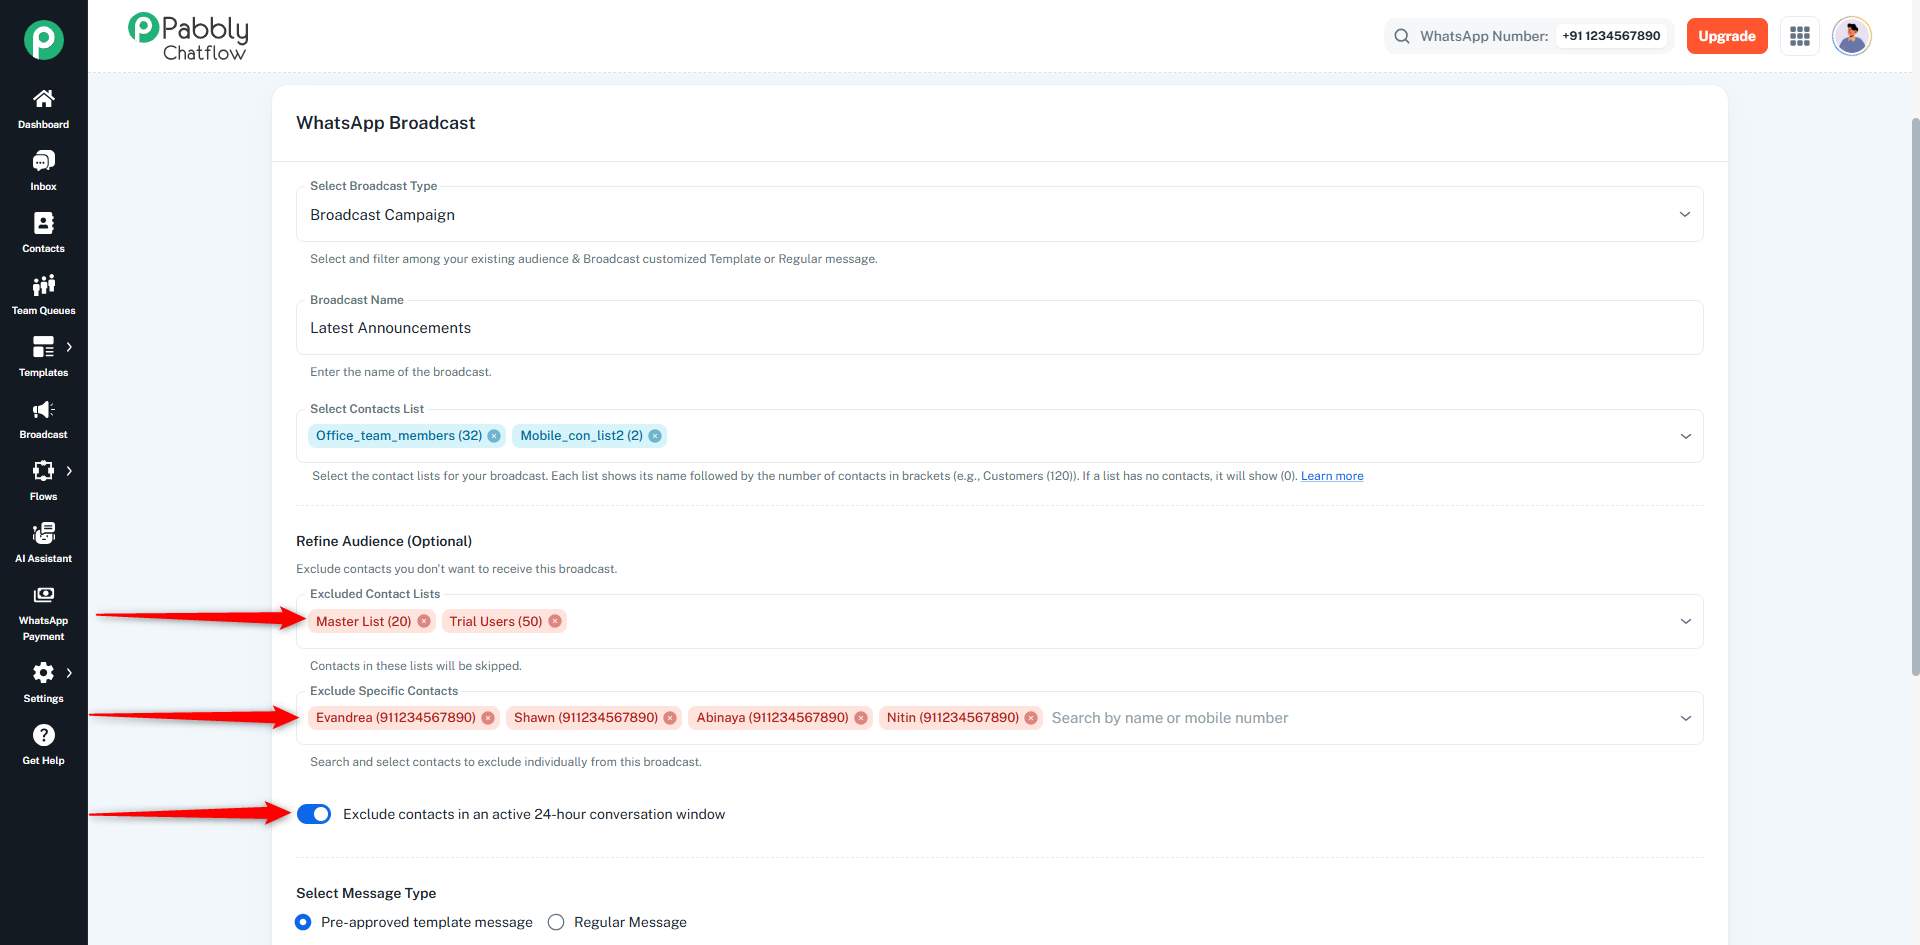
The Refine Audience (Optional) section allows you to control which contacts should be excluded from receiving the broadcast. This helps in sending messages only to the most relevant audience.
You can exclude entire contact lists from the broadcast.
Supports multi-select dropdown
Displays contact count with each list (e.g., Customers (120))
All contacts within selected lists will be skipped
You can exclude individual contacts from the broadcast.
Search by name or mobile number
Displays suggestions when the field is focused
Supports real-time search
This option allows you to skip contacts who are currently within an active WhatsApp conversation window.
Available for Pre-approved Template Messages only
When enabled, contacts with an active 24-hour session will not receive the broadcast
The selected Contact List defines the base audience
Any contacts or lists selected in the Refine Audience section are excluded from that base audience
The final broadcast is sent only to the remaining eligible contacts
Excluded contacts and lists are not included in the broadcast delivery.
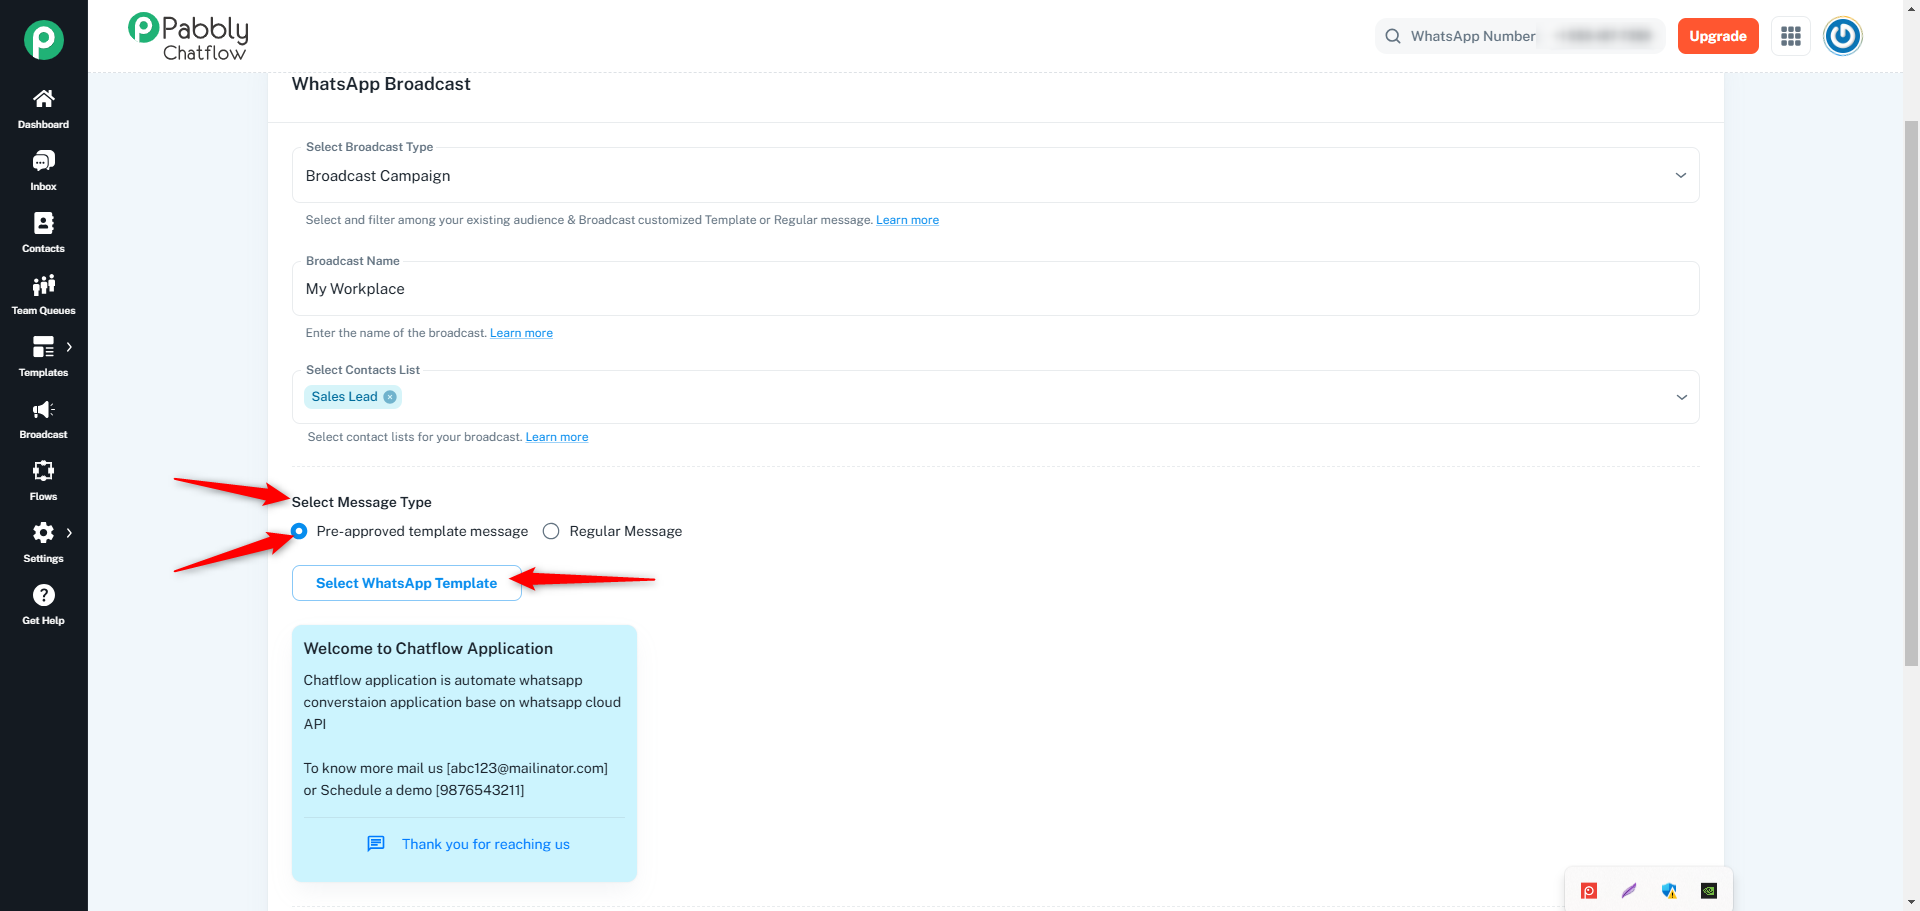
Choose the type of message you want to send:
Select a pre-approved template to send to your contacts.
You can send various types of messages, including text, audio, video, image, or file. Below are the mandatory requirements based on the message type:
Text Message: Message body is required.
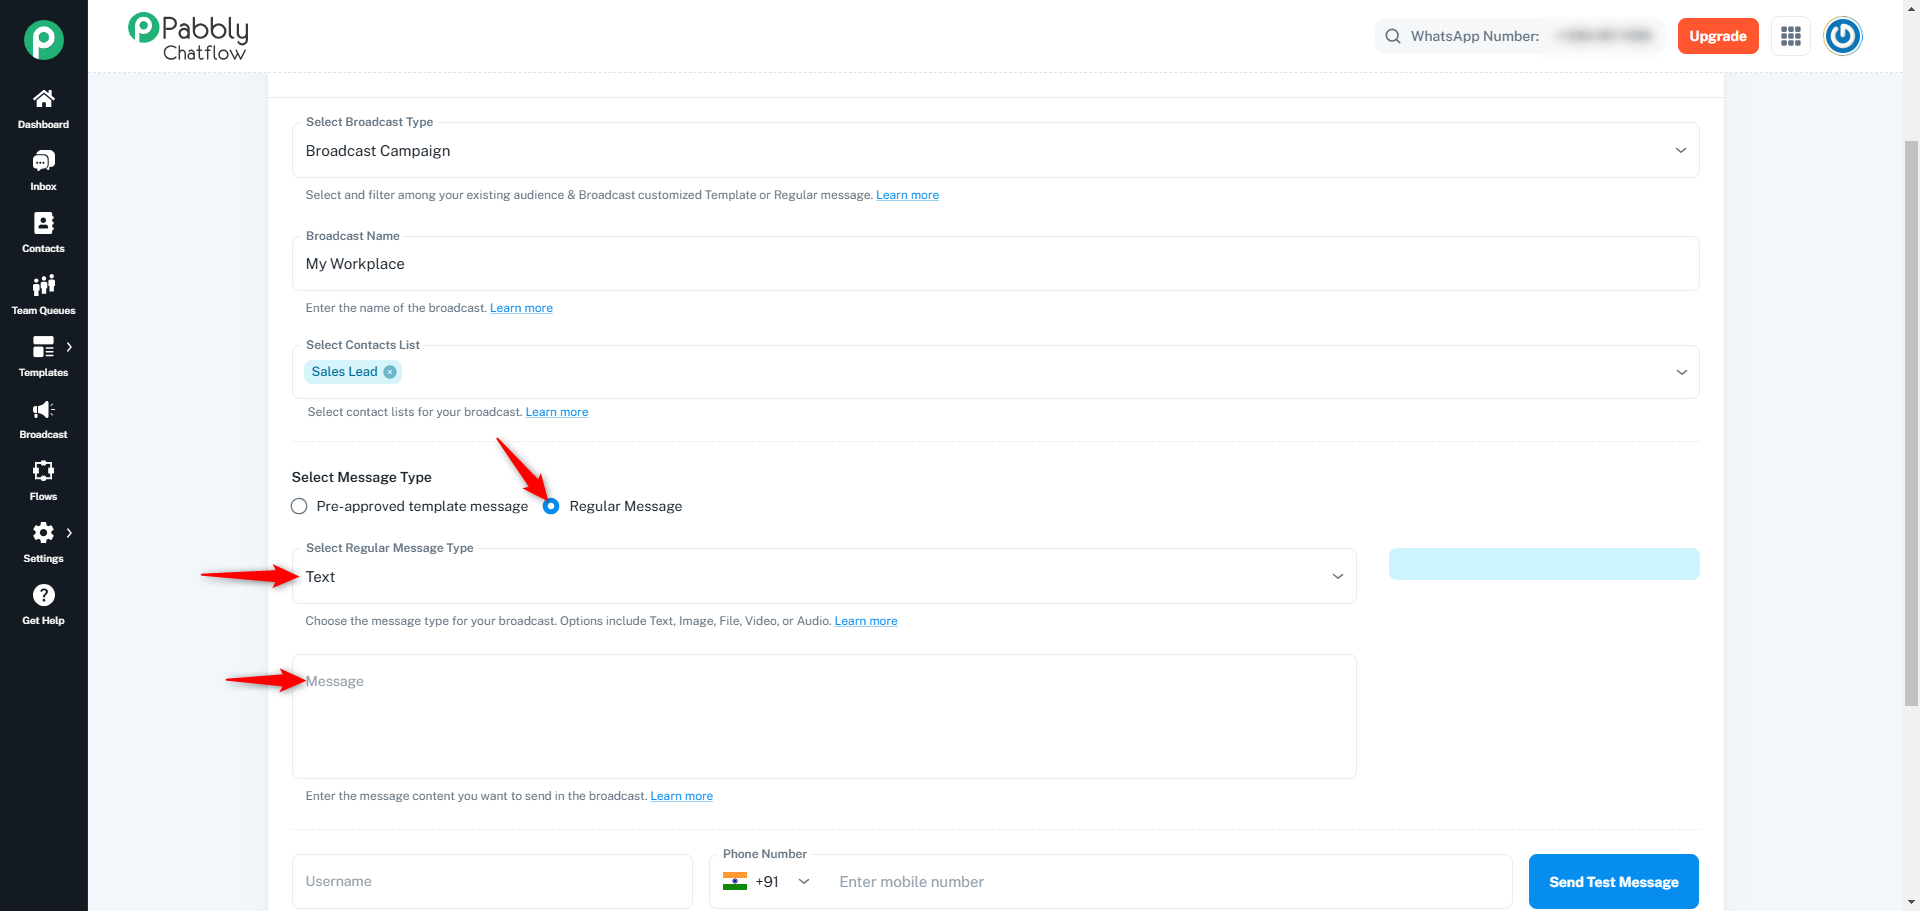
Image Message:
Image URL (Size < 5 MB, Formats: .png, .jpeg) is required.
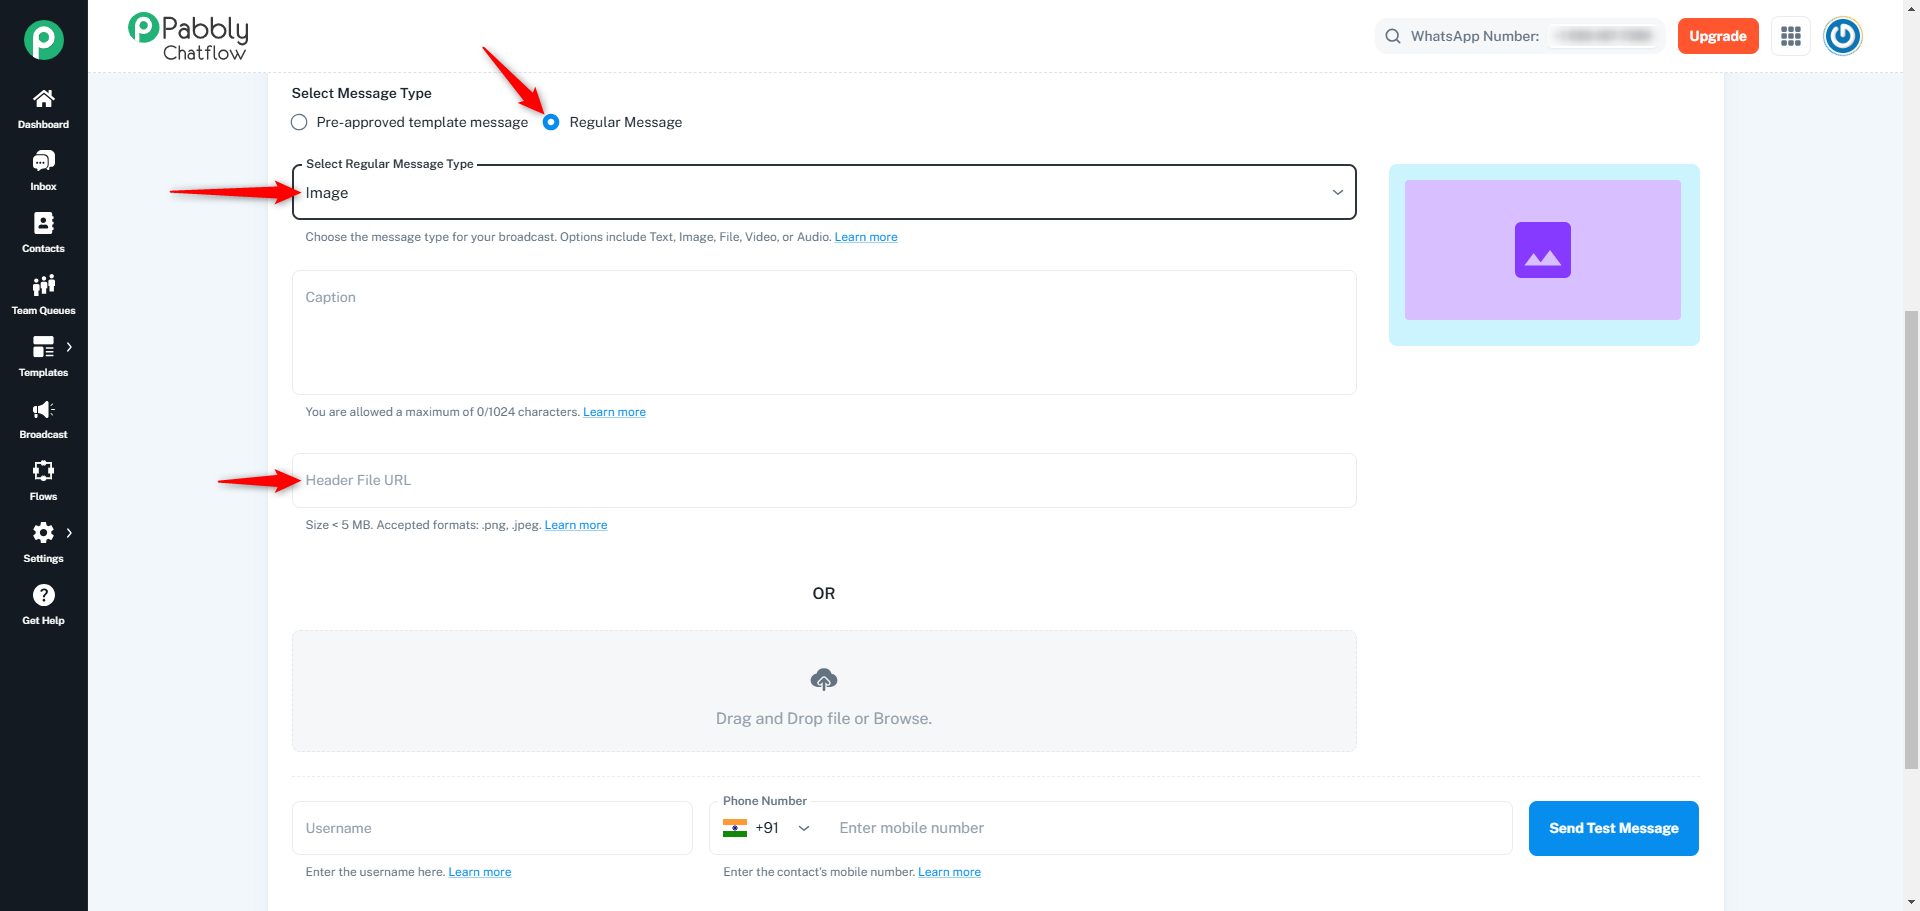
File Message:
Document URL (Size < 100 MB, Formats: .pdf, .doc, .txt) is required.
File Name is required.
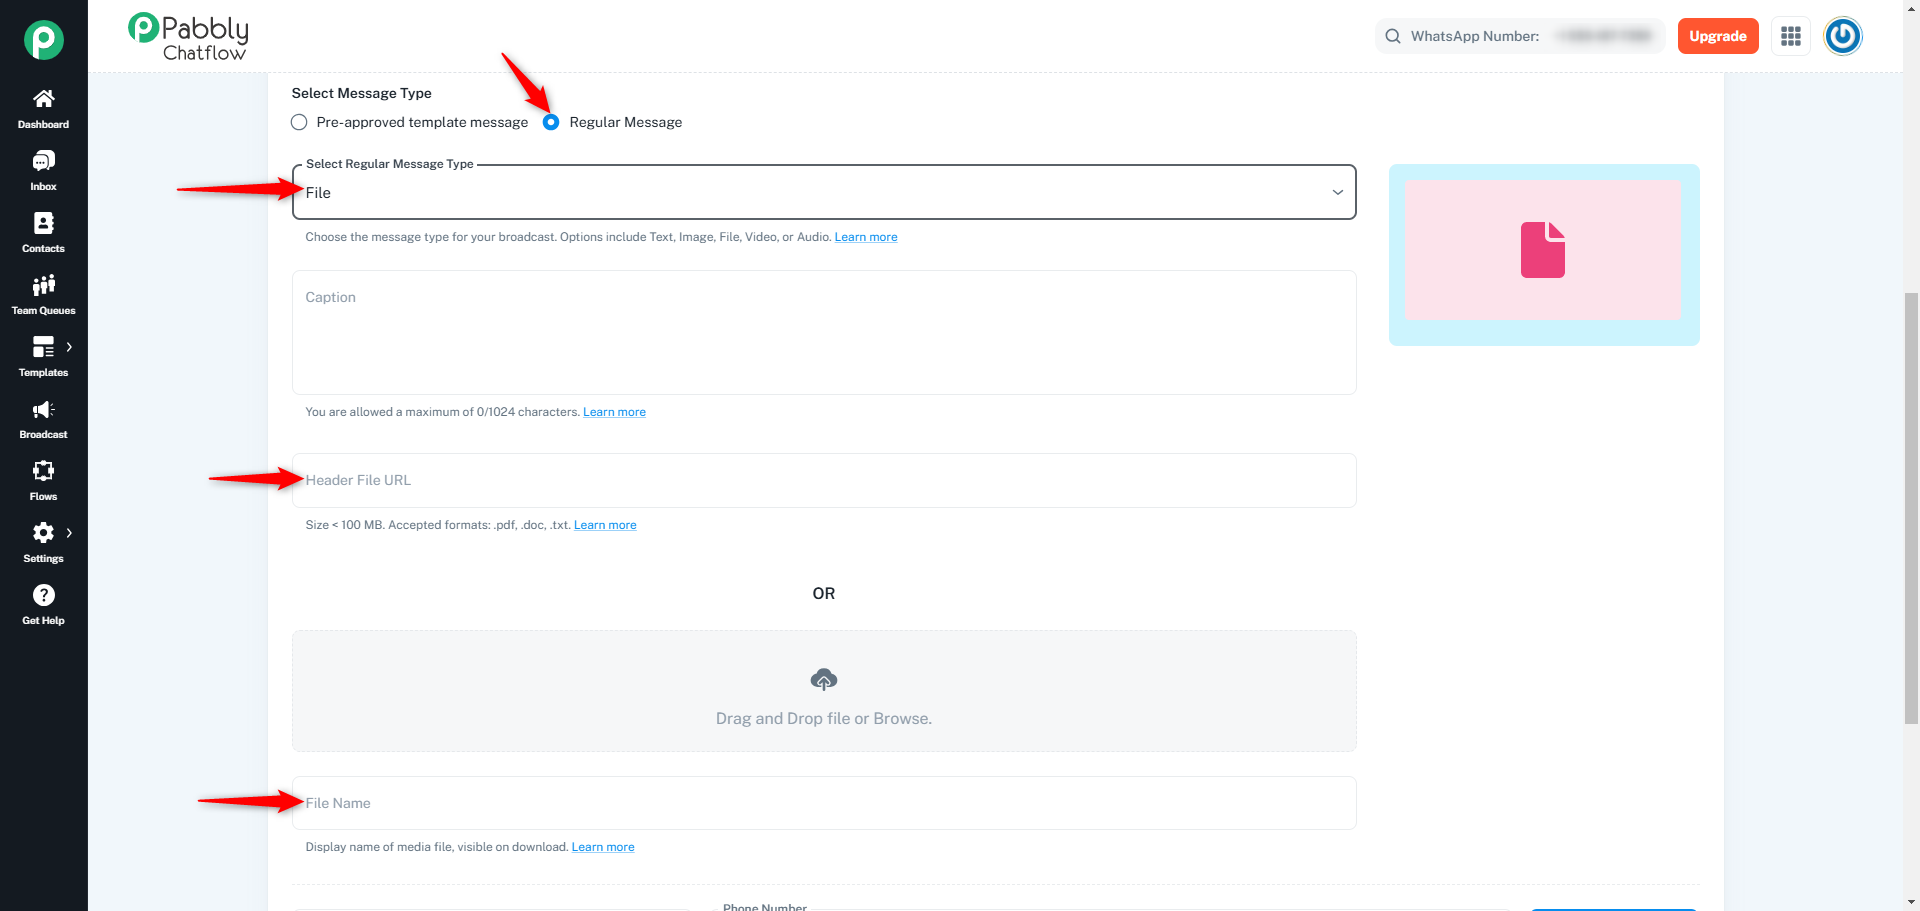
Video Message:
Video URL (Size < 10 MB, Format: .mp4) is required.
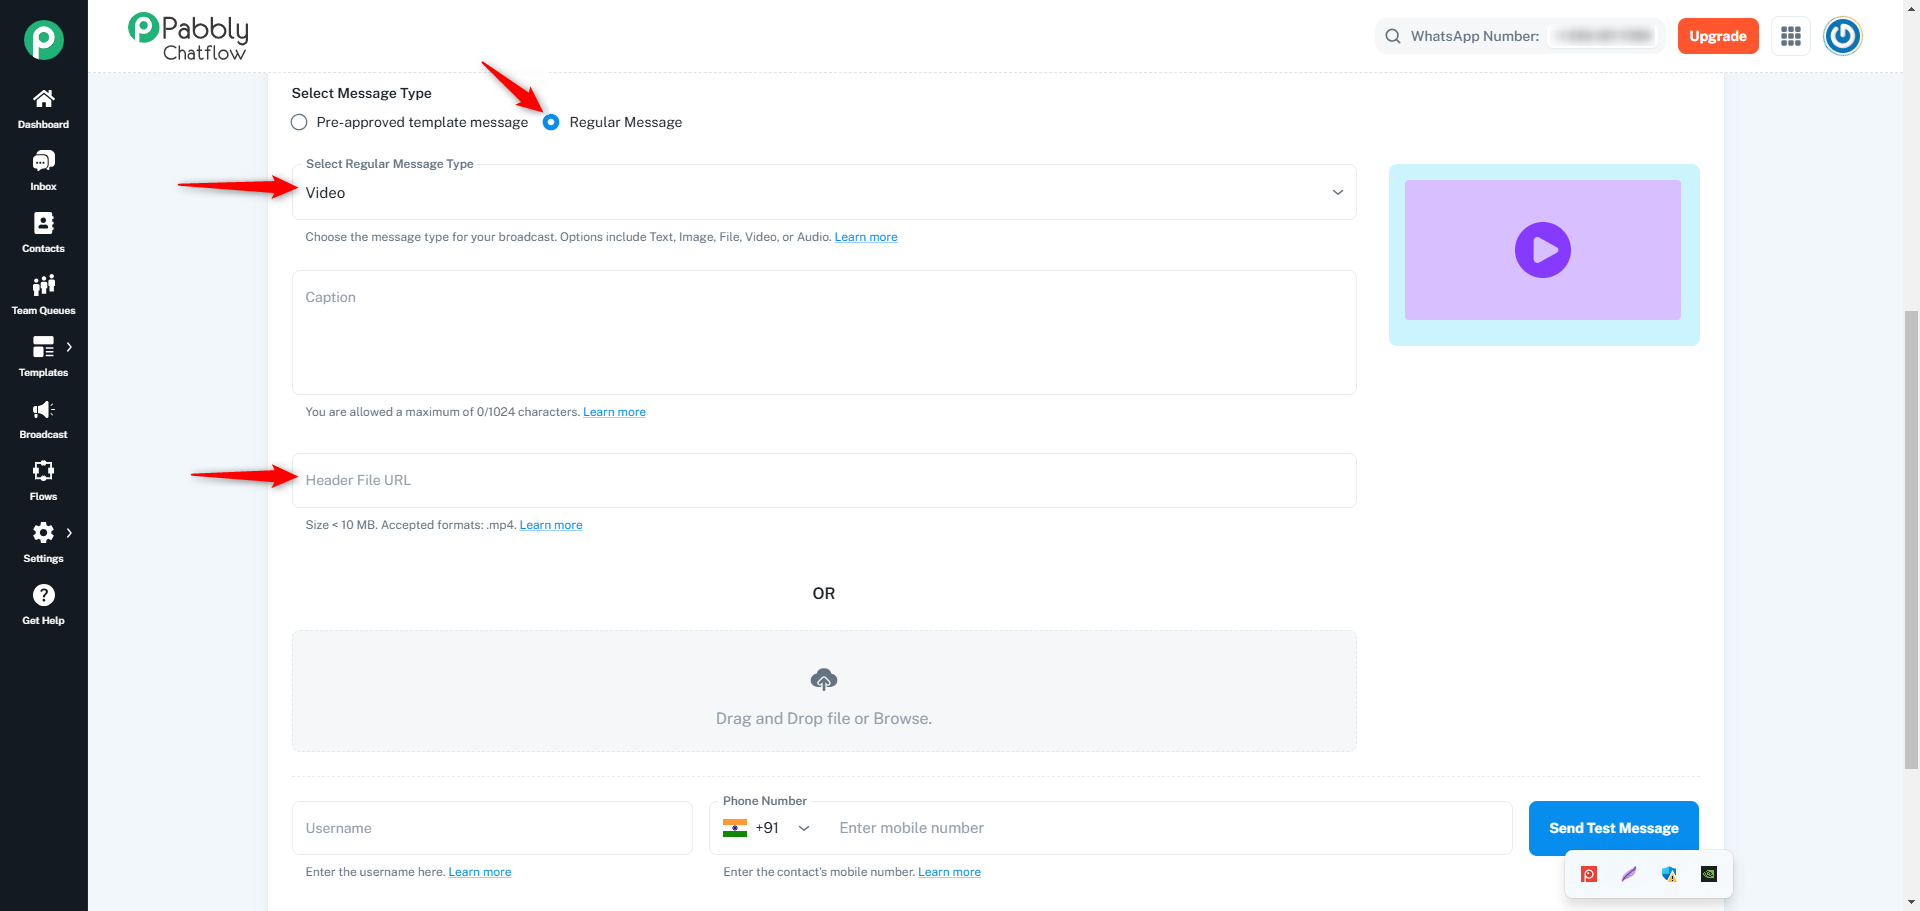
Audio Message:
Audio URL (Size < 16 MB, Format: .mp3) is required.
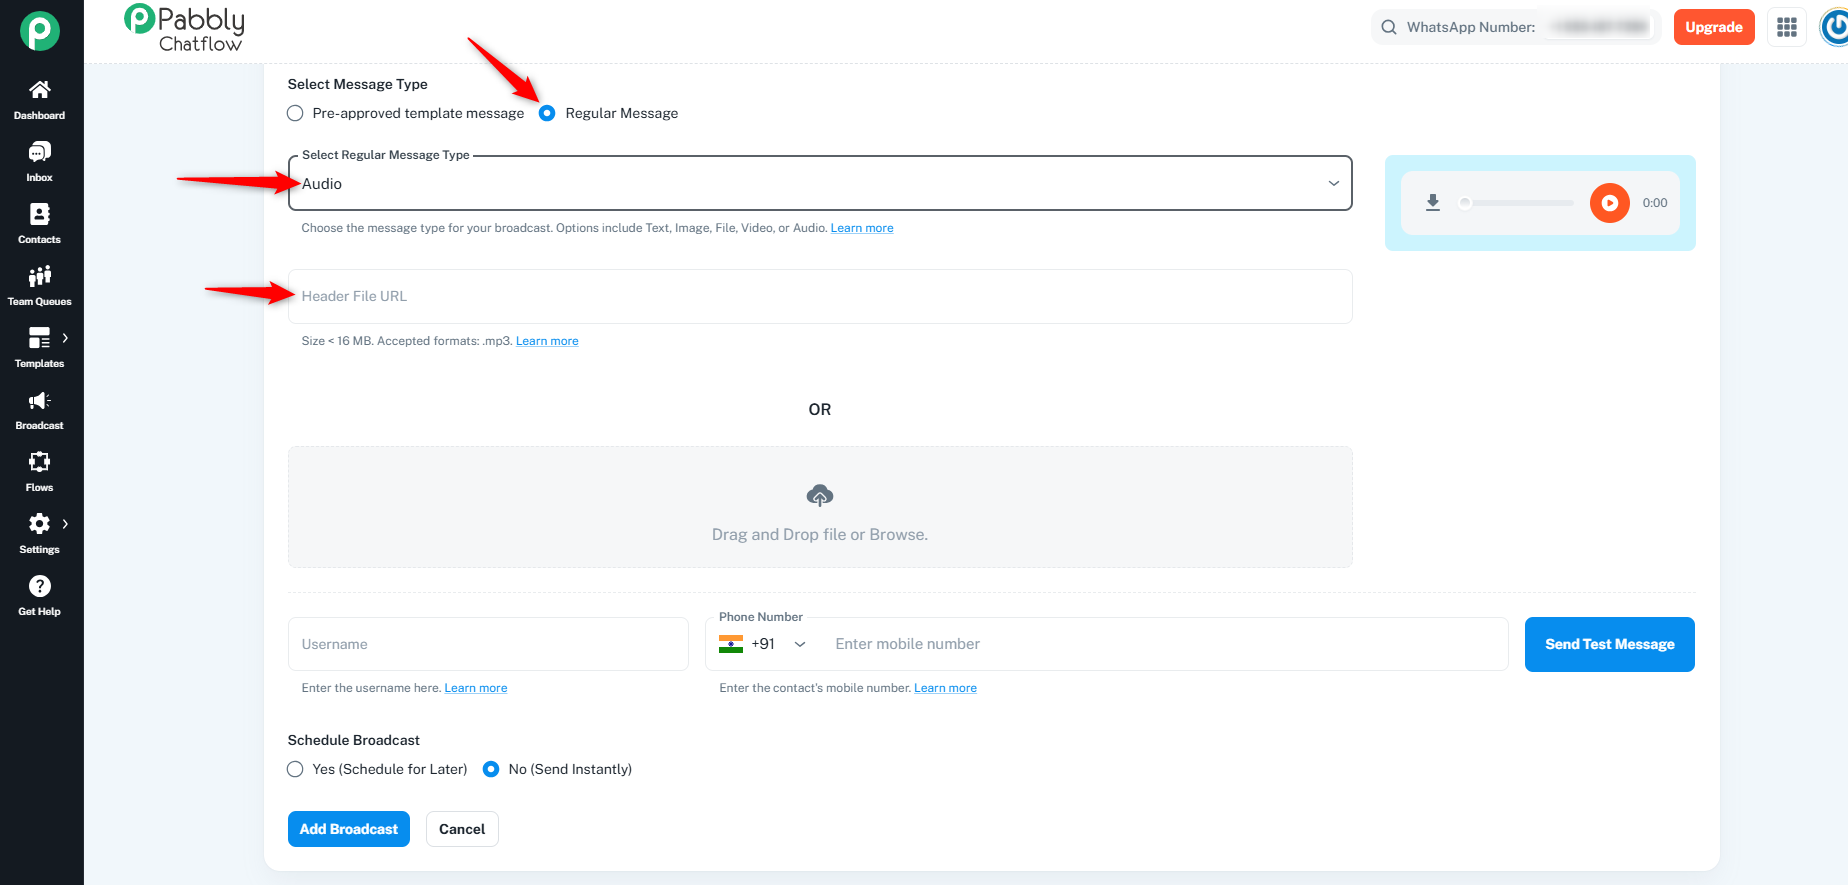
You can test your broadcast by sending a test message before finalizing the campaign. Ensure that you enter a valid username and phone number (with country code).
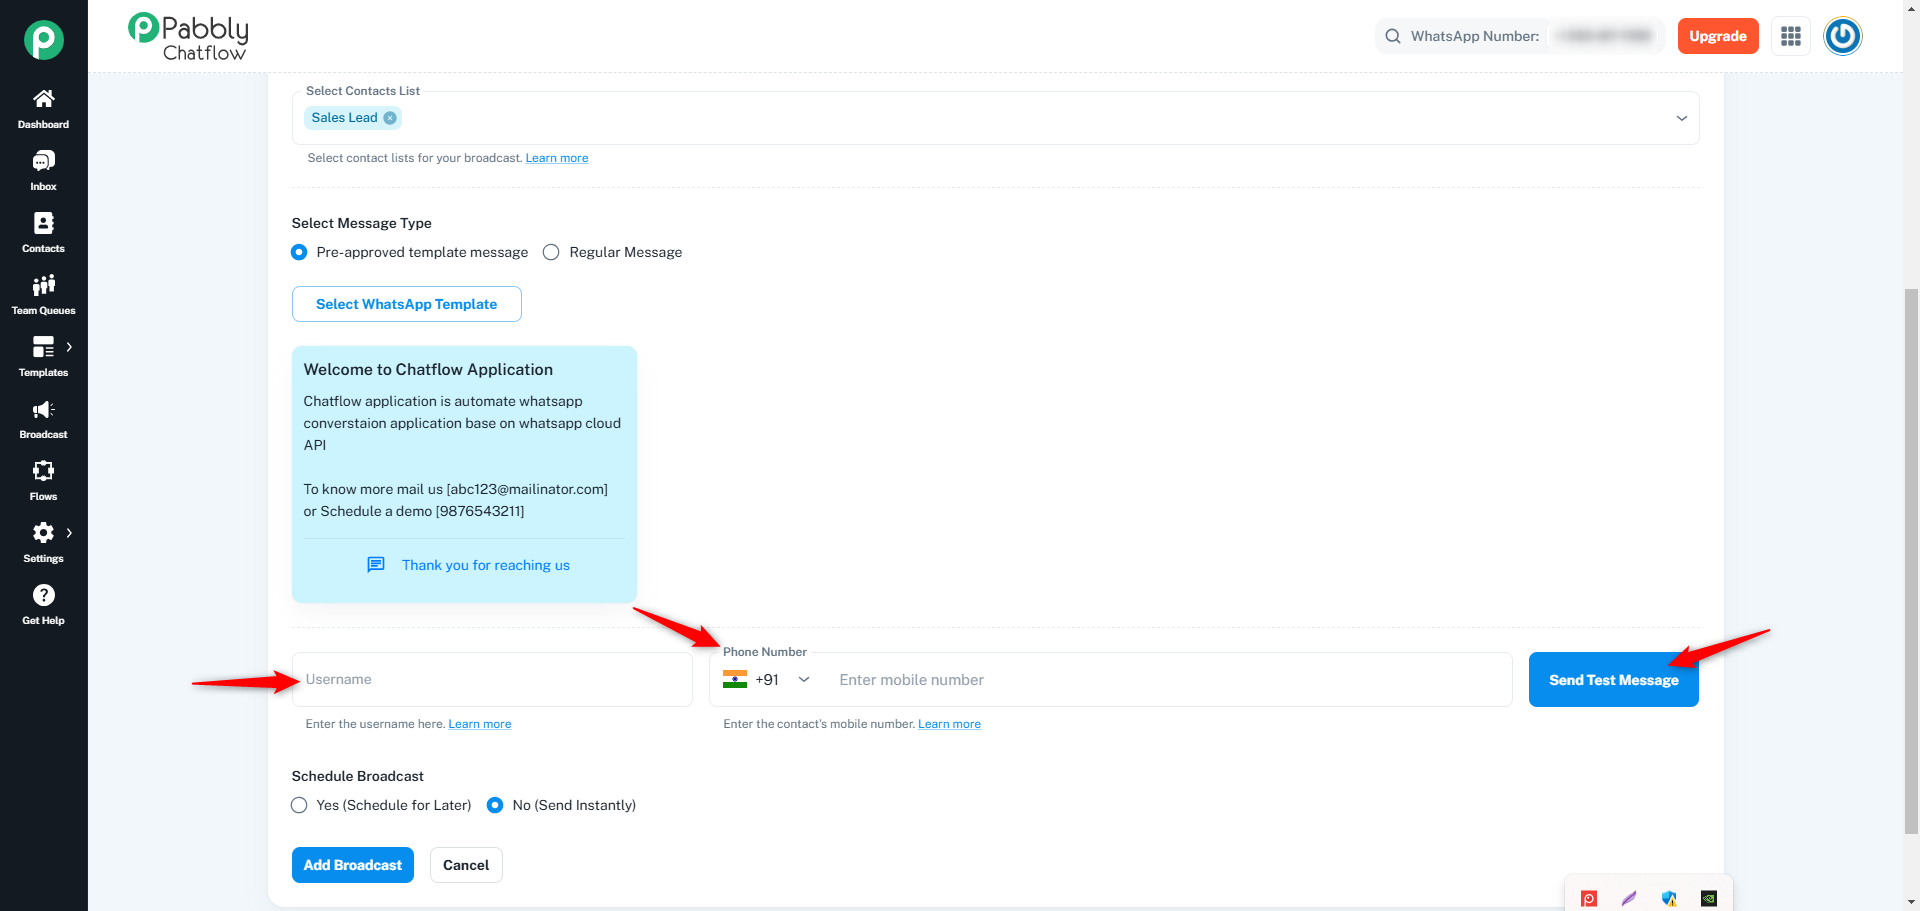
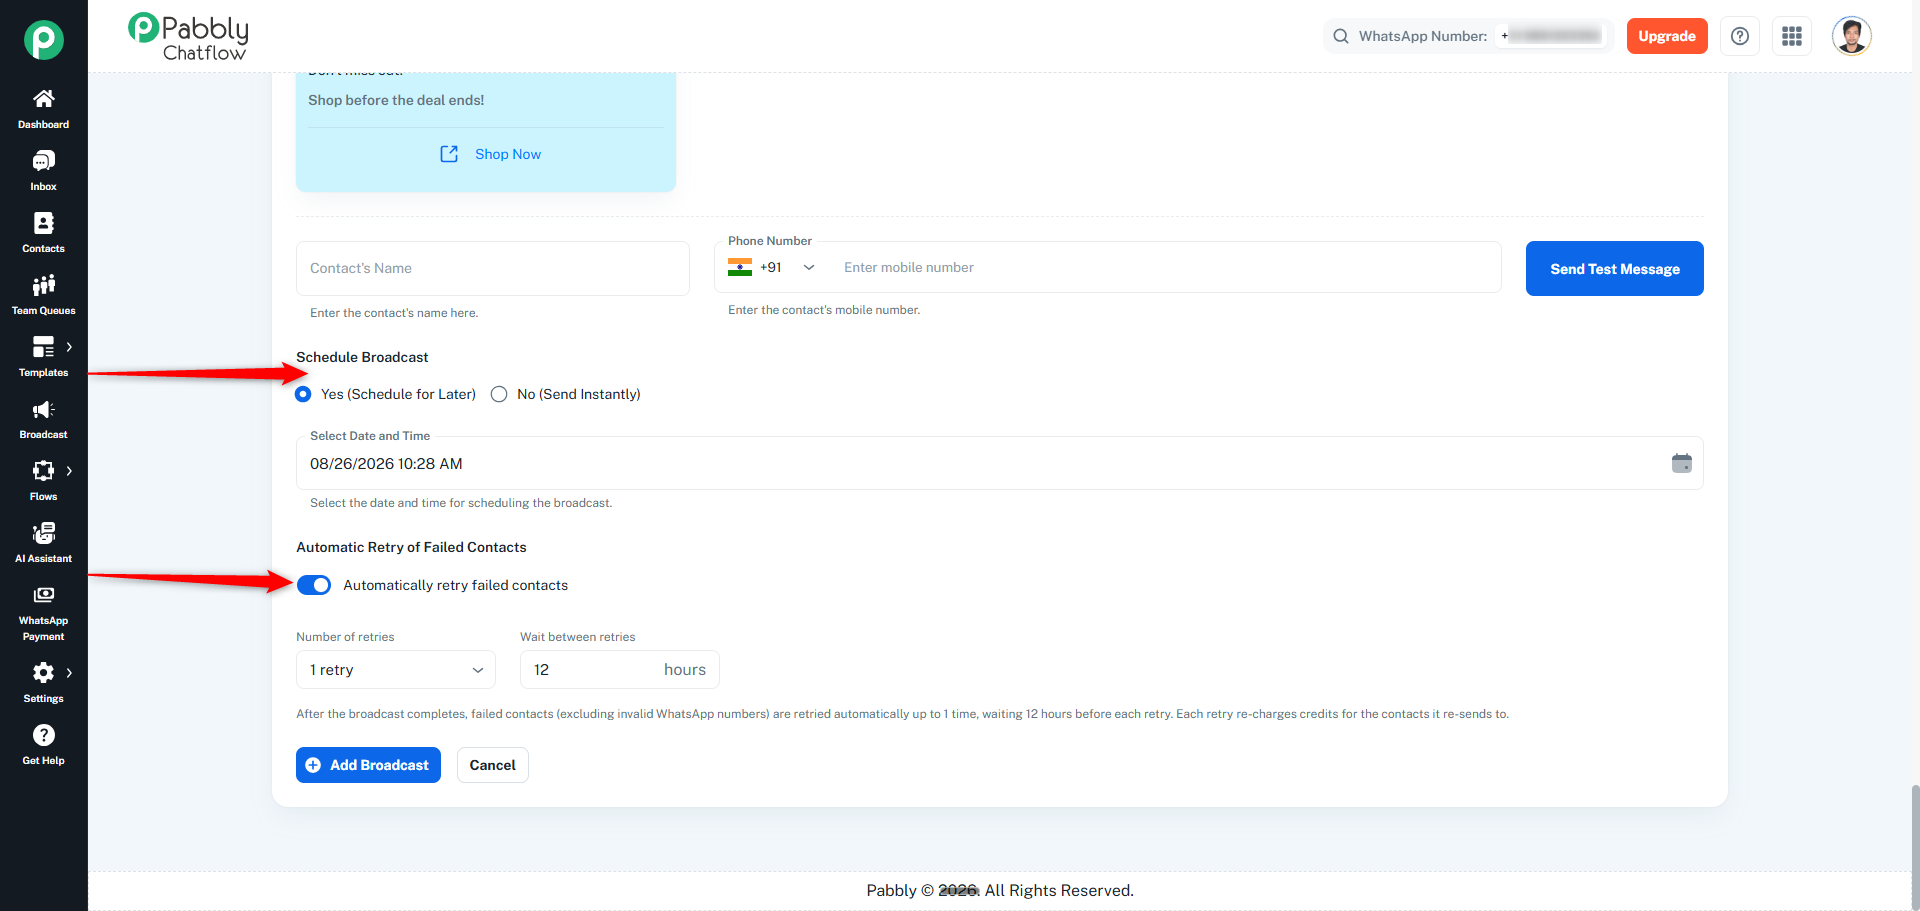
You have the option to schedule the broadcast or send it instantly:
Schedule for Later: Select "Yes" and specify the date and time for the broadcast.
Send Instantly: Select "No" to send the broadcast immediately to the selected contact list.
You can enable Automatically retry failed contacts to automatically resend the broadcast to contacts whose messages failed.
When enabled:
Select the Number of retries: 1, 2, or 3 retries.
Set the Wait between retries in hours.
Failed contacts, excluding invalid WhatsApp numbers, will be retried automatically after the selected waiting period.
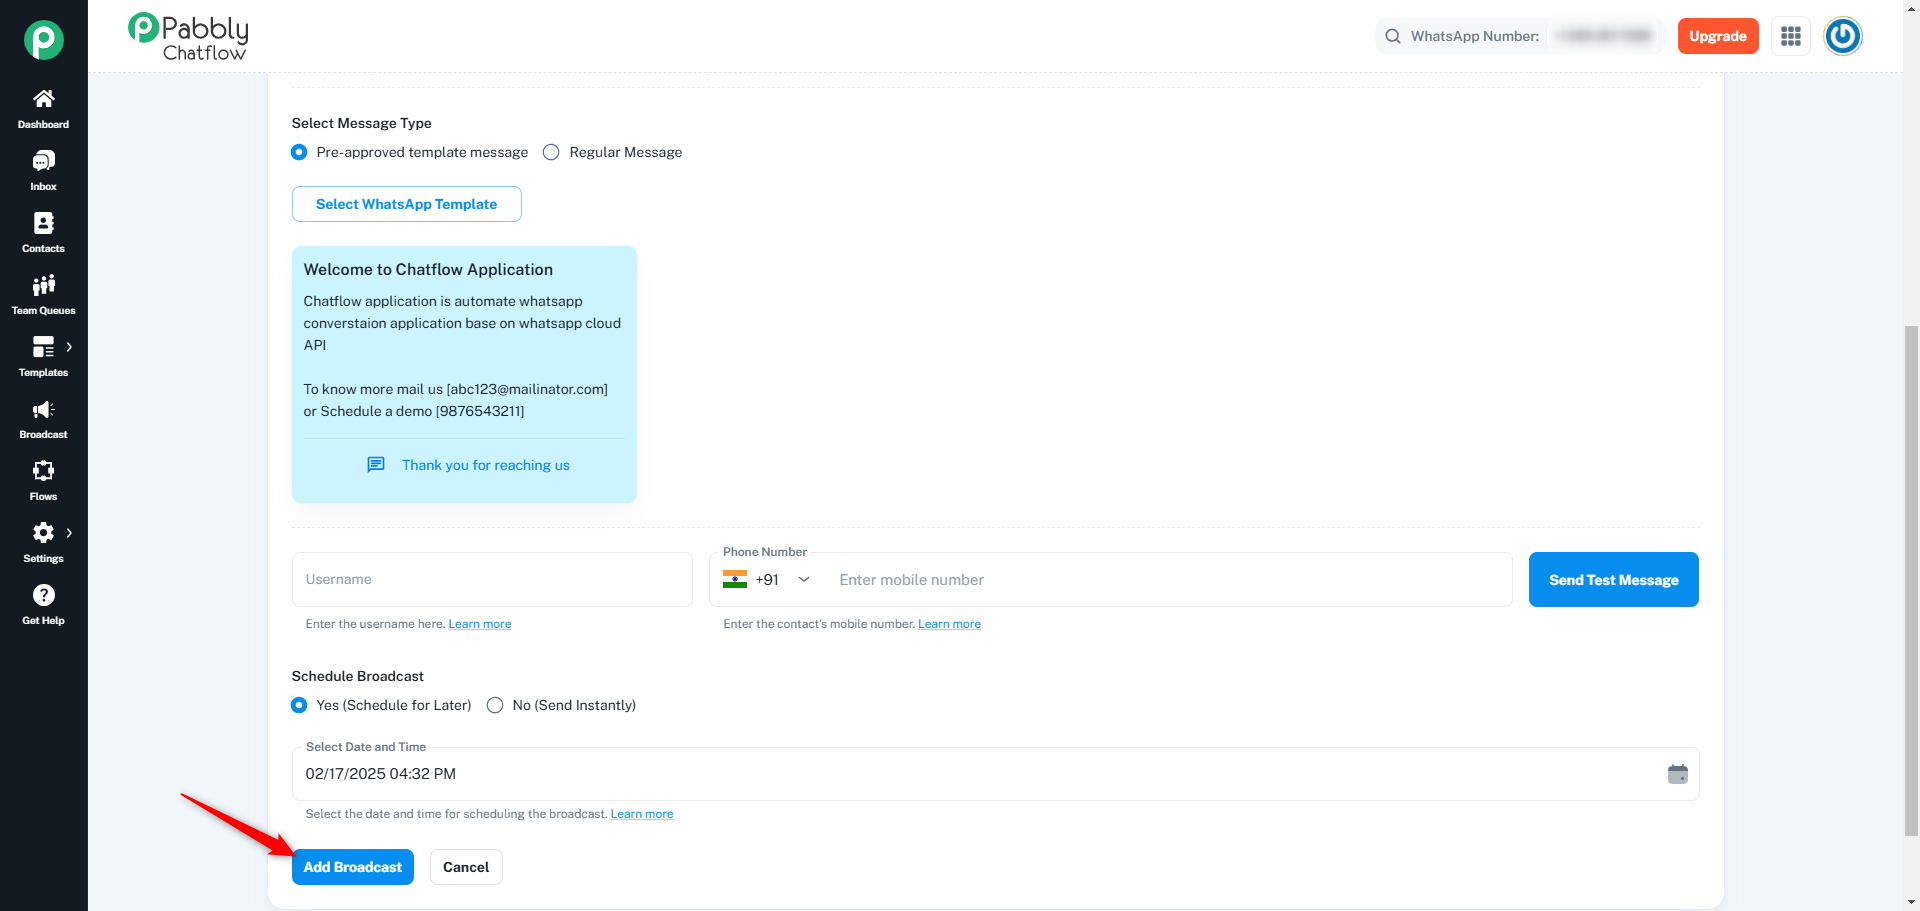
Once all the required details are filled, click on the Add Broadcast button to create the campaign.
Chat Status Information:
If a contact's chat status is not AI Assistant, it will change to Pending after the broadcast.
If a contact's chat status is AI Assistant, it will remain AI Assistant status after the broadcast.
Log in to your Chatflow account using your credentials.
On the left-side menu, click on the Broadcast module to access the API campaign section.
Click on the Add Broadcast button to initiate a new API campaign.
Click the Select Broadcast Type dropdown, then choose API Campaign from the available options.
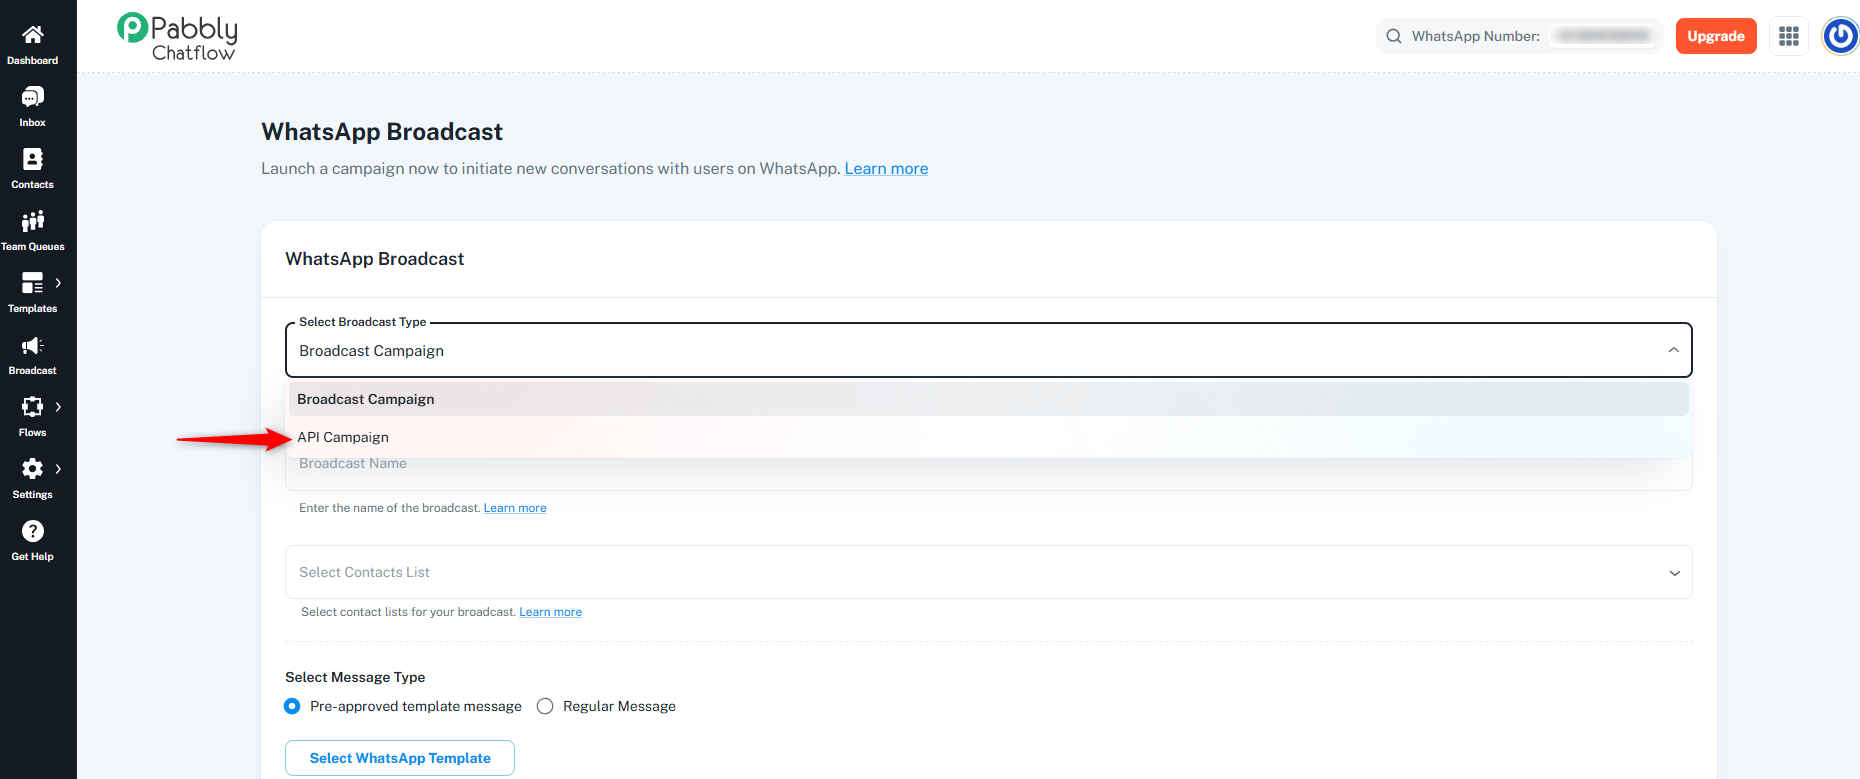
Fill in the required details based on your campaign needs:
Campaign Name: Select the name of your campaign as per your requirements.
Select Template: Select the pre-approved template from the drop-down list.
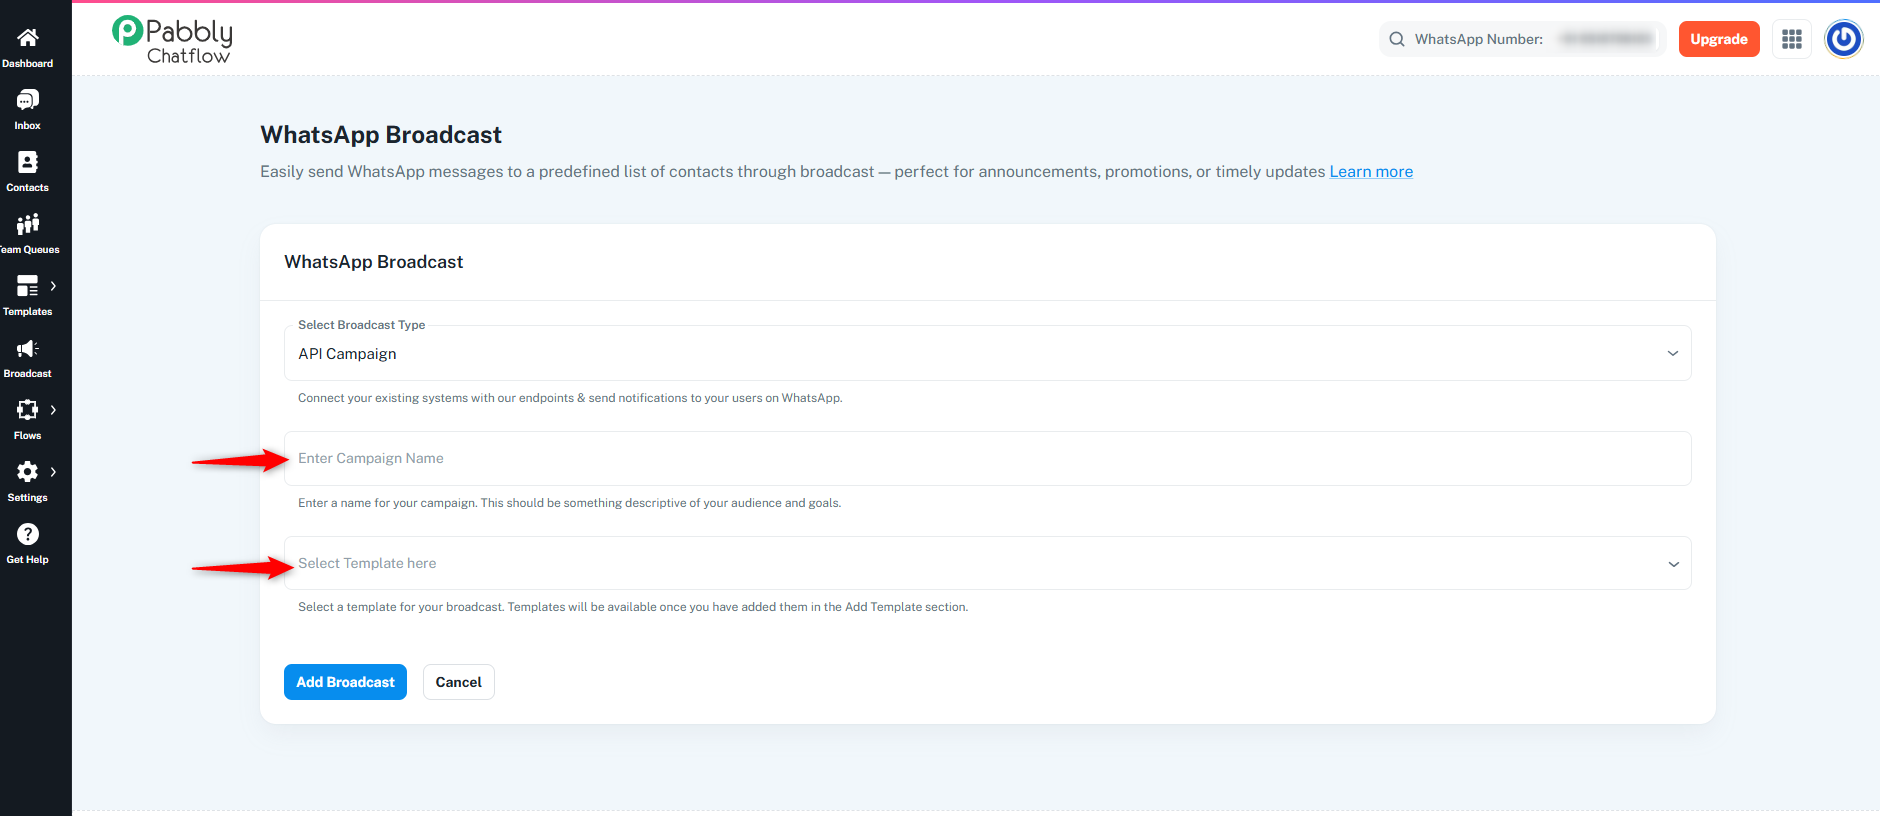
Once all the required details are filled in, click on the Add Broadcast button to create the API campaign.
Chat Status Information:
If a contact's chat status is not AI Assistant, it will change to Pending after the broadcast.
If a contact's chat status is AI Assistant, it will remain AI Assistant status after the broadcast.
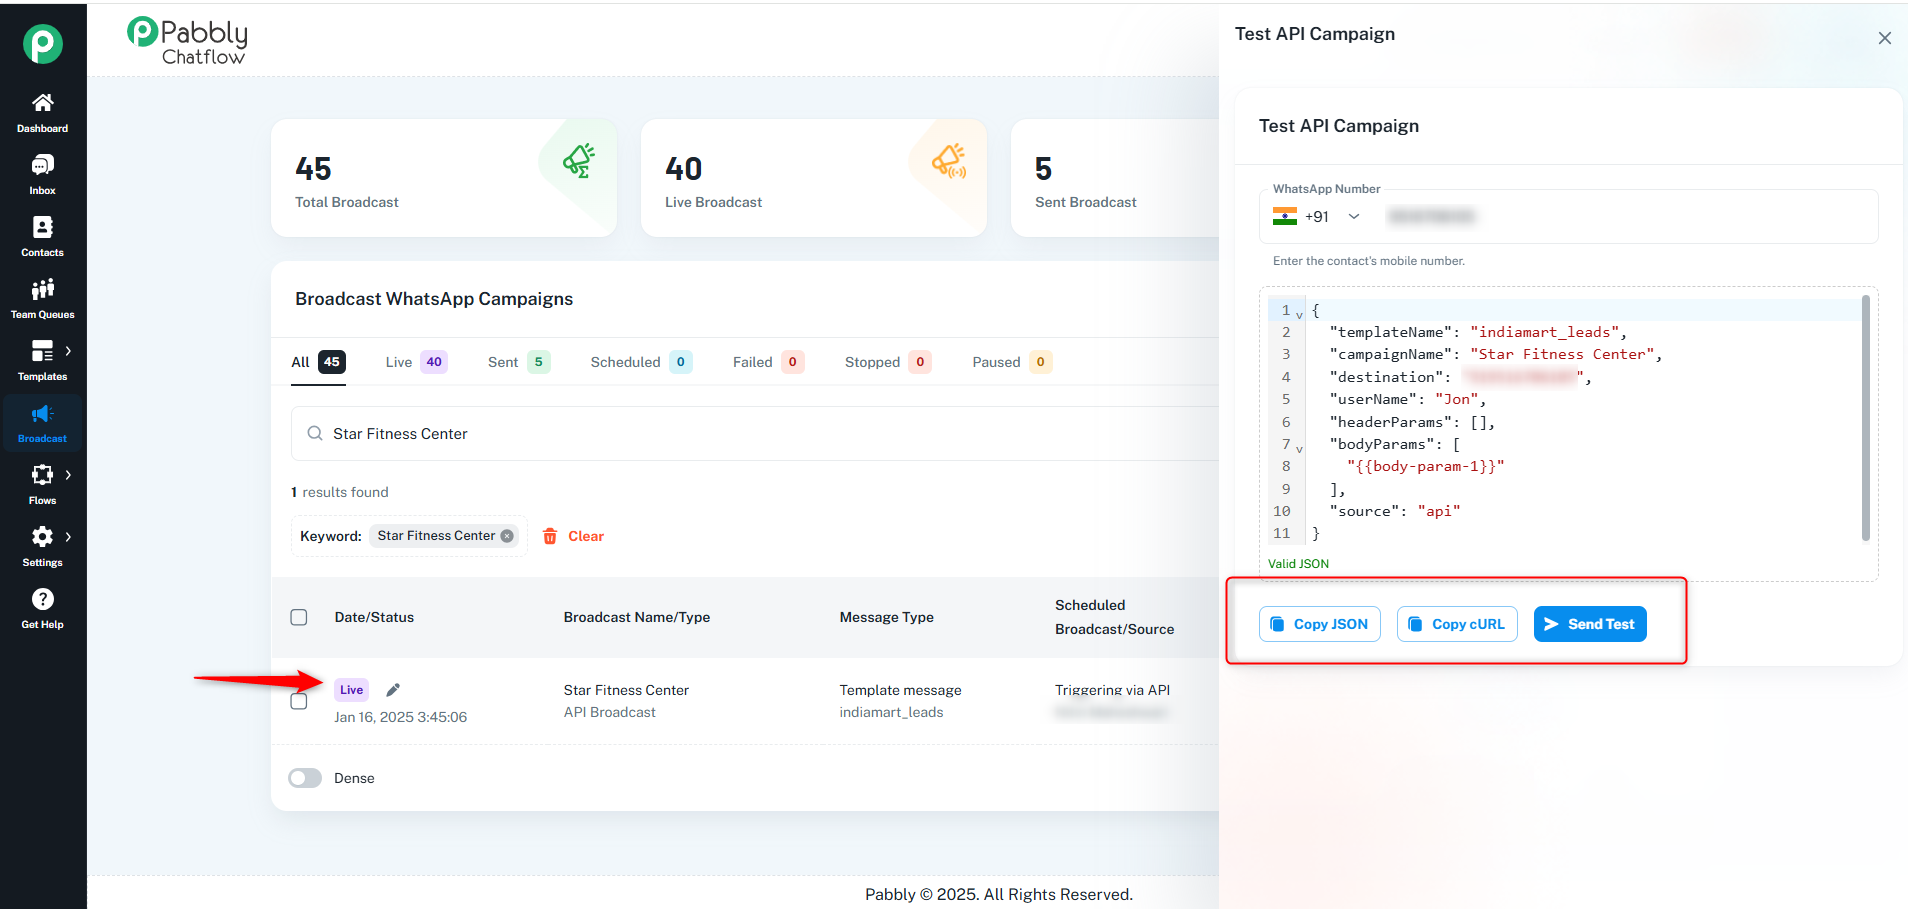
Once the Broadcast is added, it will appear with a LIVE status in the broadcast table. You can click on the Test Broadcast button to view the JSON, cURL, or to test the broadcast.
The Broadcast Table will display the status of each broadcast, allowing you to easily monitor its progress.
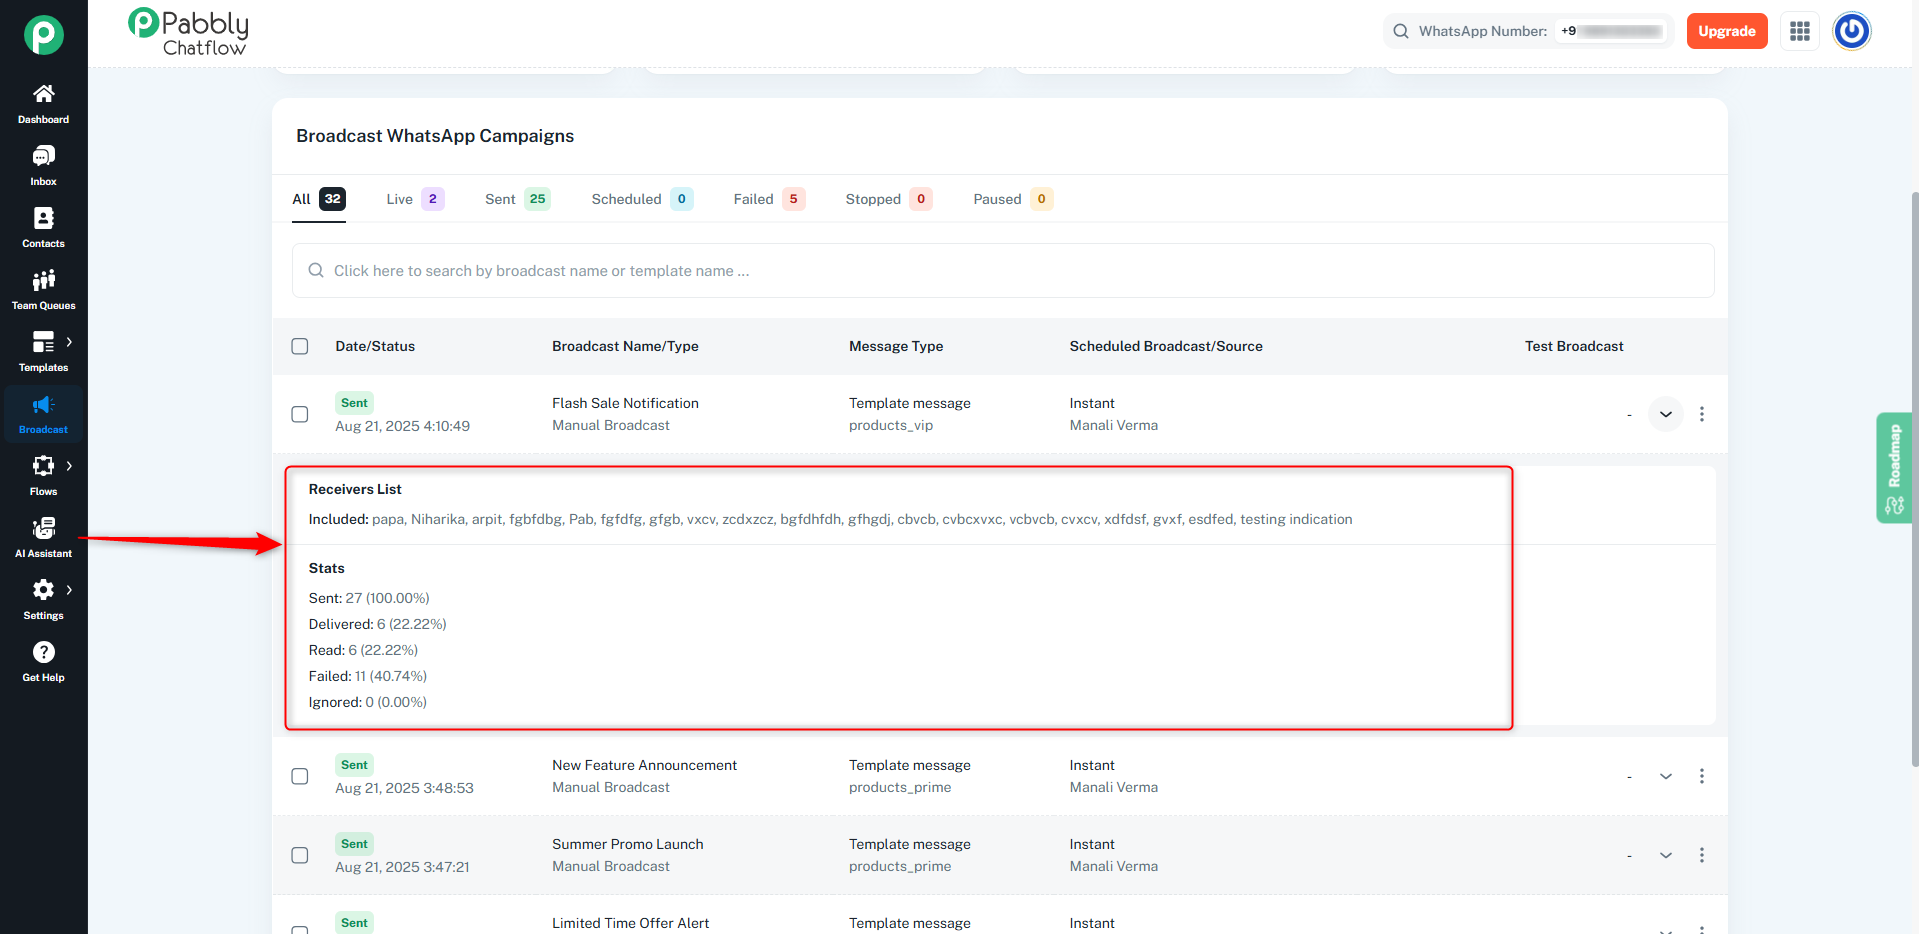
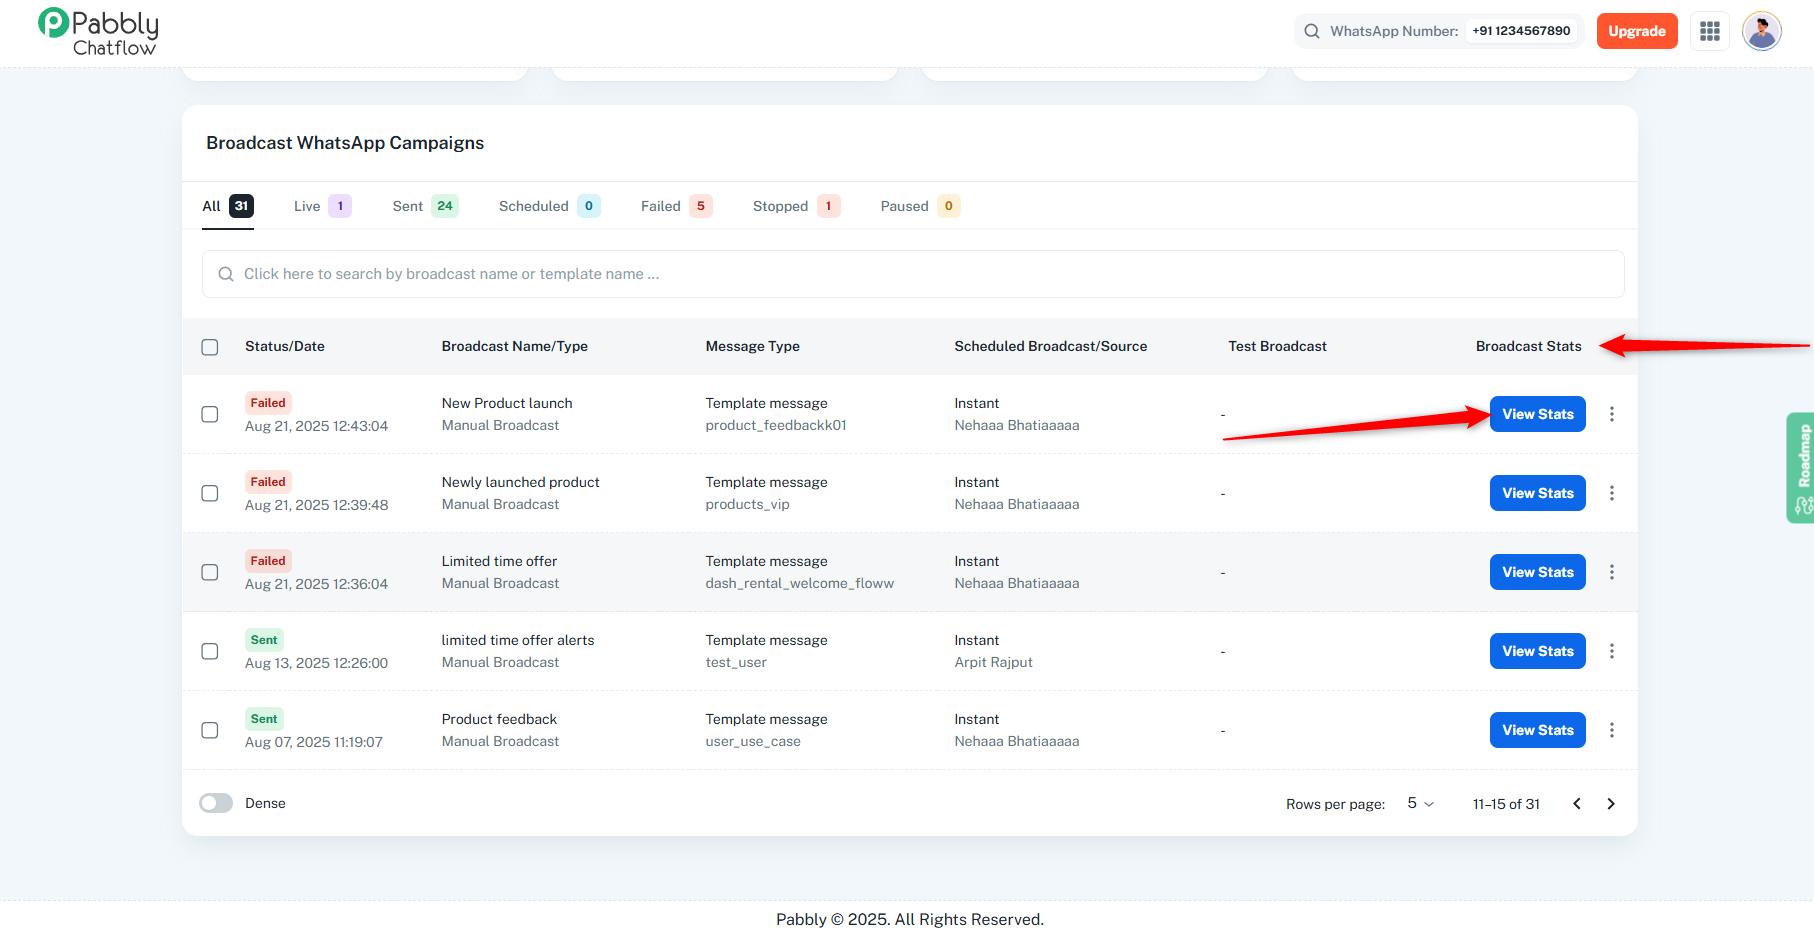
Once you create a broadcast, it will appear in the Broadcast Table within the application. This table displays the list of all broadcasts along with their status and detailed statistics.
Date/Status: Shows when the broadcast was created and whether it is Sent, Failed, Scheduled, or Live.
Broadcast Name/Type: The name you assigned to the broadcast and whether it was a Manual or API broadcast.
Message Type: The template or message format used (e.g., text, image, video, order confirmation template).
Scheduled Broadcast/Source: Whether it was sent instantly or scheduled, and which user created it.
Test Broadcast: Option to send or view test messages before finalizing.
Broadcast Stats: Click the View Stats button to access detailed broadcast analytics and management options.
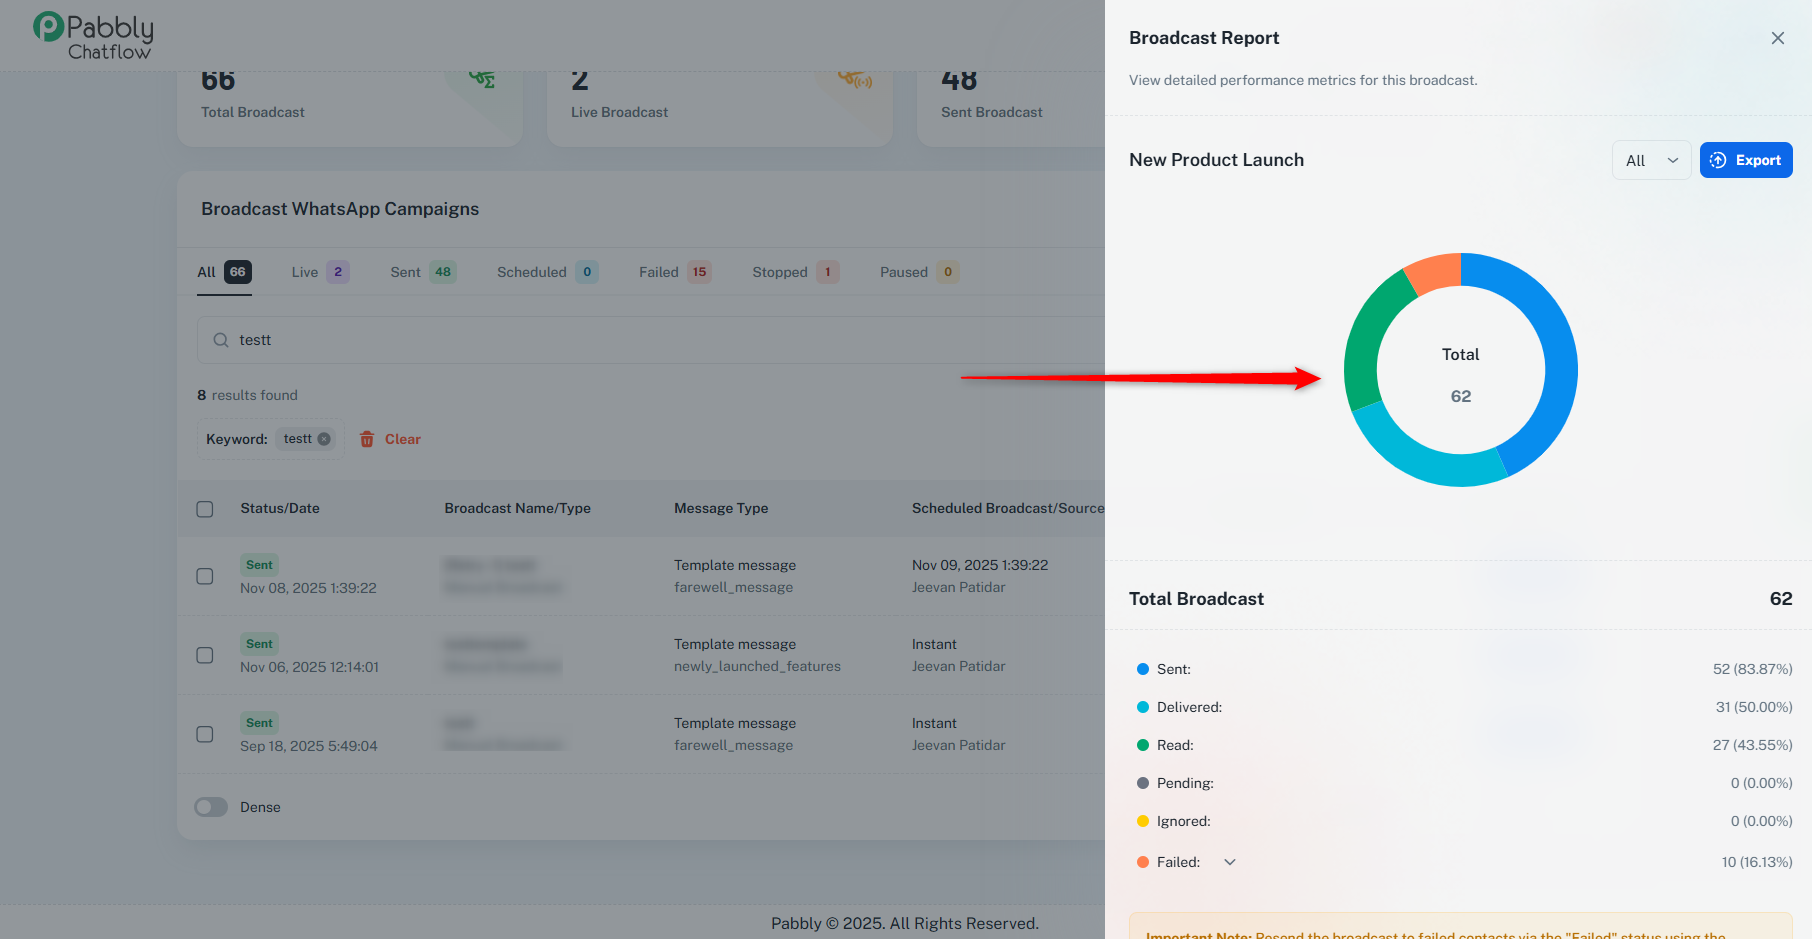
Each broadcast also includes real-time statistics to help you measure performance:
Sent: The number of contacts to whom the broadcast was successfully sent.
Delivered: The number of contacts who successfully received the broadcast.
Read: The number of contacts who opened and read the broadcast message.
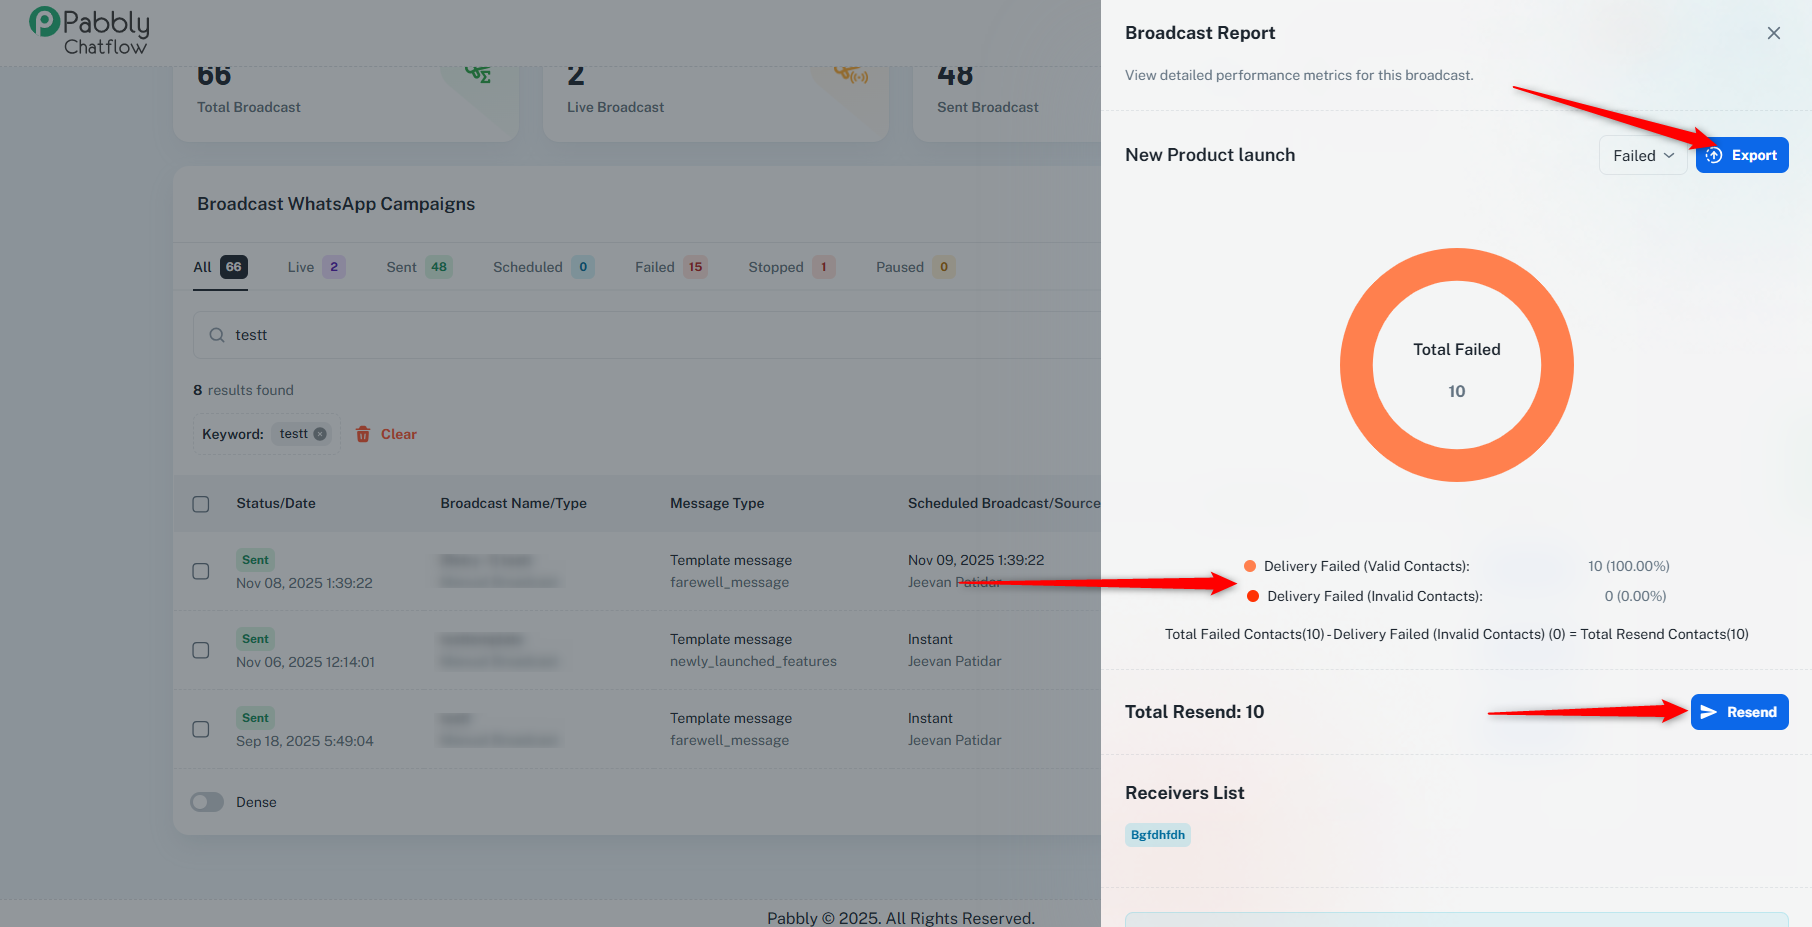
Failed: The number of contacts to whom the broadcast failed to be delivered due to issues such as invalid numbers or template errors.
Valid Failed: Failed contacts with valid numbers (can be resent)
Invalid Failed: Failed contacts with invalid numbers (cannot be resent)
Pending: The number of contacts for whom the broadcast message is still in progress and awaiting sent confirmation from the messaging provider. These messages have not yet been confirmed as successfully sent or failed.
Ignored: The number of contacts outside the 24-hour window, to whom the broadcast was not sent and were ignored during the sending of the broadcast.
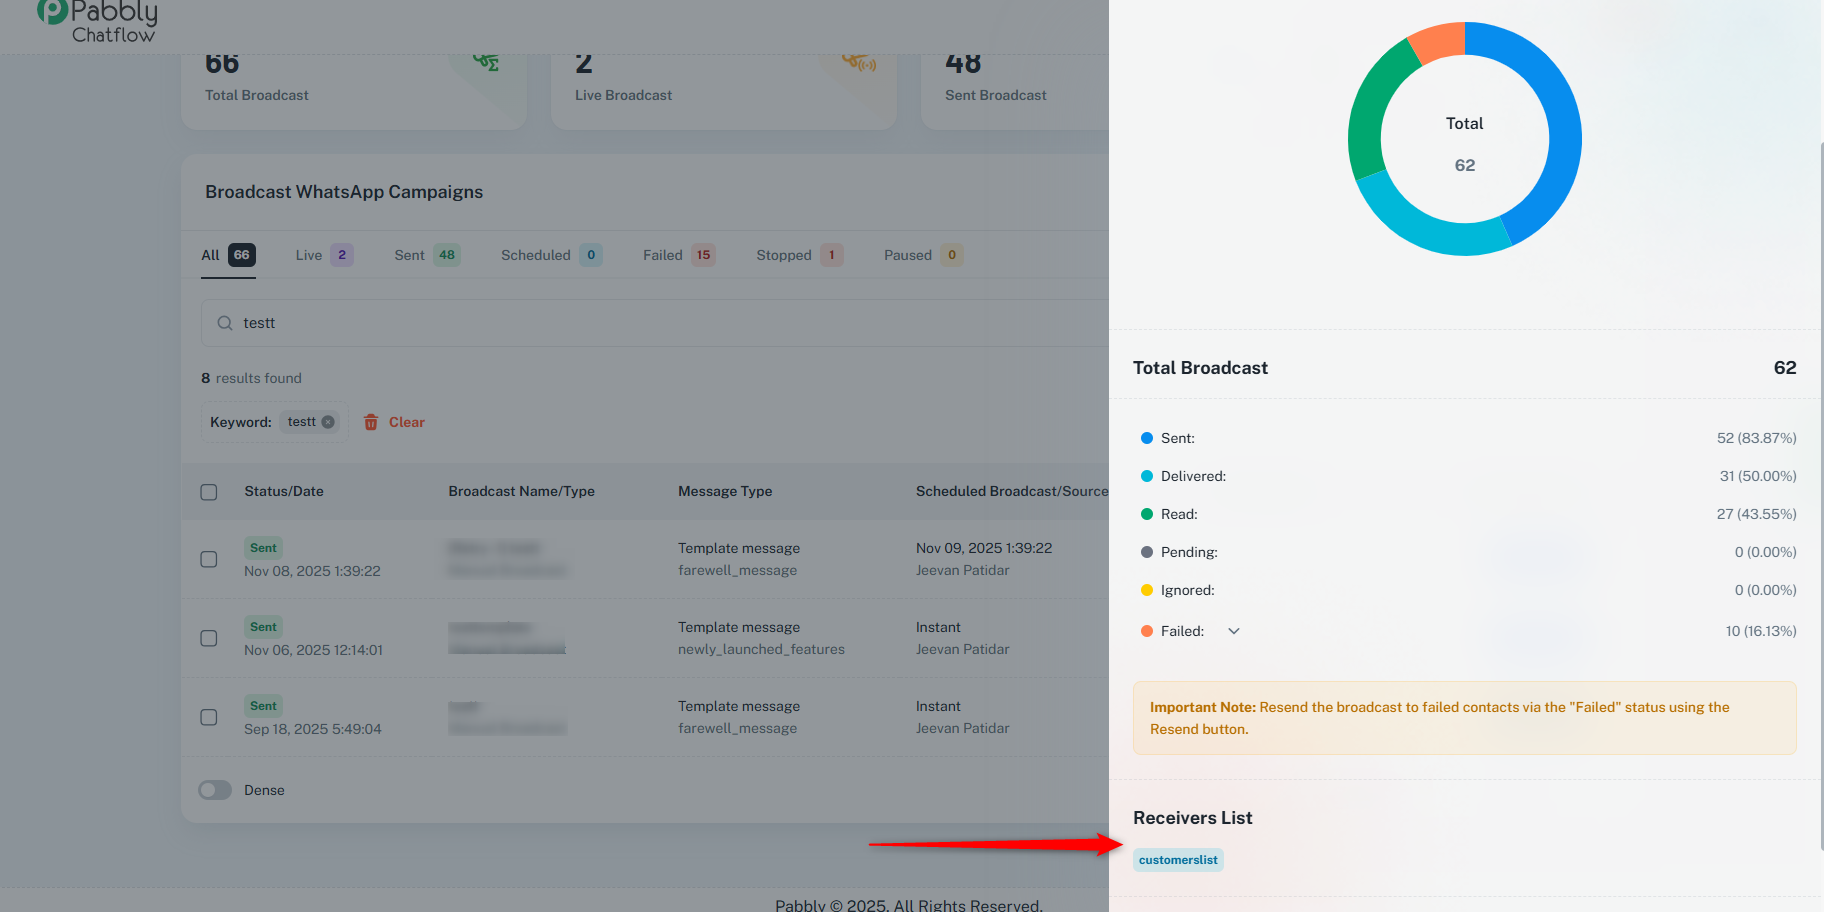
Displays the name of the contact lists associated with this broadcast.
The Export button allows you to download broadcast data in CSV format:
Export works for all statuses and filters (All, Sent, Delivered, Read, Failed, Ignored).
Failed export separates Valid Failed and Invalid Failed, including failure reasons.
The Resend button allows you to retry sending to failed contacts:
Only Valid Failed contacts can be resent
Invalid contacts are automatically excluded from resend
Creates a new broadcast with prefix [Retry 1]
Resend is scheduled to go live after 12 hours
Maximum 2 retries allowed per broadcast
After second retry, "Resend limit reached" message appears
Product Launch Update → [Retry 1] Product Launch Update → [Retry 2] Product Launch Update → Resend limit reached
Broadcast stats show zero only if all chats linked to the contacts in the broadcast list are deleted. Deleting the contact list alone does not reset the stats.
When resending, contacts deleted from the list will not be included in the resend, even if they were previously valid.
The View Stats button is disabled if the broadcast is scheduled. You can view broadcast stats only once the broadcast goes live.
You cannot resend the broadcast immediately. It will be scheduled to resend 12 hours later and will go live after 12 hours.
If a broadcast has already been resent once, it cannot be resent from the original broadcast. The system creates a new broadcast with the prefix [Retry 1] or [Retry 2], with a maximum retry limit of 2.
Live: Broadcasts that are currently in progress and being sent to recipients.
Sent: Broadcasts that have been successfully delivered to recipients.
Scheduled: Broadcasts that are set to be sent at a designated future time, but have not yet been delivered.
Failed: Broadcasts that could not be delivered successfully due to errors, such as invalid numbers, issues with the message template.
Stopped: Broadcasts that were manually ended before completion, stopping further messages from being sent.
Paused: Broadcasts that are temporarily stopped and can be resumed later. No messages are sent during the pause.
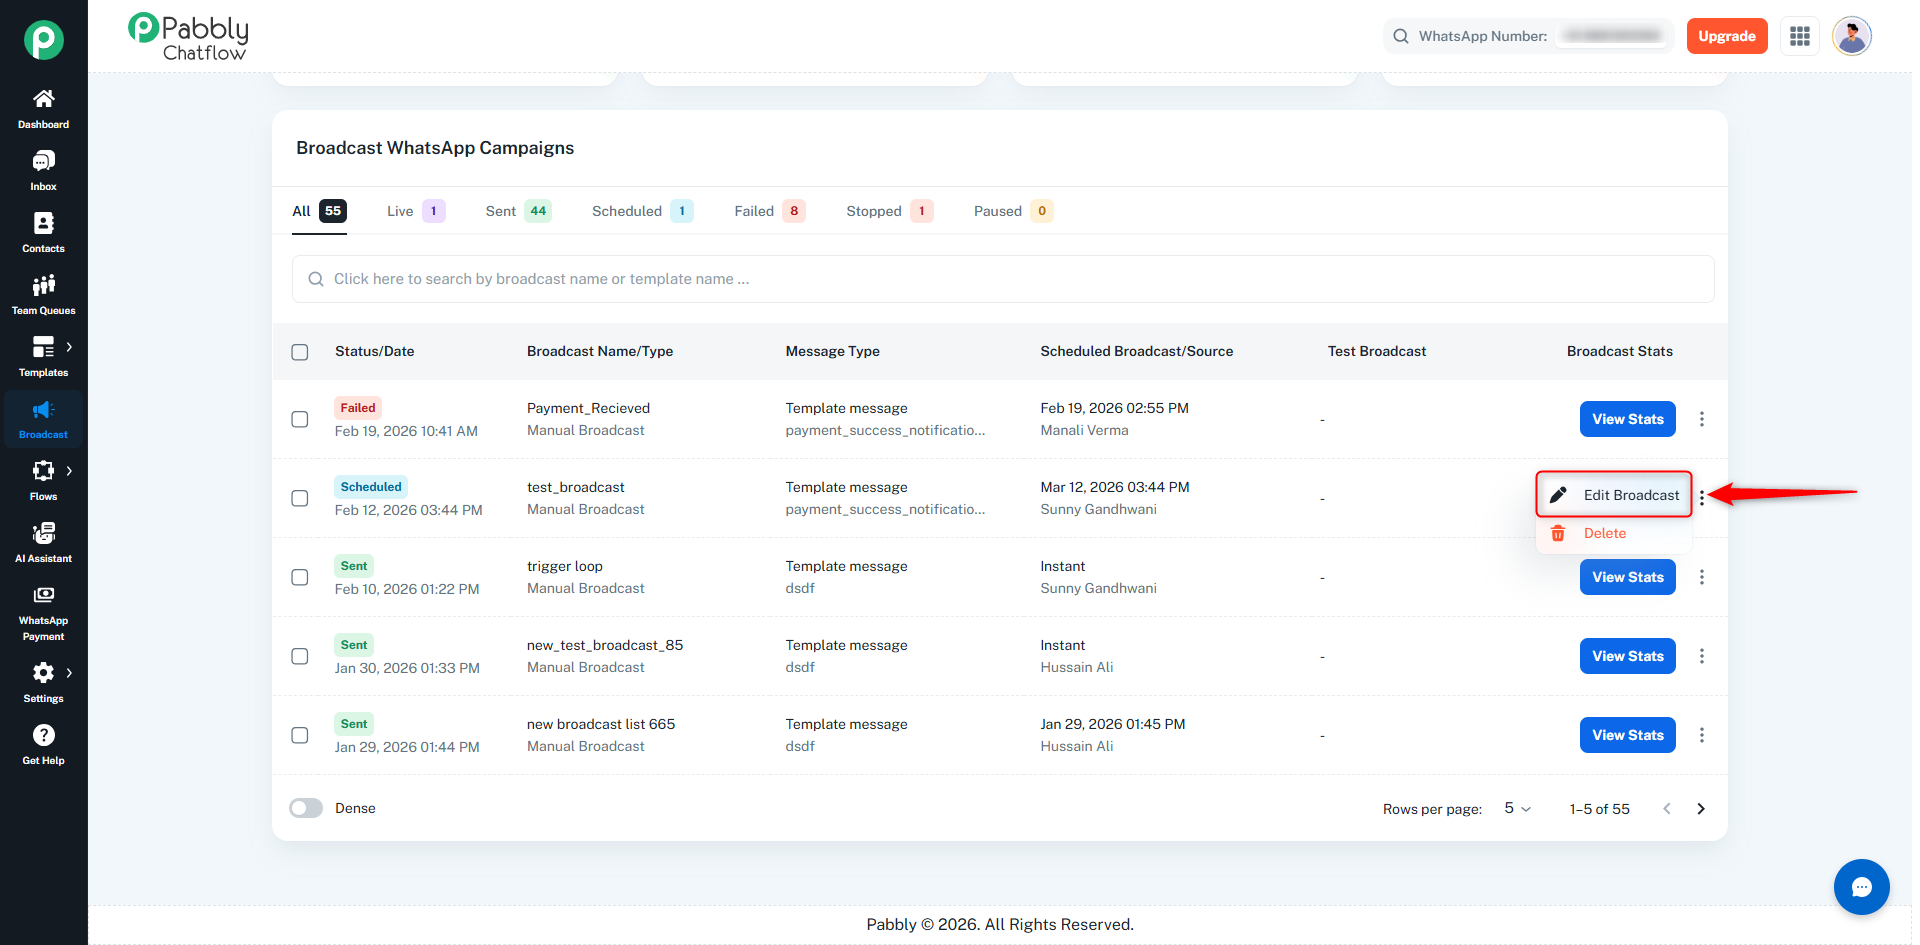
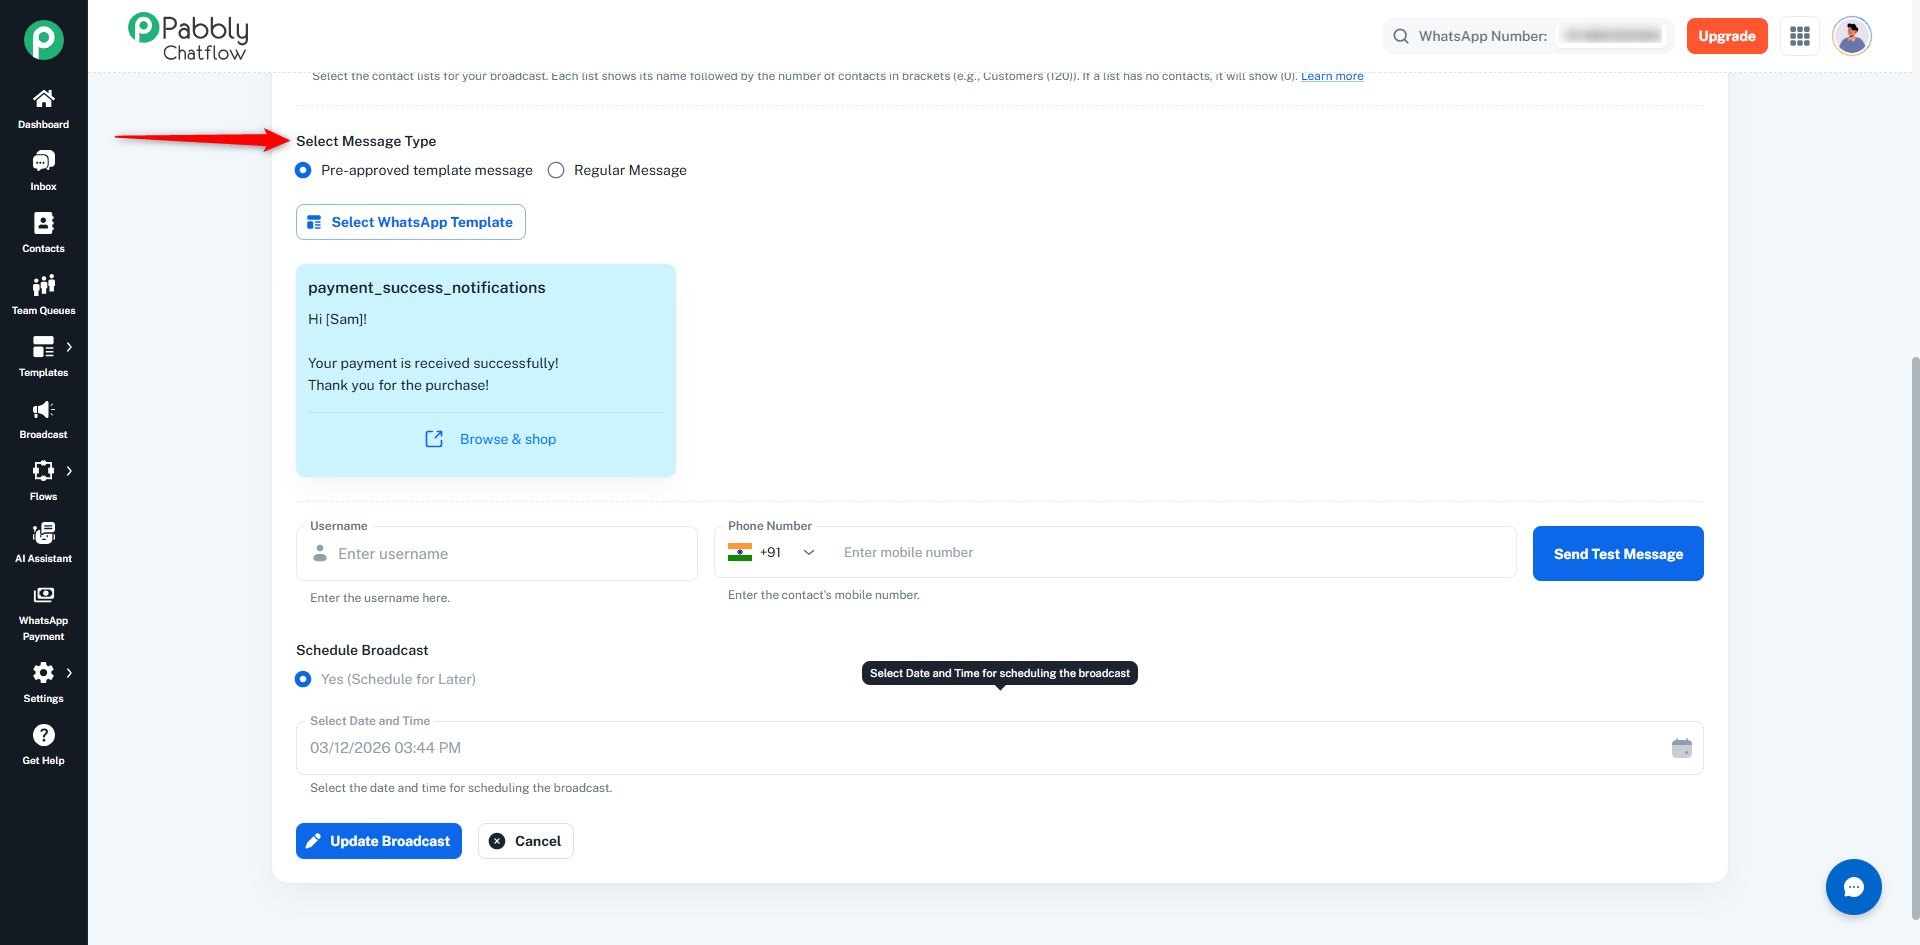
If a broadcast is scheduled for a future date and time, you can update the message type before it is sent.
Navigate to the Broadcast Module from the left-side menu.
Locate the broadcast with Scheduled status in the broadcast table.
Click the Edit option for the scheduled broadcast.
In the Edit WhatsApp Broadcast screen, update the Message Type as required:
Pre-approved Template Message – Select a different approved template.
Regular Message – Modify the message content or media if needed.
Click Update Broadcast to save the changes.
Note:
Only the Message Type can be updated for a scheduled broadcast.
Other fields such as Broadcast Name, Contact List, and Broadcast Type cannot be modified after the broadcast is created.
Editing is allowed only while the broadcast status is Scheduled. Once the broadcast becomes Live or Sent, it cannot be edited.
By following these steps, you can successfully create and manage a broadcast campaign & API campaign. Ensure that all required fields are correctly filled for a smooth broadcasting experience.
