WhatsApp Payment – Full Feature Overview
This document explains the complete working of the WhatsApp Payment in Pabbly Chatflow – from initial setup to using payments in Inbox and Flows, including the Payment Captured and Order Received trigger events.
1. Initial Setup – Enabling WhatsApp Payments
Step 1: Log in and open WhatsApp Payment
- Log in to your Pabbly Chatflow account.
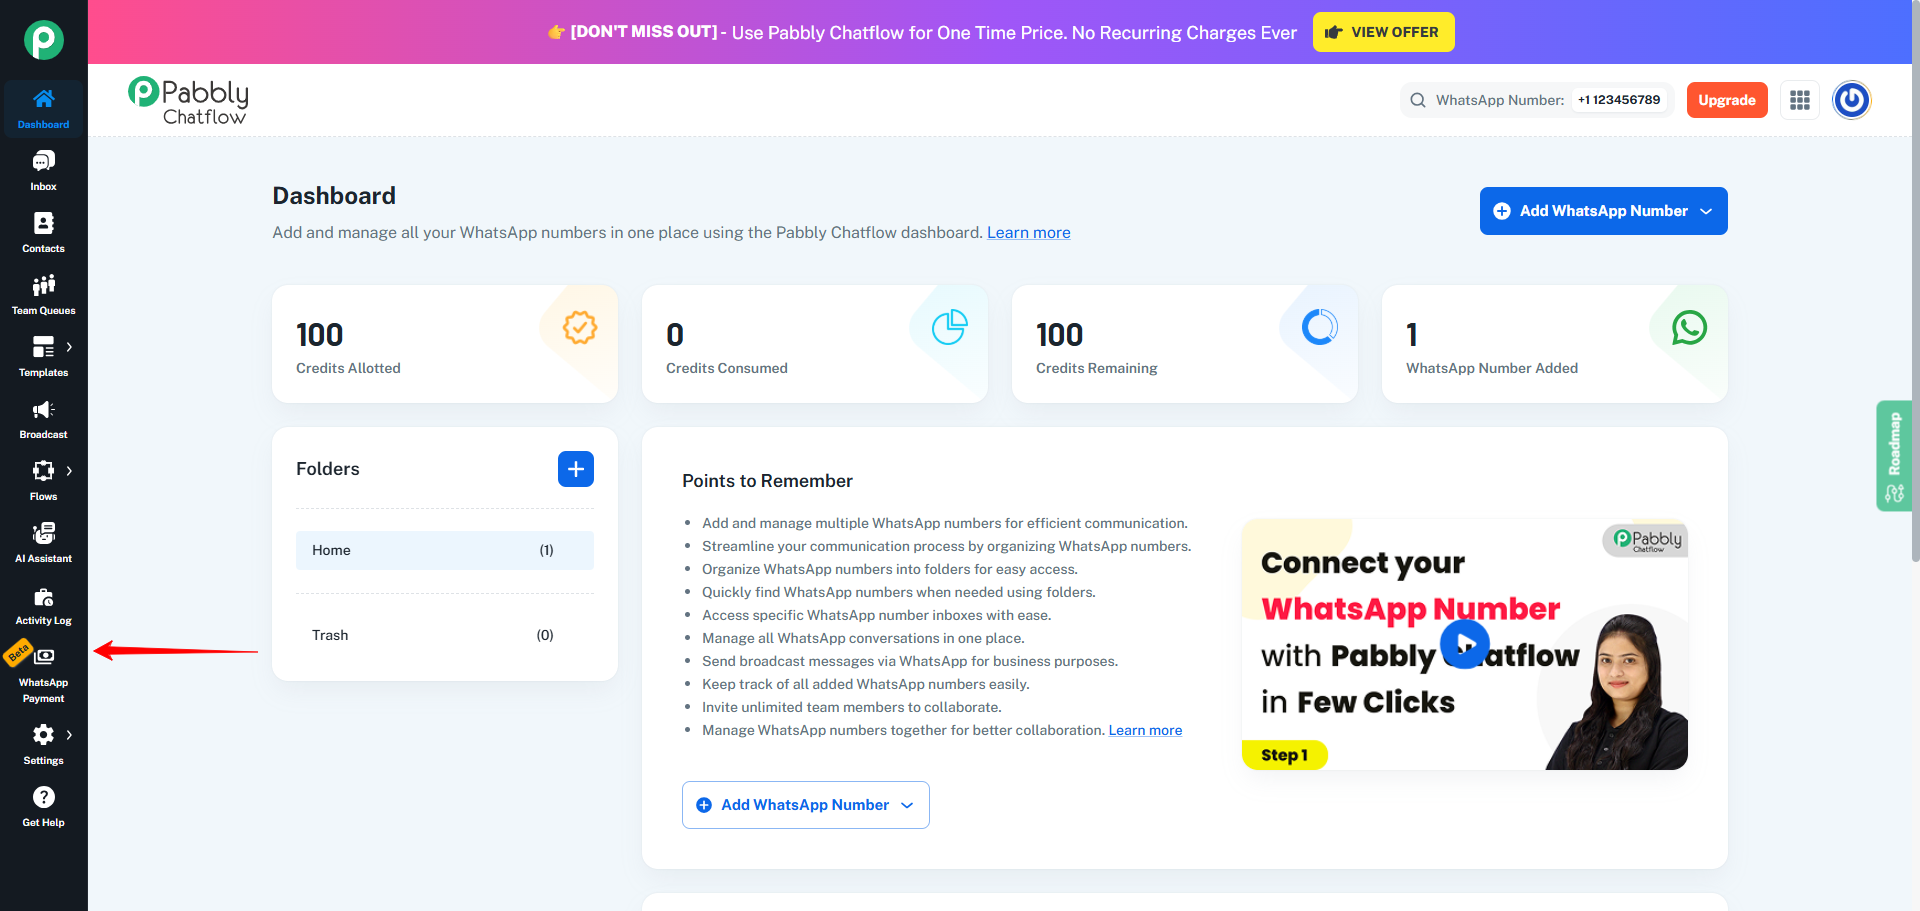
- From the left-hand navigation menu, click on “WhatsApp Payment”.
- If you have not configured the mandatory settings yet, you will automatically be redirected to the WhatsApp Payment tab.
- Here you will see a button called Add WhatsApp Payment at the top-right corner.
Step 2: Add WhatsApp Payment Configuration
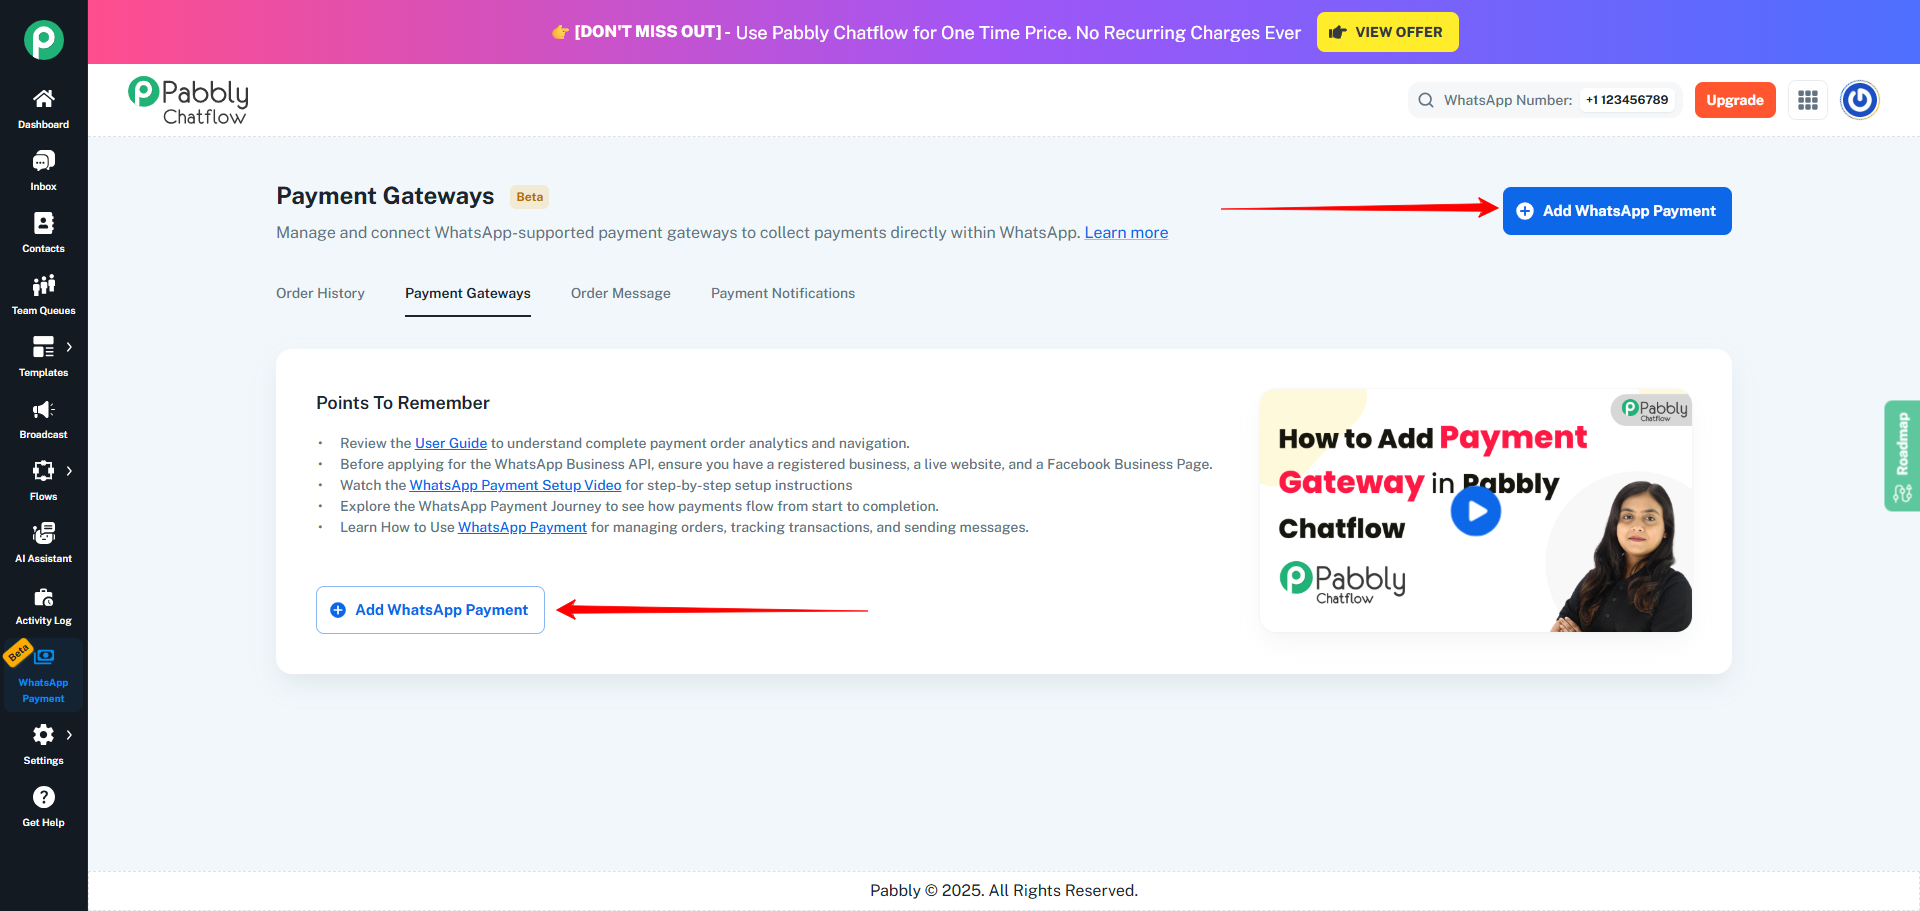
- Click on the Add WhatsApp Payment button.
- A drawer will open where you can configure your Payment Gateway and other related settings.
- Fill in all required details and save the configuration.
- For detailed configuration instructions how to add payment configuration, refer to:
Guide: https://docs.pabbly.com/s/f3b40ae7-4846-4110-8cf3-cdd0cf3467c2/doc/payment-gateways-how-to-add-payment-gateways-TzyV9Q4dJk
Step 3: Add an Order Message
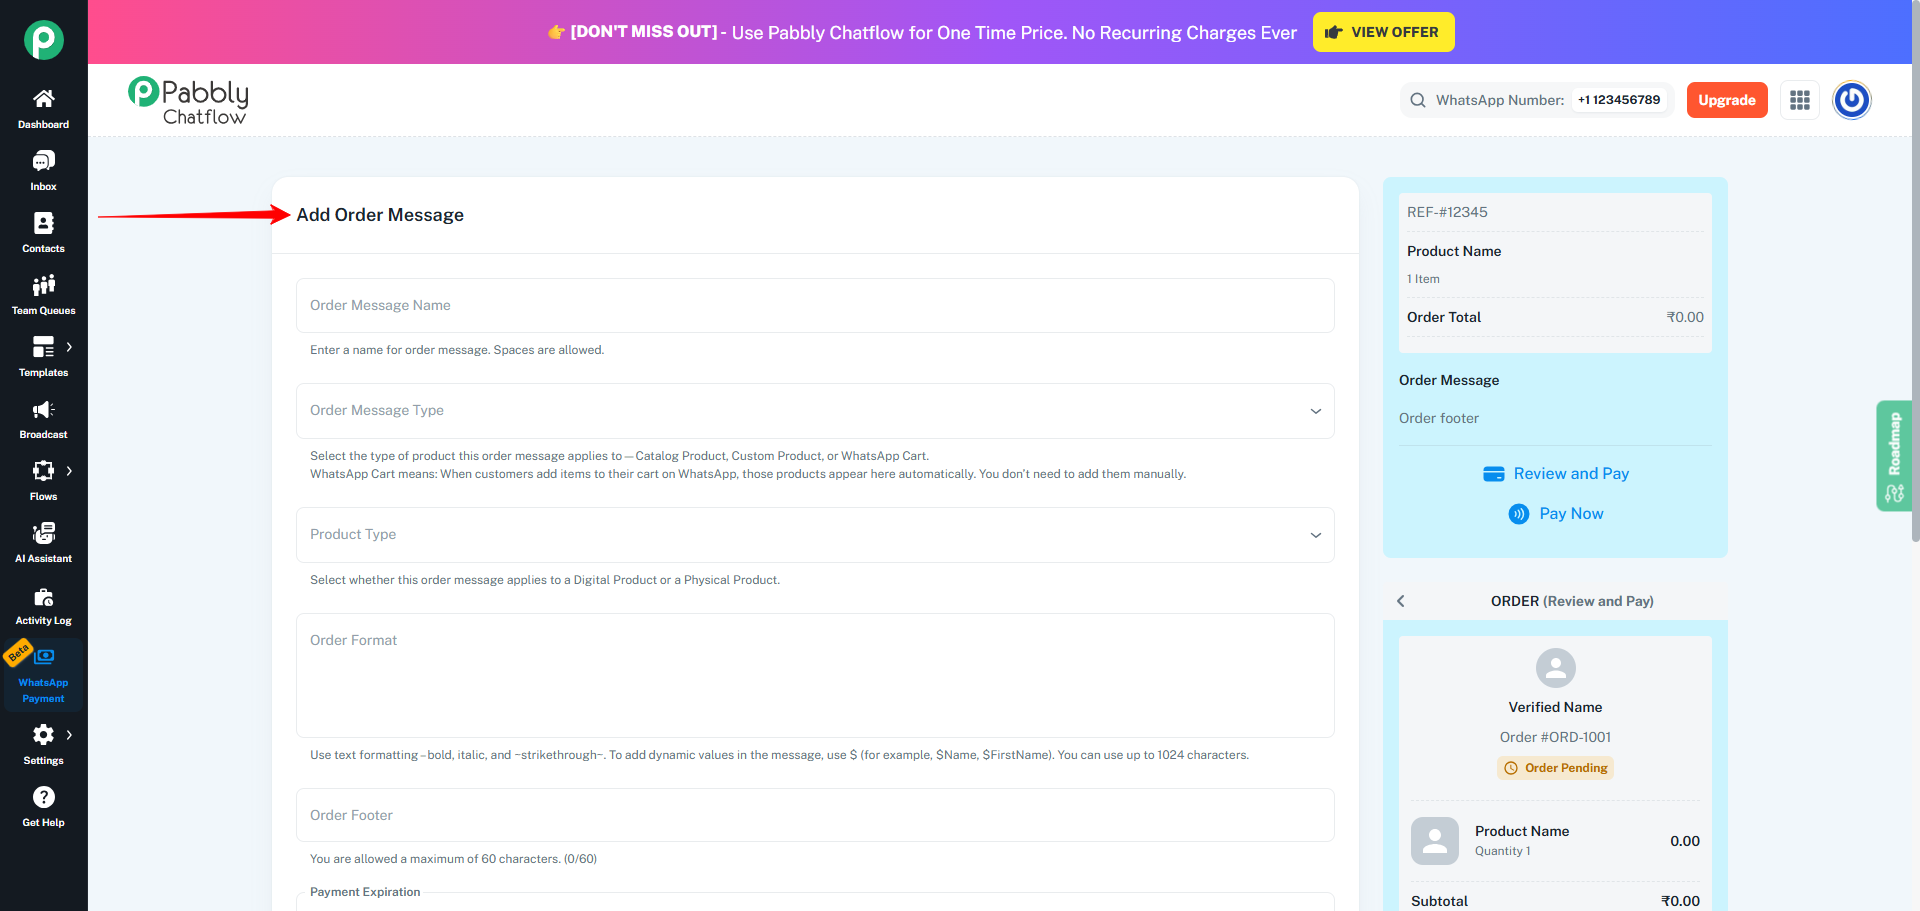
Once the payment configuration is saved, you will be redirected to the Add Order Message page.
- On the Add Order Message page, create at least one Order Message.
- You can choose from the following Order Message Types:
- Custom Product
- Catalog Product
- WhatsApp Cart
- Configure the following for each Order Message:
- Products (name, description, price, image, etc.)
- Charges (Tax, Shipping, Discount)
- Payment link expiration time (e.g., 300 seconds / 5 minutes)
- Save the Order Message.
For detailed instructions how to add order messages, refer to:
Guide: https://docs.pabbly.com/s/f3b40ae7-4846-4110-8cf3-cdd0cf3467c2/doc/order-messages-how-to-add-an-order-message-ypImWe58Wo
After adding an Order Message, you will be redirected to the Payment Notification tab.
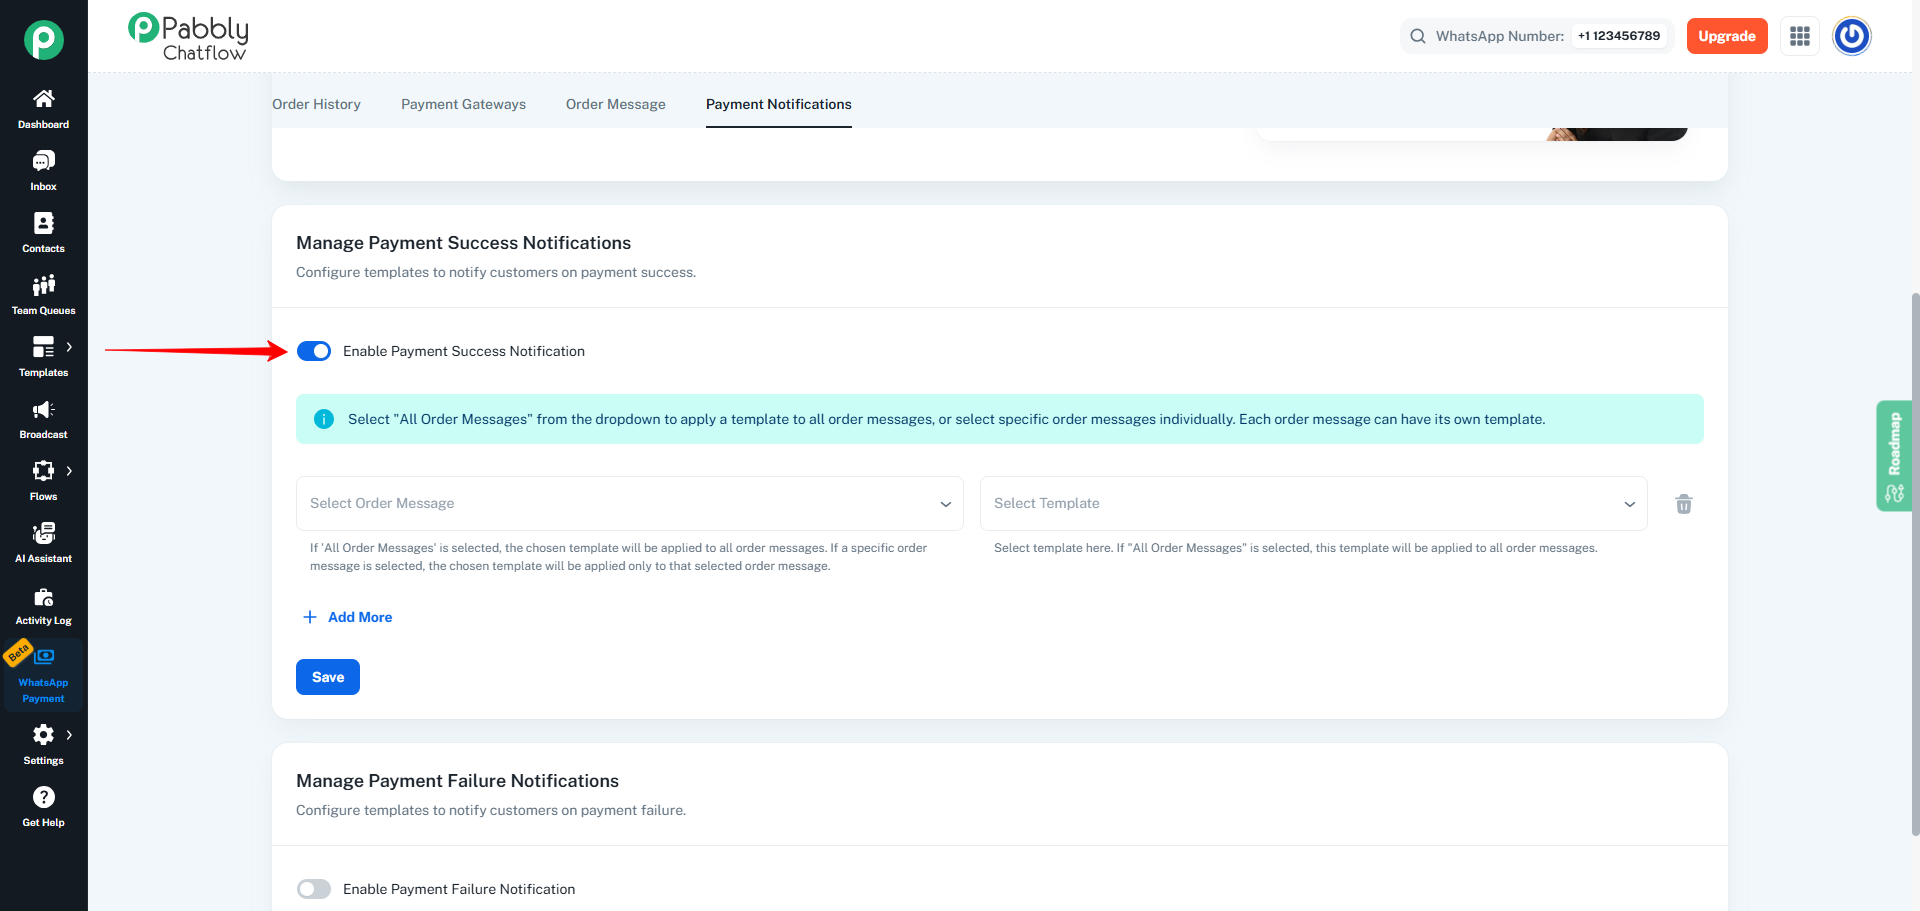
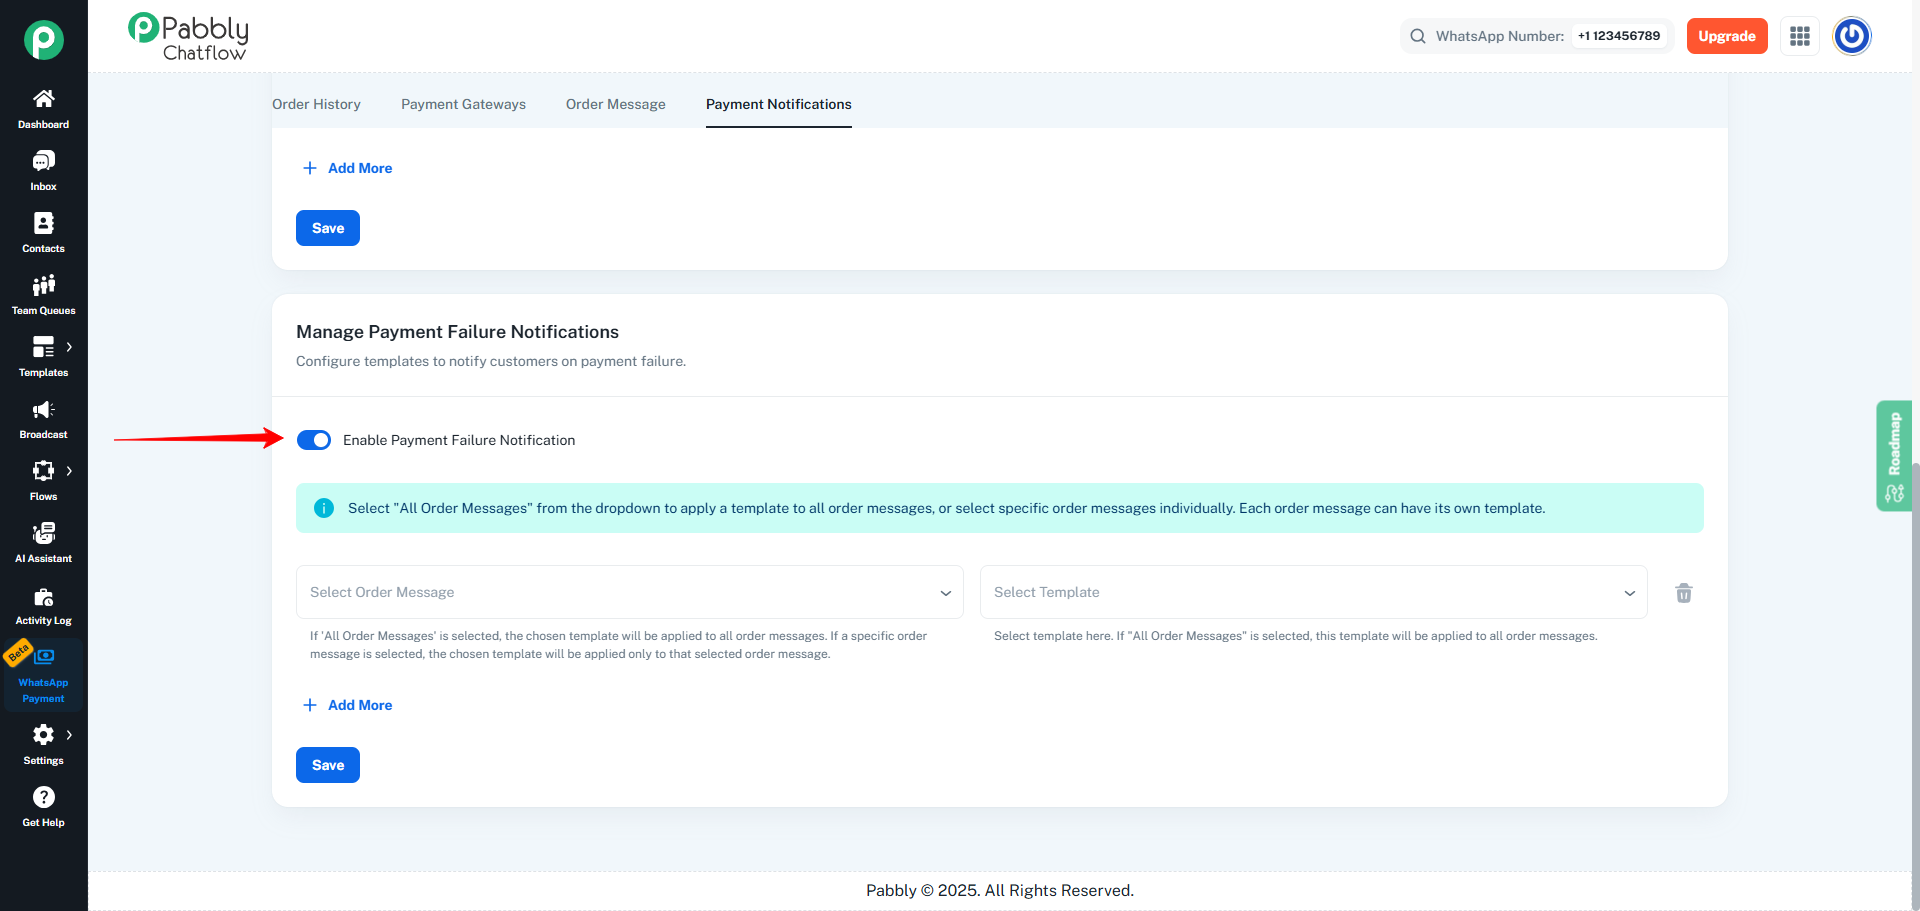
Here, you can configure Notification Rules for payment events:
- Payment Success
- Payment Failure
- Go to the Payment Notification tab.
- For each event (Success and Failure):
- Select the Order Message.
- Select the Meta-approved Template to be sent when that event occurs.
- Save the notification configuration.
- This step is optional but strongly recommended, so that customers receive automatic updates when their payment is successful or fails.
For detailed instructions how to set payment notification, refer to:
Guide: https://docs.pabbly.com/s/f3b40ae7-4846-4110-8cf3-cdd0cf3467c2/doc/how-to-set-up-payment-notifications-ZxbdmeiOVB
2. How WhatsApp Payment Works from Inbox
Once setup is complete, you can create orders directly from the Inbox for any customer chat.
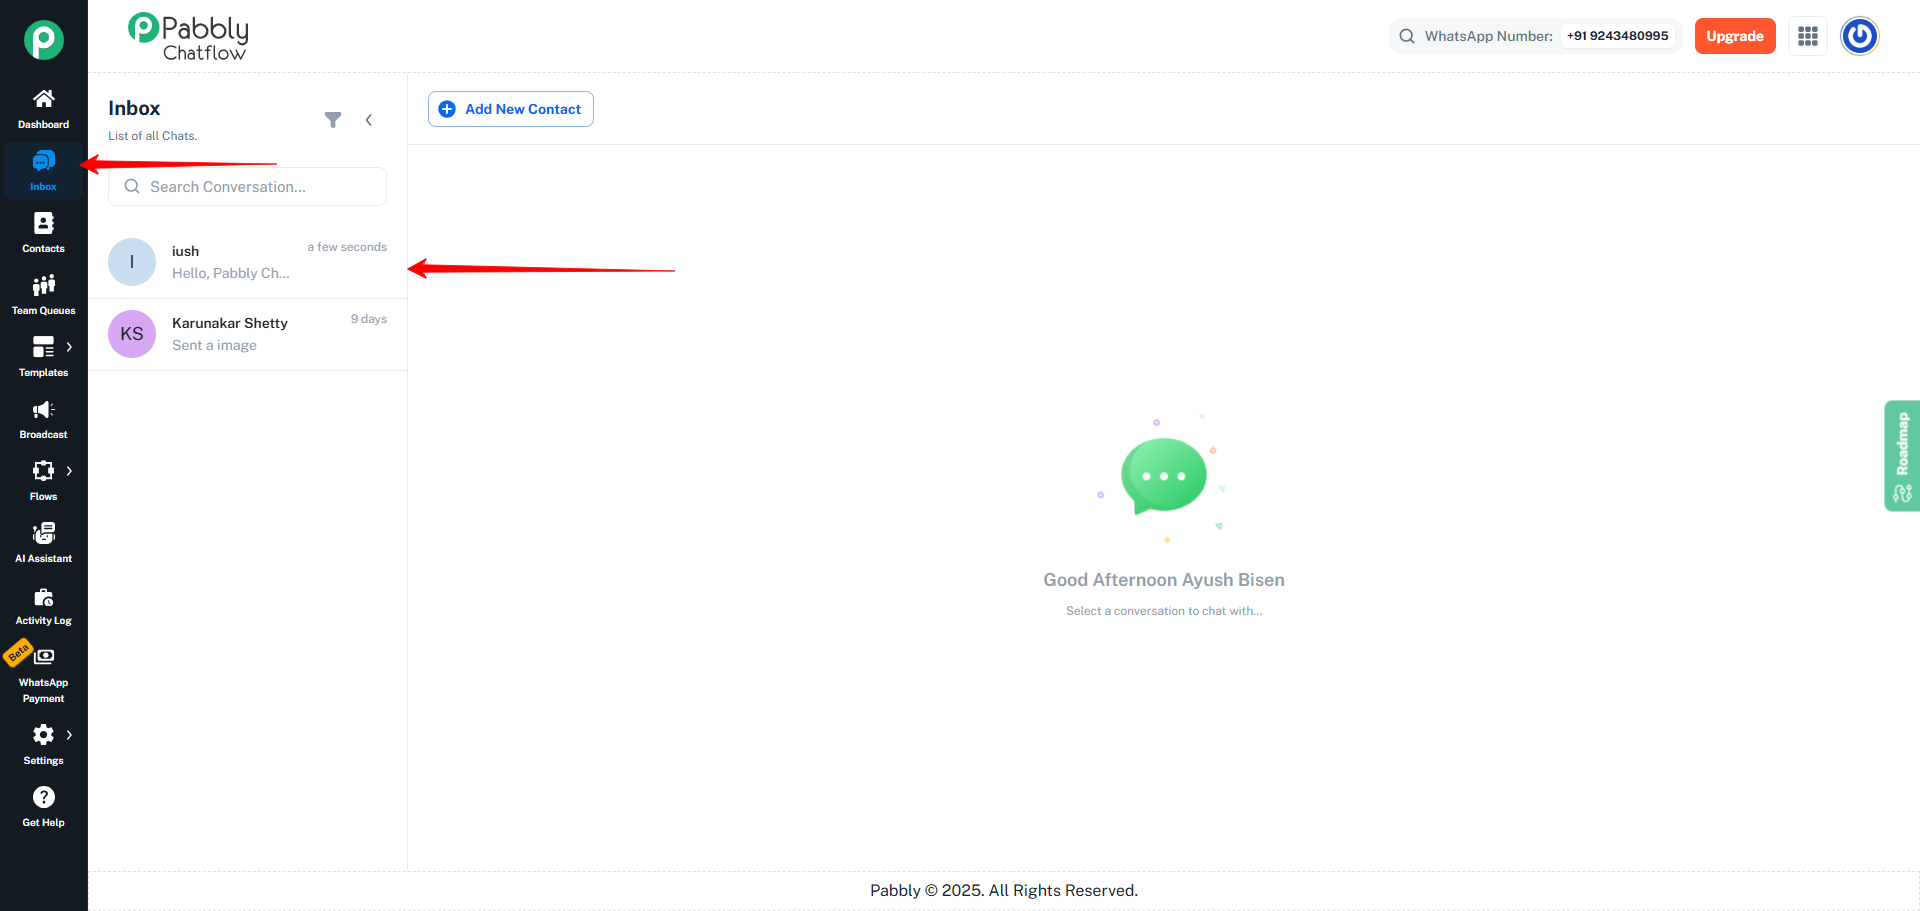
Step 1: Open the Customer Chat in Inbox
- Go to the Inbox page inside Pabbly Chatflow.
- Open the chat for the customer for whom you want to create an order.
Step 2: Open the Payment Tab in Inbox
- Inside the selected customer chat, look at the right side panel.
- Click on the Payment tab.
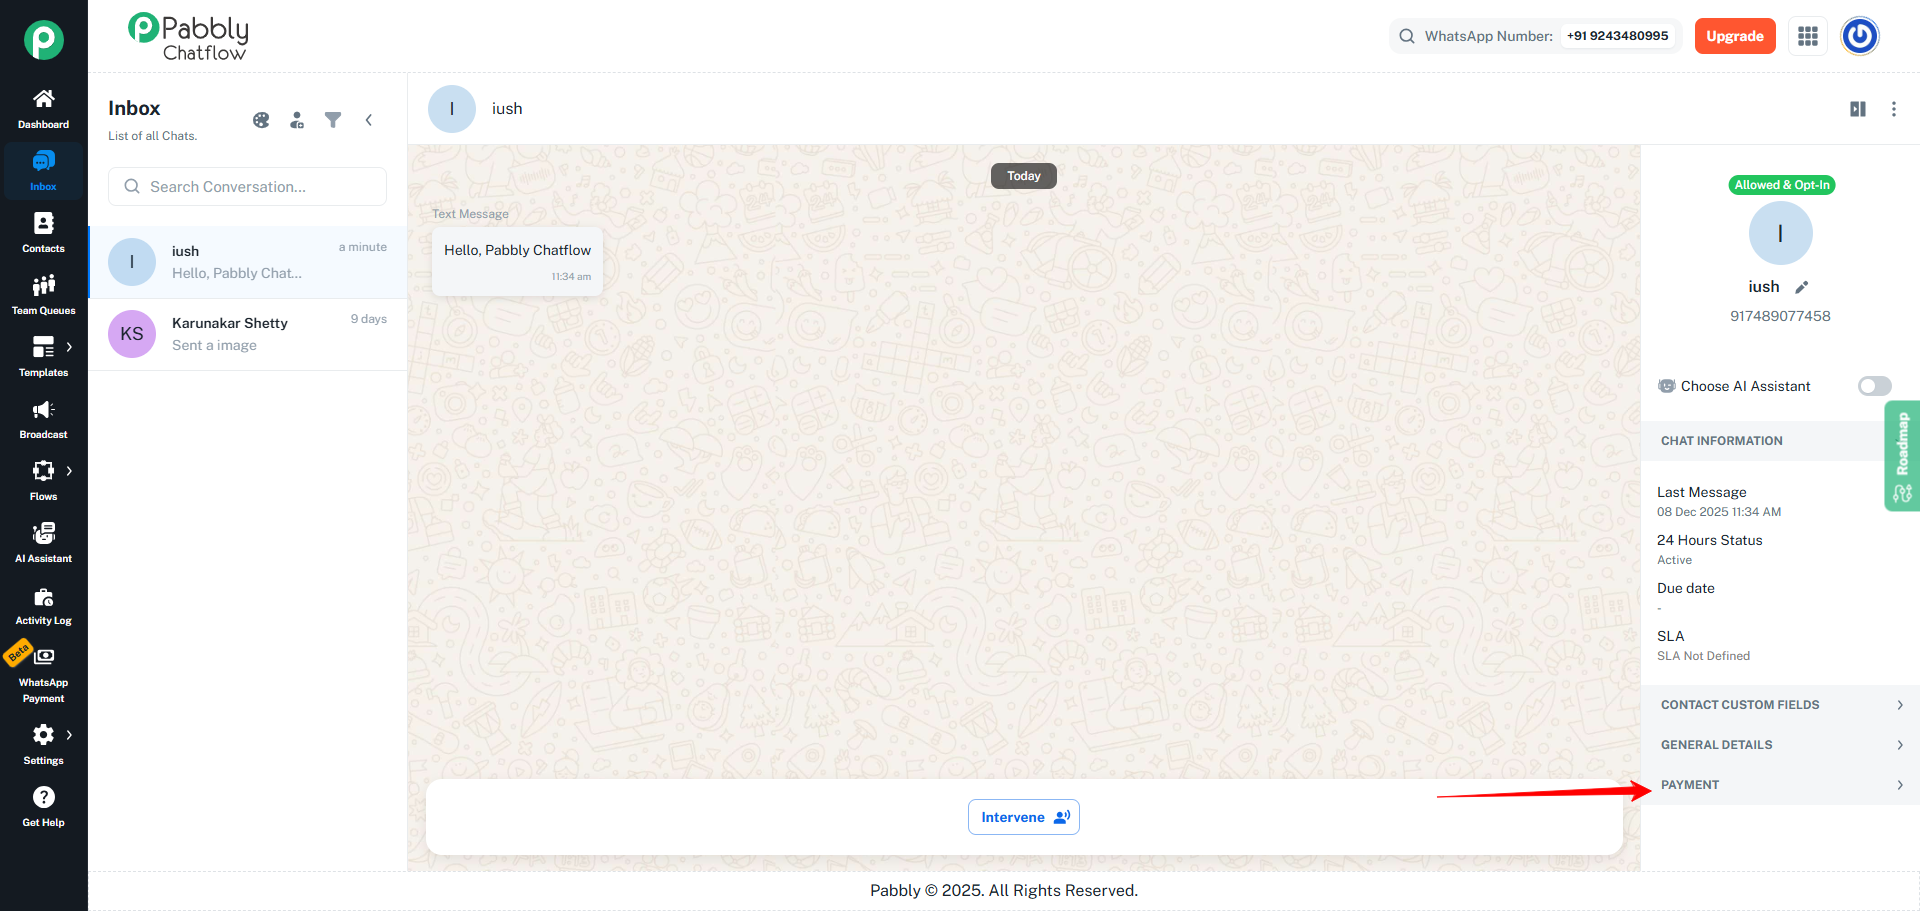
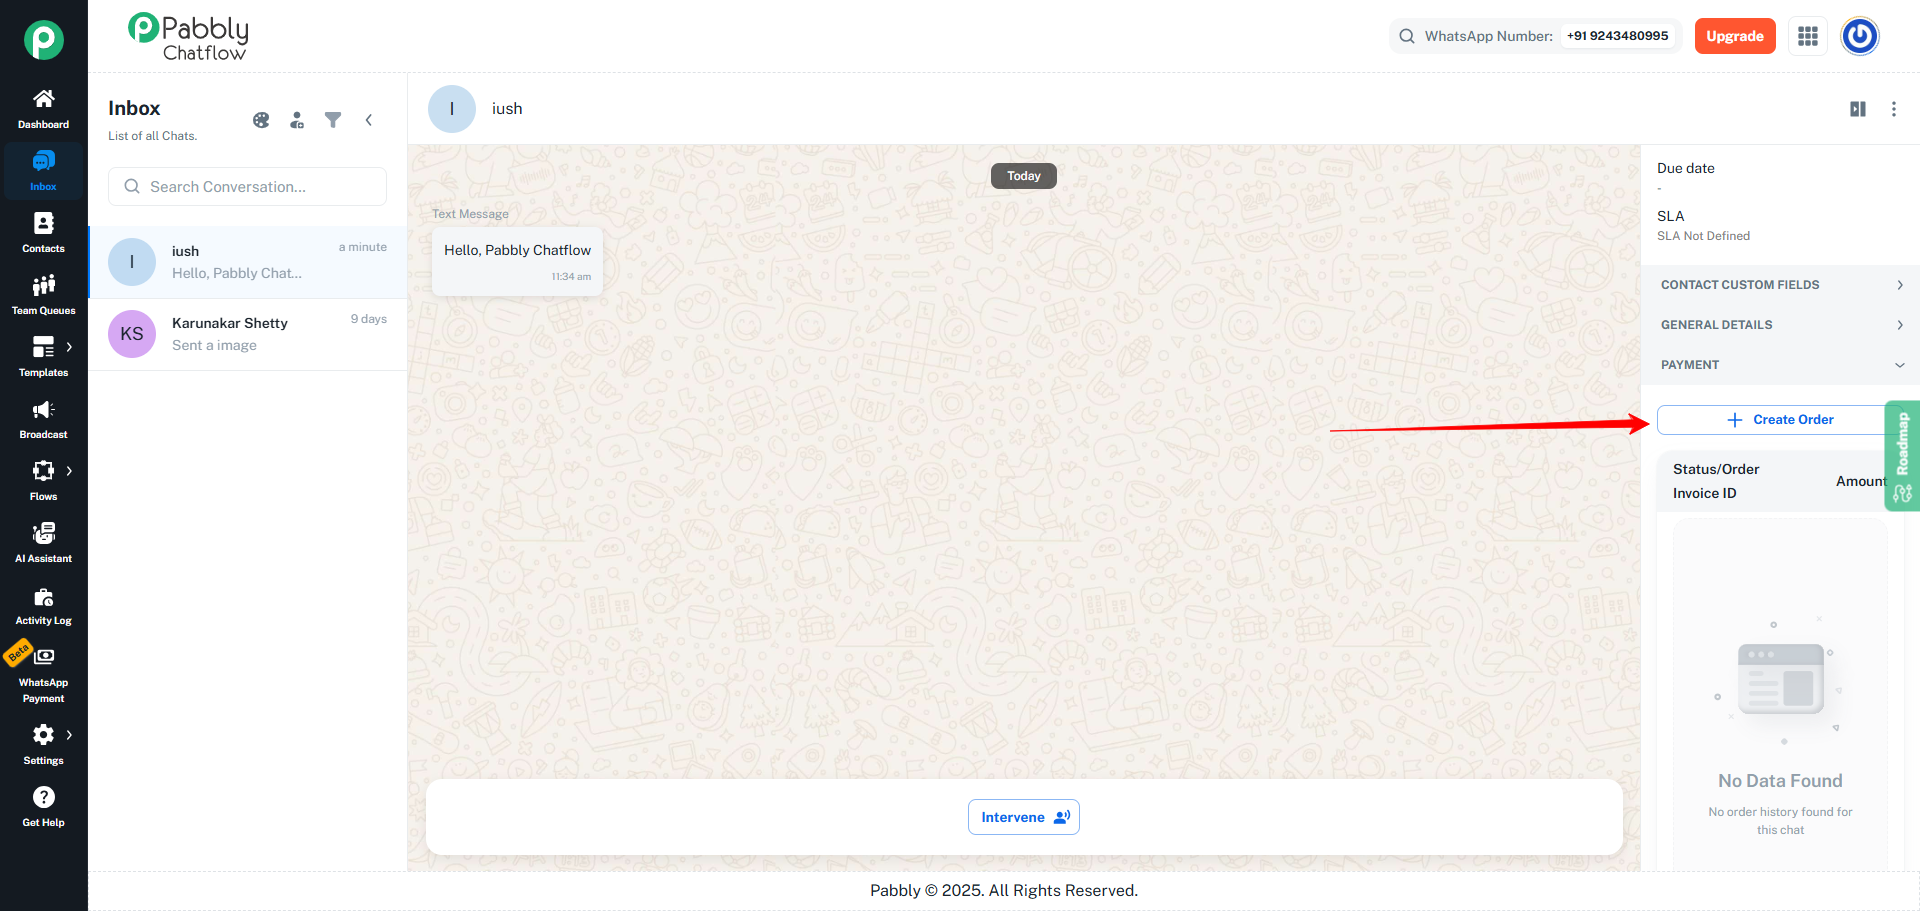
Step 3: Click on “Create Order”
- Inside the Payment tab, click on the Create Order button.
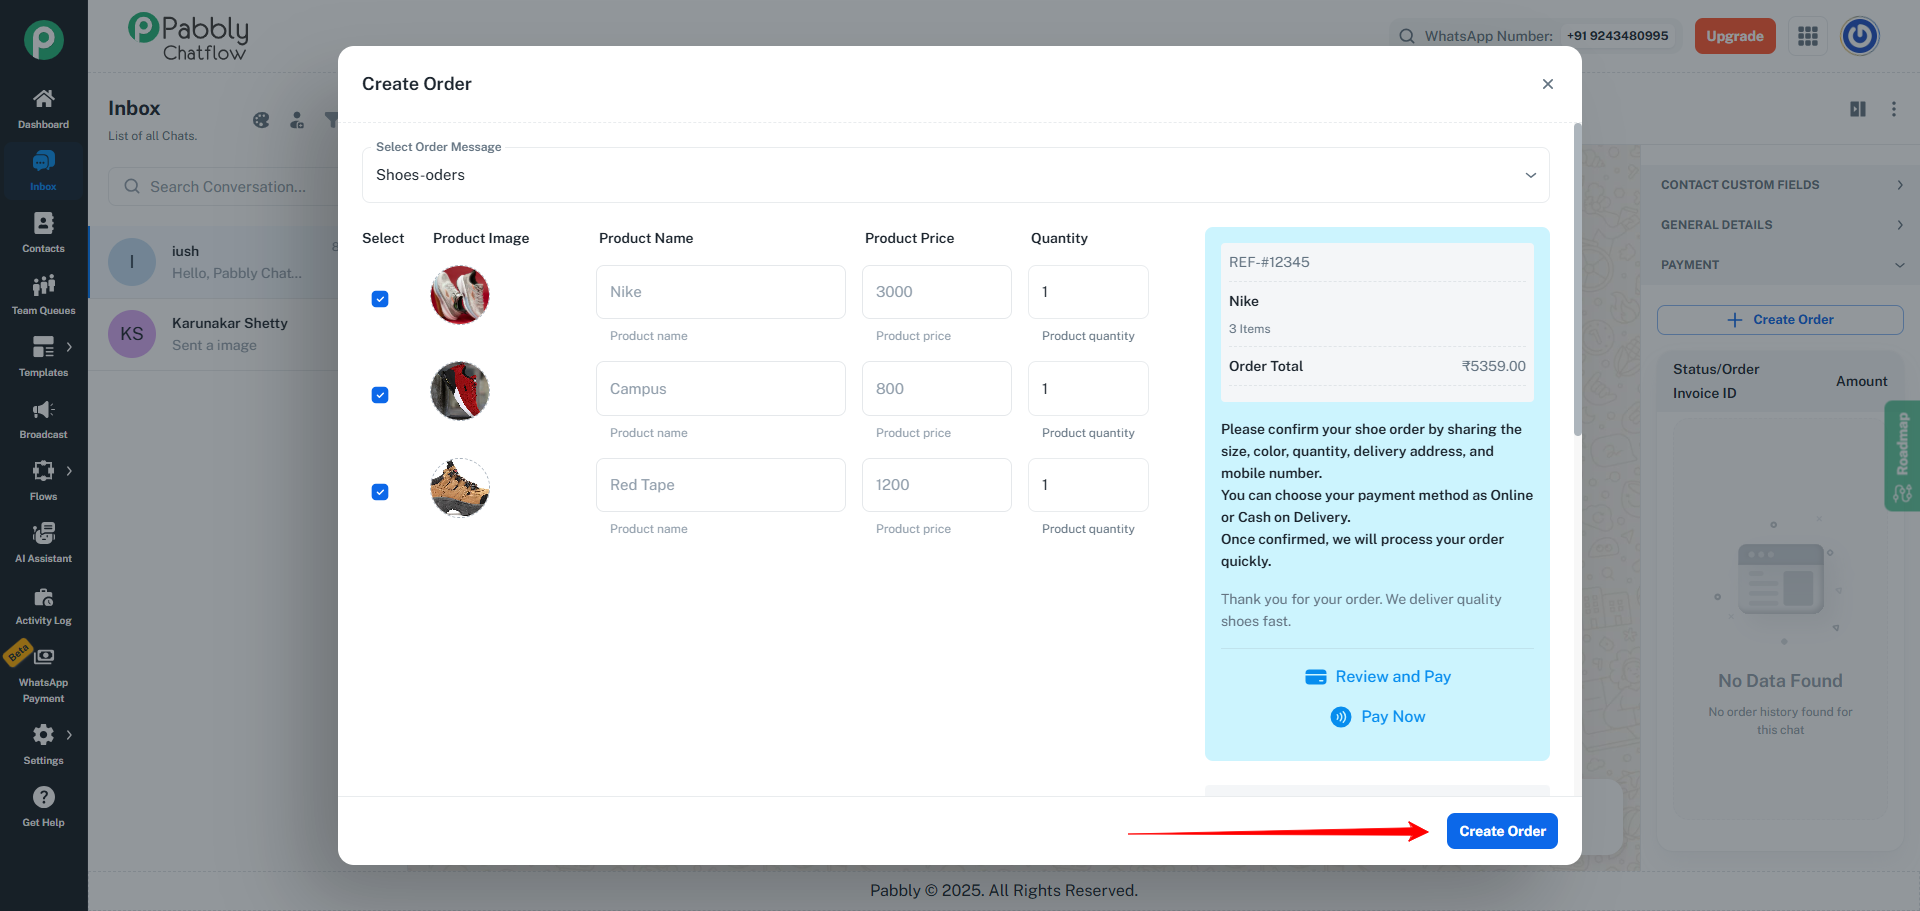
- A Create Order dialog will open.
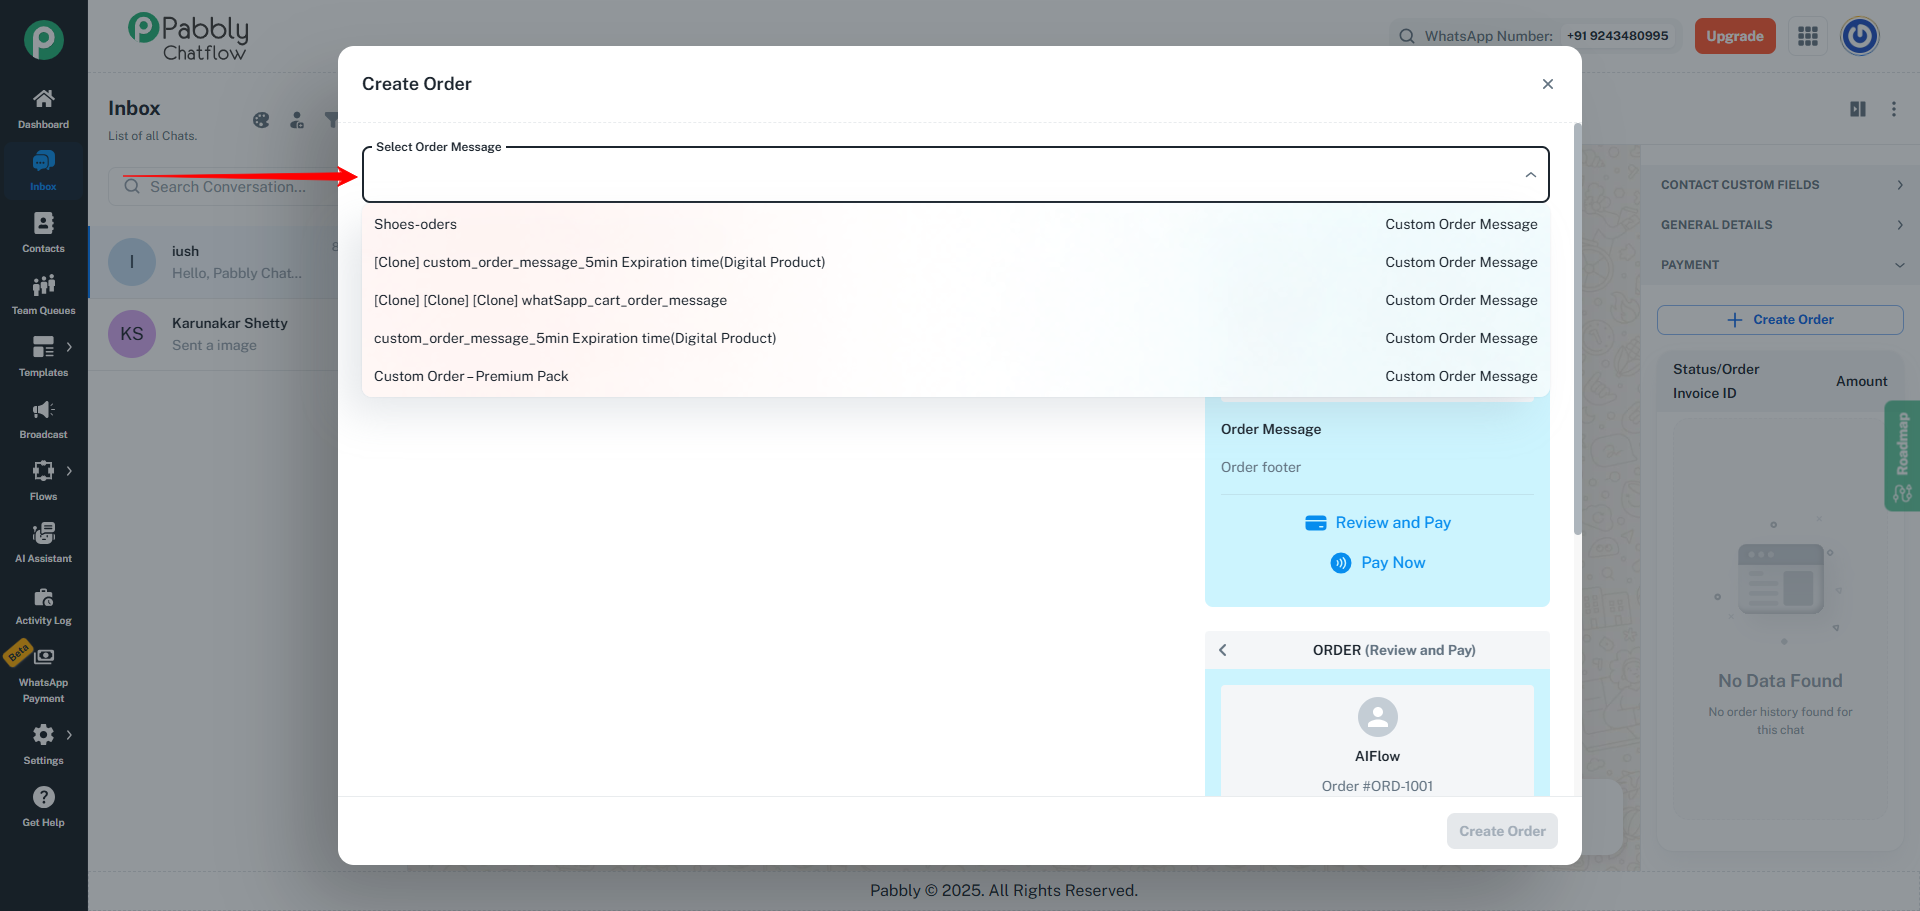
Step 4: Select an Order Message (Custom or Catalog)
Inside the Create Order dialog:
- You will see a list of Order Messages that you have created earlier.
- Only Order Messages of type:
- Custom Product
- Catalog Product
will be shown here.
- WhatsApp Cart Order Message type is not shown in this dialog because WhatsApp Cart is designed to work directly with the WhatsApp application and Flows, not manual order creation in Inbox.
- Select one Order Message from the list.
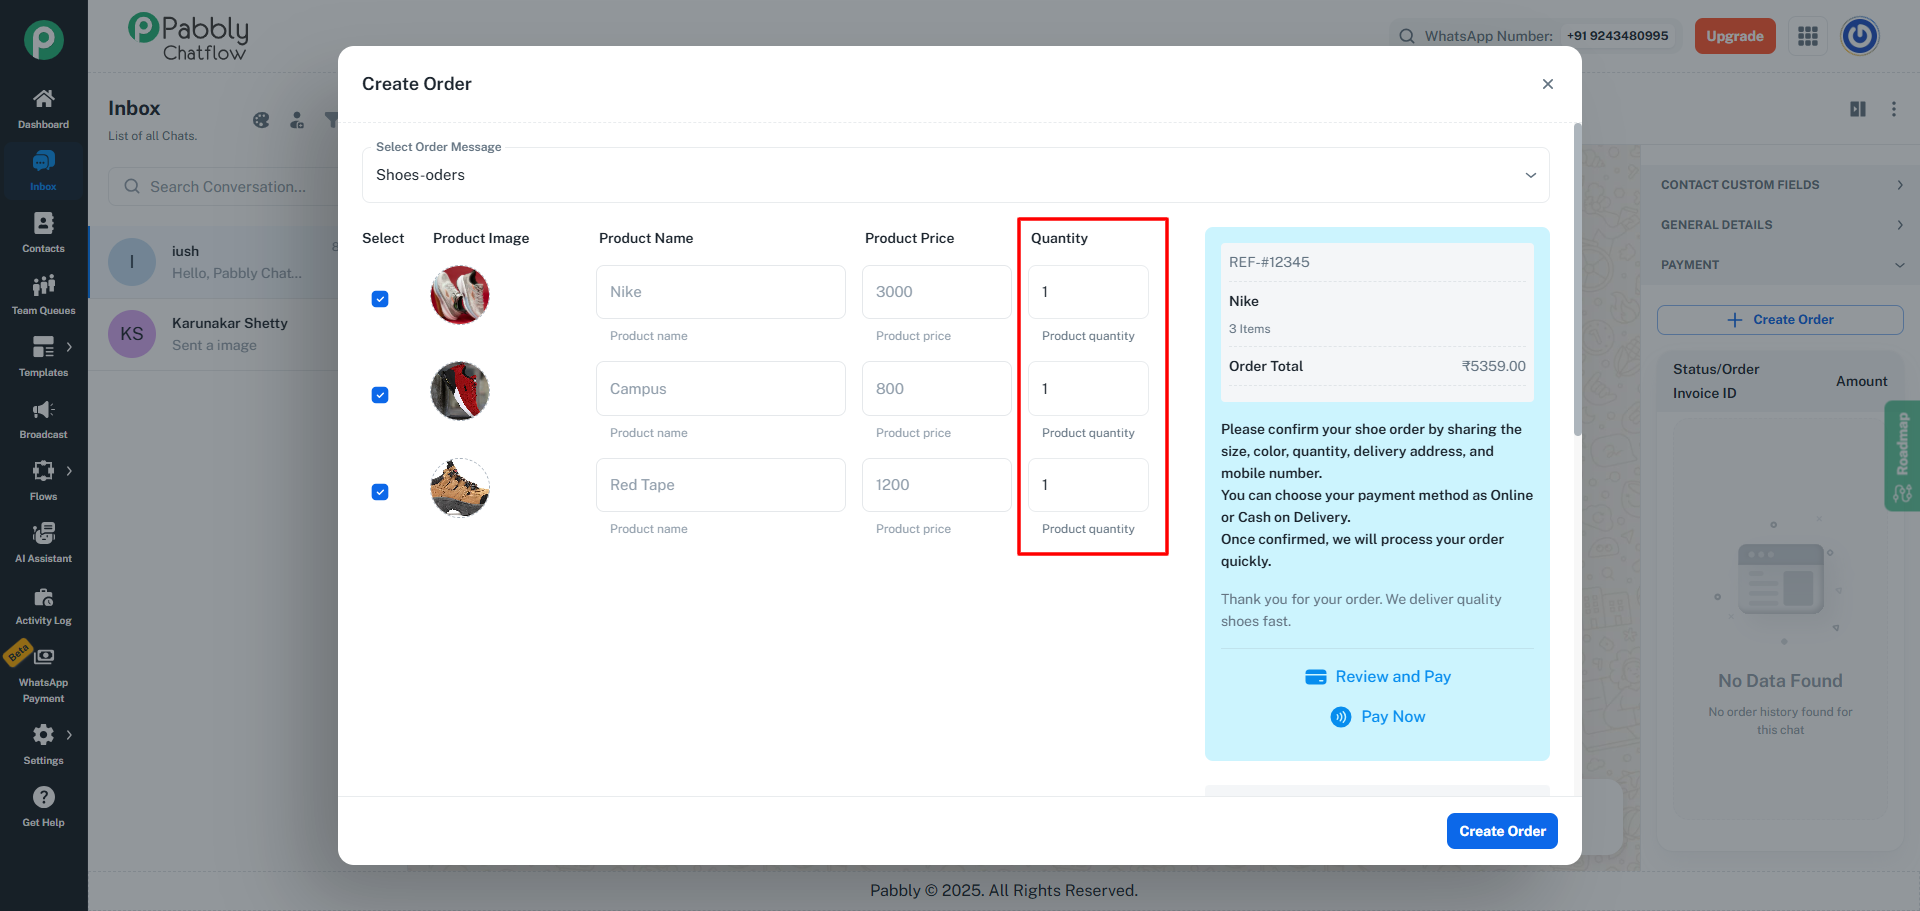
Step 5: Select Products and Set Quantities
Based on the selected Order Message:
- All products added in that Order Message will be listed.
- For each product, you can:
- Select or unselect the product.
- Change the quantity.
- While setting quantities, the system enforces two rules:
- Total quantity of all selected products must not exceed 30.
- Final payable amount (after Tax, Shipping, Discount) must be greater than ₹1.
- If these conditions are not met, the order cannot be created.
Step 6: Click on “Create Order”
- After selecting the products and setting valid quantities, click on the Create Order button.
-
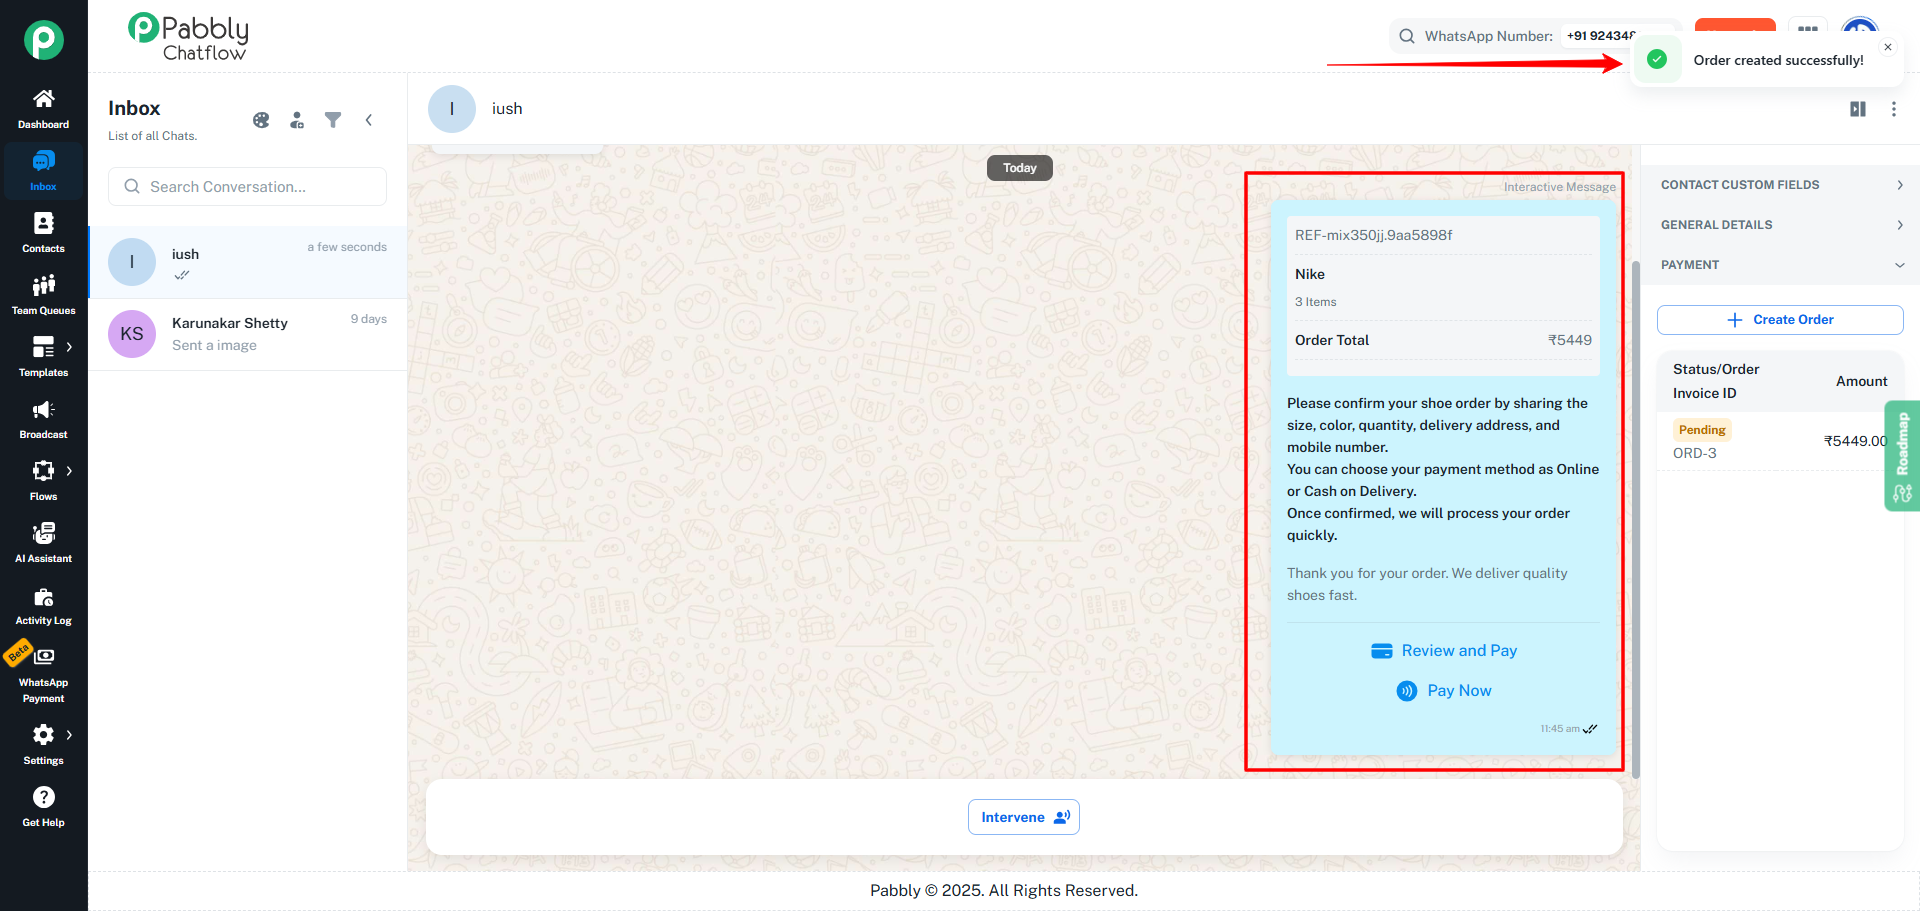
Once the order is created successfully:
- A payment message will be sent to the customer in the chat.
- You will see the order message in the chat window.
Order Expiry and Status Updates
When the order is created, the expiry timer starts based on the settings defined in the Order Message.
For example:
- If the expiration time = 300 seconds (5 minutes)
- And the order was created at 2:10 PM,
- Then the payment link will be valid until 2:15 PM.
Status Behavior
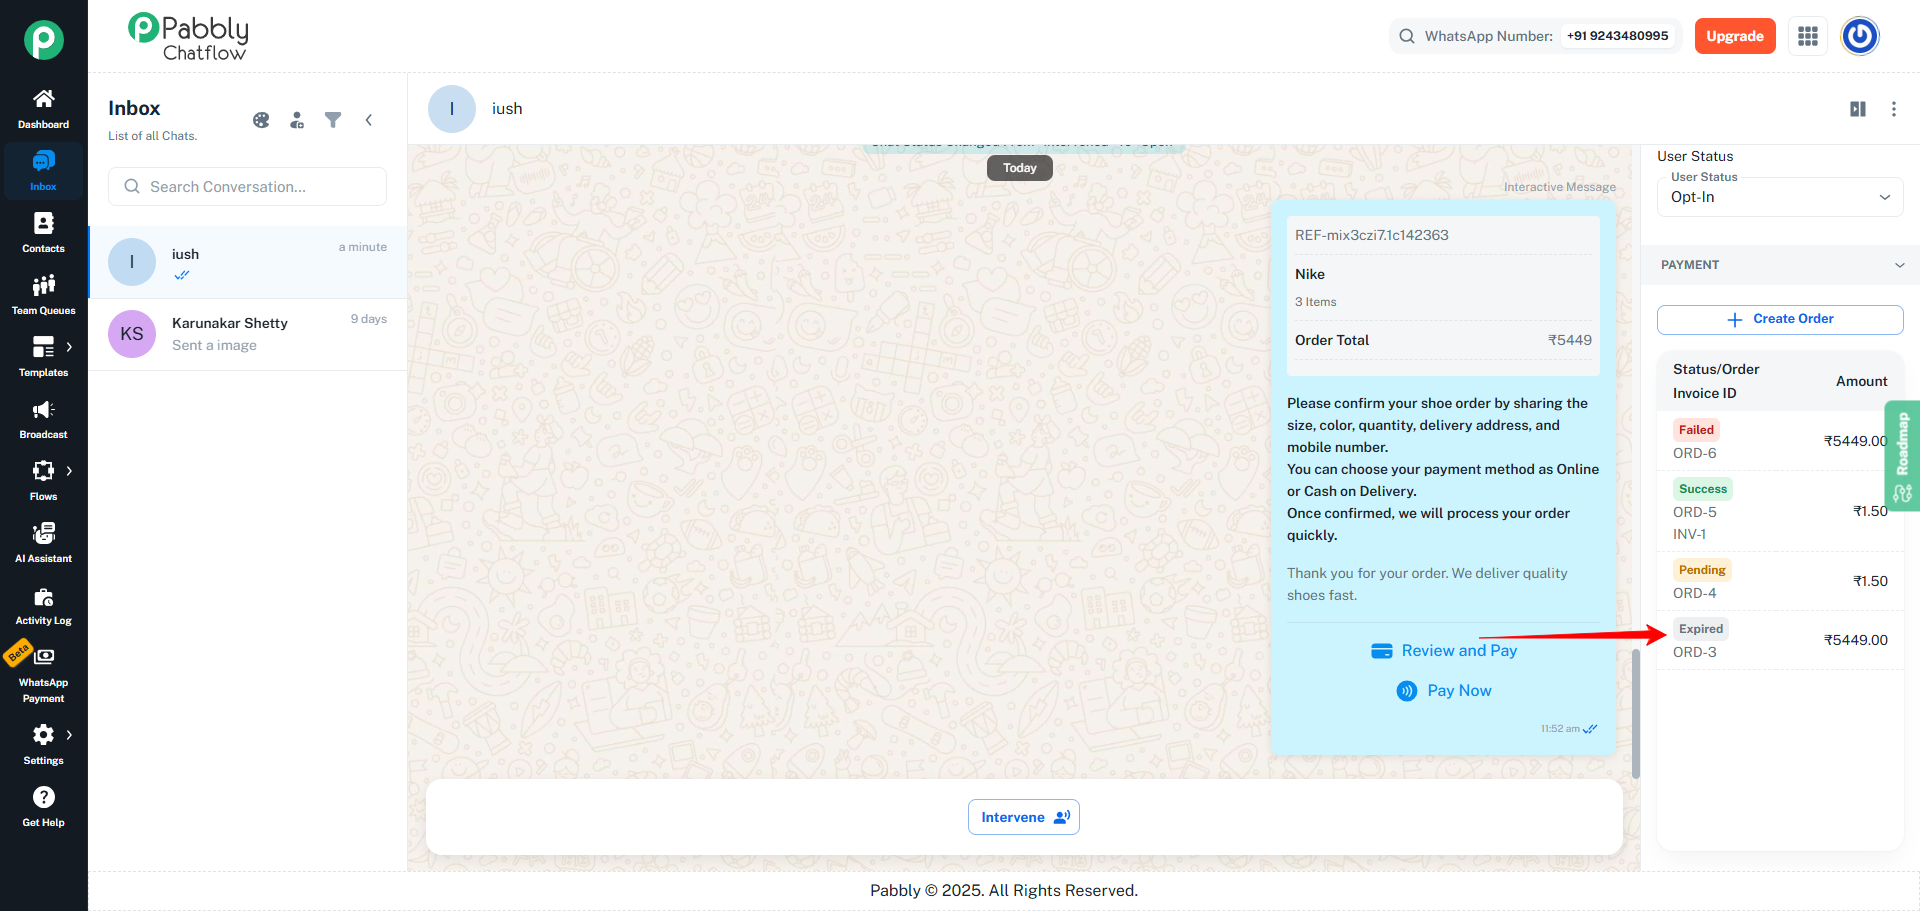
In the order status table or interface, you will see one of the following statuses:
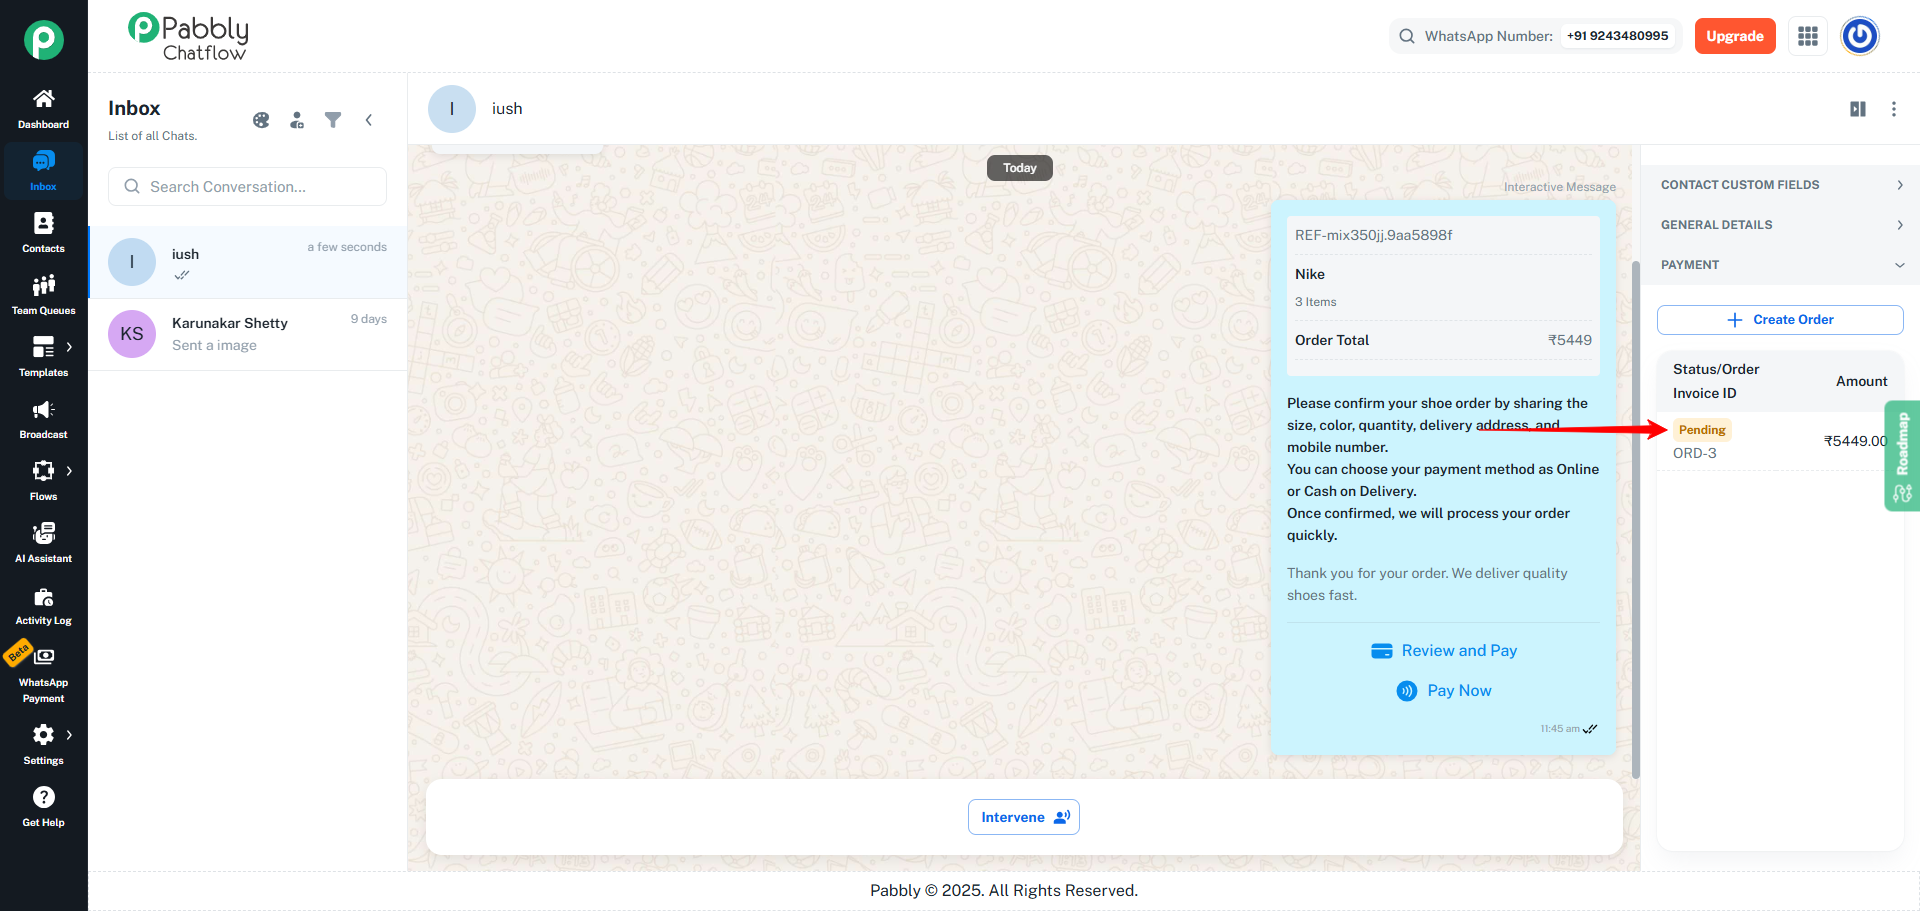
Pending
-
The order is created, but the customer has not completed the payment yet.
-
The link is still active (not expired).
Paid
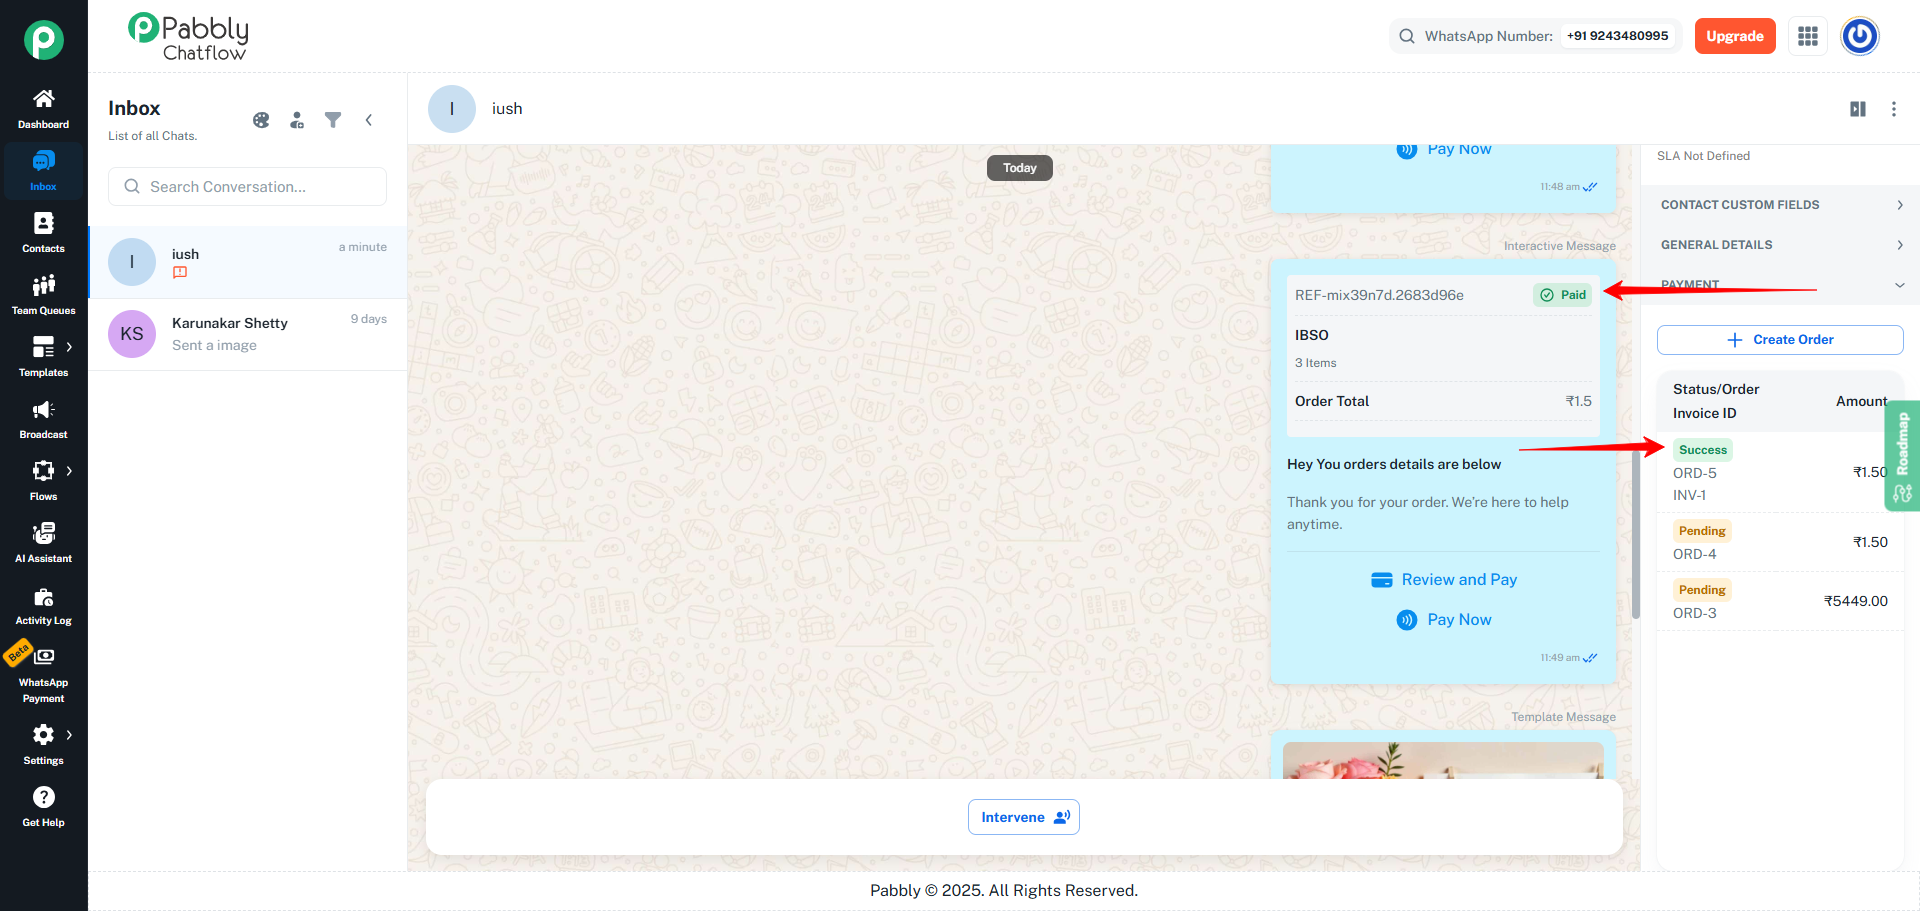
- The customer completed the payment within the allowed time.
- The status changes to Paid.
- A success message may be visible in the chat (and via notifications if configured).
Expired
- The customer did not complete the payment within the expiry time (e.g., after 5 minutes).
- The status will change to Expired.
- The old payment link cannot be used anymore; you must send a new Order Message if payment is still needed.
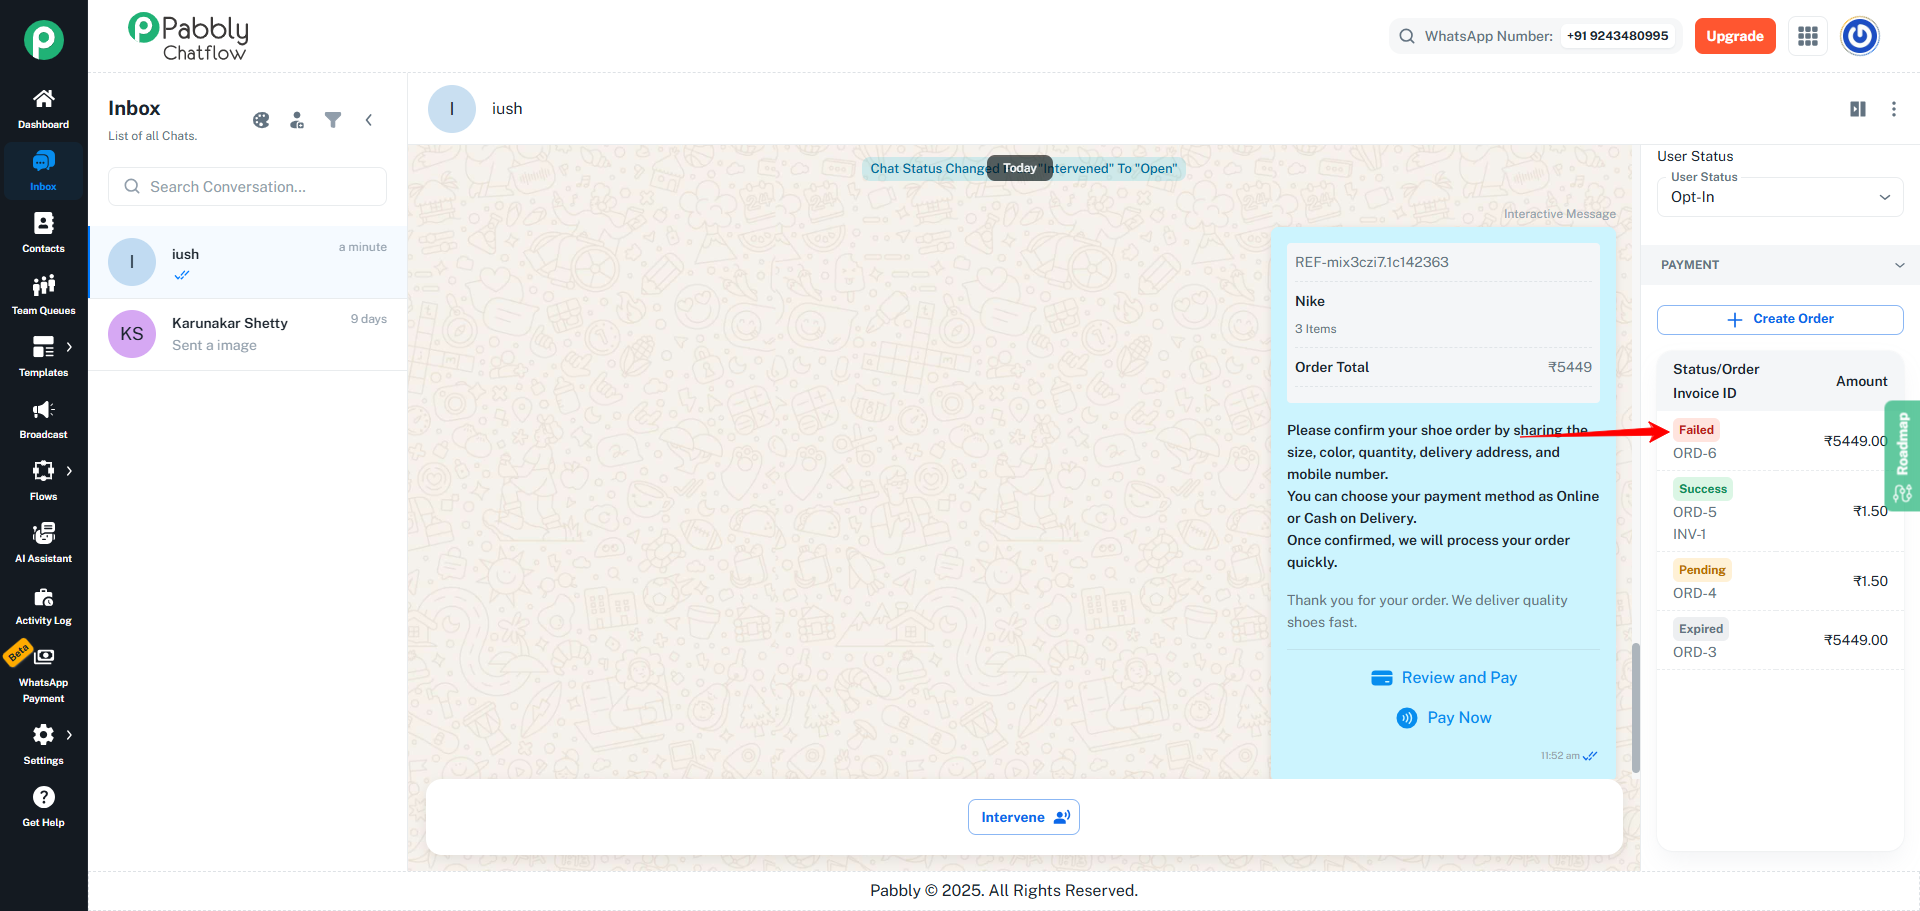
Failed
- If the payment attempt fails for any reason (gateway issue, declined, etc.).
- The status will be updated to Failed in the table.
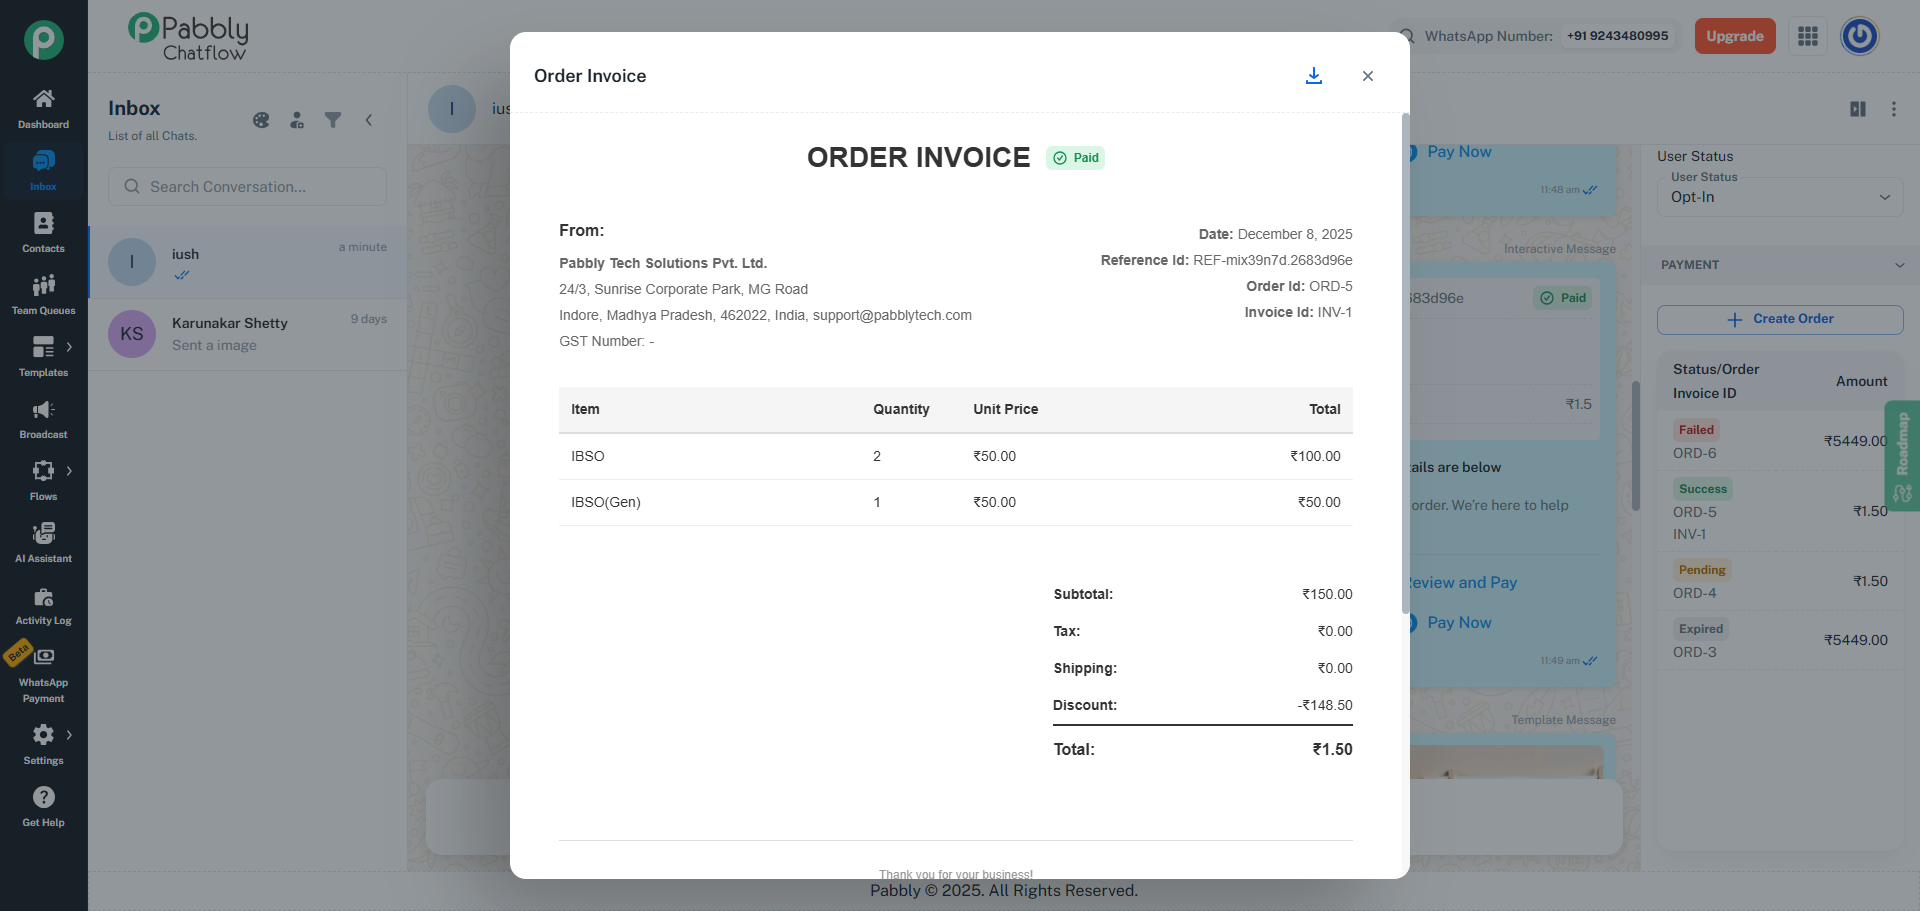
View Order Receipt
You can also view the full order receipt:
- Click on the order message in the chat or table.
- A detailed Order Receipt will open, showing:
- Product details
- Quantity
- Taxes
- Shipping
- Discount
- Final amount
- Payment status
The Inbox behavior is the same for both Custom Product and Catalog Product Order Message types.
3.How WhatsApp Payments Work with Flows
Step 1: Log in and Open the Flow Creation Page
- Log in to your Pabbly Chatflow account using your registered credentials.
- From the left-hand navigation menu, click on Flows.
- You will be redirected to the Flow List page. Here, locate the Add Flow button in the top-right corner and click on it.
- This will take you to the Create Flow page, where you can begin setting up your new flow.
Prerequisite: Enable WhatsApp Pay in Flows
- To create a flow using WhatsApp Payment, you must first configure at least one Payment Gateway and create at least one Order Message (of any type) and both should be Active.
- Once your Payment Gateway is successfully configured and an Order Message is created, a new message called “WhatsApp Pay” becomes available inside Flows.
- Before completing this setup, the WhatsApp Pay message remains disabled in the Flow builder.
- As soon as your payment configuration is complete and an Order Message is available, the WhatsApp Pay message becomes enabled and ready to use.
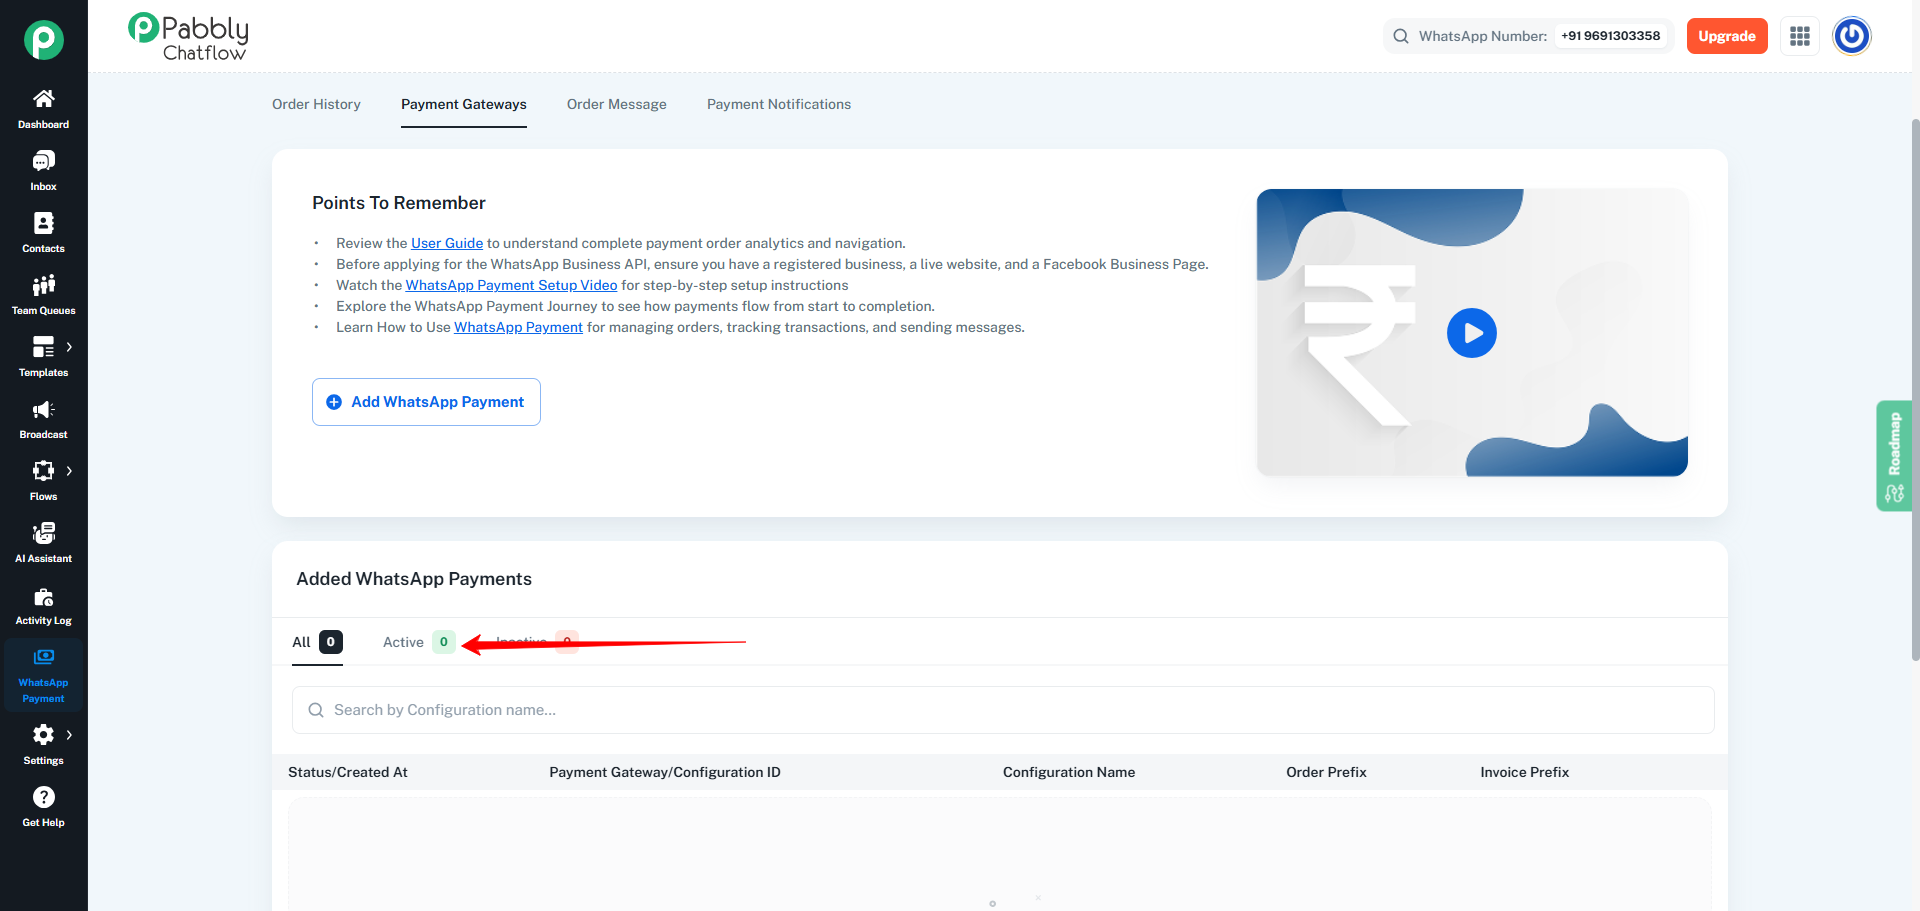
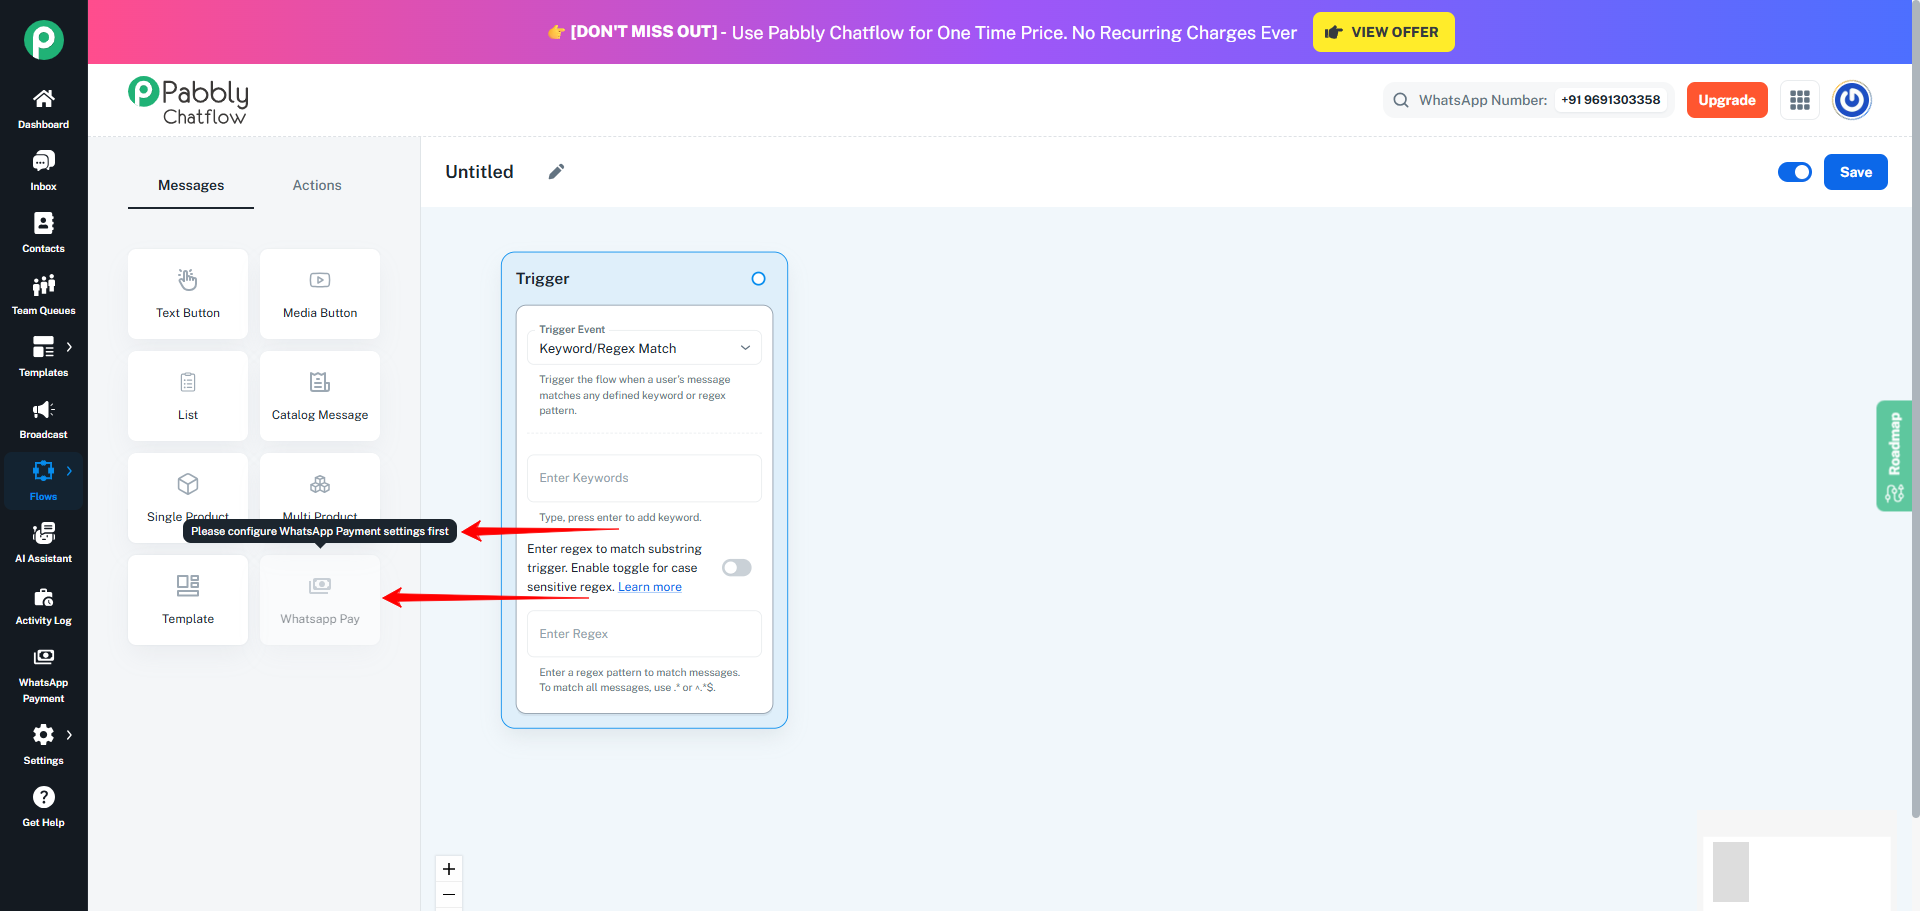
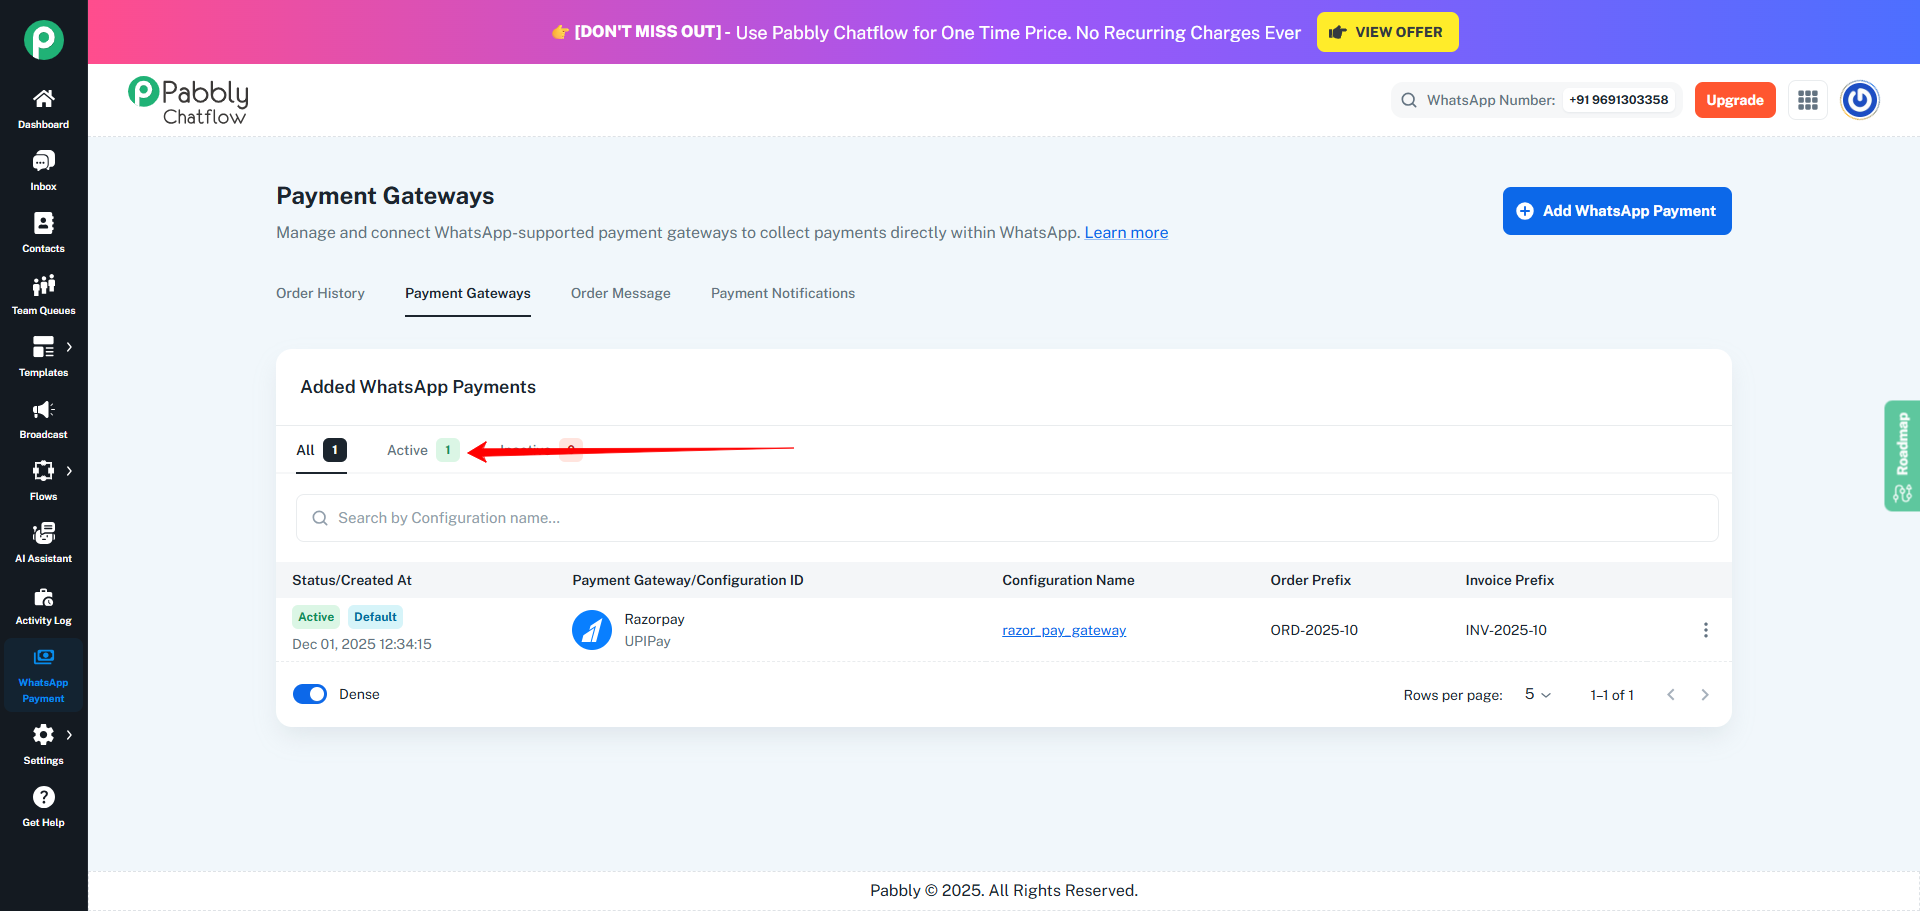
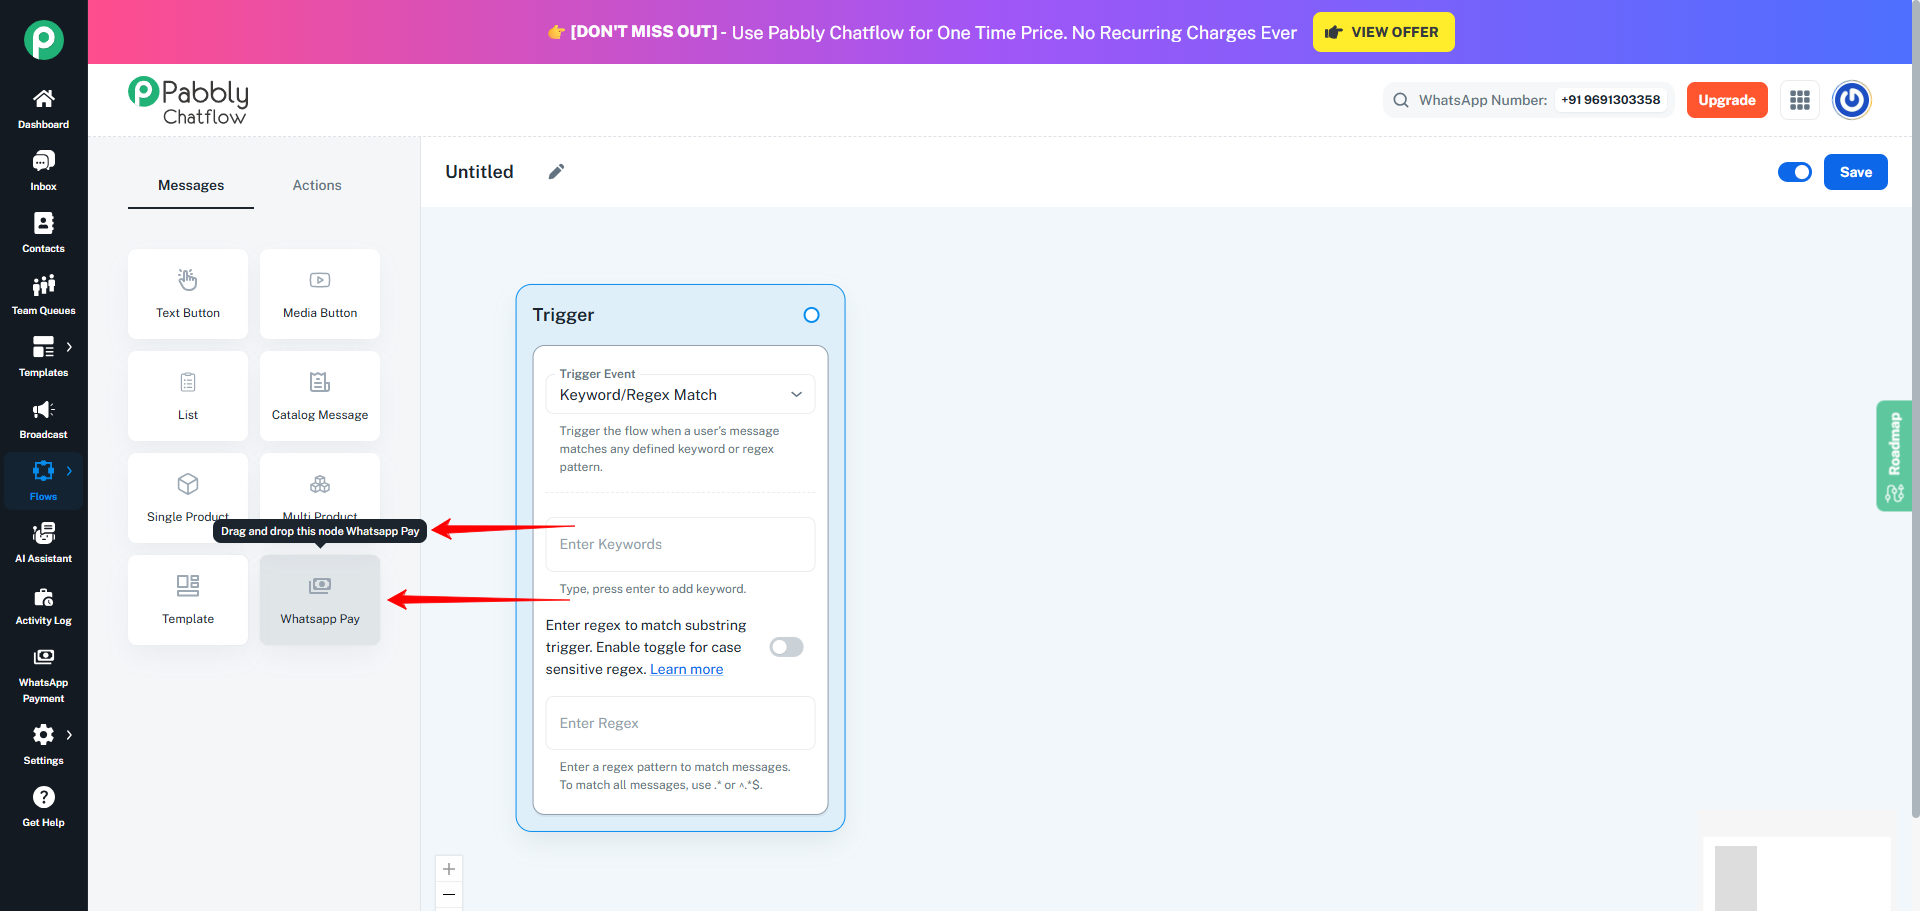
- From this point forward, you can place the WhatsApp Pay message anywhere inside your Flow, depending on how you want customers to receive order messages and payment links.
WhatsApp Pay works with three different Order Message Types:
- WhatsApp Cart
- Custom Product
- Catalog Product
Each of these types determines how the order is created, how products appear to the customer, and how payment links behave.
1. Using WhatsApp Pay with the "WhatsApp Cart" Order Message Type
When using WhatsApp Pay message with the WhatsApp Cart Order message type, the order creation process begins directly inside the customer’s WhatsApp application.
- The customer selects products from your Meta Catalog, adds them to the WhatsApp Cart, and places an order.
- As soon as this happens, the Order Received trigger fires inside your Flow. This trigger is specifically designed to capture WhatsApp Cart orders and start automation based on them.
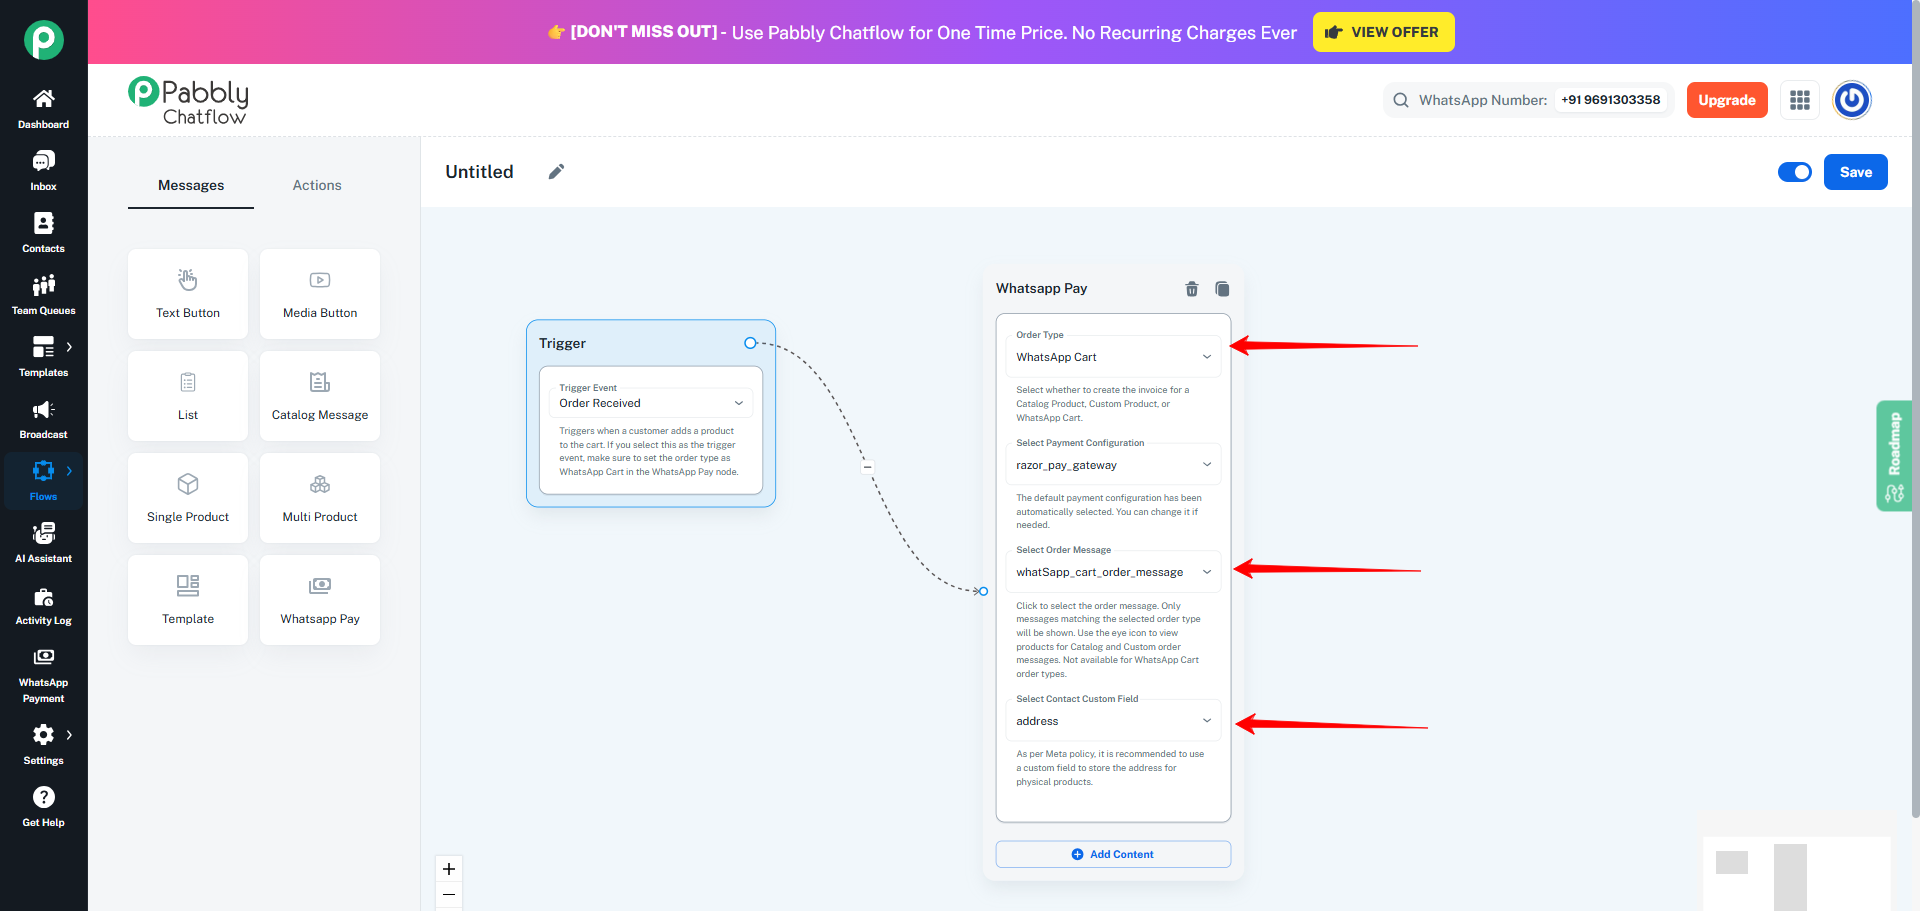
- To begin, open the Flow Builder and set Order Received as the Trigger event in flow start. From there, drag the WhatsApp Pay message into the Flow and connect it.
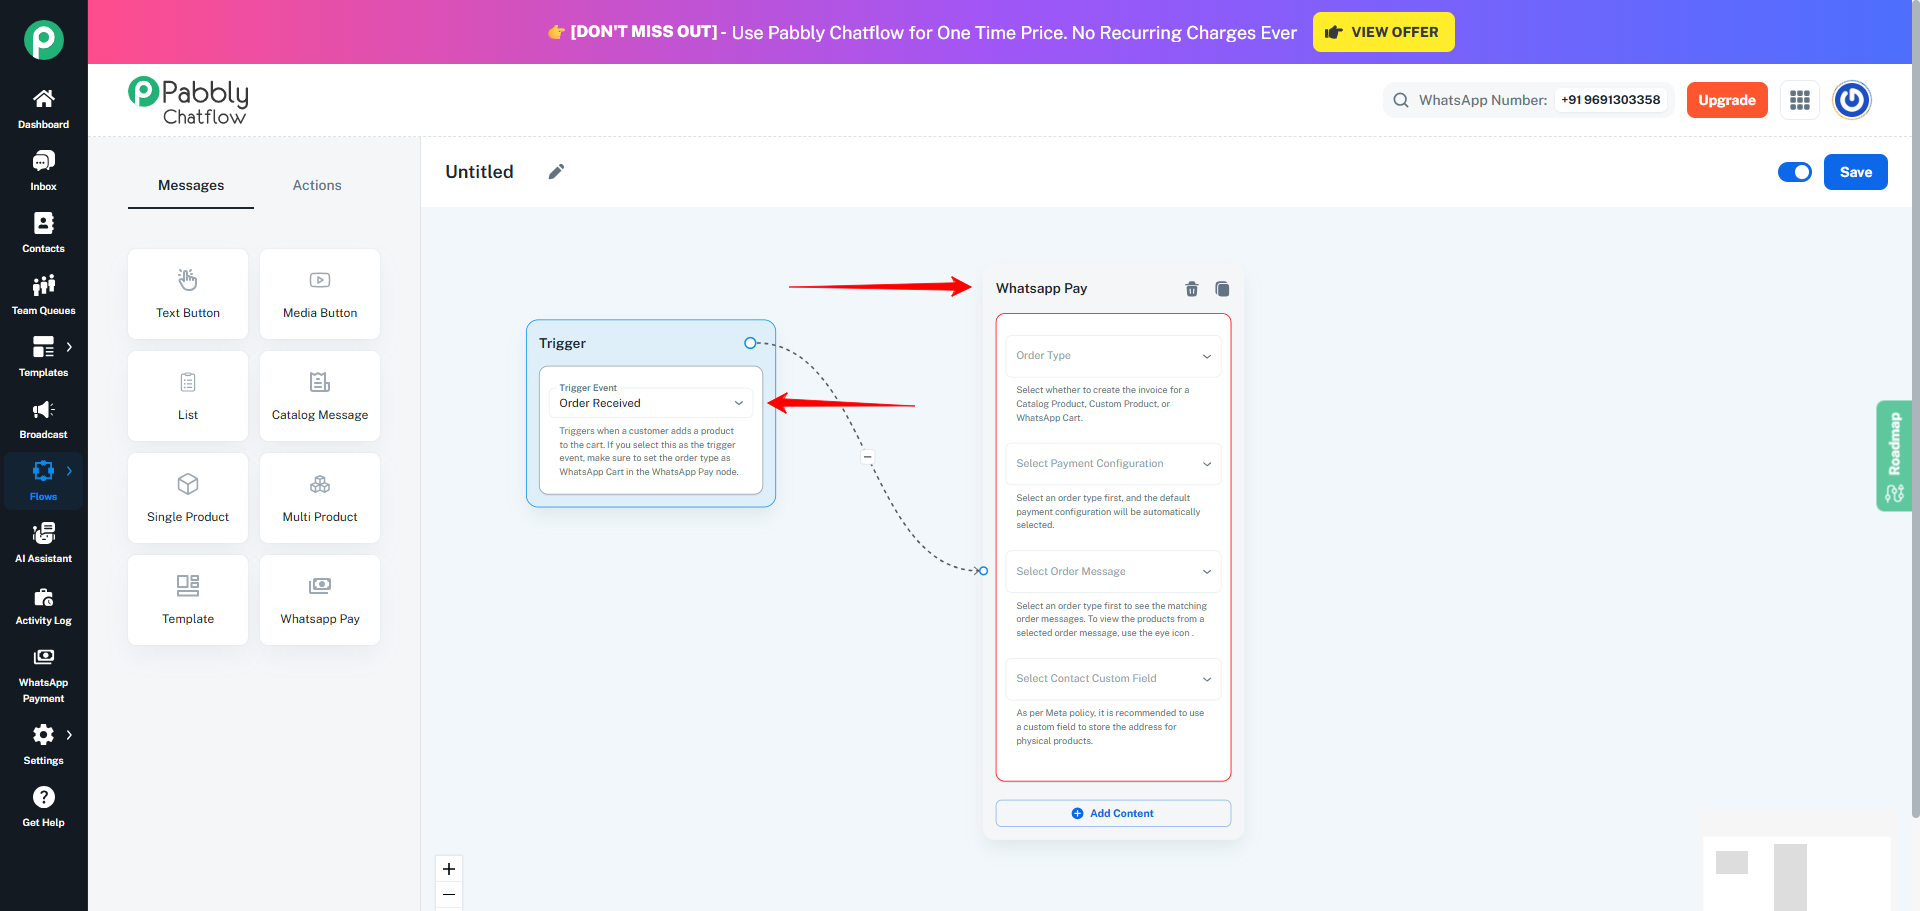
- In the WhatsApp Pay message choose WhatsApp Cart as the Order Message Type.
- The Order Message dropdown will automatically filter to display only WhatsApp Cart–based Order Messages.
- This ensures that only compatible Order Messages can be selected.
- Your Payment Configuration ID is automatically preselected using the default payment gateway.
- You may manually select a different payment gateway if required.
- Select the Order Message template that defines the message text, product display, and payment link sent to customers.
- Choose a Contact Custom Field to store extra customer information such as shipping address or customer notes.
When Selling Physical Products
- If you are selling physical products through WhatsApp, it is essential to collect the customer’s shipping address before initiating payment.
- To do this, add the Ask Address action just before the WhatsApp Pay message in your Flow.
- This ensures that the shipping address is securely stored and properly linked to the order.
- As a result, the payment link is generated only after capturing the complete delivery details.
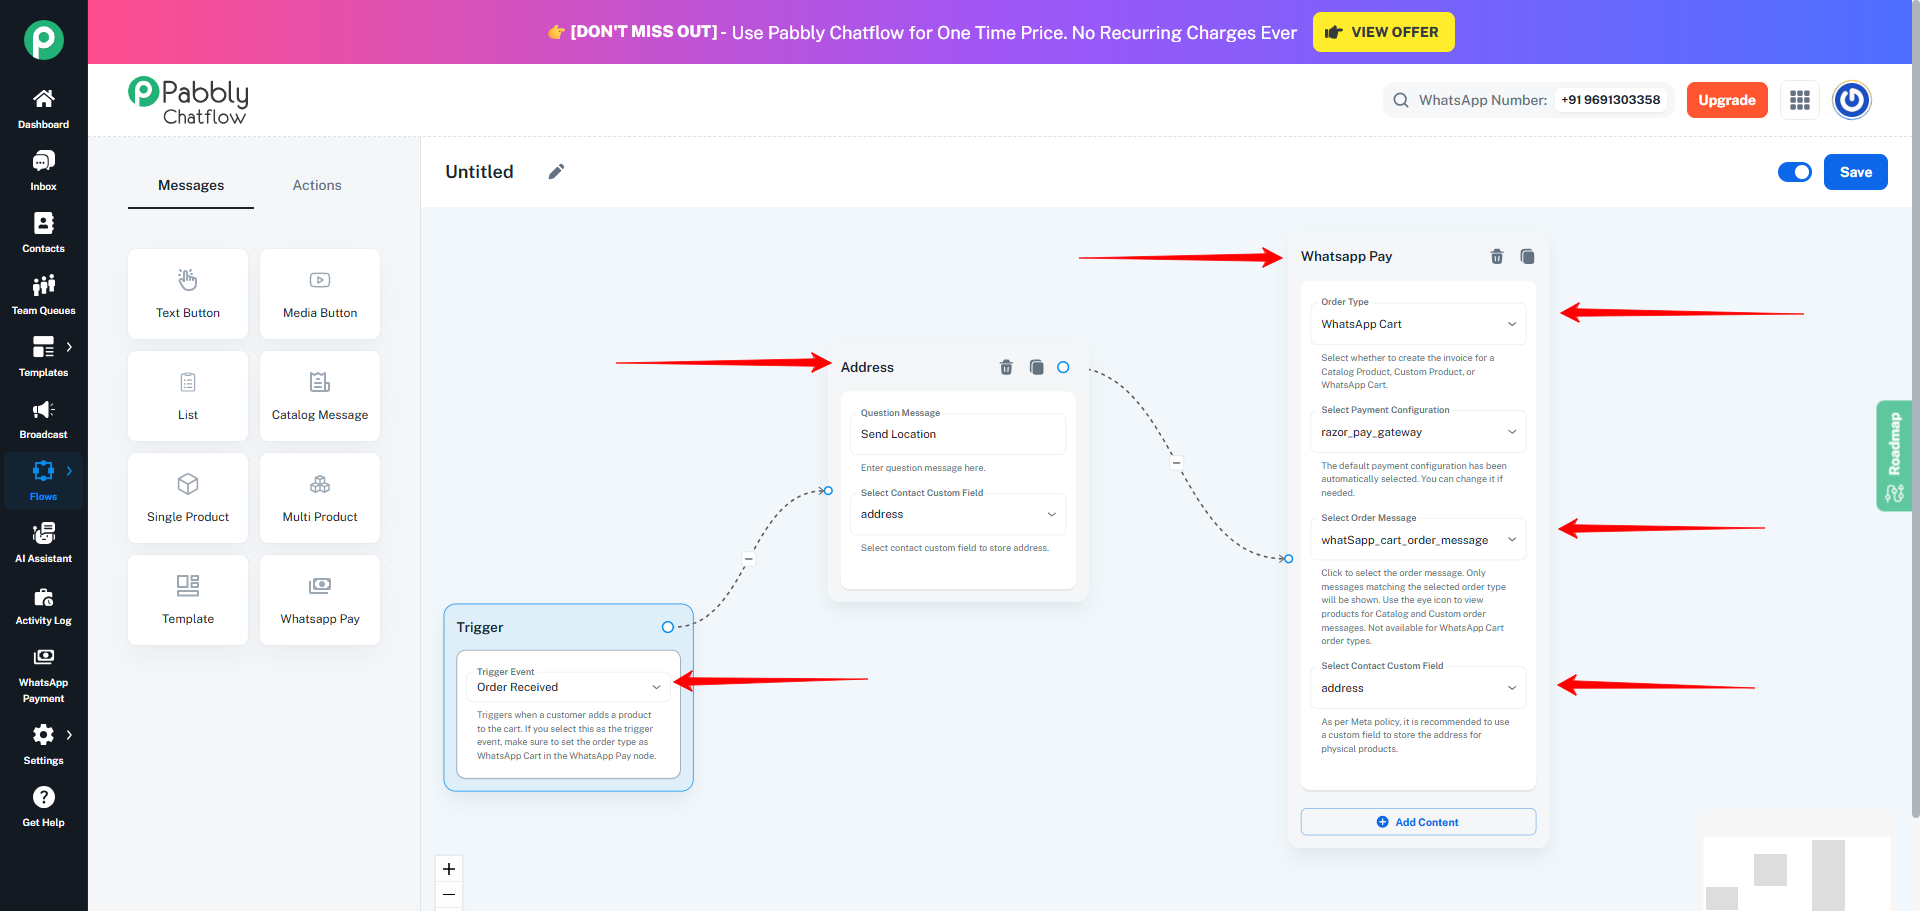
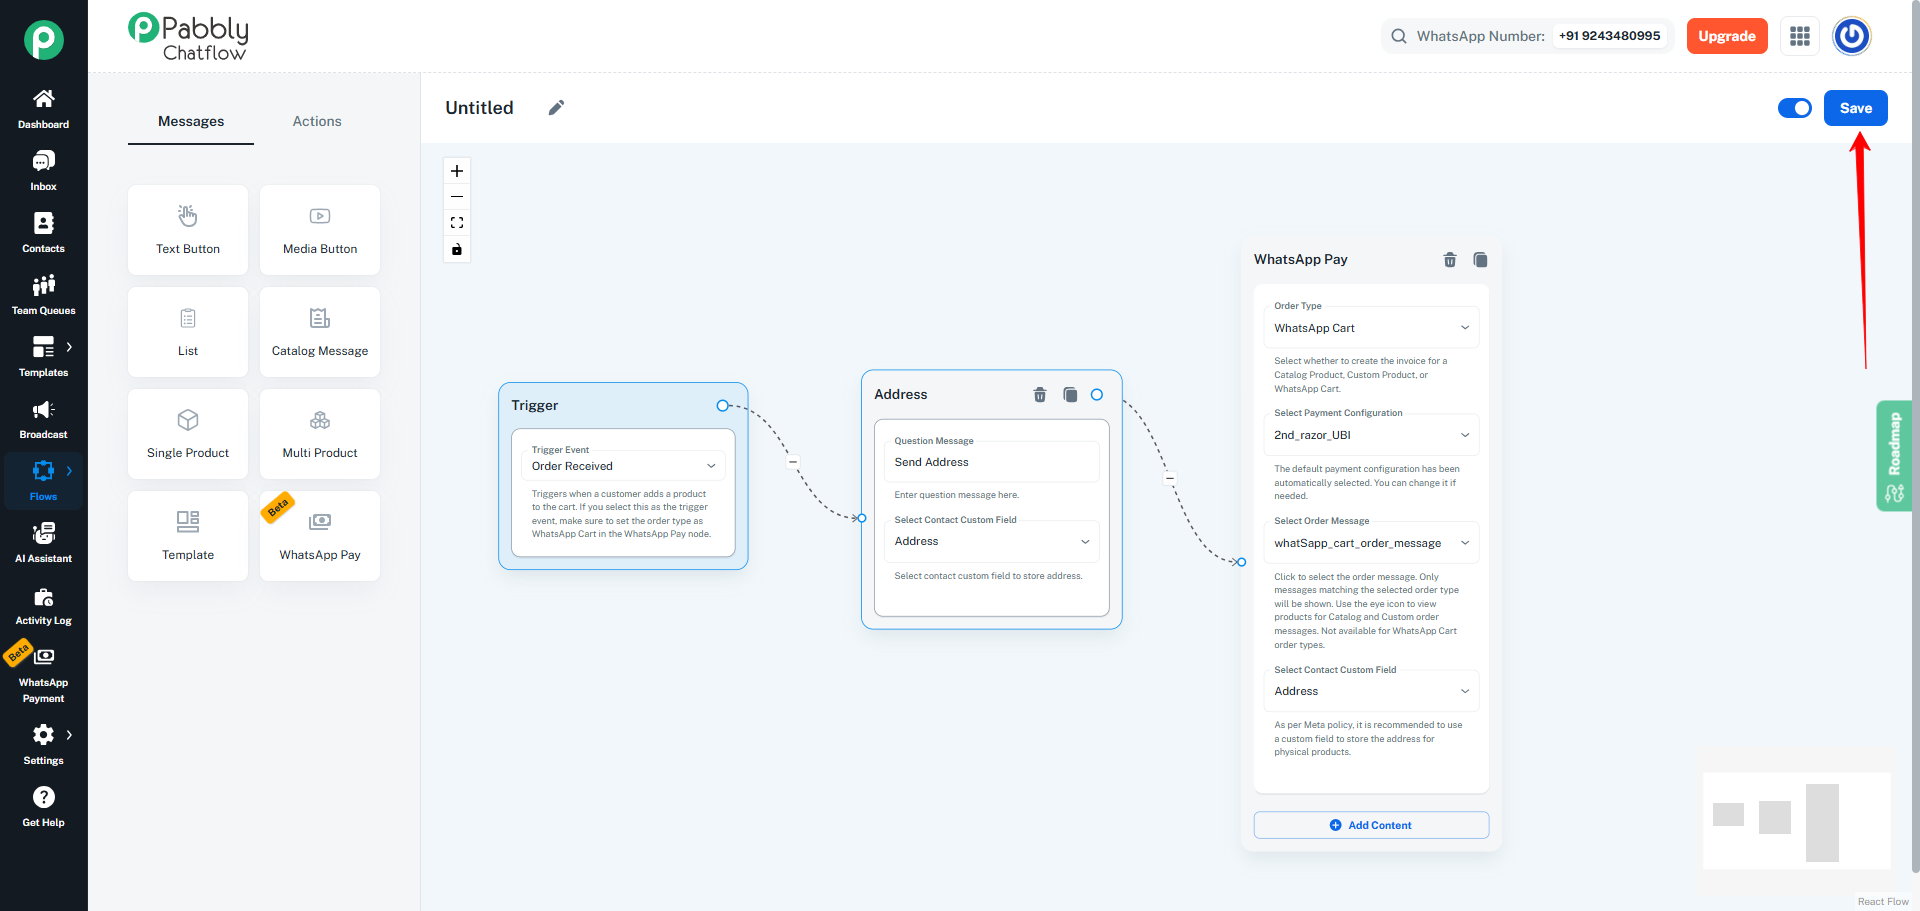
- Once the flow is fully set up, click on the Save button to activate it.
How the Flow Works Once Saved
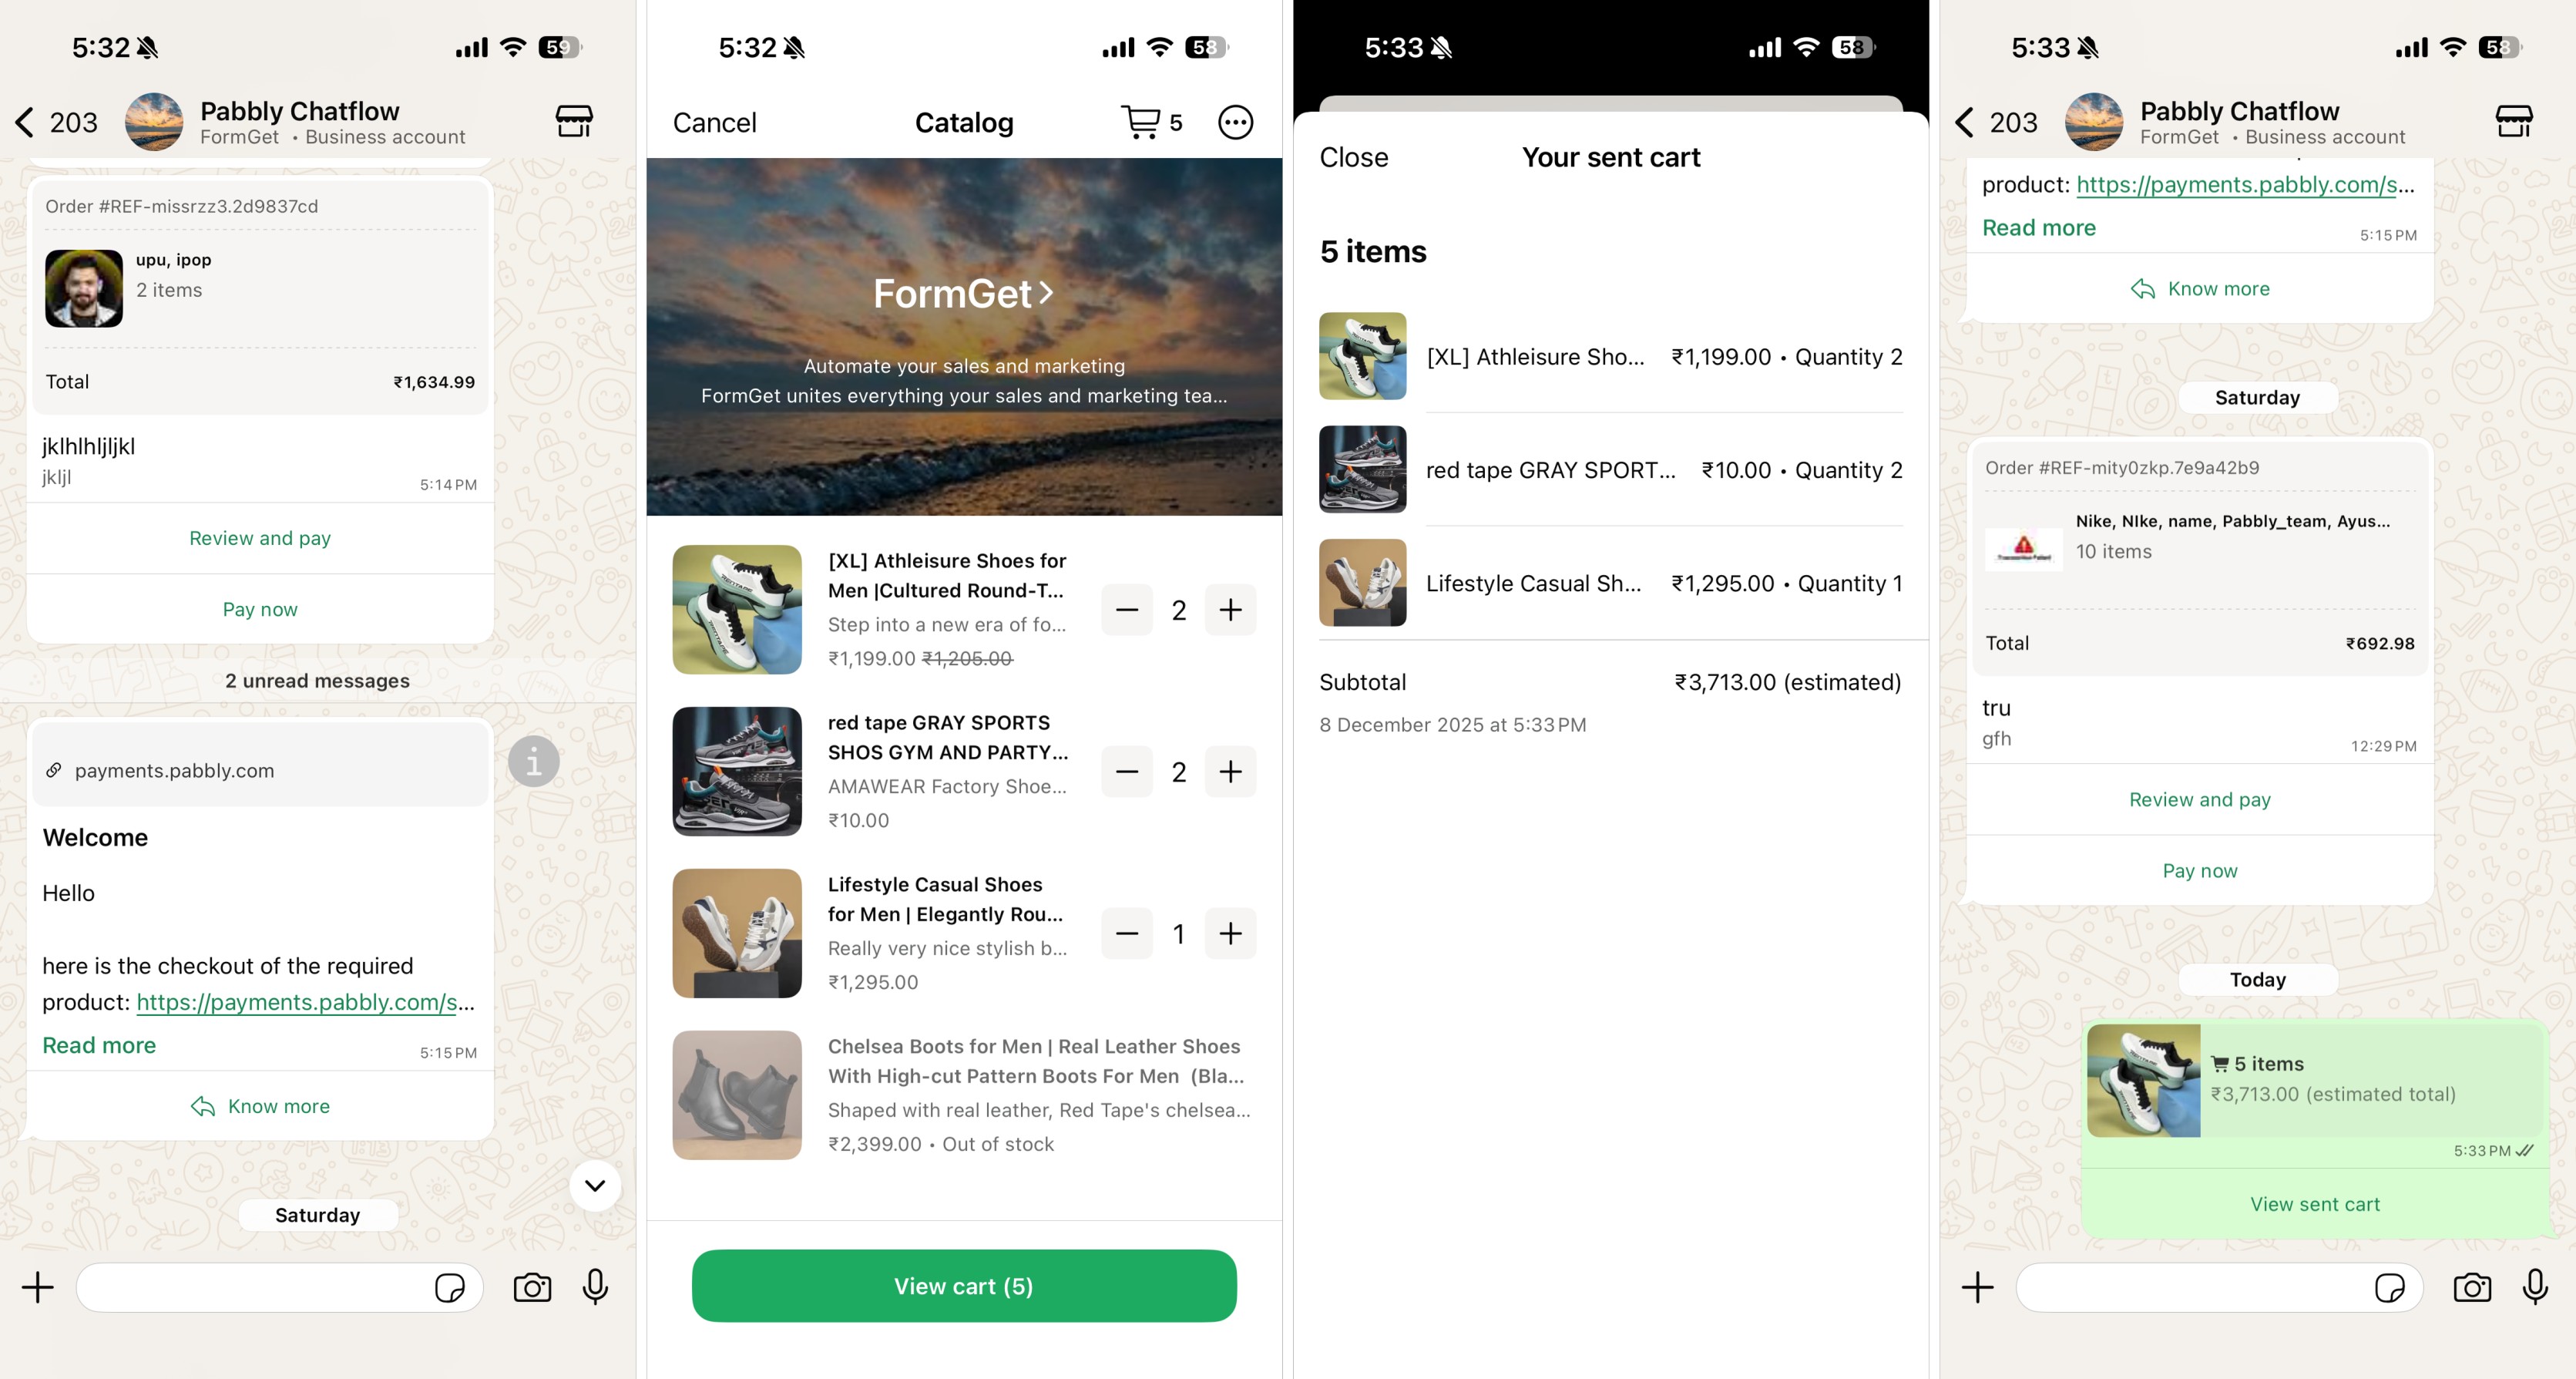
- Once the Flow is saved, the payment process begins automatically whenever a customer places an order through your WhatsApp Catalog.
- When an order is submitted from the WhatsApp app, the Order Received trigger is activated.
- Based on your flow configuration, the Ask Address action is first sent to the customer on WhatsApp.
- As soon as the customer replies with their address, the WhatsApp Pay action is executed and your configured Order Message is delivered to the customer.
- This Order Message includes the products added to the cart along with all applicable charges as defined in the selected Order Message.
The Order Message contains:
- All products added to the cart
- Applied tax rate, shipping charges, and discounts
- A secure payment link generated through your configured payment gateway
- A payment expiry timer based on your Order Message settings
- Two action buttons within the same Order Message:
- Pay Now – Opens the payment panel directly and allows the customer to choose a payment method (UPI, PhonePe, etc.) and complete the payment instantly.
- Review & Pay – Opens the full order summary where the customer can review products, applied charges, and discounts before completing the payment.
- If the Order Message is created with a 300-second (5-minute) expiry, the payment link will automatically expire after five minutes.
- Once the link has expired, the customer will no longer be able to complete the payment using that link.
Note: The Order Received trigger works only with WhatsApp Cart Order Messages. It will not fire for other types of Order Messages.
Using WhatsApp Pay Message with the "Custom Product" Order Message Type
When using the Custom Product type, you are not limited to the Order Received trigger. You can use any other supported trigger in Pabbly Chatflow except the Order Received trigger, such as Keyword, Regex etc.
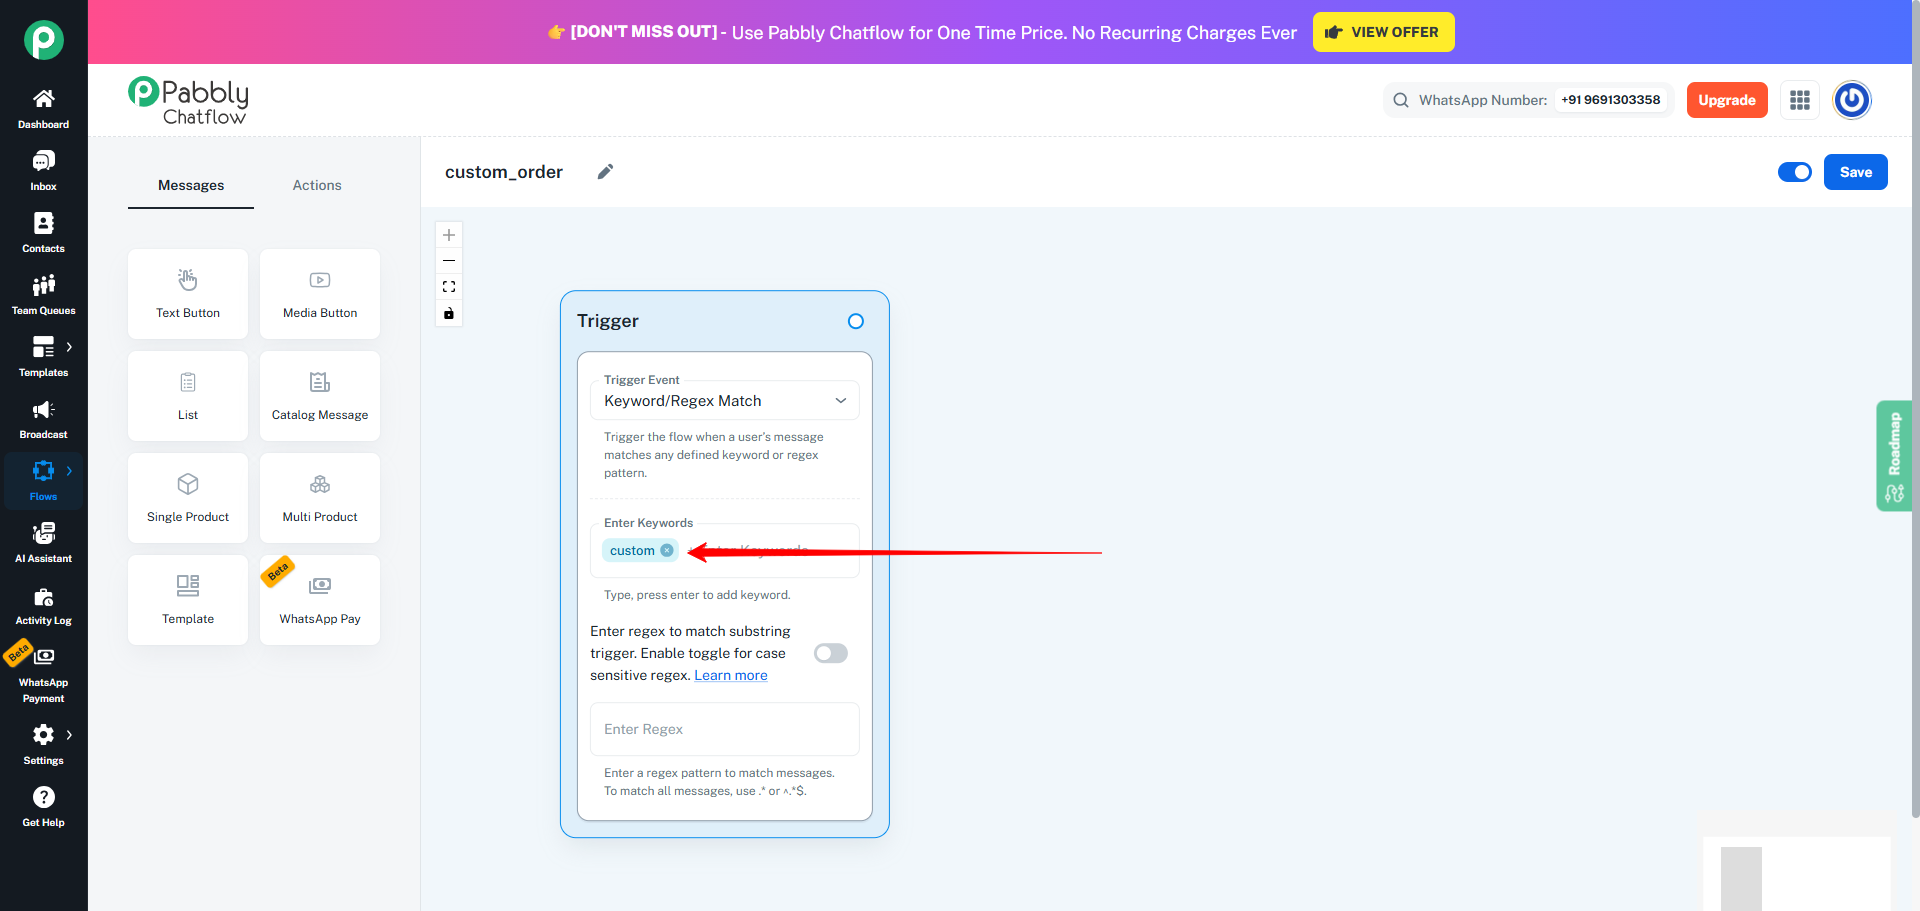
- For example, you may want to create a Flow that starts when the customer types a specific keyword. suppose you enter custom as a keyword
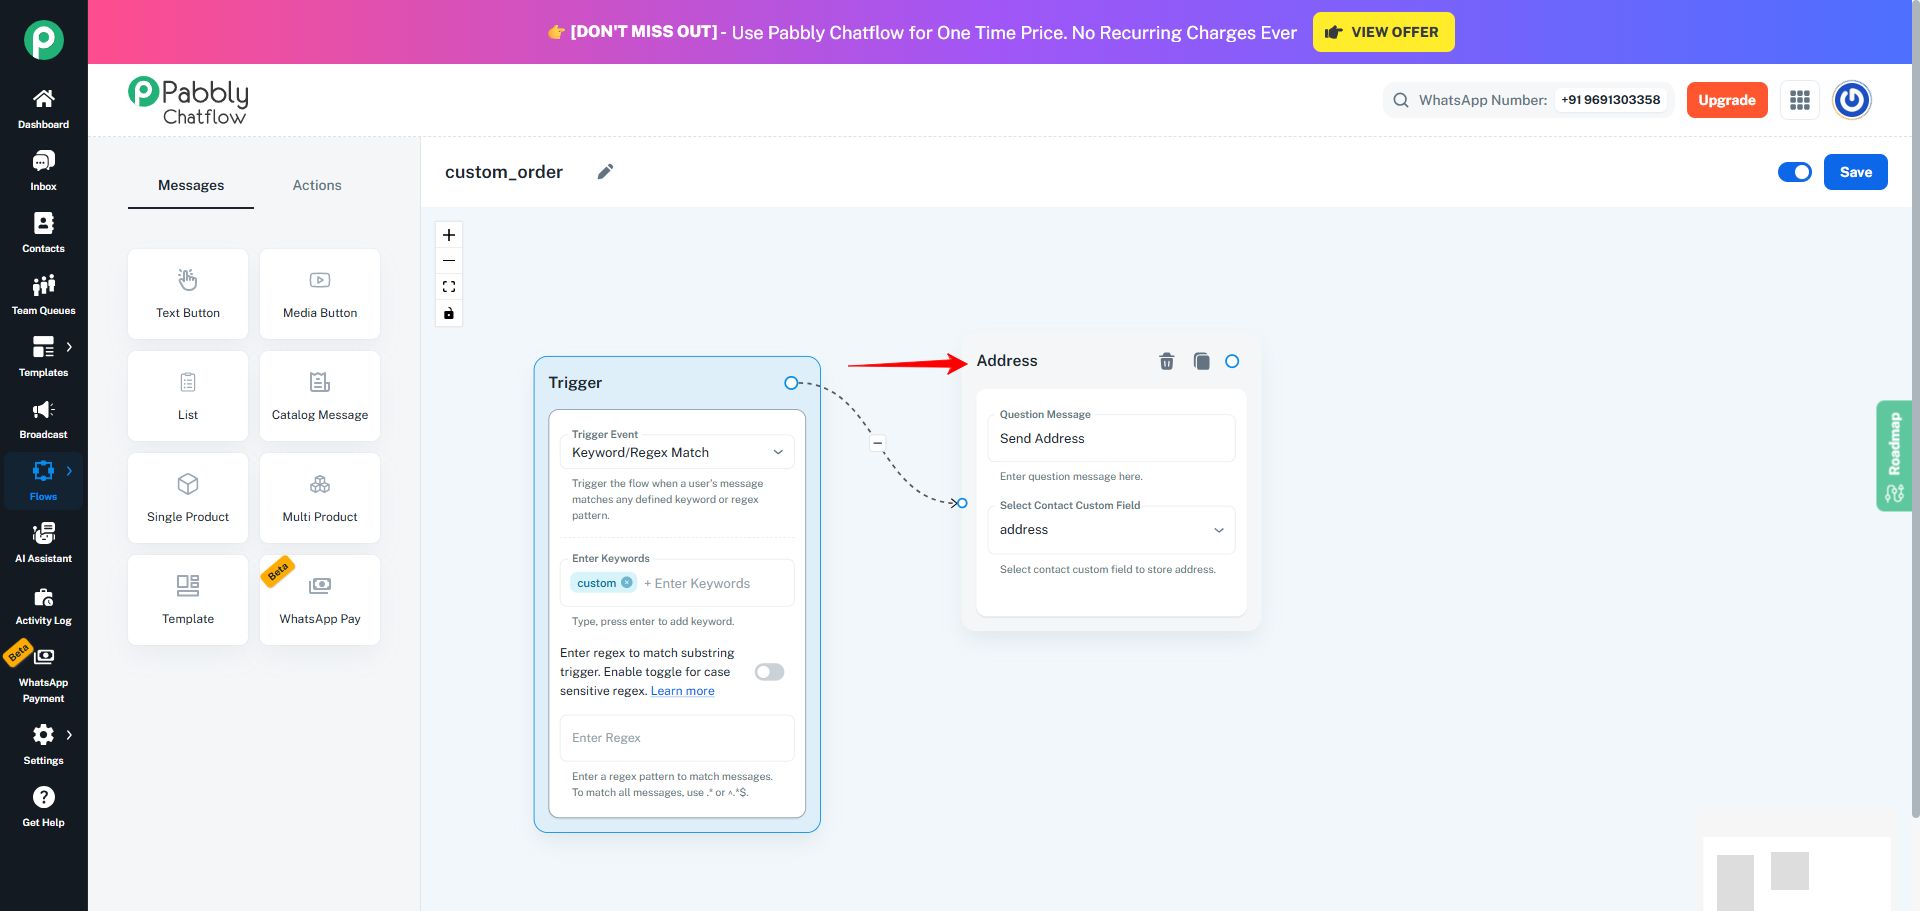
- After selecting the trigger, you can place an Ask Address action (recommended for physical goods)
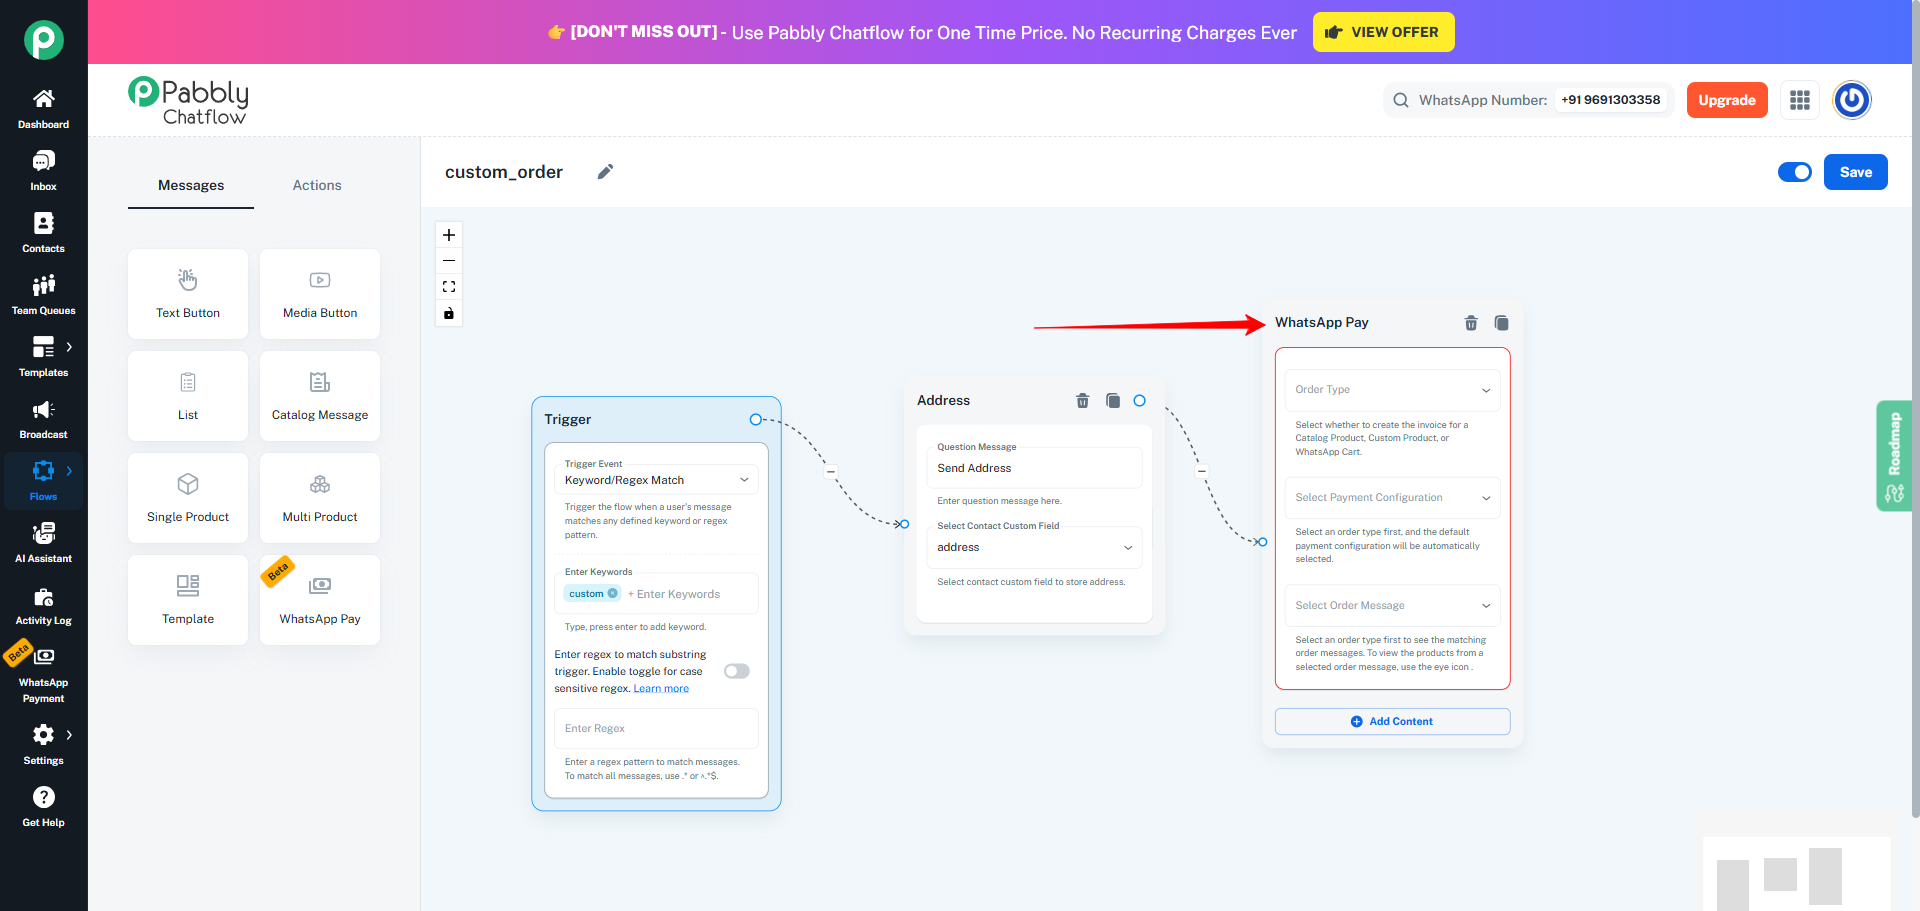
- And Add the WhatsApp Pay Message
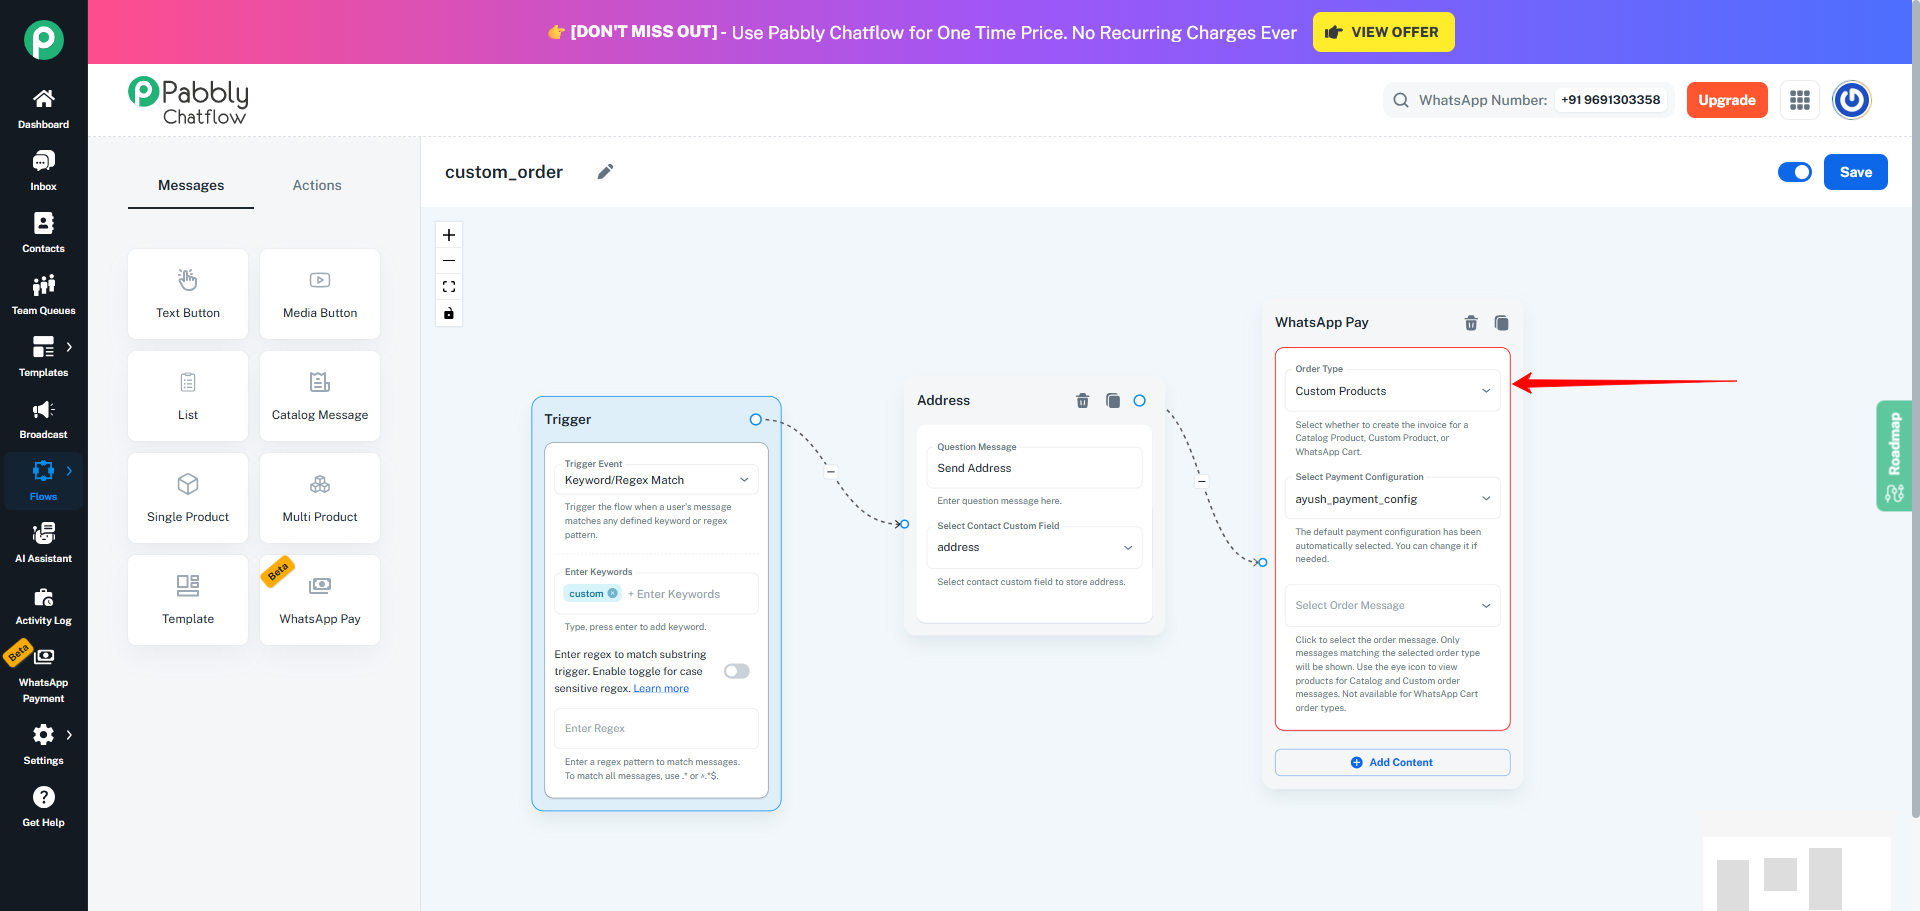
- Inside the WhatsApp Pay message, select Custom Product as the Order Message Type.
- In the next step, choose the required Order Message. Once selected, the system opens a dialog displaying all products included in that Order Message.
Each product is displayed with the following details:
- Product image
- Product name
- Quantity field
By default, the quantity for every product is set to 1. You can adjust the quantities as per the requirement however, the system enforces a strict rule
The total combined quantity of all selected products must not exceed 30
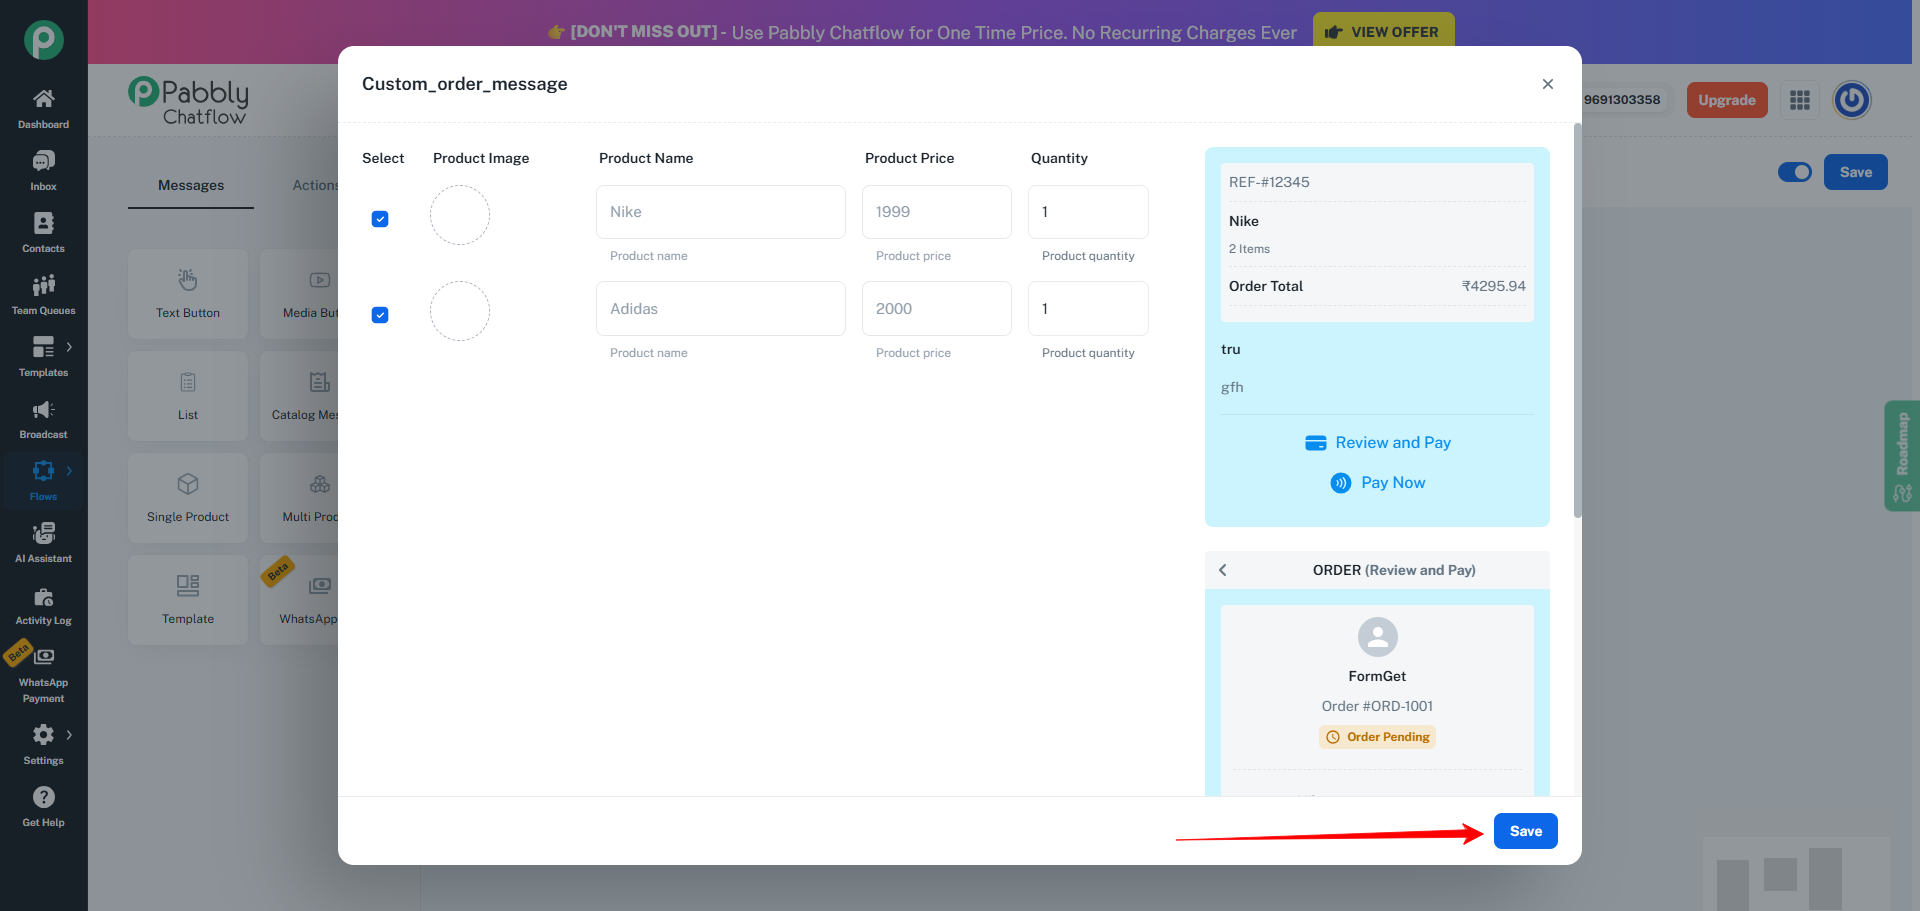
- After selecting the products and setting their quantities, click the Save button as shown in the image above.
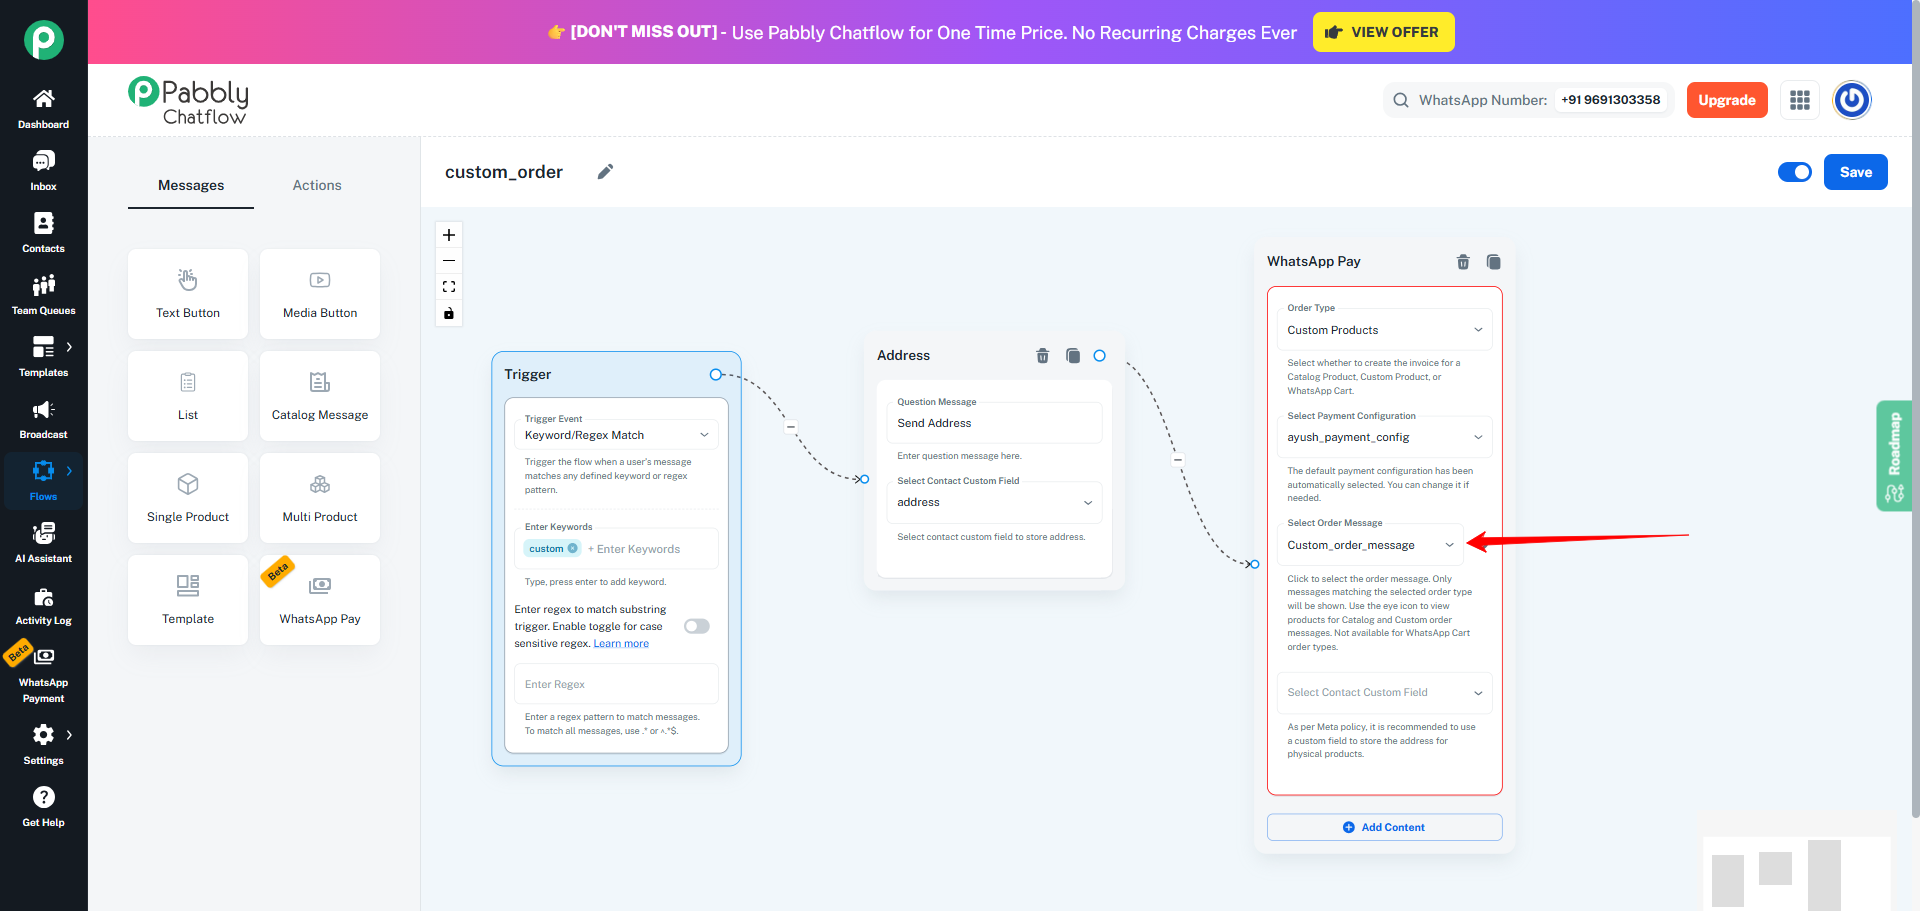
- If the selected Order Message is of the Physical Product type, you must select a Contact Custom Field to store additional customer information related to the order.
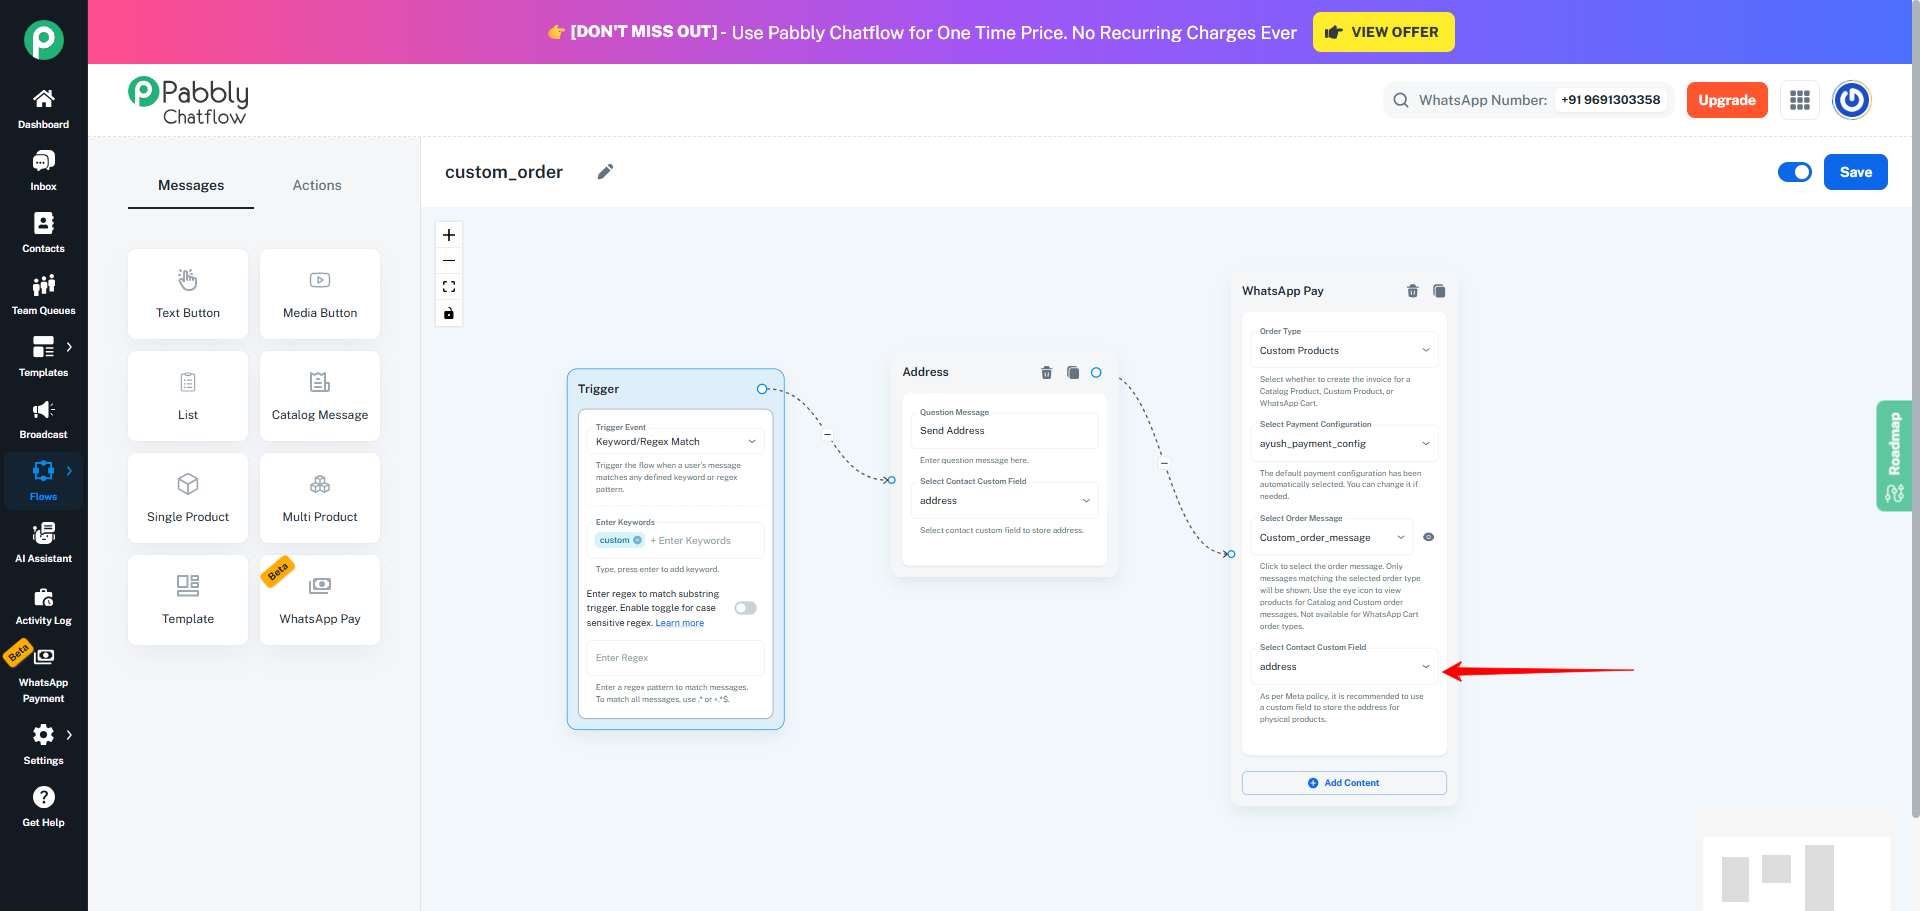
- Now, save the Flow by clicking the Save button.
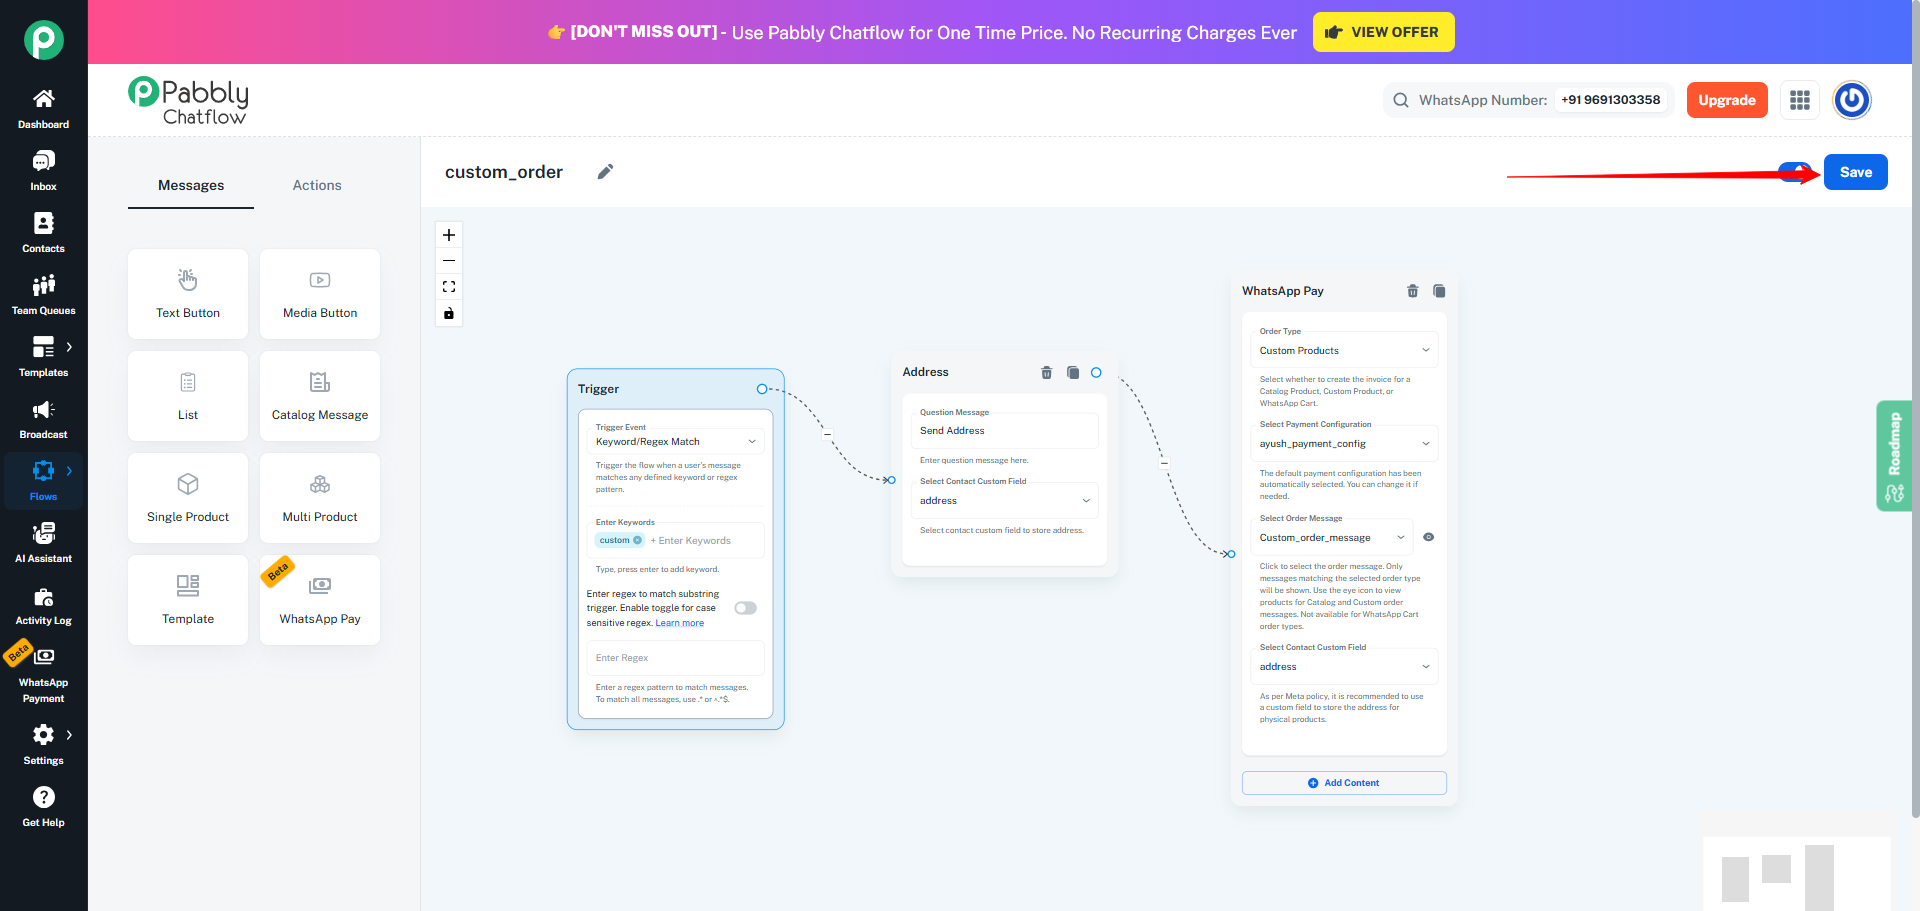
- Once the Flow is saved,
To test the setup:
- Open WhatsApp.
- Send the same keyword that you configured while creating the Flow.
- As soon as the system receives the keyword, the Flow gets activated automatically.
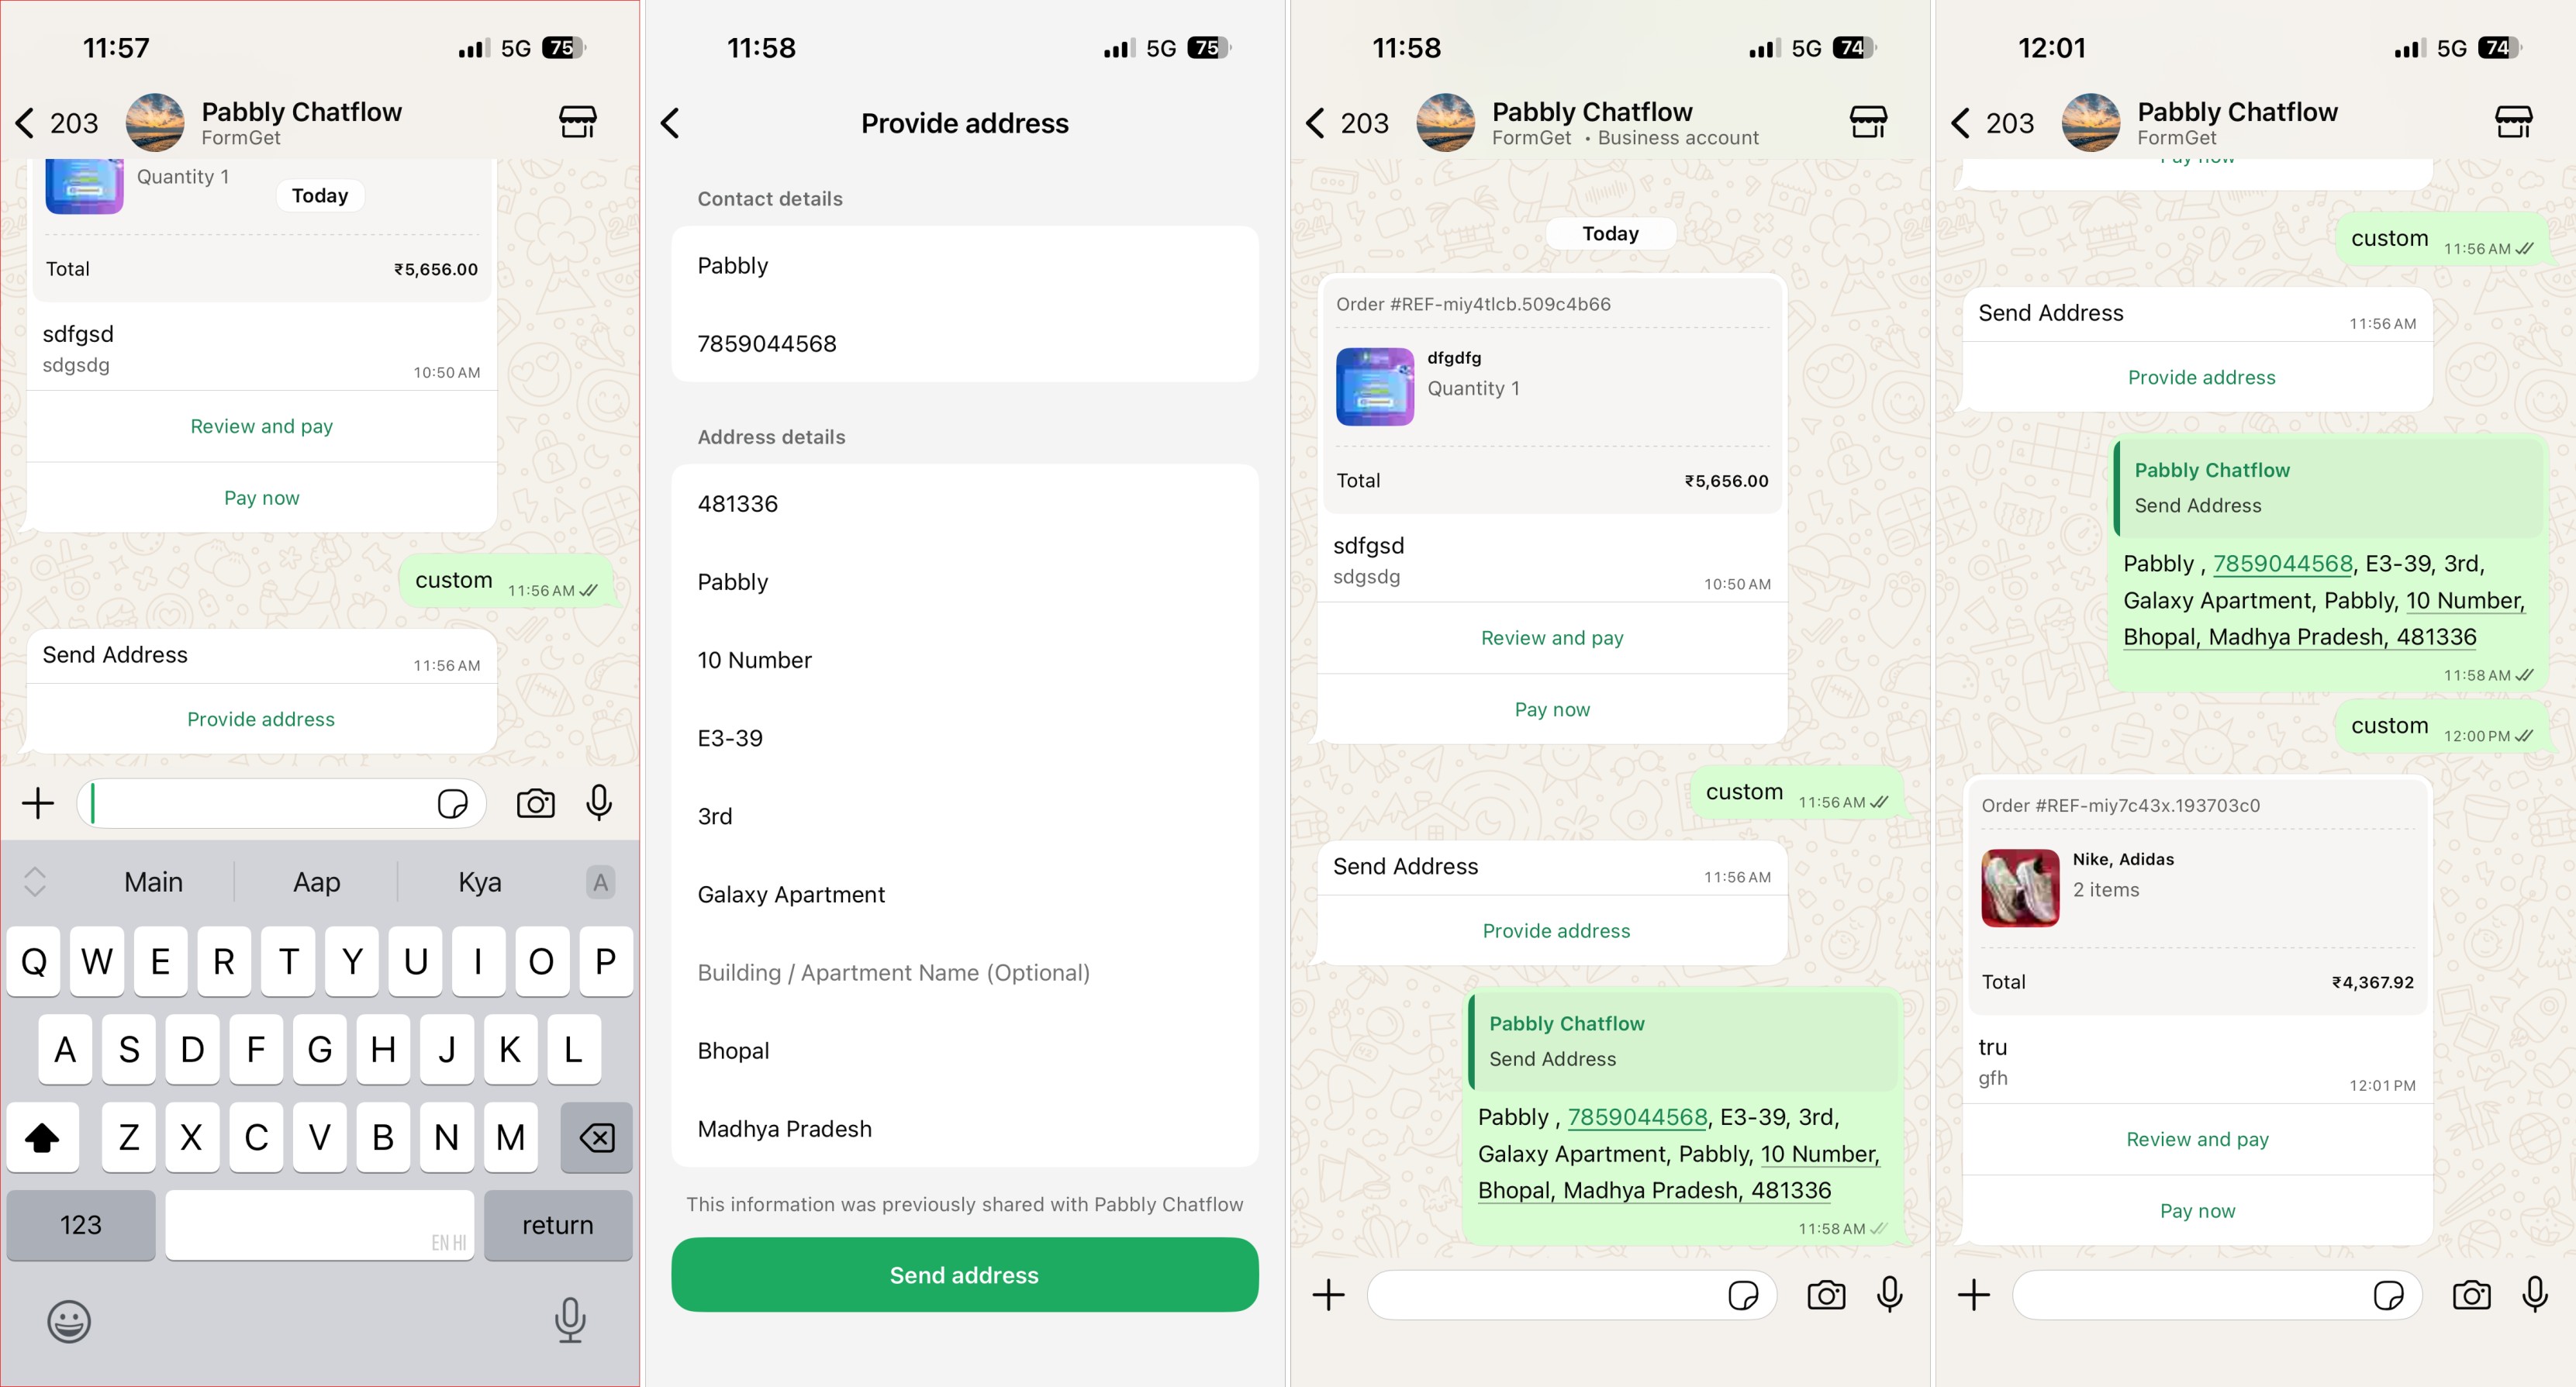
If you have added an Ask Address action in the Flow:
- The customer will first receive the address request on WhatsApp.
- Once the customer replies with their address, the Order Message is delivered automatically with:
- The selected products
- Their respective quantities
- Complete pricing details
Using WhatsApp Pay Message with the "Catalog Product" Order Message Type
The Catalog Product Order Message Type works the same way as the Custom Product type. The overall flow execution, order processing, and payment behavior remain exactly the same.
Prerequisites (Recommended)
Before using the Catalog Product Order Message Type inside the WhatsApp Pay Message, it is highly recommended to complete the following:
- Ensure that the Catalog is synced successfully in Pabbly Chatflow
- Make sure that all connected catalog products are also fully synced
This helps avoid any product visibility or delivery issues while sending the Order Message.
The “Catalog Product “ Order Message Type works exactly the same way as the Custom Product type. Once you select it, everything functions in the same manner, including:
- Flow triggering
- Order processing
- Ask Address step (for physical products)
- Order message delivery
- Payment link generation
- Tax, shipping, discount, and payment expiry rules
Using the "Payment Captured" Trigger
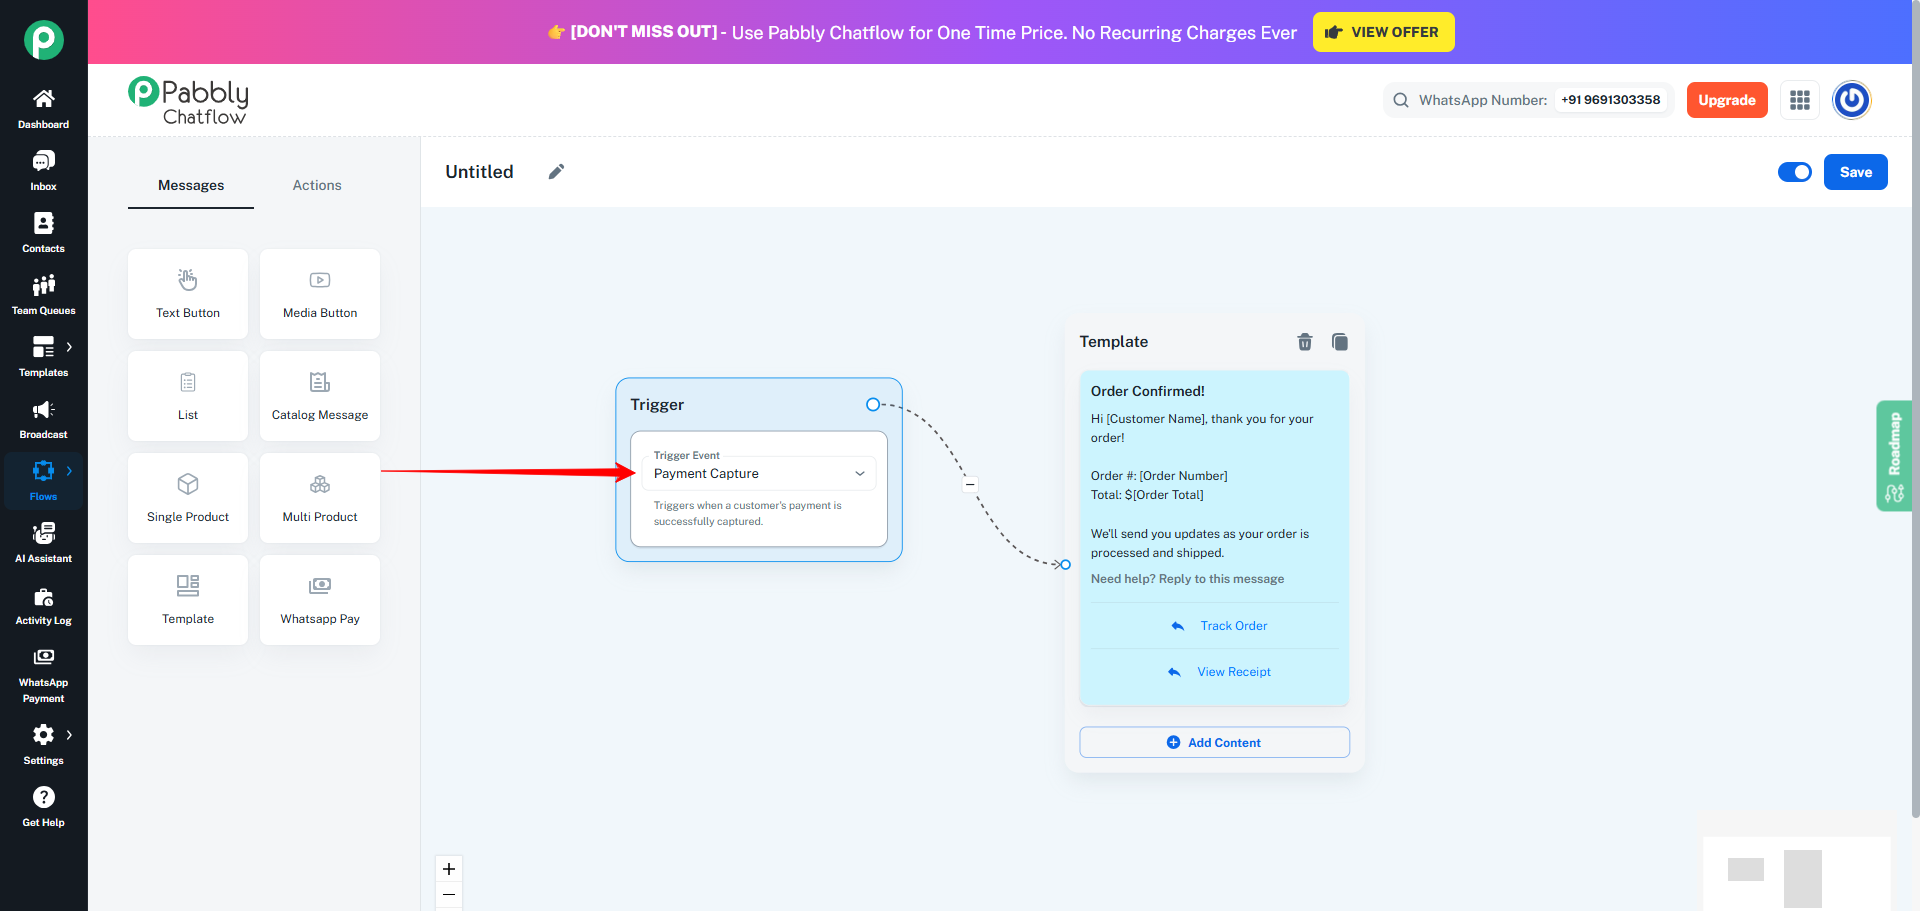
In addition with WhatsApp Pay, Pabbly Chatflow also provides a dedicated Payment Captured trigger event.
- This trigger activates automatically whenever a payment is successfully completed by a customer. If you configured any flow with this trigger events.
- This is helpful if you want to send a follow-up message then you will use this trigger events.
 Pabbly Chatflow Team•Updated Oct 24, 2026•11 min read Video included