Settings
 Pabbly Email Marketing Team•Updated Sep 15, 2026•6 min read
Pabbly Email Marketing has a built-in MCP Server. MCP (Model Context Protocol) is the open standard that lets AI assistants such as ChatGPT and Claude work inside other apps. Once connected, you can manage your email marketing by chatting: add subscribers, check campaign results, create templates and campaigns, build automations, and more.
This guide walks through the connection in four steps. It takes about five minutes.
A Pabbly Email Marketing account with at least one business.
A ChatGPT or Claude account on a plan that supports custom connectors. Free plans generally do not.
Your Pabbly login email and password (or Google login) handy. You will sign in once during setup.
Log in to Pabbly Email Marketing.
In the left sidebar, open Settings.
Click the MCP Server tab.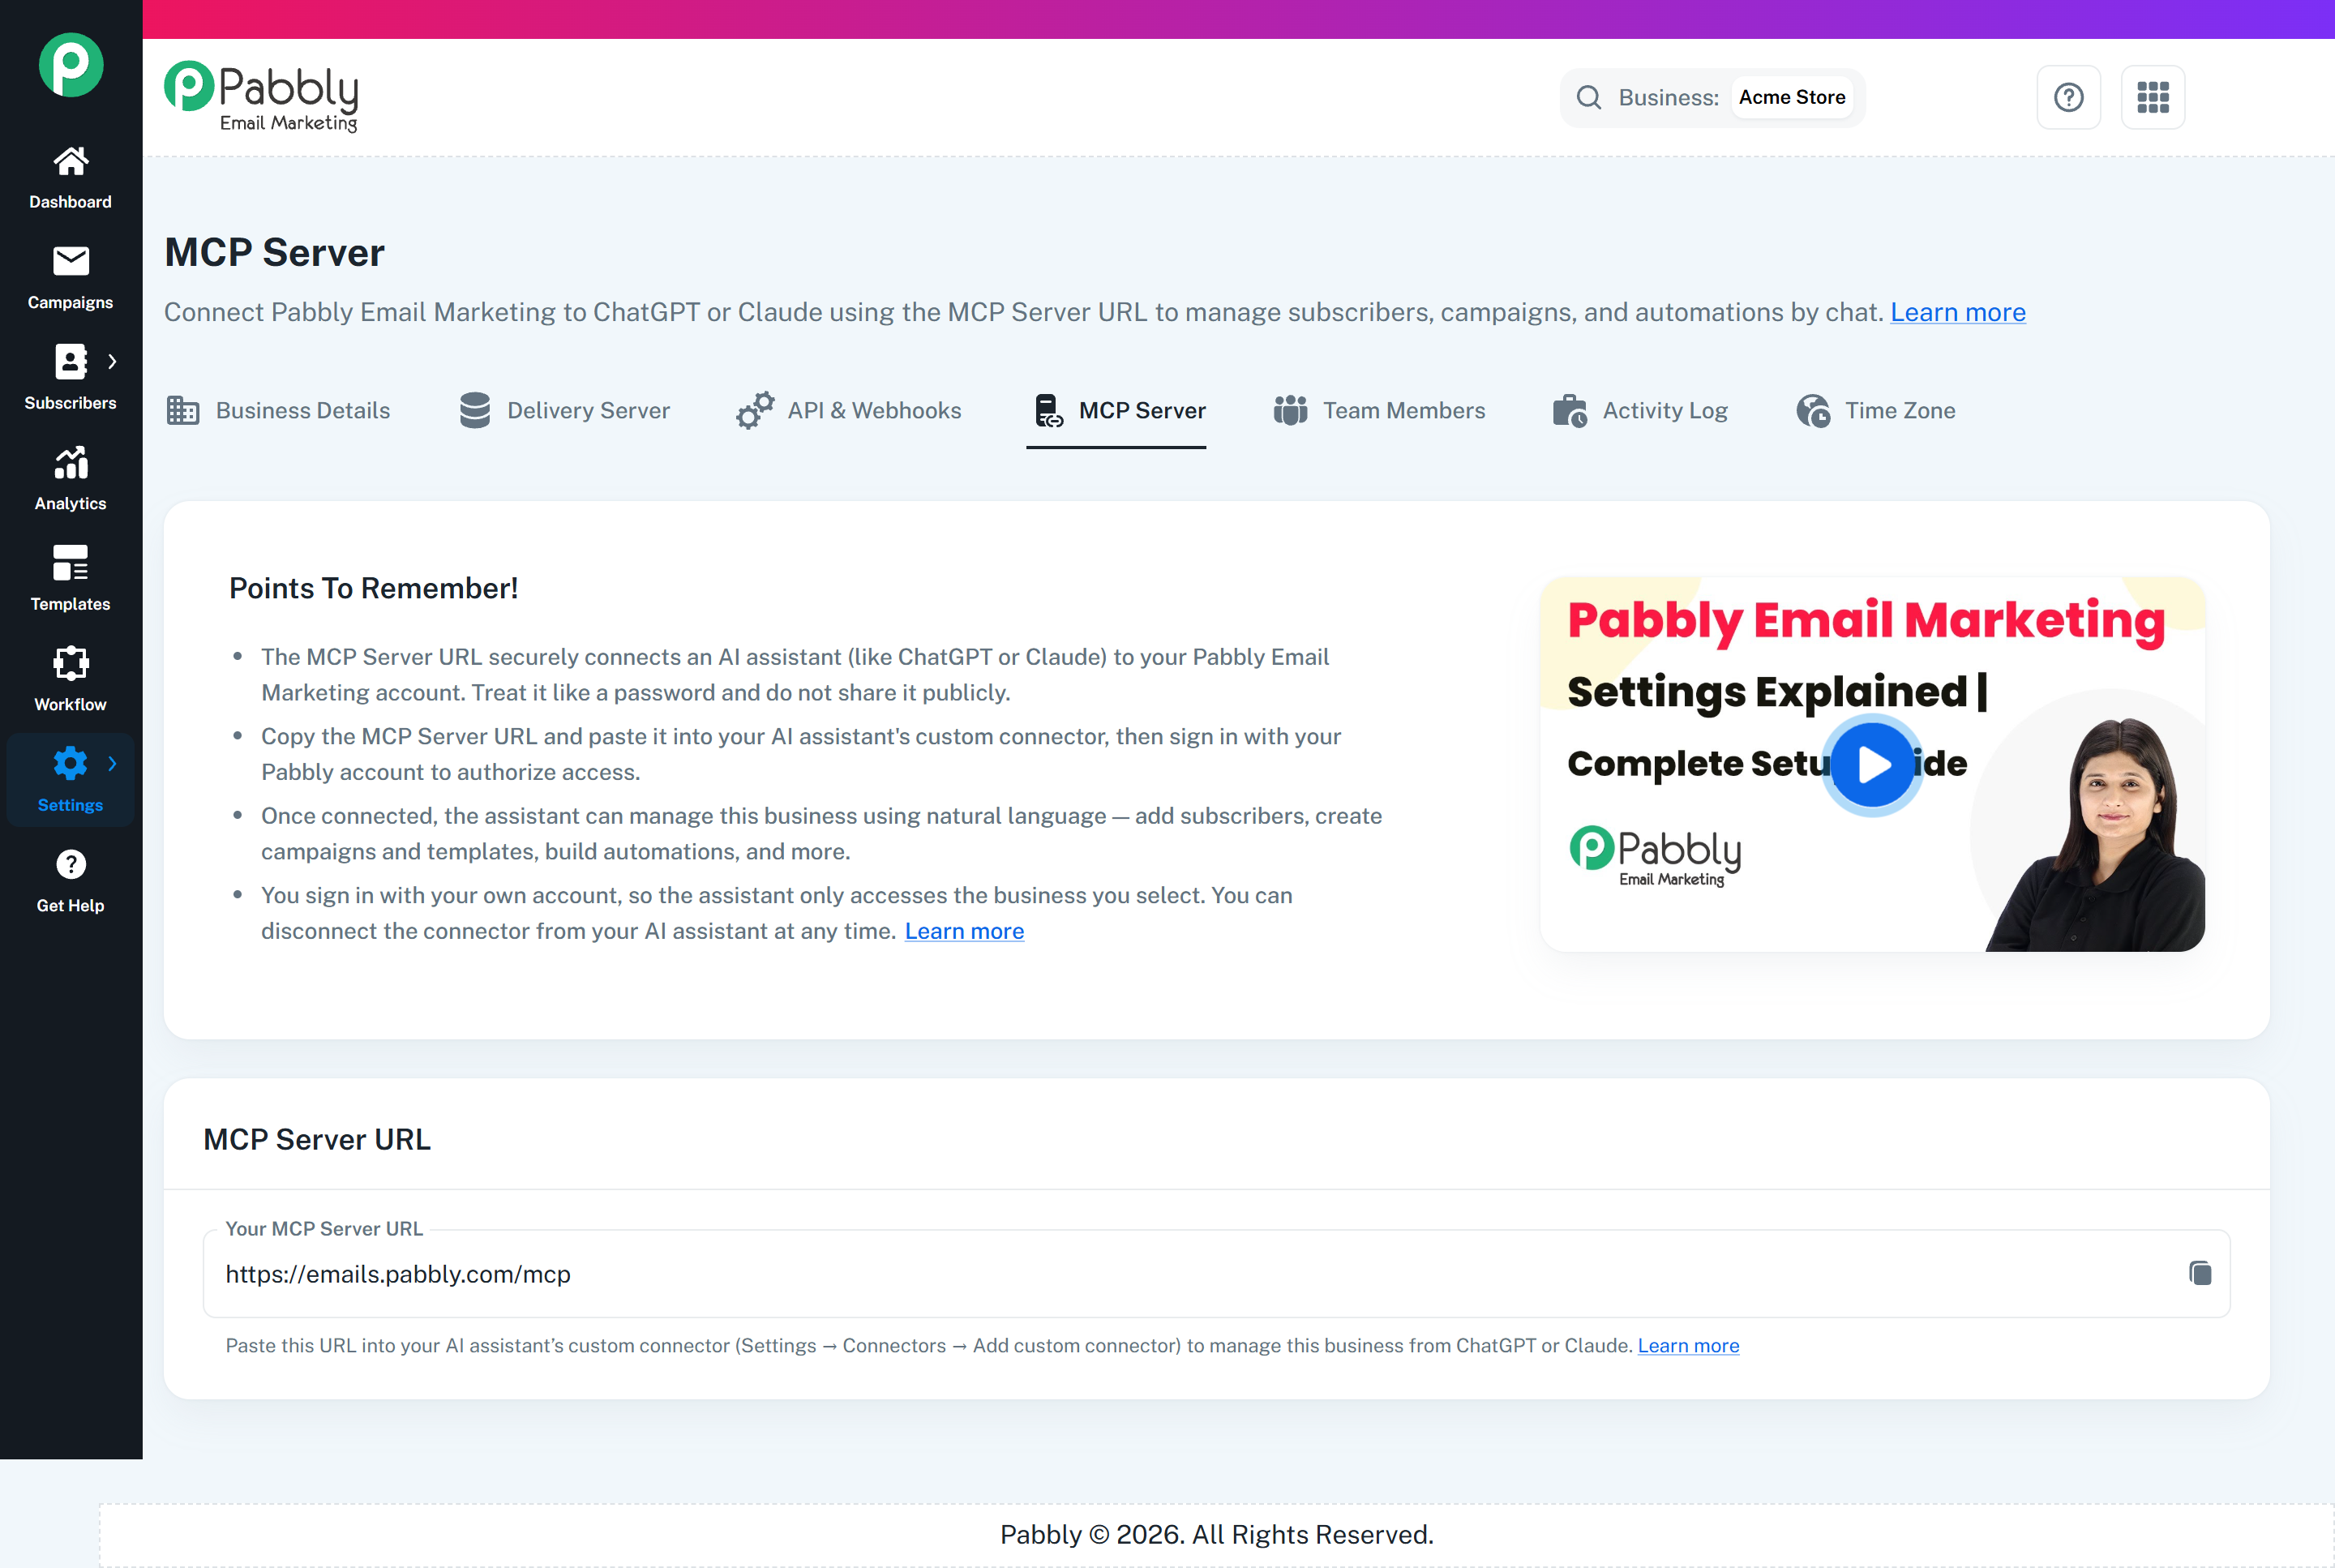
In the MCP Server URL card, click the copy icon at the right end of the field.
The URL is the same for every account:
https://emails.pabbly.com/mcpThe URL alone does not give anyone access to your account. Access is granted only after you sign in and approve it in Step 3.
Pick the assistant you use. Menu names can shift slightly as ChatGPT and Claude update their apps, but the fields are the same.
Open Settings in ChatGPT, then Connectors.
Click Create (or Add connector). If you do not see it, open Advanced settings on the Connectors page and turn on Developer mode first.
Fill in the form:
Name: Pabbly Email Marketing
Description: anything you like, for example Manage subscribers, campaigns and automations from chat.
MCP Server URL: paste https://emails.pabbly.com/mcp
Authentication: choose OAuth. Leave any Client ID / Client Secret fields empty.
Tick I understand and want to continue and click Create.
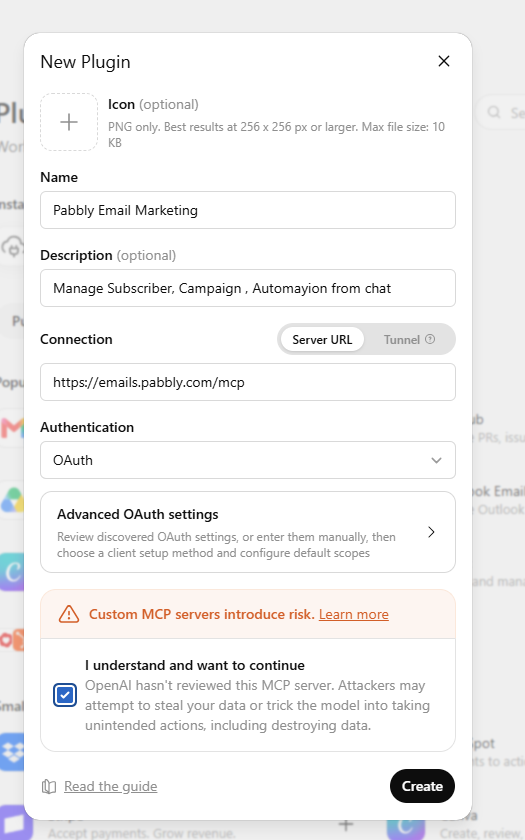
Illustration of the form. Your screen may look slightly different.
ChatGPT immediately opens the Pabbly sign-in window. Continue with Step 3.
Open Settings in Claude, then Connectors.
Click Add custom connector.
Fill in the form:
Name: Pabbly Email Marketing
Remote MCP server URL: paste https://emails.pabbly.com/mcp
Leave Advanced settings (OAuth Client ID / Secret) empty.
Click Add.
Find the new connector in the list and click Connect.
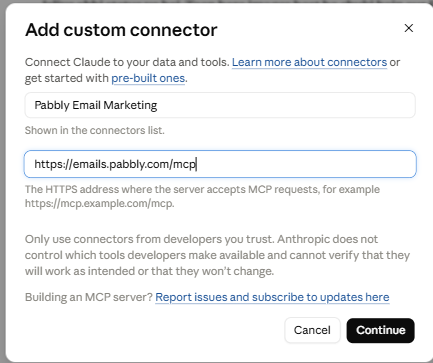
Claude opens the Pabbly sign-in window. Continue with Step 3.
A Pabbly window opens inside your assistant.
Choose the business the assistant may work with, then click Approve access.
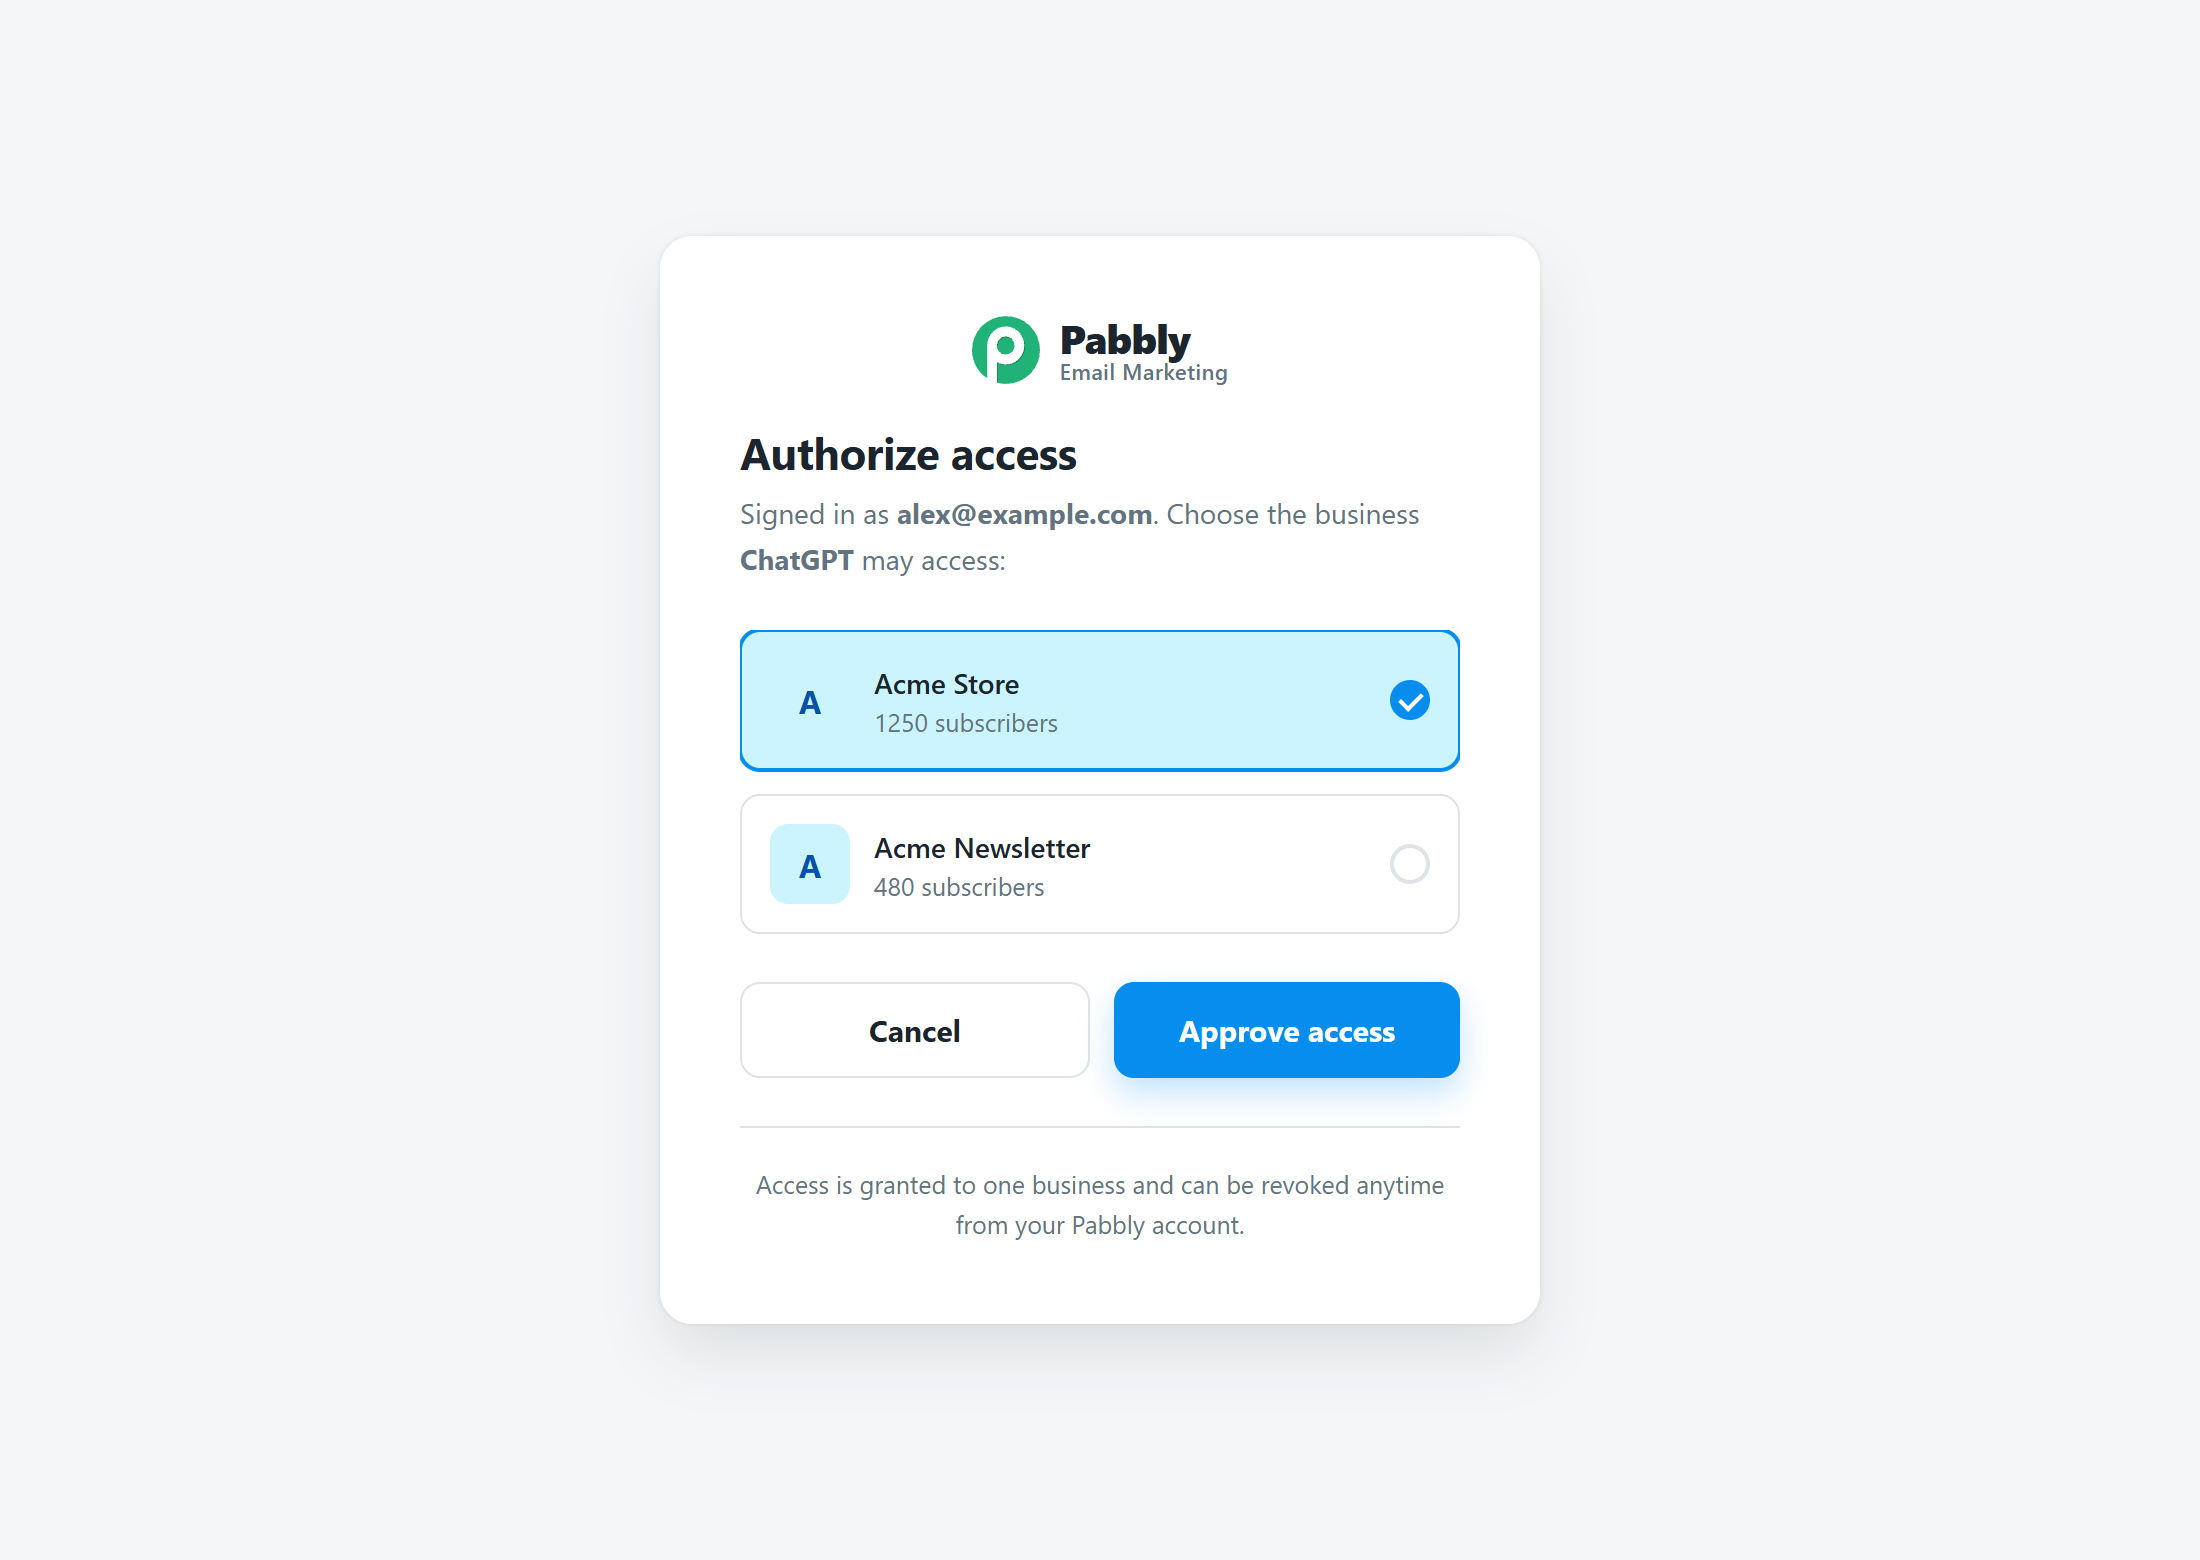
One connection covers one business. To work with a different business, disconnect and connect again, choosing the other one (see "Switching business" below).
After you approve, the window closes and the connector shows as Connected.
Open a new chat and ask for something. The assistant picks the right Pabbly tools on its own.
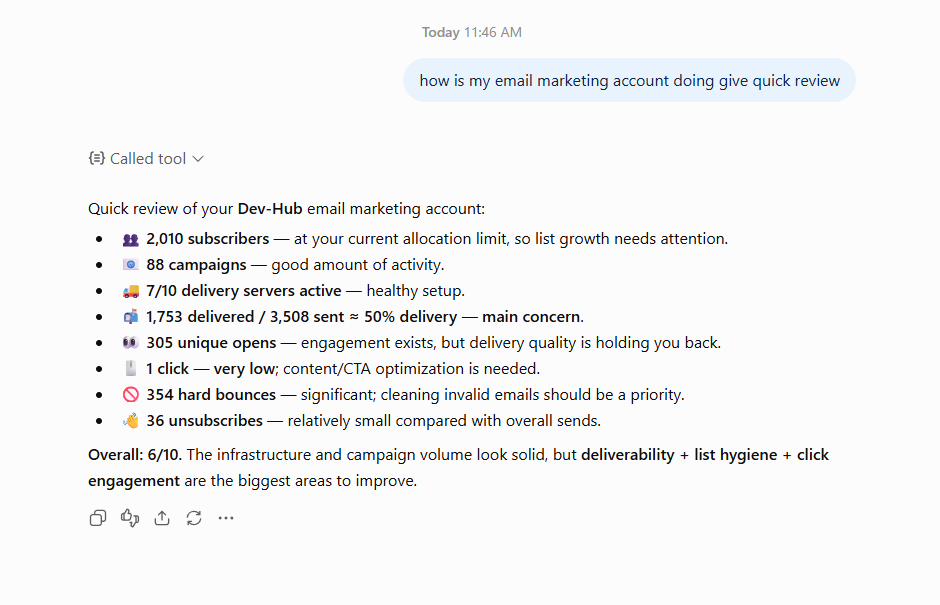
Prompts to try:
"Give me an overview of my Pabbly Email Marketing account."
"How many subscribers are in my Newsletter list?"
"Add [email protected] to the Newsletter list with first name Priya."
"Which of my campaigns had the best open rate?"
"Who bounced in the September Newsletter campaign?"
"Create an email template called 'Diwali Offer' with a 20% discount banner and a Shop Now button."
"Create a draft campaign from that template with subject 'Diwali sale starts today' and show me the preview."
"Build an automation: when someone joins the Newsletter list, wait 1 day, then send the Welcome campaign."
"Send new subscribers to this webhook URL: https://example.com/hooks/new-subscriber"
Tip: In ChatGPT, if a chat does not use the connector, click the + button in the message box and enable Pabbly Email Marketing for that conversation.
Area | What you can ask for |
|---|---|
Account | Account overview, list of your businesses, which business is connected |
Subscribers | Search and view subscribers, add or update them, add to or move between lists, unsubscribe, delete |
Lists | View, create, rename, delete lists |
Segments | View segments and their subscribers, create, update, delete |
Campaigns | List campaigns, view content, create drafts, send to a list or to specific emails, per-campaign open / click / bounce rates |
Engagement | Who opened, clicked, bounced or unsubscribed in a campaign, and when |
Templates | View, create (HTML or Drag & Drop builder), update, delete. A live preview link is returned for every template and campaign the assistant creates |
Images | Upload an image (from a URL or a file) and get a hosted link to use in emails |
Automations | View workflows and their stats, build new workflows from a plain-English description, update, delete |
Webhooks | Add a webhook that fires on events such as new subscriber, campaign sent, email opened |
Delivery | See your delivery servers and sending options, custom fields |
You approve, the assistant asks. Sending a campaign, deleting subscribers, lists, templates or automations always requires your confirmation in the chat.
One business per connection. The assistant can see and change only the business you selected during sign-in. Other businesses and other accounts are never visible.
Same limits as the app. Subscriber quota, sending limits and bulk-delete protections apply exactly as they do in Pabbly Email Marketing.
Paged results. Lists are shown 20 rows at a time. Ask for the next page rather than "everything at once".
Compliance footer. Templates and campaigns created through the assistant automatically get the unsubscribe and business-address footer, just like the editor does.
Disconnect any time. Remove the connector in your assistant's Connectors settings. Access ends immediately.
In ChatGPT or Claude, open Settings → Connectors, select Pabbly Email Marketing and choose Disconnect (or remove it).
Connect again. On the Authorize access screen, pick the other business.
Any client that supports remote MCP servers over HTTP with OAuth can connect. The URL is always https://emails.pabbly.com/mcp.
Claude Code (terminal)
claude mcp add --transport http pabbly-email-marketing https://emails.pabbly.com/mcpThen run /mcp inside Claude Code and choose Authenticate next to the server.
Cursor and other JSON-configured clients
{
  "mcpServers": {
    "pabbly-email-marketing": {
      "url": "https://emails.pabbly.com/mcp"
    }
  }
}
The client opens the same Pabbly sign-in window as in Step 3.
The sign-in window says "Invalid email or password." Use the same email and password you use at emails.pabbly.com. If you normally sign in with Google, click Login with Google instead.
The connector shows "Disconnected" or the assistant says it is not authorized. Open Settings → Connectors in your assistant and click Connect (or Reconnect) on Pabbly Email Marketing. Sign in again when prompted.
The assistant says it cannot find a tool, or an older feature is missing. Disconnect and reconnect the connector. Assistants cache the tool list at connect time.
The assistant is working on the wrong business. See "Switching business" above.
A campaign the assistant sent shows as "Sending". That is normal. Emails go out through the sending queue, and the status changes to Sent once delivery finishes. Ask the assistant for the campaign status again in a few minutes.
"Quota full" when adding subscribers. Your business has reached its subscriber limit. Upgrade the plan or remove unused subscribers, then try again.
An image the assistant added does not show in the email. Ask the assistant to upload the image first ("upload this image and use the hosted link"). Images must be hosted to display in email clients.
I want to stop the assistant's access completely. Remove the connector in your assistant's Connectors settings. The assistant no longer holds any access to your business after that.
Need help? Contact Pabbly support from the Get Help menu in Pabbly Email Marketing.
