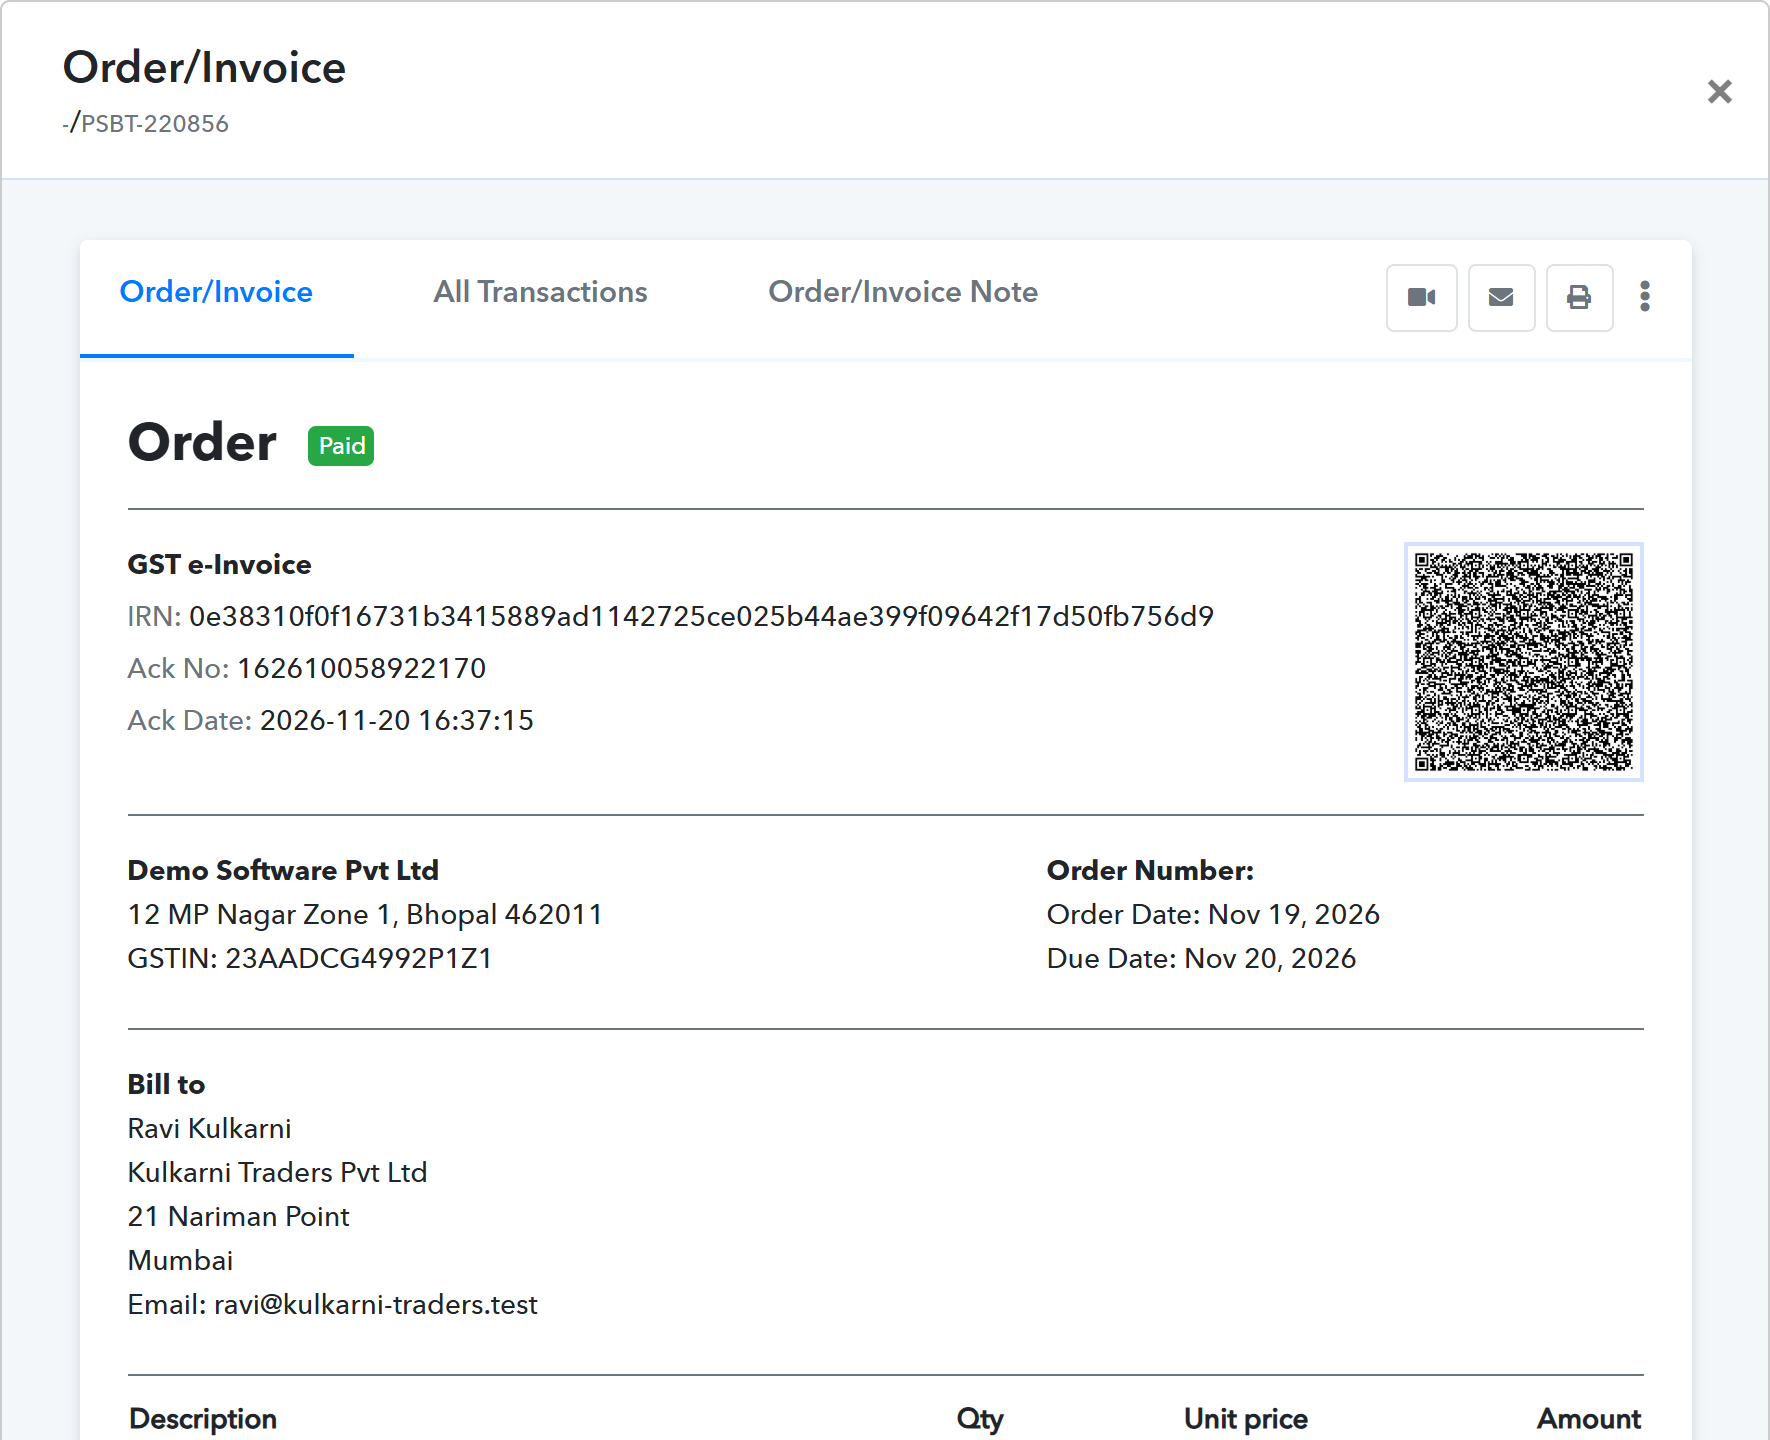
Pabbly Subscription Billing can register your paid invoices as GST e-invoices on the Government of India e-invoice portal, through your own GSTZen account. Each registered invoice gets an IRN (Invoice Reference Number), an Ack No, an Ack Date and a signed QR code. These are shown on the invoice and in your customer's payment email automatically.
Note: GST e-invoicing is being rolled out gradually. If you don't see Generate GST e-invoice in your Invoice Settings, contact our support team.
How it works
- Your customer pays an invoice in INR. GST is charged by your tax rules, as usual.
- If the invoice's Invoice Setting has e-invoicing turned on, and the customer has a valid GSTIN and a billing address in India, the invoice is sent to the e-invoice portal through GSTZen. This happens in the background, so the payment and checkout are never slowed down.
- The portal returns the IRN, Ack No, Ack Date and QR code, and they are saved on the invoice. This usually takes a few seconds.
- The customer's payment email waits for the e-invoice (at most 10 minutes), so it can show the IRN and QR code at the top.
- If you refund the invoice later, a credit note e-invoice is created for the refund.
Tax rules and Invoice Settings: who does what
- Tax rules decide the GST. Whether GST is charged, and how much, still comes from your tax rules (country, state, product and plan). Nothing about this changes.
- The Invoice Setting decides the e-invoice. It decides whether a paid invoice is registered as an e-invoice, and with which GSTIN, HSN/SAC codes and GSTZen account.
- The e-invoice reports the GST already charged. It never recalculates tax, so the e-invoice always matches the invoice your customer paid.
Why it is set up this way:
- Use it only where you need it. An Invoice Setting can apply to all products or to selected products and gateways, so you can e-invoice only your Indian business.
- More than one GSTIN. Each Invoice Setting has its own GSTIN, codes and GSTZen token, so different businesses on one account can each use their own GST registration.
- Prices never change. Turning e-invoicing on or off never changes what your customers pay, because tax stays in one place.
- Only the right invoices. Customers without a GSTIN, customers outside India and invoices in other currencies are skipped automatically.
Before you start
- A GSTZen account with e-invoicing set up, and your GSTZen API token.
- Your GSTIN, and the HSN/SAC code of what you sell. Codes are 6 or 8 digits. SAC codes (for services) start with 99.
- A GST tax rule for India in Settings → Tax Setting, so GST is charged on the invoice. Tick Record Tax Id in the rule, so customers can enter their GSTIN on the checkout page.
- City and PIN code at checkout. In the checkout page customizer, keep Street, City and Zip turned on in the billing address. An e-invoice needs the customer's city and 6-digit PIN code.
- INR invoices. E-invoices are created only for invoices in INR.
Turn on GST e-invoicing
- Go to Settings → Invoice Settings. Open an Invoice Setting, or click Add Invoice Setting.
- Fill in the Company Name and the address with City, State and a 6-digit PIN code. These are used as the seller details on the e-invoice.
- Check the invoice number: the invoice prefix plus the number can have at most 16 characters (letters, numbers, / and -), and cannot start with 0, / or -.
- Tick Generate GST e-invoice.
- Enter your GSTIN, the Default HSN/SAC Code and your GSTZen API Token. The token is stored encrypted and is never shown again. When you edit the setting later, leave the token field blank to keep the saved token.
- Optional: under Different code for some items, click + Add item, choose a product or addon and enter its code.
- Click Save.
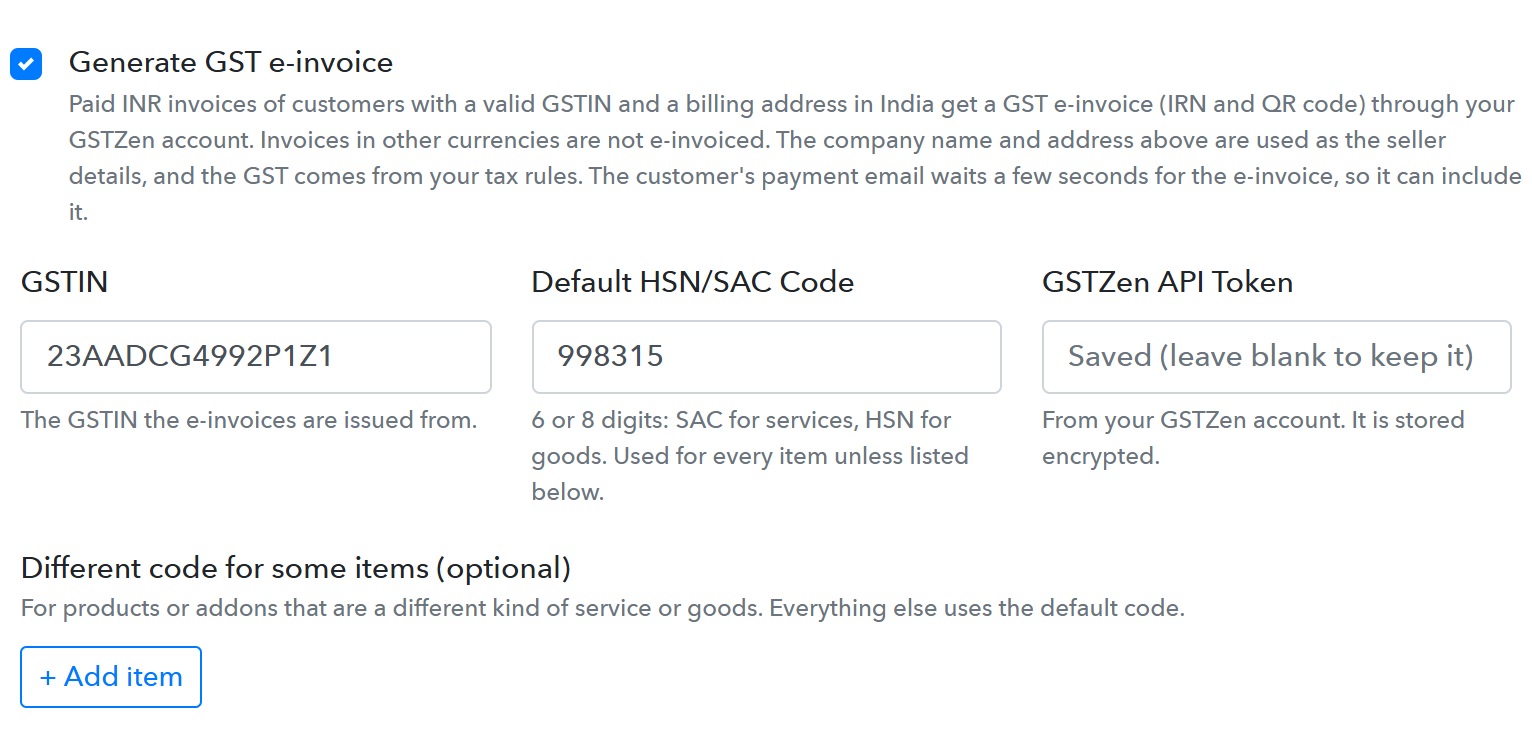
From now on, every paid invoice that uses this Invoice Setting gets an e-invoice status. Invoices paid before you turned it on are left as they are; you can still create an e-invoice for them one by one (see Create a GST e-invoice later).
Different HSN/SAC codes for products and addons
- The default code is used for every item on the invoice.
- Add a row for a product or addon that is a different kind of service or goods.
- When an item matches more than one row, the addon's row is used first, then the product's row, then the default code.
- Each item on the invoice (the plan, the setup fee and each addon) becomes its own line on the e-invoice, with its own code.
- Coupon discounts are shown as line discounts, and the e-invoice total always equals the invoice total.
CGST + SGST or IGST
This is decided automatically from the first two digits (the state code) of your GSTIN and the customer's GSTIN:
- Same state: the GST is split equally into CGST and SGST.
- Different states: the GST is reported as IGST.
Where the e-invoice appears
- The invoice in your dashboard (Invoice → open the invoice).
- The invoice link you share with your customer, and invoices in the customer portal.
- The customer's payment email, for the first payment and for renewals (see GST e-invoice in customer emails).
Which invoices get an e-invoice
An e-invoice is created when all of these are true:
- the invoice is paid, in INR, and its amount is more than zero;
- its Invoice Setting has Generate GST e-invoice turned on;
- the customer has a valid GSTIN that is not your own GSTIN;
- the customer's billing address is in India;
- GST was charged on the invoice.
Every other paid invoice under that Invoice Setting is marked Skipped or Untaxed, with the reason. Neither is an error. See GST e-invoice statuses and how to fix a failed e-invoice.
Not supported yet
- Exports and invoices in other currencies (for example USD). These are Skipped.
- Reverse charge supplies, where the buyer pays the GST.
- Cancelling an e-invoice from Pabbly Subscription Billing. Cancel it in your GSTZen account; the e-invoice portal allows it only within 24 hours.
More help
 Pabbly Subscription Billing Team•Updated Nov 21, 2026•5 min read
